Drivers for Windows 10 are essential for the modern computer user. Quite recently, the family of Windows operating systems was replenished with another new product - Windows 10 was released, and users immediately had the question of where to get and how to install drivers for Windows 10. This question arises regularly among users.
Microsoft tries to take care of its customers, so the company's servers contain a huge database of drivers and install them automatically. However, not all devices have information and such drivers have to be installed manually.
It’s worth making a note here - all further work will be done under a user account with administrator rights.
Driver installation sequence
A computer is a complex of interconnected devices, and their coordinated operation directly depends on the correct sequence of driver installation. You might say, “Old school!” But isn’t it logical to first install drivers on the USB controller before installing drivers on the printer connected via USB? Does your printer work over Wi-Fi? Great! Will you install drivers for the printer, and then drivers for the network controller that is responsible for the correct operation of Wi-Fi?
And so, the correct sequence for installing drivers is as follows:
Firstly , you need to install drivers responsible for the correct operation of the chipset and other controllers installed on the motherboard (for example: USB 3.0/3.1, Ethernet, Wi-Fi, Bluetooth, etc.).
Secondly , install drivers for the audio controller and video card. Attention! If the motherboard contains an integrated video chip or your processor is equipped with a graphics core, then the video drivers for these components must be installed first. A similar algorithm of actions should be applied if you use a sound card. You can always choose your default device in Windows 10 audio settings.
Thirdly , install drivers for other equipment installed inside the computer (audio-video capture cards, DVB-S2 satellite cards, TV tuners and other additional hardware).
Fourth , install drivers for external devices: printer, scanner, MFP, projector, etc.
Installing drivers on a new laptop or desktop PC model
In this chapter, we will look at installing driver software on a new ASUS X540LJ and a modern desktop computer based on an ASUS H110T motherboard and an Intel Core i5-6402P processor. First, let's look at installation on the ASUS X540LJ laptop.
To do this, let's go to its official page www.asus.com/Notebooks/X540LJ. On this page we are interested in the Support button, which is located in the upper right part of the page.
By clicking on this link we will be taken to the support page, in which we are interested in the “ Driver & Tools ” tab. The image below shows an open tab.
For the ASUS H110T laptop, you can download driver software only for Windows 10 64bit. On this page you do not need to download all the files in a row, but only the drivers. In addition to drivers, the download page also contains manuals, various utilities and BIOS files. Which sub-tabs you need to use to download are shown in the list below:
- Chipset;
- ATK;
- AUDIO;
- VGA;
- LAN;
- Card Reader;
- TouchPad;
- Wireless;
- BlueTooth.
The next step will be to download all archives to a separate directory. It is also worth noting that the download page may have more than one driver for a particular PC component. For example, in the “ VGA ” subtab there are two versions for NVIDIA video cards, which differ in serial number and release date. Which driver software to use is up to you, but it is best to install the latest one. After downloading the archives, you can begin installing drivers. We will not describe the entire installation process, but we will show you how to install the driver for the network card. The image below shows the step-by-step installation of Realtek LAN Driver.
Installing the rest of the driver software for the sound card, chipset and video card is as similar as installing a network adapter and involves step-by-step clicks of the Next > and Install buttons. You can find drivers for a computer based on an ASUS H110T motherboard and an Intel Core i5-6402P processor on the motherboard website www.asus.com/Motherboards/H110T. The download process is similar to downloading driver software for the ASUS X540LJ laptop. For other computer manufacturers, the process of downloading drivers is as similar as described. For example, below is their download window for the Acer Aspire E5-532G laptop.
Driver installation methods
There are two main ways to install drivers: automatic and manual.
You can install drivers automatically using standard Windows 10 tools or using special programs (“DriverPack Solution”, “DevID”).
Manual installation of drivers involves searching for the necessary drivers and installing them directly.
Next, we will look at each of the methods in detail, but first, let's figure out how to open the Device Manager in Windows 10.
Windows 10 Device Manager
In order to get to the “Device Manager”, just right-click on the “Start” menu and select the item of the same name in the context menu.
If such an item is missing, use the search bar, type “Device Manager” and launch the corresponding program.
Automatic driver installation
Standard method
To automatically install drivers using standard Windows 10 tools, you need to open “Device Manager” and right-click on the desired device, then select “Update drivers...”.
After which Windows 10 will offer one of the ways to update drivers; you need to select “Automatically search for updated drivers.”
Windows 10 will search system folders on your computer and on the Internet for drivers.
The disadvantage of this method is that the OS often does not find the necessary drivers or reports that the latest version of the driver is already installed.
Special programs
You can also run automatic installation of drivers using special programs that analyze the system and, based on the data obtained, search for drivers on a remote server, then download them to your PC and offer to install them. There are many such programs, but the most popular are: “DriverPack Solution” and “DevID”. I will not describe these programs in detail, because they have a very clear intuitive interface.
How to install drivers on windows 10 - Working with software
You can install and update software using solutions already present in the system or using third-party tools. In the first case, you do not need to make any special efforts and acquire specific knowledge.
To perform the required actions, just launch the “Device Manager” program. This can be done by entering its name into the search bar of the operating system. A similar result is obtained by right-clicking on “Start” and clicking on the “Device Manager” application line.
How to install drivers on Windows 10 - searching for the required device
When the manager is open, you can familiarize yourself with all the components and components of your computer, seeing which drivers are installed in Windows 10.
These include audio, video and gaming devices, keyboards, mice, ports, monitors, processors and many others.
If you want to install/update a set of instructions, you need to select a specific component (for example, a printer) and perform directed manipulations in the window that opens.
Theoretical preparation for installation and update
You can install drivers on Windows 10, as well as update them, in two ways: automatically and manually. In the first case, the search for the necessary software is assigned to the software shell. To do this, he will need stable access to the global network.
The equipment will independently search, install and update the software. This option is not always suitable, since computers sometimes do not find the necessary sets of instructions. But you can try installing middleware in this simple way.
Manual work requires independent searching, downloading and installation. It is advisable to take middleware from the websites of manufacturers of PC components, while focusing on the unique number, version and name.
If you don’t have a passport/information sticker or just looking at this information is long and time-consuming, then use the following algorithm:
- Go to Device Manager, right-click on the component of interest for which you need a set of instructions. Expand properties.
- A window will open in which you switch to “Information”.
- Set the "Device ID" parameter in "Properties" and copy the designation. They let you know what exactly is being used. All that remains is to go to the manufacturer’s official website, available on the world wide web, and download the necessary sets of instructions, based on the numbers received.
Differences between installing and updating middleware
From a software point of view, installing drivers on Windows 10 and updating it are the same thing. After all, installing new middleware is always done on top of old software. The distinction is more important to people.
Although, if the middleware is installed because the component has stopped working properly, you should uninstall the current version of the software. This is necessary to avoid error transmission and is done as follows:
- Go to “Properties” of the selected hardware and select the “Driver” tab there.
- Select the "Delete" option. You must wait until the process completes. An alternative option may be available where it says "Remove device".
- Then you should return to the manager, open the component menu and select “Update driver”. If the device was removed, the system itself will search for and connect it upon boot.
- All that remains is to choose the update method. It is advisable to start with automatic. In case of failure, you will have to do everything yourself. Automatic updating simplifies the process - you only need to confirm the installation of instruction sets found by the system. A manual solution will require specifying the path to the previously downloaded software.
- After installation, you may need to restart your computer for the changes to take effect.
How to install drivers on Windows 10 - disabling signature verification
Each middleware has its own certificate to prove its authenticity. If it is missing, the system prohibits further operation.
Often, unofficial sets of instructions downloaded from third-party sites not related to the device developer have no signatures. Although there may be other reasons why middleware is not recognized as licensed.
Please note that using unofficial software may result in incorrect operation of the component. But if you are still interested in how to bypass the ban, you need to follow these steps:
- Open Settings from the Start menu, go to Updates..., select Recovery and under Special boot options click on restart now.
- You need to follow the path: “Troubleshooting”, then “Advanced options” and “View other recovery options”, and the last item “Boot options”.
- A window will open in which you should press 6 or F6 to activate safe mode with command line support.
- Wait for the system to start in safe mode. When this happens, you need to open a command prompt with administrator rights.
- Enter the command for the computer: bcdedit.exe /set nointegritychecks X. Instead of X, you must substitute on to deactivate the check, off - so that the system again monitors the presence of the certificate.
- The computer needs to be restarted. It will start in normal operation mode. All that remains is to run the installation of unsigned instruction sets.
Using Third Party Applications
You can install drivers on Windows 10 using many tools offered by independent developers. They are aimed at searching for the required software and its subsequent launch is carried out automatically. Driver Booster software is a good example.
The application is free, has an intuitive graphical shell and supports the Russian language. When you start the program, it scans your computer, resulting in a list of instruction sets for which an update is available. You should select everything that interests you and wait for the work to complete.
Do not download the pirated PRO version! You can catch the virus.
Individual companies (usually large ones) create their own applications designed to install their proprietary middleware.
They are narrowly focused and thanks to this there is a high probability of finding the required software. Display Driver Uninstaller is suitable as a sample.
This is an official application developed by NVidia and AMD, specializing in supporting work with video cards. Distributed free of charge from company websites.
Deactivating automatic updates
By default, the operating system itself searches for installed instruction sets and updates for them. But the new solution is not always better than the old solution.
Advanced users monitor new versions independently, while automatic checking is deactivated:
- One/multiple devices. You have to disable automatic updates for each individual individually. Initially, you need to activate the device manager, go to the properties of the component, open “Information” and find the unique number - copy it. Using the Win+R key combination, launch the shortcut application. To open the registry use regedit.
You should go to the directory: HKEY_LOCAL_MACHINE\SOFTWARE\Policies\Microsoft\Windows\DeviceInstall\Restrictions\DenyDeviceIDs. If there are missing partitions, you need to create them yourself.
The last directive (DenyDeviceIDs) requires a separate initial parameter tied to each specific device, where the middleware should not be updated automatically.
New elements should be named with numbers starting with 1, and the copied unique number should be specified as the value. When all sets of instructions have been entered, the register can be closed. Updates will no longer be installed.
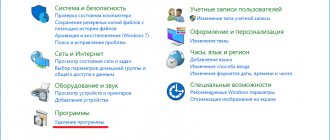
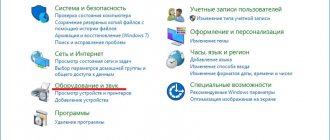
- For all devices. This option is much easier. You need to open the Control Panel, then select “Hardware and Sound”, then “Devices and Printers”. Look for your own computer in the list that opens, right-click on the icon and launch “Device Installation Settings”. In the window that appears, select “No” to update the middleware and save the changes.
Manual driver installation
This method of installing drivers is preferable, since you have complete control over the process and will not allow unnecessary software to be installed on your PC.
Let's start with the fact that you must have disks with the necessary drivers included with your PC or a list of Internet resources from where you can download them (indicated in the instructions). To install drivers from a disk or its image, just run the setup or install file, after which an interface will open in which you need to select automatic or custom software installation mode.
Standard method of installing drivers manually
To install drivers in Windows 10 manually, you need to open “Device Manager” and right-click on the desired device. Select "Update drivers..." and then select "Search for drivers on this computer."
Then you need to specify the location for searching for drivers using the “Browse” button.
Be sure to check the “Including subfolders” checkbox - this option allows you to select a shared folder in which to search for drivers. Then click Next and wait for the device driver installation process to complete.
Ways to update video drivers to the latest version in Windows 10
The user can complete the update process in three ways:
- automatically thanks to the “Update Wizard” built into Windows 10;
- in semi-automatic mode using third-party utilities;
- manually (to do this you will need to download a special installer from the official website of the video card developer).
Any of the listed options will not require the user to have any specialized knowledge in programming or other information sciences . But before you start updating drivers, you need to find out the model name of the installed video card, in particular for manual updating.
How to find out the video driver model name
To find out the full name of the video adapter:
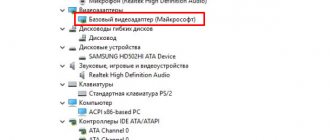
- Right-click on the Start icon and launch the Device Manager application. You can also find “Device Manager” through the search function by entering the appropriate query (the search bar is located next to the “Start” button)
- Find the "Video Adapters" category and expand it. Find the name of your video card. To ensure the accuracy of the video card model name, you can double-click on the card name with the left mouse button (in the window that appears, accurate information about the hardware will also be available)
Video: how to find out all the necessary information about a video card using the TechPowerUp GPU-Z program
Automatic video driver update
Automatic updating of the video card driver is carried out thanks to the “Update Wizard” built into Windows 10. To run it, you need:
- Updating the video card driver in Windows 10
- In “Device Manager”, find the video adapter connected to the PC, right-click on its name and select “Update Driver”. The update process can also be started through the "Properties" menu
- In the “Update Wizard” window that appears, select the “Automatically search for updated drivers” option. An Internet connection is required to automatically search for updates.
- Wait for the automatic process of searching, downloading and installing the current driver version to complete, and then click the “Close” button. After updating the video driver, it is advisable to restart the PC
Video: How to automatically update your video driver using the Windows 10 Update Wizard
Manually updating the video driver
To update the software for the video adapter manually, you need to download the update package from the official website of the video card developer.
Nvidia GeForce
If you have an Nvidia GeForce video card, then you should:
- Go to www.nvidia.ru and select the “Drivers” section. On the loaded page, fill out the information form with the data and click “Search”. Don’t forget to also select the current version of the Windows operating system before searching.
- Wait until the Nvidia service finds the appropriate (current) version of the driver, and then click on the “Download Now” button. In the “Additional Information” tab you can find information of interest about the downloaded driver (for example, its release date)
- After downloading the exe file of the update package, run it, specify the installer unpacking folder and click “OK”. The unpacking path can be absolutely anything (user-friendly)
- Once the unpacking process is complete, the Nvidia Installation Wizard will automatically launch. You need to wait for the OS preliminary scan to finish. The check usually lasts a few seconds
- After successful verification, select the driver installation option and click “I Accept.” Continue". GeForce Experience is a special utility from Nvidia for working with video card settings
- Select the desired installation options and click Next. The Custom Install option will allow you to select individual components to install
- Wait for the installation process to complete. During the driver installation process, your monitor screen may go dark for a few seconds (this is normal)
- Close the video driver Installation Wizard window. After installing the driver, it is not necessary to restart the PC
AMD Radeon
If you have a Radeon video card installed, then in this case you need to:
- Go to the AMD website, open the “Drivers and Support” tab, select the model of your video adapter (Search for your product line) and click “Submit”. You can also find your video card in the hardware table provided just below the search bar
- Select the version of the driver package suitable for your Windows OS and download it. The most current driver versions are always at the top of the list
- After downloading, run the installer and unpack the package to any folder on your PC. To fully see the process of unpacking files, you need to click on the Show Details button
- Once the unpacking process is complete, the Radeon Driver Installation Wizard will automatically launch. You need to accept the “License Agreement” and wait while the utility scans the system. The scanning process depends on the processor load
- Then choose one of the video driver installation methods. By default, it is better to select the “Express Install” mode
- Wait for the installation process to complete, then click “Reboot now”. If you want your driver to always be updated automatically, then before restarting your PC, check the box next to “Update the system in a timely manner”
- Done, after restarting the PC, the driver for the video adapter will be finally updated.
Update/install video driver in semi-automatic mode
Such an update involves the use of third-party utilities designed to simplify the search and installation of drivers for all PC components, including the video adapter. To make the search for such specialized software easier, let’s look at the most popular ones.
Display Driver Uninstaller
The utility is designed to completely remove all versions of previously installed video drivers. You can download it on the official website of the developer. It is recommended to use it if you need (for example, when updating the current driver version an error appears) to reinstall the latest “clean” driver for the video adapter . All you need to do is download/run the program, indicate the model of the installed video card in the start window and select one of three uninstallation modes.
In the “Log” field you can also see all the information about the video card and the installed driver
After uninstallation, you can proceed to reinstall the driver.
SlimDrivers
You can find and download the program on the developer’s website. SlimDrivers is not only capable of automatically searching, downloading and installing the latest versions of drivers for components, but also creating “rollback points” (useful if problems arise during the update) . To update the video driver, you need to:
- Download and run the program. Click the Start Scan button. The utility does not support Russian language
- Wait for the scanning process to finish, find the name of the video card in the list of results and click Download Update. Updating the driver will only be possible if a newer version is available on the network
Radeon Software Crimson Edition
It is a specialized comprehensive program for owners of AMD Radeon video cards, which can not only update the video driver, but also improve (increase) the performance of the card itself. To update the driver:
- Install and run the program. Click on the “Updates” tab and select “Check for updates.” The program installation file weighs ~500 MB
- At the end of the check, mark with a marker the components that need updating and click “Install”. To update the graphics card software, you must select “AMD Display Driver”
- Done, after installation you should reboot the system.
DriverPack Solution
An excellent driver update manager from Russian developers. The utility does not require installation on your hard drive and runs in standalone mode . Capable of automatically searching and installing drivers for all PC components:
- Launch the manager and click the “System Scan” button. The manager works correctly on all operating systems and with any models of components
- After that, find your video card in the list of devices, place a marker next to it and click “Install all”. Next, the program will perform an automatic update. If you want to update the driver only for the video card, then uncheck all other checkboxes
Where can I download the missing drivers?
Drivers can always be downloaded from the device developer’s website; however, you need to take into account the version of the operating system and its bit depth.
But, there are times when drivers are not available on the developer’s website due to the fact that the device version is outdated or we are talking about operating systems that are no longer supported. Don't despair! Drivers can be found and downloaded from the Internet.
Download drivers by hardware ID
In order to download exactly the drivers that are needed, you need to determine the “Hardware ID” - this can be easily done using the “Device Manager”. Right-click on the desired device and select “Properties”. Then go to the “Details” tab, where in the “Property” drop-down menu, select “Equipment ID” and in the “Values” field, select the first line - this is the “Equipment ID”.
You can copy a line using the right mouse button by selecting “Copy” from the drop-down context menu. Then paste the copied line into the search engine input field and add “download driver”.
Select the most relevant site for your request and download the required driver.
Then update the device driver manually as described earlier.
How to remove the driver?
There are situations when the native device driver does not work correctly, in which case it needs to be reinstalled. To install the driver completely, it must be completely removed from the computer. To do this, remove the device itself in the “Device Manager” using the right mouse button and select “Delete”, be sure to check the “Remove driver programs for this device” checkbox and click “OK”. The device will be removed and the accompanying drivers too.
"Update your hardware configuration" in the Device Manager window.
The hardware list will update and you will see your device with an exclamation mark, indicating that there is no driver available for that device.
How to reinstall video card drivers on Windows
How to reinstall video card drivers? To do this, you need to follow a certain procedure. Now, we will look at how to properly reinstall drivers on a video card.
The reinstallation process takes place in several stages:
- Download a new driver from the official website of the equipment manufacturer: NVIDIA or AMD.
- Removing old video driver from computer.
- Installing a new video driver in the Windows operating system.
As a result, the old software will be removed from the PC and then the new software will be installed. In most cases, this will solve the problems that arise.
It is important to make sure that after removing the old video driver, there are no “tails” left on the computer from the deleted graphics device software.
In this guide, you will find instructions on how to remove the video driver in several ways, and how to reinstall the video driver in the Windows operating system.
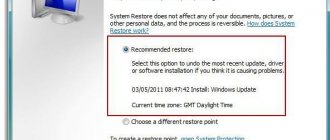
Before performing operations to remove or reinstall drivers on your computer, create a Windows restore point to be able to roll back the system in case of problems after reinstalling the drivers.