Good afternoon Dear readers and guests of the IT blog Pyatilistnik.org. Last time we learned how to fix error 8050800C when updating Windows. Today we will look at an equally interesting and, in my opinion, often occurring situation when you get a blue screen of death BSOD . Often for people it’s just a screen with incomprehensible codes and entries that carries practically no information for them. I am sure that on any computer forum there are several topics where possible causes are discussed, but from my own experience I can say that the overwhelming number of people who give advice there are, to put it mildly, incompetent, since their advice most often comes down to platitudes, or the victims themselves They really can’t provide diagnostic information, which entails the lack of a solution and a banal reinstallation of Windows. Today I will show you a tool that will help you thoroughly understand the causes of the blue screen in Windows 10 and its other analogues.
Purpose of the blue screen
They’ve already given it a hundred million times on the Internet, so there’s no point in repeating it, in a nutshell:
Commonly referred to as BSOD for short, the Blue Screen of Death is a blue, full-screen error that often appears after a very serious system crash. "Blue Screen of Death" is actually just a popular name for what is technically called a stop message or stop error.
Besides its official name, BSOD is also sometimes called Blue Screen of Doom, error checking screen, system crash, kernel error, or simply blue screen error.
BSODs have been around since the inception of Windows and were much more common back then, simply because the hardware, software, and Windows itself were more buggy, so to speak.
From Windows 95 to Windows 10, the Blue Screen of Death hasn't changed much. Dark blue background and silver text. Lots of useless data on the screen.
What Causes Blue Screens of Death
Blue screens usually occur due to problems with your computer's hardware or problems with its software. Sometimes they can be caused by problems with low-level software running in the Windows kernel. Regular applications most often cannot cause blue screens. If an application crashes, it will crash but will not affect the operating system.
A blue screen appears when Windows encounters a “ STOP Error ”. This critical failure causes Windows to crash and stop working. The only thing Windows can do at this point is to restart the computer. This can lead to data loss since programs have no way to save their open data.
When a blue screen occurs, Windows automatically creates a " minidump Memory.DM dump , that contains information about the crash and saves it to disk. You can view information about these minidumps to help determine the cause of the blue screen.
Blue screens also look different depending on which version of Windows you are using. In Windows 7 and previous versions, the blue screen looked a lot like a terminal screen, displaying all sorts of information.
In Windows 8 and 10, blue screens are much easier.
In most cases, all the information that appears on the screen is useless to you for several reasons:
- Firstly, most often you won’t even see it, since the system will reboot after the BSOD
- Secondly, if we talk about the blue screen of death, even if it is captured on the screen, it will have purely technical information and there will be little that can tell you about the true causes of the failure, only memory dump analysis will help here.
Something else
- For each Microsoft account, you can set an individual Windows start screen. Therefore, each user can customize everything for themselves.
- The mouse wheel allows you to scroll through tiles if they don't fit on one screen. The touch screen allows you to simply scroll through screens.
- There is a search form on the home screen. As soon as you start entering a query, search results for it immediately appear.
- The home screen is well suited for both mouse and touch screens.
- You can install interactive tiles on the home screen: weather forecast, event calendar, news, etc. All of these items can be found in the Microsoft Store.
Similar articles:
- Windows 8 lock screen: what's new in it and how the developers have improved this element The Windows 8 lock screen appears upon boot at the moment when you need to enter a password (if...
- How to make and change the Windows XP boot screen without using additional programs Windows XP is an operating system that is quite old, and there will never be an update to it again...
- The design of Windows 8, and what tools are there to change it The design of Windows 8 has undergone numerous changes compared to previous versions. The methods of changing the external...
Examples of common blue screens
Here is a small list of the most common situations with blue screen of death on Windows platforms, but believe me, it can be continued for a very, very long time.
- STOP 0x00000050
- Blue screen dpc watchdog violation
- Whea uncorrectable error
- HAL INITIALIZATION FAILED
None of them will reveal the cause of the blue screen, and I think it’s right that Microsoft went this route. If anyone is interested, there are also green error screens and purple screens of death, for example in Vmware ESXI.
Blue Screen Diagnostic Utilities
There are two utilities. which can give you information about the causes of BSOD:
- The first one, free and in my opinion of little use, is called BlueScreenView
- The second has the maximum diagnostic tools, and was developed by the vendors themselves. I'm talking about Microsoft Kernel Debugger or WinDbg (Debugging Tools for Windows). I can’t imagine how it’s possible to completely identify why a “STOP Error” is occurring in the system without this utility. In this article, I will make a detailed analysis of this tool.
Creating a restore point
1. From the Start
Right-click
on the
Computer Properties
.
The System dialog box will open on the screen.
, which displays all the most important functions of the computer.
System Properties dialog box appears
.
3. Click on the Create
in the
System Protection
.
In the System Protection
Enter a name for the new restore point.
Save the restore point by clicking on the Create
. By creating a restore point in advance, you will always be able to choose the state to which it is best to return in the event of a system failure.
If you discover that your computer is infected with viruses, before you disinfect it with an antivirus program, delete all existing restore points. They may contain viruses!
Where to look for the dump file (MEMORY.DMP)
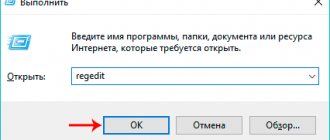
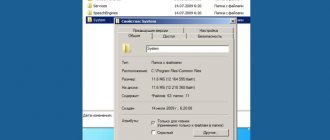
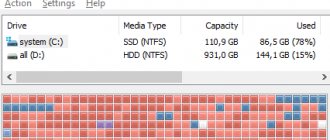
Before we learn how to identify the causes of BSOD, I want to remind you where the files needed for diagnosis are located. You can determine the desired location from the system settings window. To do this, go to the properties of my computer or press the WIN and Pause Break keys simultaneously.
Next, being in the system properties window, select “Advanced system settings”.
On the Advanced tab, find the Startup and Recovery section, where you will be required to click Options. In the window that opens, you can see the path to the dump file; by default, it is %SystemRoot%\MEMORY.DMP. In practice this means C:\Windows\MEMORY.DMP. You can set your location on any other drive.
You also have the opportunity not to create a full dump, but to replace it with a mini dump of a smaller size.
Reasons for the problem
The most likely and most common reasons for the narrowing of the image on the monitor are:
- Incorrect screen resolution;
- Absence ;
- Connecting an additional monitor or TV;
- Incorrect monitor settings.
Now let's look at each of the reasons in more detail. Let's start with the simplest and most obvious one.
Wrong resolution in graphics settings
A similar situation may occur immediately after installing or reinstalling Windows. Less commonly, the cause of an incorrectly set resolution is a game or other application in which you can change the screen resolution.
It's very easy to check and fix. You need to click on an empty space on the desktop and select “Screen settings” or “Screen resolution” or “Personalization” in the menu that opens.
Entering screen resolution settings in Windows 7
Entering screen resolution settings in Windows 10
If you select the first two items, you will immediately be taken to the desired window for changing the screen resolution. If you selected “Personalization”, then in the window that opens, select “Screen” at the bottom left and then “Setting screen resolution” at the top left.
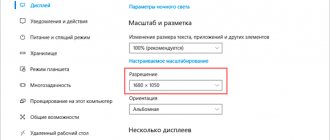
Here, in the “Resolution” item, you need to sort through the values until the image on the screen expands to the desired size. Most often, “(Recommended)” will be written next to the desired value.
Changing screen resolution in Windows 7
Changing screen resolution in Windows 10
Differences between full memory dump files and mini dump files
A memory dump file can collect various information. Typically, a support engineer should have the entire contents of virtual memory available to resolve the issue. In other cases, you may need to collect less information to focus on a specific problem. The debugger is flexible. This flexibility allows you to limit the information that a memory dump file captures by collecting either full memory dump files or mini memory dump files.
Complete memory dump of . These files contain the virtual memory contents for the process. These files are most useful when troubleshooting unknown issues. A help desk engineer can use these files to search any memory location to find any object, find a variable that was loaded into any call stack, and parse code to help diagnose a problem. The disadvantage of full memory dump files is that they are large. These files may also require additional time to collect, and the process being recorded must be frozen while the dump file is being generated.
Mini memory dump of files . A minidump file is more customizable than a full dump file and can range in size from a few megabytes (MB) to the size of a full dump file. The size differs due to the amount of virtual memory that the debugger writes to disk. Although you can quickly collect mini memory dump files that are small, they also have a disadvantage. Minidump files can contain much less information than full dump files. The information that a mini-dump file collects may be of little or no use to a help desk engineer; if the memory area that the help desk engineer is supposed to examine has not been captured, then they won't be able to really understand the cause. For example, if heap memory is not written to a memory dump file, the support engineer cannot verify the contents of the message that was being processed when the problem occurred.
Therefore, I recommend that you leave the full MEMORY.DMP file, if there is not enough space on the SSD disk, then move it to another location
Setting the screen resolution
Setting up the screen on a personal computer, tablet or laptop with Windows 10 is not very difficult for any user. Its interface is simple and intuitive, which allows you to modify the screen at your discretion in a few clicks. To configure:
- Left-click on the “Start” button.
- Click on the “Options” icon.
In the Start menu, click on the Settings icon
- Click the System icon in the Settings window.
In the "Options" window, click on the "System" icon
- Open the "Screen" tab.
Review your screen settings
- Check your screen resolution. It must match the recommended resolution of the device.
- If the resolution is set correctly, click on the “Graphics Adapter Properties” button.
Click on the "Graphics Adapter Properties" button
- Make sure that your adapter is selected in the “Adapter Type” tab.
Check that the video adapter is installed correctly
- Close Graphics Adapter Properties by clicking OK.
- Change the screen resolution if necessary.
- Close the System Settings window.
- Screen setup is complete.
Other screen parameters can be adjusted as needed.
When installing Windows 10, all screen settings are usually configured automatically. The exception is rare or outdated types of video adapters, the drivers of which are not in the database on Microsoft servers. In this case, the driver is downloaded from the manufacturer’s website or installed from an optical disc that is included with the computer or laptop upon sale. It contains distribution kits of all drivers for installed devices.
Video: how to change screen resolution on a computer, monitor or tablet with Windows 10
Find out the cause of the blue screen in BlueScreenView
BlueScreen is a free utility included with nirsoft, I remind you that we used this collection of tools when we needed to find out the passwords saved in the browser (/kak-posmotret-sohranennyie-paroli-v-brauzerah/), it scans all your files minidumps generated during Blue Screen of Death crashes and displays information about all crashes in one table. For each crash, BlueScreenView displays the minidump file name, date/time of the crash, basic crash information displayed on the blue screen (error check code and 4 parameters), and information about the driver or module that may have caused the crash (file name, product name, file description and file version). For each crash displayed in the top pane, you can view detailed information about the device drivers loaded at the time of the crash in the bottom pane. BlueScreenView also flags the drivers whose addresses are found in the crash stack, so you can easily find suspected drivers that may have caused the crash.
You can download BlueScreenView from the official website https://www.nirsoft.net/utils/blue_screen_view.html
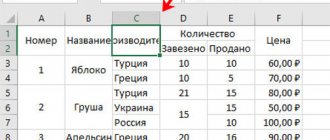
So, let's say that on one ESXI virtual machine or physical server, a blue screen occurred, I received a full MEMORY.DMP memory dump file and I need to find out the cause of the failure. Open the BlueScreenView utility. The utility by default finds memory dump files in standard places, but if you are analyzing MEMORY.DMP not on the server where the BSOD occurred, but on your server, then you can show it the path to the file, to do this, click the leftmost, top icon and in In the “Advanced Options” window that opens, select “Load a single MiniDump File”. There, use the “Browse” button to find your MEMORY.DMP file and click “Ok”.
Your dump will appear in the list of files. Here you can see columns with various information:
- BSOD time
- The error message, in my case, is PAGA_FAULT_IN_NONPAGED_AREA
- Error code 0x00000050
- And columns with parameters
If you double-click on the desired memory dump entry, a properties window will open with the same information, the only plus there is that you can copy the name and error code. You must admit that the cat is crying for information, and if the blue screen has a vague wording, you will search hundreds of forums in the hope of finding the cause of the BSOD. Therefore, I personally consider this tool to be of little use and I suggest switching to a professional one from Microsoft.
How to fix stretched screen resolution
To make a horizontally stretched screen normal, right-click on any free space on the laptop/computer desktop.
Immediately after this, a small window will pop up in front of you. In it, click on the “screen resolution” line. See fig. below.
In this field, by expanding the parameters opposite the “resolution” line, you will have access to a slider.
By moving it, you can fix the stretched screen on your computer or laptop.
But as written above, if there are no appropriate drivers, you won’t be able to make it ideal (you’ll be able to narrow it down a little horizontally, but the vertically won’t match).
What to do then? Download and install “native” drivers. It's easier for a laptop. You can log into the official website and download from there. With computers the situation is more complicated (everything is usually prefabricated), but there is a way out.
First way. Take advantage, However, there is no 100% guarantee that she will find them. It all depends on the monitor.
Second way. Find out the exact model name of your monitor and try to find drivers for it using search engines: Google or Yandex.
Third way. Use Windows Update (and click on the “Windows Update” option). The system itself will determine which drivers it needs, download, install and fix a stretched monitor.
I use the third option - everything always came back to normal. Yes, when you update, and the Internet is slow, you don’t have to check the boxes next to the lines where it says “for security”; these updates have nothing to do with the stretched screen.
ATTENTION. There are many programs online that promise to quickly update all the drivers for your PC. I advise you not to use them - after their intervention, you usually need to reinstall Windows.
Quite often, computer users ask the question of how to expand their monitor screen. There may be several reasons why the monitor screen becomes narrow with black stripes around the edges, or the picture is not fully displayed, and the image becomes blurry. Now we will look at the most common situations of such incidents and try to correct them.
Most often this happens for several reasons:
- Incorrect setting;
- The video card driver is not installed;
- Connecting to a computer or additional monitor;
- Incorrect monitor settings.
Now let's look at all these reasons in more detail.
Incorrect screen resolution setting
Screen resolution settings may become lost when installing pirated programs, reinstalling the system, a virus enters the system, after beating the game with your own settings, or after a sudden unexpected shutdown of the computer.
In this case, fixing the situation is quite simple. Just right-click on the free space on your desktop:
On Windows 7
And in the drop-down context menu select “ Screen resolution”
»
In the next window find " Permission"
» and open the list by left-clicking on the small black arrow on the right.
You should see a list of possible screen resolution settings.
You should not experiment with all resolutions in a row, because... If you select a resolution that your monitor does not support, the screen may go blank and you will not be able to adjust it without the help of the wizard. The monitor will not burn out, but you will need to reset your settings. This is usually done through "Safe Mode", or on another computer that supports the resolution that you set yourself.
Therefore, before changing the screen resolution, read the instructions for your monitor to see what parameters it supports, or click on the blue link “ What monitor parameters should you choose?”
? (in the same window where you select the resolution), and carefully read what is written there.
On Windows 10
Right-click on an empty space on the desktop and select “ Display Settings”
»
Go to the “ Display”
Resolution
in the window on the right , click on the arrow and select the necessary parameters.
Usually next to the required parameter it is written “( Recommended
)»
Video card driver not installed
Usually, after reinstalling the operating system, or after replacing the video adapter, a temporary video card driver is automatically loaded. And if you then do not download specialized drivers for the video card, then in the “Resolution” item in the screen settings there will be no list of resolutions (at best, two parameters). And in the device manager there will be an entry “ Standard
VGA graphics adapter
”.
In this case, you need (video adapter) from the disk that comes with the video card or from the official website of the video card manufacturer.
If you have the Windows 10 operating system installed on your computer, the driver will be installed automatically.
Connecting a TV, laptop, or additional monitor to a computer
If another monitor, or laptop, or even a TV is connected to your computer, then disconnect them. If after this everything has been corrected on your main monitor and the image has expanded to fill the entire screen, then you need to correctly determine in the display selection settings which one will be the main one and which one will be the secondary one.
And in settings " Display"
» select the required monitor.
Monitor settings
Almost any monitor has buttons for adjusting it. They are usually located at the lower front (bottom) or side.
Find the auto setup options and set them.
You can try setting up the monitor yourself using other buttons. But it will take longer.
That's all for now. If you have any questions, ask them in the comments.
Good day!
I will describe a fairly common situation about which I often receive questions. So …
On an ordinary “average” laptop by modern standards, with an IntelHD video card (possibly plus some other discrete Nvidia), Windows 7 is installed. After the system is installed and the desktop appears for the first time, the user notices that the screen has become somewhat then small compared to what it was (note: i.e. the screen has a low resolution). In the screen properties, the resolution is set to 800x600 (usually) and cannot be set differently. And what to do in this case?
In this article I will give a solution to a similar problem (so that there is nothing tricky here :)).
SOLUTION
This problem most often occurs with Windows 7 (or XP). The fact is that they do not come with (or rather, much fewer of them) built-in universal video drivers (which, by the way, are present in Windows 8, 10 - which is why there are significantly fewer problems with video drivers when installing these OSes). Moreover, this applies to drivers for other components, not just video cards.
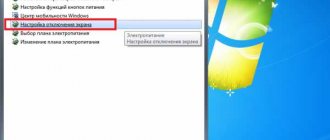
To see which drivers are having problems, I recommend opening Device Manager. The easiest way to do this is to use the Windows Control Panel (just in case, see the screenshot below on how to open it in Windows 7).
In Control Panel, open the address: Control Panel\System and Security\System
. On the left side of the menu there is a link to the device manager - open it (screen below)!
How to Open Device Manager - Windows 7
Next, pay attention to the “Video adapters” tab: if “” is present in it, then this confirms that you do not have drivers in the system (because of this, the resolution is low and nothing fits on the screen :)).
Important!
Please note that the icon shows that there is no driver for the device at all - and it does not work! For example, the screenshot above shows that, for example, there is no driver even for the Ethernet controller (i.e. for the network card). This means that the driver for the video card will not be downloaded, because... there is no network driver, and you can’t download the network driver, because... no network... In general, it’s still a node!
By the way, the screenshot below shows what the “Video adapters” tab looks like if the driver is installed (the name of the video card will be visible - Intel HD Graphics Family).
The easiest way to solve this problem
- this is to get the driver disk that came with your PC (however, such disks are not provided for laptops :)). And with its help, everything can be quickly restored. Below I will consider the option of what can be done and how to restore everything even in cases where your network card does not work and there is no Internet to even download the network driver.
1) How to restore the network.
It won’t be possible without the help of a friend (neighbor). As a last resort, you can use a regular phone (if you have internet on it).
The essence of the solution
the fact that there is a special program
3DP Net
(the size of which is about 30 MB), which contains universal drivers for almost all types of network adapters. Those. Roughly speaking, download this program, install it, it will select the driver and your network card will work. You can download everything else from your PC.
About how to share the Internet from your phone:
2) Auto-installation of drivers - useful/harmful?
If you have Internet access on your PC, then auto-installing drivers may be a good solution. In my practice, of course, I have encountered both the correct operation of such utilities and the fact that sometimes they updated drivers in such a way that it would be better not to do anything at all...
But in the vast majority of cases, the driver update proceeds correctly and everything works. And there are a number of advantages from using them:
- save a lot of time identifying and searching for drivers for specific equipment;
- can automatically find and update drivers to the latest version;
- in case of unsuccessful update, such a utility can roll back the system to the old driver.
In general, for those who want to save time, I recommend the following:
- Create a restore point manually - how to do this, see this article:
- Install one of the driver managers, I recommend these: .
- Using one of the programs above, search for and update “firewood” on your PC!
- In case of force majeure, simply roll back the system using a restore point (see point 1 just above).
Driver Booster is one of the programs for updating drivers. Everything is done with one click of the mouse! The program is provided at the link above.
3) Decide on the video card model.
If you decide to do it manually, then before downloading and installing video drivers, you need to decide what model of video card you have installed in your PC (laptop). The easiest way to do this is to use special utilities. One of the best, in my humble opinion (and also free) is (screenshot below).
Determining the video card model - HWinfo
By the way, if you have a laptop
- then video drivers for it can be found on the laptop manufacturer’s website. To do this, you need to know the exact model of the device. You can find out about this in the article about determining the laptop model:
3) Official sites
There seems to be nothing to comment on here. Knowing your OS (for example, Windows 7, 8, 10), video card model or laptop model, all you need to do is go to the manufacturer’s website and download the required video driver (by the way, the newest driver is not always the best. Sometimes it’s better to install an older one - because it’s more stable. But it’s quite difficult to guess here, just in case, I recommend that you download a couple of driver versions and try it experimentally...)
.
Websites of video card manufacturers:
Websites of laptop manufacturers:
4) Installing the driver and setting the “native” screen resolution
Installation…
As a rule, there is nothing complicated - just run the executable file and wait for the installation to complete. After restarting the computer, the screen will blink a couple of times and everything will start working as before. The only thing I also recommend is to make a backup copy of Windows before installing -
Changing resolution...
A full description of changing the resolution can be found in this article:
I'll try to be brief here. In most cases, it is enough to right-click anywhere on the desktop, and then open a link to the video card or screen resolution settings (which is what I will do, see the screenshot below :)).
By the way? You can also change the resolution in the video driver settings - usually it is always visible next to the clock (if anything, click the arrow - “Show hidden icons”, as in the screenshot below).
IntelHD video driver icon.
This completes the mission of the article - the screen resolution should have become optimal and the workspace should have grown. If you have anything to add to the article, thank you in advance. Good luck!
Quite often, users of the Windows operating system encounter a problem when the image on the monitor is narrowed or is not displayed on the entire screen. All this can also be accompanied by enlarged icons on the desktop and general blurriness of the image.
In this article we will tell you why such a situation can happen and how to restore and expand the monitor screen if it has narrowed.
Identifying the causes of the Windows blue screen in Microsoft Kernel Debugger
So, when it comes to BSOD, advanced users immediately remember the Microsoft Kernel Debugger or WinDbg (Debugging Tools for Windows). WinDbg is a multi-purpose debugger for Windows distributed by Microsoft. Debugging is the process of finding and eliminating errors in a system; in computing, it also involves studying the inner workings of software. It can be used to debug user-mode applications, device drivers, and the operating system itself in kernel mode. Like the more famous Visual Studio debugger, it has a graphical user interface (GUI).
WinDbg can be used to debug kernel-mode memory dumps created after what is commonly referred to as a "blue screen of death" that occurs when performing error checking. It can also be used to debug crash dumps in user mode. This is known as post-mortem debugging.
WinDbg can automatically load debug symbol files (such as PDB files) from the server, matching various criteria (such as timestamp, CRC, single or multiprocessor version) through SymSrv (SymSrv.dll), instead of the more time-consuming task of creating a symbol tree for the debug target environment. Microsoft has a public symbol server that has most of the public symbols for Windows 2000 and later versions of Windows (including service packs).
You can read more about WinDbg at the link
Installing Microsoft Kernel Debugger
You can install WinDbg using two methods:
- Microsoft Kernel Debugger is included in the SDK, which is where you can download it from
- Microsoft Kernel Debugger can be downloaded as a separate package, but the most current versions are not always available
Go to the SDK page. You have the option of downloading a thin client, where you then have to download everything from the Internet, or you download an ISO image that has all the packages, but it weighs more and is suitable for environments where there is no Internet.
Download SDK https://developer.microsoft.com/ru-ru/windows/downloads/windows-10-sdk
Let's assume that you chose the thin client method, where you downloaded the winsdksetup.ex e. Please note that you can install Microsoft Kernel Debugger on any system from the list:
- Windows 10 version 1507 or later
- Windows Server 2012 R2 (command line only) Windows Server 2020 (command line only)
- Windows 8.1
- Windows Server 2012 R2
- Windows 7 SP1
Run winsdksetup.exe, make sure that you have Internet access and 5-6 GB of free disk space.
The Windows SDK installation wizard will open, you will have two options to choose from, the first is installation in a standard location and the second option is downloading the Windows Software Development Kit to the location you need for subsequent Offline installation. I'll choose the first option. By the way, the second option will give you the opportunity to get a separate MSI file with WinDbg.
Next, you can subscribe to send anonymous statistics in the quality program, I did not.
We accept the SDK license agreement by clicking “Accept”.
Uncheck all items except “Debugging Tools for Windows” and click Install.
The WinDbg installation process will begin.
All blue screen diagnostic utilities are installed.
in a separate package you can follow the link on the left