Creating secure notes
The LastPass vault can store not only passwords, but also notes. They will be securely encrypted and no one will have access to them without knowing your master password. You can use them to record, for example, answers to security questions to recover your password. Well, or any text at all.
To create a note, click on the LastPass extension icon in the browser panel and click Add item → Secure note. In the window that opens, enter the name and text that you want to protect from strangers.
Select the folder where you want to save the note and click Save. In the "Advanced Settings" section, you can also activate the repeated request for a master password when opening a note.
In the LastPass mobile client, create notes by tapping the + icon in the lower right corner, select Secure note, enter a name and text for the note, then tap Save.
Notes can also be sorted into folders. And you can access them through a browser extension by clicking All items → Notes, or through the mobile application by opening the sidebar and selecting Secure notes.
The number of notes is unlimited, but LastPass developers say the extension starts to slow down if you create more than 2,000 notes.
LastPass Password Manager for Mozilla Firefox
A separate menu section is responsible for saving passwords in any web browser, including Mozilla Firefox. However, it is not convenient for all users - without synchronization enabled, this data is saved locally, and if the hard drive becomes unusable, fatal problems will arise with the operating system; the saved authorization data can easily be lost without the possibility of recovery. In addition, even with synchronization enabled, the user is tied to a specific browser. Third-party tools allow you to avoid all these inconveniences while keeping your personal data safe. This particularly applies to LastPass, an add-on with a proven track record and useful features.
Cloud password storage
The main purpose of this add-on is to store all the passwords that you enter when logging in to websites in the cloud. Thanks to this, it is not at all necessary to be tied to one browser - just install the extension on another device, log in under the same account and easily access any sites for which passwords have already been saved previously. Creating your LastPass account is very simple:
- Install the extension from Firefox Browser Add-ons using the site search or the link below.
Go to download LastPass Password Manager from Firefox Browser Add-ons - Confirm the installation with the appropriate button.
- After this, you will need to register in it: click on the LastPass icon that will appear to the right of the address bar, and click on the “Accept” button.
- A new page will open in your web browser where you need to go through the registration process. To begin, please provide a valid email address. The email address must be a valid email address so that if you lose your LastPass password, you can recover it.
- The service requires a complex password: from 12 characters, containing at least 1 lowercase and 1 capital letter, as well as at least 1 number. Be sure to include a hint that will help you recover the key if you forget it.
Once your account is created, you will need to make your first save. It works like this: Open the site whose account password you want to save in LastPass. Go through the standard authorization procedure. The extension will ask for permission to save the password, confirm this with the “Add” button.
As an experiment, log out of your account on this site, and you will see that even if you do not remember the password in Mozilla Firefox itself, the login information will be substituted. If you have several accounts from one site, click on the button in the login or password input field and select the desired option. Different authorization data from accounts will become available only after you log in to them one by one.
Local encryption
The peculiarity of this extension is that all encryption that occurs in LastPass is carried out locally using a unique key, which is why passwords, even in encrypted form, are not transferred to the company’s server. In this case, AES-256 and PBKDF2 SHA-256 technologies are used. Thanks to this, the user does not have to worry about entering confidential information into the add-on’s memory: unauthorized persons will not be able to recognize it. Additionally, each important action requires you to re-enter your password - this helps protect personal data from other users who are at the computer in your absence.
Personal Vault
Each registered user is given a profile in which he can manage various functions. To do this, click on the extension button and go to “Open my Vault”.
The most important thing is that here you can view all the passwords you have ever saved in LastPass, sorting them and distributing them into folders.
For each password, if you click on the wrench button in the tile with it, you can configure several additional options: view login, password, add a note, folder, the need to enter a master password before substituting the password in the authorization form, enable automatic login to the site with these data, disabling autofill (this particular login and password will not be automatically entered into the appropriate fields on the login page for your personal account on this site). It is even possible to add a password to your favorites and send it to a person you trust by mail.
Despite the name, in addition to the passwords themselves, this extension allows you to store some other data. Namely: notes, addresses/phone numbers, payment cards, bank accounts. This way, you can quickly access any of this sensitive information using your computer, mobile device, or Apple Watch where the LastPass app is available. The same goes for them: notes, credit card numbers, etc. can be easily viewed, sorted, distributed. All this is also easy to edit and delete when some information turns out to be changed or outdated.
Here it is also proposed to take advantage of secondary features, which we will not dwell on, but will partially consider further (since they are part of the extension menu), and make some basic account settings. Unfortunately, there is no Russian interface language here.
View recently used login passwords
This item and others are called up through the menu, which can be opened by clicking on the extension icon, as we said above. Therefore, we will not dwell on this in the future, but simply indicate the names of the points. Now we will talk about “Recently Used”.
Here you will see a list of the latest logins and passwords that were used to log into the sites. This, by the way, is a convenient thing not only for the account owner himself, but also for privacy purposes. Data from here cannot be erased, unlike browser history, so if someone was at your computer and entered sites without your knowledge, by looking at “Recently Used” you will definitely find out about it, even if the browsing history of the web browser has been cleared.
By clicking on any item, you can either go to the site itself, edit authorization data, or completely remove the login/password combination from LastPass.
Viewing personal information
Previously, we clarified that in addition to passwords, notes, card numbers and other data are entered into the extension. Through the “All Items” item you can not only quickly view them, but also add a new item. This is convenient because there is no need to go to your personal account. In the future, all this information can be used to quickly register on websites, pay for some purchases, and invoices without having to manually enter payment information.
Adding personal information
This very personal data can be easily entered into the extension by going through the menu to the “Add item” section. Here you can choose from several thematic templates, where you enter the necessary information. Some of them are not applicable to our country, but in general the fields are relevant to fill out, and thus you can enter information about health insurance, driver's license, passport, etc. All this is subsequently available for viewing through your personal account.
Generating a complex password
The extension invites users to create complex passwords that cannot be cracked by attackers. By going to “Generate Secure Password”, you are asked to set the length of the future key, indicate its type (easy to pronounce, easy to read, with uppercase, lowercase letters, numbers and symbols). If you don’t like the result, change its parameters or simply generate it again.
Additional account options
Apart from all these features, there are also a few technical and non-essential features that some may find useful. In the Account Options menu section you will find the following additional options:
- “Secure Challenge” - the service offers to check how secure the passwords are. If any of them (only those saved in LastPass are checked) turn out to be weak, you will be notified about this. For example, in the screenshot below you can see that from all the comments - the low security of some passwords, while the rest of the parameters are secure.
- "Identities" - This section of the menu allows you to switch between one of three identities. Identifiers are created through the vault (“Open my Vault”) and serve to categorize passwords. If there is a lot of stored data, over time it becomes very difficult to navigate between them and it simply becomes unsafe when several people are working on one device. Identifiers allow you to differentiate your activities, for example, into work, personal and children's. Thus, passwords cannot be mixed with each other, and each user can be sure that when entering any site (conditional VKontakte), only his personal data will be entered, while other users with a different identifier will be able to log in only using your username and password. The same applies to the user who simply wants to differentiate between work at home and in the office. This is achieved by requiring you to enter a master password, without which you will not be able to access a specific identifier.
- “Advanced” - technical parameters that do not require additional explanation for experienced users and are not particularly useful for beginners. Here you can reload tabs, clear the local cache, export a CSV file with passwords, etc.
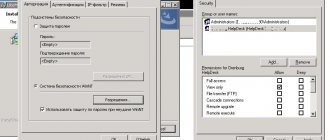
- “Extension Preferences” - here you can configure LastPass operating parameters: some general and advanced settings, security, notifications, hot keys, icons. Do not confuse with the settings that are in the repository. Those are responsible only for the account, these are responsible for the operation of the extension itself.
To summarize, it should be said that LastPass is a fairly functional extension that has no analogues in its benefits for all those who actively work with websites on the Internet. LastPass is not very suitable for beginners who do not want to understand its functions and are not going to pay for the provision of advanced features. After registration, you receive 30 days of premium use as a gift, after which you will have to purchase the PRO version according to the prices of the service (look at the list of options that open when you purchase Premium - you probably simply do not need them). However, LastPass is also successfully used for general password storage: using it, you can easily use different browsers and on different devices, automatically receiving and managing authorization data wherever this add-on is installed.
We are glad that we were able to help you solve the problem. Add the Lumpics.ru website to your bookmarks and we will be useful to you. Thank the author and share the article on social networks.
Describe what didn't work for you. Our specialists will try to answer as quickly as possible.
Did this article help you?
NO
Storage of personal data
LastPass has a variety of note templates. Universal is an empty field where you can enter arbitrary data.
But a specialized template is provided for storing passport data, residential addresses, information about payment cards and bank accounts, Wi-Fi passwords, software licenses and other similar stuff.
In this way, you can not only keep important data safe, but also automatically insert it into registration forms on different sites.
Storing attachments
In addition to text information, LastPass also allows you to store attachments. For example, you can take a photo of your ID or some other document and attach it to a note in the program. Or keep an archive with key files as a protected attachment.
To do this, when you create any protected note through a browser extension, click the “Add attachment” button in the editing window. On your smartphone, you need to press the Attachment button at the bottom of the screen.
LastPass allows you to attach files of any type, as long as they are no larger than 10 MB. The free account is limited to 50 MB of storage, premium users get 1 GB.
Saving bookmarks
LastPass can be used to store secret bookmarks that won't be visible in your browser's address list. You can access them only after entering the master password.
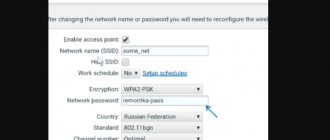
To do this, click on the extension icon and click Add item → Password, as you usually do when creating any LastPass password entry. Enter the URL of the desired site, the name of the bookmark, the folder where it is stored, and, if necessary, a comment. If you do not need to log in to the site, you do not have to enter a username and password.
With LastPass, you can easily access the site through an extension or mobile app. And bookmarks, like all other data in the program, will be synchronized between your devices.
create a LastPass account
Enter your email... (preferably one that you remember without any copying to the clipboard) because it will be easier to work with your account on some gadgets.
At this point, the hints will probably be in English... don't worry, I'll explain...
Next, you need to come up with security data and enter it accordingly. I added some hints in the screenshot))
After creating an account, you need to log in to the application... this makes it more convenient to work with LastPass Password Manager.
That is, enter your new registration data, click on the “Login!... “Log in” button
When authorization is successful, the window will look like this:
At this stage of LastPass Password settings, just click on “Open my vault”...and...
back to contents
Autofill forms
LastPass does more than just enter logins and passwords for you. He can also fill out registration forms on various websites. Allowing the extension to automatically fill in your first name, last name, address, phone number, credit card numbers, and other personal information can save you a lot of time.
Create a new entry in LastPass by clicking Add item → Address. In the window that opens, enter the information about yourself that you want to fill in automatically. Save the entry.
When you open any site that has registration fields, simply click on the icon that appears in the field. LastPass will automatically select what information to enter and fill out the forms for you.
Installing and Configuring LastPass
To install, go to the official website of the service lastpass.com and click Get Lastpass for free:
The extension will automatically download and install. A new icon will appear in the browser toolbar.
After installation, create your account; you only need to do this once.
You need to provide an e-mail address and come up with a single password that you will need to remember. It shouldn't be easy.
Click create an account.
The service will prompt you to enter your password again. This will ensure that you entered exactly what you wanted and did not make a mistake.
Emergency access
This feature allows you to give your family or friends permission to use your passwords, bank codes, and other information in an emergency. If you end up in the hospital or are otherwise unavailable, the person you designate as your trusted person will be able to log into your LastPass vault.
However, you need a premium account to do this. The trusted person must also have a LastPass account, but a free one will do.
To enable the feature, click the Emergency Access icon in your LastPass vault in the bottom left corner of the screen. Click + and choose who to share.
If your family or friend needs your LastPass information, they can submit a login request. A special letter will be sent to your email. If you do not deny the request within a period of time, access will be granted.