What can you do with any folder?
Using these menu items, you can do many useful things with the folder:
- open, in particular – in a new window;
- configure shared access to a folder on the network;
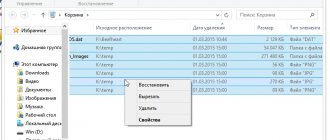
- recreate the previous version if the creation of system restore points is enabled;
- add to one of the existing libraries, or create a new one;
- four ways to create an archive with a folder;
- send by e-mail, fax or move to a specific location on your hard drive;
- cut/copy/create shortcut/delete/rename;
- change the properties of a specific folder.
- When you click on the last item, a window for general properties of the directory (folder) will appear.
Click on “Properties”
There are only two actions you can perform here. Firstly, make the folder invisible (hidden), this is necessary so that it is impossible to see the folder, however, with certain system settings, it can still be detected. Secondly, make the contents of the folder read-only for other users; they will not be able to change the files.
- There is also an “Others” button, by clicking on which you can see a menu for changing other directory attributes - archiving, indexing, compression and encryption.
Click “Other” to change other directory attributes
- The “Folder is ready for archiving” field is a parameter for the system and PC administrators; a check mark means that this directory has not yet been backed up.
“Folder ready for archiving” field
- Indexing - when you select this option, the folder will be added to a special database, which will make it easier to search in Windows if necessary.
When you select this option, the folder will be added to a special database
- Folder compression – this item should be highlighted if there are a lot of text files in the folder and the total volume of the folder is really large. All directory contents will then take up less space without sacrificing performance.
If there are a lot of text files in the folder, check the box “Compress contents..”
- Encryption - setting up a folder, according to which, even if the hard drive is stolen, it will be very difficult to read the contents. You can only encrypt folders that have not been compressed. The settings are made after editing your own account, regarding the encryption options for files and folders.
Encryption - Folder Settings
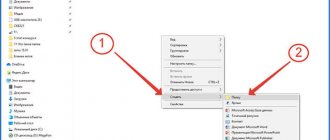
- The "View"/"Settings" tab allows you to change the picture that represents the directory by selecting from a collection of standard pictures (1), or from a separate file (2), or restore the default picture (3).
View or Settings Tab
- The "Previous Versions" tab provides the ability to restore a folder in the form and state that was captured by the Windows checkpoint.
Previous Versions Tab
Description of useful parameters
The “general” tab (picture above) displays a limited set of configurations. Here you can set the folder to open in the same or separate window. You can choose to open files and folders with one or double click.
The View tab contains many options. The user decides which options to use individually. I recommend paying special attention to the following folder properties settings:
- Always display icons rather than thumbnails - this option is useful when you work with large volumes of files and folders. If your computer loads thumbnails slowly, enable this option.
- Hide empty drives in a folder - If you insert an empty flash drive or other removable drive, it will not appear in Explorer, which can cause confusion. It is strongly recommended that you uncheck this option.
- Hide extensions for registered file types – disabling this property shows file extensions. It will help distinguish normal files from virus ones. There is malware that specifies two extensions, for example filename.doc.exe. If the parameter is enabled, you will only see file_name.doc and treat it as a regular text file. Uncheck this option.
- Use checkboxes to select elements – allows you to select elements with the mouse. The setting is equivalent to holding Ctrl and then clicking the mouse button on the selected elements. This property is useful when you need to select a group of files and folders for subsequent actions.
- Hidden Files and Folders – Contains two options that show or hide items with matching attributes.
Access rights settings
Here you can determine who can view, edit, and delete the contents of this folder.
- When you select the “Sharing” button, a new window will appear where you can determine who should be allowed to interact with the directory files.
Select "Sharing"
- By default, only the PC administrator and the owner who created the folder have all changes and access. If you want to open the viewing ability to all users, select “Everyone” in the top list. You can immediately identify one specific user or create a new account in the system.
Select “All” from the top list
- The “Advanced settings” button will allow you to provide access to the resource not only to individual users, but to entire groups.
The “Advanced setup” button provides access to the resource
Carefully! You need to clearly understand what goals need to be achieved when changing access rights, since as a result of rash actions, you can prohibit yourself from any interaction with your own folder.
No access rights to the object
- Password protection of the directory will be possible after appropriate configuration.
Directory password protection
- A continuation of setting up access to the folder is the “Security” tab, in which you can change both the owner and creator of the directory and his access rights.
The “Security” tab is used to configure access rights
And here you need to be careful so as not to lose the ability to manage the folder.
Enabling folder properties
There are situations when viruses (and maybe even the administrator) block the opening of folder parameters. To solve this problem, you should use one of the antivirus utilities.
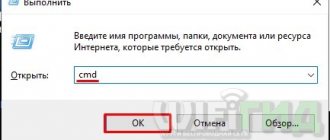
- In the Run window, enter gpedit.msc and go to User Configuration - Administrative Templates - Windows Components - Windows Explorer.
- Find the item (shown in the figure below) and double-click to disable it, after which the folder properties in the Windows operating system should be available.
Folders settings
However, there are other ways to change folder properties.
- Just go to the “Control Panel”, and then call up the “Appearance and Personalization” item; in the window that opens, you can find the “Folder Options” link.
Select “Folder Options”
- When activated, the folder properties window will pop up.
Folder properties window
It is worth noting here that it is now possible to open directories in the same way as in Linux operating systems - with one click.
- The “View” tab is interesting. Especially if you scroll the list of “Advanced settings” to the very bottom, you can, if you uncheck the box, hidden files will be visible. But at the same time, oh, he is the very last on the list.
View Tab Properties
- Now, in the root of the main system drive, the swap file (pagefile.sys) and other previously “secret” objects will be visible.
Objects in the root of the main system drive
Although in this case you won’t even be able to open the virtual memory file, sometimes you may need access to the hidden resources of some programs, so it is better to disable the ability to view hidden data, but keep in mind the method of opening access.
How to show hidden files?
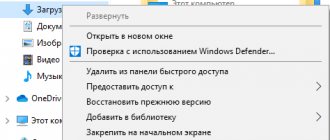
- Open a regular window and click on the “Arrange” button.
- In the “View” tab, check the box next to “Show hidden files...”.
In order to find system components that are protected by default by the system, you should uncheck the “Hide protected system files. Attentively! It is not recommended for novice users to perform the last operation unless absolutely necessary.
How to open access in Windows 8 and 10
Access in Windows 8
- In the eighth version, you need to activate the settings item in the original Start menu (with the image of a gear).
In the Start menu, click Settings
- Then select the last link “Control Panel”.
Select “Control Panel”
- In the familiar window, you will need to click on the “Folder Options” item and get to the desired menu.
Click on “Folder Options”
Access on Windows 10
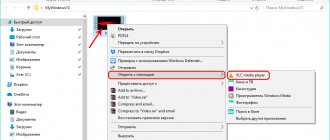
- In the tenth version of the operating system, you can select “Explorer” in the main menu.
Select “Explorer” from the Start menu
- In the Explorer window, follow the steps: “View” - “Show and hide” - you need to select the “Hidden elements” item and check the box.
Check the box “Hidden elements”
A similar function for opening access to system objects (in Windows 7 “Folder Options”) in the tenth version of the system is the “Explorer Options” option.
- To quickly navigate, use the hotkeys Win+Q or through the icon on the taskbar. Here you need to click on the search result “Explorer Options”.
Press the Win+Q keys and go to “Explorer Options”
- And the same window will appear, with the ability to enable viewing of system files and folders.
Open a window for viewing system files and folders
Advice! It is not recommended to constantly work in the operating system as an administrator. It is best to log in as a simple user, without the ability to make critical changes, as required by most Linux-like operating systems. In this case, the risk of damaging the system will be much lower.
Other useful features
Show folder size information.
Check the box “Show folder size data”
This is important because sometimes it is difficult to quickly estimate how much more information will fit on a particular medium (for example, a flash drive).
If you need to disable caching of thumbnails, you will have to check the corresponding box.
Item with the choice of action “Always display icons, not thumbnails”
Now, instead of images of graphic files, only faceless standard images of files will be displayed.
Displaying standard file images
This will save a little space on the PC’s hard drive, but if the workstation is needed specifically for editing pictures, then there is no point in disabling caching, because on the contrary, it reduces the time it takes to search for the necessary data, but you need a decent amount of RAM, otherwise the system will “slow down.”
If you select the option to highlight compressed and encrypted NTFS files in different colors, you will be able to find out where these file types are located. The system cannot compress some system data and encrypted folders, however, reducing disk space may be necessary for comfortable operation. In some cases, it may be advisable to remove encryption from certain large directories and compress that folder.
Vadim Sterkin
Windows Vista Explorer has many improvements over Windows XP. However, some of the problems with the previous operating system have migrated to the next OS, causing a lot of inconvenience to users as before. In particular, one of the most annoying problems is the OS's inability to display the appearance of folders the way users want to see it.
This bothers not only those who use Explorer as a file manager - after all, the Open and Save As . First of all, we are talking about the “forgetfulness” of Windows, losing user view settings. Added to this is the not always correct determination of the folder template depending on the files in it, which is an innovation in Windows. How to customize the appearance of folders and avoid inconvenience when working with them will be discussed below.
Resetting the folder view
If you have already encountered the fact that Windows does not remember the type of folders you installed, you will have to reset it and start over. The problem here is that the OS can remember the settings of only a limited number of folders, which, however, can be increased. But first things first. There are two ways to reset folder view settings.
Method 1 - Control Panel
In Control Panel, open Folder Options , go to the View and click the Reset Folder View .
Method 2 - Registry
This method boils down to deleting the registry settings in which folder view settings are stored. In particular, you need to remove the Bags and BagMRU from the sections:
HKEY_CURRENT_USER\Software\Microsoft\Windows\ShellNoRoam HKEY_CURRENT_USER\Software\Microsoft\Windows\Shell HKEY_CURRENT_USER\Software\Classes\Local Settings\Software\Microsoft\Windows\Shell\
You can do this manually, or you can simply use the REG file provided below and import it into the registry. This file does however include three more parameters, which we'll look at in a little more detail.
Disable automatic template assignment for folders
We are talking about templates that you can set for a folder in its properties on the Settings .
We'll look at templates in more detail a little later. Windows automatically assigns folders a template based on their contents. Sometimes the OS detects the pattern correctly, sometimes it gets it wrong. When he makes a mistake, it’s annoying. Therefore, auto-detection can be disabled in the registry.
In chapter
HKEY_CURRENT_USER\Software\Classes\Local Settings\Software\Microsoft\Windows\Shell\Bags
you need to create a subsection AllFolders , and in it a subsection Shell . Then, in the Shell , you need to create a string parameter FolderType and assign it the value NotSpecified .
Note : NotSpecified parameter, you can specify some others, and then the OS will automatically assign the specified template.
| Parameter | Description |
| NotSpecified | All elements |
| Contacts | Contacts |
| Music | Recording details |
| MusicIcons | Music icons |
| Documents | Documentation |
| Pictures | Images and videos |
Increasing memory cache for folder view
You can increase the number of folders for which Windows remembers view settings. In chapter
HKEY_CURRENT_USER\Software\Classes\Local Settings\Software\Microsoft\Windows\Shell
you need to create a DWORD value called BagMRU Size and assign it a decimal value, say 20000.
Remembering display options for each folder
By default, Windows remembers the display settings for each folder. In Windows Vista, in Control Panel - Folder Options - View there was a checkbox next to Remember display settings for each folder .
In Windows 7 and later this checkbox is not present. In the registry, this behavior is responsible for the DWORD parameter NoSaveSettings in the section
HKEY_CURRENT_USER\Software\Microsoft\Windows\CurrentVersion\Policies\Explorer
for which you need to set the value 0 (which, however, is equivalent to the absence of a parameter).
REG file to perform the above steps
To save time, I suggest you use a REG file , which you can import into the registry to simultaneously reset the appearance of folders, disable automatic detection of templates, increase the memory cache, and set the display settings of each folder to be remembered. After importing the REG file, you must log out for the changes to take effect.
But this is not the end of our story! Next, I will talk about how to correctly configure the appearance of folders so that working with them becomes as convenient as possible and does not cause unpleasant emotions.
Correctly customize the appearance of folders
Much of the dissatisfaction with the display of folder views is due to the fact that users do not have a very good understanding of the operating principle of this OS element. I will briefly describe it.
The basis for displaying the appearance of a folder is its template , which is specified in the folder properties. The template defines the tasks for files located below the address bar, as well as the displayed columns (Name, Size, Modified Date, etc.) and/or views (List, Table, Tile, Small Icons, etc.). Once you've specified a template, you can then fine-tune the folder's appearance by choosing the appropriate columns and views. Next, I'll demonstrate how you can customize folders using this information. It is assumed that you have reset the folder view by following the instructions above (otherwise you may not achieve the desired result). The procedure is as follows:
- Apply a single template for all user folders
- Applying templates to individual user folders
- Fine-tuning the appearance of user folders
- Apply a view to all subfolders
Let's look at each stage in more detail.
Apply a single template for all user folders
The first step is to bring all user folders to a single form. These mean all user profile folders, including Documents, Music, Pictures and others. Open File Explorer and go to the Users located at the root of the system drive. Right-click on an empty space and select Customize Folder View . All Items as the template and make sure the Apply the same template to all subfolders .
Click OK . Now all user folders should have the same appearance. But of course, the template we chose doesn't work well with folders like Music and Pictures, so they require some additional customization.
Applying templates to individual user folders
For folders where you store music, pictures, and videos, it makes sense to assign your own templates. Let's look at how to specify them using the Music folder as an example. shell:My Music in the search there and press Enter. Right-click on an empty space and select Customize Folder View . Entry Details as the template and make sure the Apply the same template to all subfolders . Click OK . Now all music folders should have a uniform look based on the selected template. You can do the same with the Images folder by selecting the Images and videos .
Fine-tuning the appearance of user folders
Let's continue setting up the Music folder. A lot here depends on how the user places files in the folder, so there cannot be a universal recipe. I have a separate folder for each artist, and it already has its own folder for each album. So, I have the Music folder open, i.e. the list of subfolders in it is displayed. You, like me, may not be happy with the standard list or order of columns displayed. Right-click on any column and check the boxes for the columns you want to see. If the columns offered in the menu are not enough, at the bottom of the menu there is a More , from where you can select all available columns.
Once you select the columns you want, you can change the Views , but I'm happy with the standard Table , which is a logical choice in this case.
Apply a view to all subfolders
Now the most important thing! At the moment, we only have the Music folder configured, but not its subfolders, as you can verify by opening any of them - you will see a standard set of template columns. You need to apply the settings of the Music folder to all its subfolders. It's easy! While in the Music folder, press the ALT key to display the menu at the top of the file. Select Folder Options from Tools , go to the View and click the Apply to all folders .
All! Now all folders subfolded in the Music folder have the appearance that we wanted to install.
When I go into each album, I see exactly the columns that I selected while in the Music folder before applying the settings to all folders. Of course, you can directly change the appearance of the Music folder according to your preferences - for example, add or remove some columns. Just customize the view as you like, but do not apply it to all folders, so as not to change the look that is already configured and suits you.
Setting up other user folders (Documents, Images, Downloads, etc.) is done in the same way. The algorithm is the same everywhere. First, the template is configured, then the type of parent folder, which is applied to all subfolders. After which the appearance of the parent folder can be changed. Of course, these actions do not have to be done at the top level of user folders - you can do this setup at any level, but it makes sense to start the initial setup at the top.
I hope this information helps you successfully customize the appearance of your folders and have fun working with them!
Indexing folders
Indexing folders
Often not everyone understands what this function is. It should be clarified that the system operates a special service to facilitate data retrieval. It manages a special database on the hard drive, if the folder or file is participating in the indexing program, the service will suggest this object during a search when the name of the directory or file is similar to the data the user is looking for.
It makes sense to partially enable indexing if you often need to search for specific files, for example, music or video. Then all folders with similar content need to be indexed.
Comment! On weak PCs, indexing can reduce system speed.
The service is turned on and off in the corresponding list of system services, called Windows Search.
The service is turned on and off in the corresponding list
Optimal folder setup will lead to more productive work. But you need to be careful when changing system settings and periodically create system restore checkpoints.
Watch the video on setting the properties of folders and files.
Useful options
Folder properties (which, thanks to Silicon Valley developers, are now called settings) display basic configurations that allow you to set folders to open in one or more windows. Also here you can choose exactly how to open files - with a single or double click.
The “View” tab contains many important parameters and settings. The user determines which options to choose independently. Experts recommend paying attention to the following folder properties settings:
- “Always show icons” is a useful option for working with large amounts of data. You should enable this option when loading thumbnails slowly.
- “Hide extensions for registered…” - disable this property to display the extension of all kinds of files, which allows you to distinguish virus software from normal software.
- “Hide empty drives in a folder” – it is advisable to uncheck this item to avoid confusion in Windows when connecting an empty flash drive.
- “Use checkboxes when selecting elements” - this setting allows you to mark the necessary components using the mouse.
“Search” is a tab containing options to search for folders and files.
After entering the necessary parameters, save by clicking “OK”.
Resetting folder view settings in Windows 10
After upgrading to Windows 10 and receiving the first add-on, users noticed that after each system boot, the position and size of the desktop icons changed. This problem occurs in both account and local records. It is caused by antivirus products, in particular ESET NOD32 or ESET Smart Security. However, there is a solution to the problem.
Adjusting the position of icons on the Windows 10 desktop
Click “Start”, then “Run” and enter “regedit”. The Registry Editor will open. Follow the branch to the folder:
For the 32-bit version – “HKEY_CLASSES_ROOT”, “CLSID”, “{42aedc87-2188-41fd-b9a3-0c966feabec1}”, “InProcServer32”.
For the 64-bit version - “HKEY_CLASSES_ROOT”, “Wow6432Node”, “CLSID”, “{42aedc87-2188-41fd-b9a3-0c966feabec1}”, “InProcServer32”.
Right-click on the “InProcServer32” folder and select “Permissions”. Then click “Advanced”.
The “Advanced security settings...” section will open. Near the “System” item, click on the “Change” link.
We check that the “Select object type” field contains “User, Group or Built-in security principal”. In the “Names of selected objects” section, enter the name of the administrator account. Then click “Check names”. If the name was entered correctly, the result will be as in the photo.
Now click “OK” and return to the previous section. Put o and click “OK”.
After completing these steps, we return to the “InProcServer32” folder of the registry editor. Right-click on the “Default” value and enter the following: “%SystemRoot%\system32\windows.storage.dll”. Click “OK”.
Close the registry editor and restart the PC.
SoftikBox.com