In this article we will figure out how to disable the screen lock function in Windows 10, taking into account a couple of technical nuances related, firstly, to the fact that in OS versions released since August 2020 (from edition 1607), this operation can be carried out using the editor Local Group Policy is not possible. Secondly, this editor as such is not available at all in the home version of the operating system (Home).
The lock screen usually displays beautiful background images, the date and time, and various buttons for quick actions. But besides this, annoying advertisements can also be displayed here. Fortunately, this type of advertising is still very rare in our country, as it is quite expensive.
By the way, there is a special key combination Win+L to open the lock screen. Using it, you can quickly and conveniently go to the lock screen, which is convenient, for example, in the office, when you need to step away from the computer for a while and don’t want to turn it off or put it, say, into sleep mode.
Now let's move on directly to ways to deactivate the lock screen.
Disabling the lock screen via Registry Editor
See also: “How to show or hide hidden files and folders in Windows 10”
It is not difficult to disable the screen lock in this way. You only need to change the value of one of the system registry parameters called “AllowLockScreen” from 1 to 0.
- To launch the registry editor, press the Win+R keys, type the command “regedit” and press Enter.
- Next, go to the address: HKEY_LOCAL_MACHINE\SOFTWARE\Microsoft\Windows\CurrentVersion\Authentication\LogonUI\SessionData .
- Double-click on the “AllowLockScreen” parameter to open its properties, change the value to 0 and click OK to save the settings.
Note: The difficulty of this method is that the result, although positive, will, unfortunately, be temporary. After restarting the PC, the value of the “AllowLockScreen” parameter will automatically change back to one. You can, of course, perform this procedure after each PC boot, but you must admit, this is very inconvenient. You can also register a bat nickname that performs the value replacement procedure and put it in autoload, but this is quite difficult.
Use Task Scheduler to turn off the lock screen
There is an easier way to solve the problem. To do this, we perform the following steps:
- Open the search bar to find and launch the task scheduler.
- In the window that opens, click on the “Create task...” button.
- Configure the parameters of the new task:
- give it an appropriate name, for example, “Disable lock screen”.
- Check the box next to “Run with highest rights”.
- in the “Configure for” parameter, click on the current option and select your operating system from the list that opens, in our case, Windows 10.
- Then go to the “Triggers” tab and create two new triggers by clicking the “Create...” button at the bottom of the window.
This is done so that any user can log in and unlock the system.
- the first trigger has the following settings: start a task at login, for any user.
- second trigger: start the task when the workstation is unlocked, and also for any user.
- in the end, when we have created 2 triggers, we move on.
- Go to the “Actions” tab and create a new one by clicking the corresponding button.
- select the “Run program” option.
- In the “Program or script” field, enter the value “reg”.
- in the line called “Add arguments” we write the following address: add HKLM\SOFTWARE\Microsoft\Windows\CurrentVersion\Authentication\LogonUI\SessionData /t REG_DWORD /v AllowLockScreen /d 0 /f .
- Confirm the changes made by pressing the OK button.
As a result of the actions taken, the lock screen will no longer appear on the computer in the situations listed in step 4 according to the created triggers. You can check this by pressing the Win+L keys, after which you will immediately be prompted to enter a password to log into the system.
How to Lock Your Windows 10 Computer
Keep your Windows 10
Stay safe from digital vandals by locking your system using the
Windows 10 screen lock
.
No matter whether you are using a laptop
or a desktop
computer
, all the methods listed below will keep your system in good hands.
How to quickly return to the Windows Lock screen
The fastest way to take your system straight to the Windows Lock screen is to use the Windows shortcut button combination. It's just a two-key combination and your computer is locked. Press Windows key + L to go directly to the lock screen.
I also advise you to read the topic on the partner’s website and find out how to set a password on Windows, thereby protecting your operating system even more reliably.
You don't need newfangled shortcuts to lock your desktop or laptop. Windows 10 also offers full support for the most classic Windows commands: Ctrl + Alt + Delete. This legendary Windows command will take you to a short menu with several available options. Select "Lock" and you will be taken to the lock and security screen.
How to Lock Windows 10 Using the Start Menu
Locking Windows 10 from the Start menu takes a few extra steps, but it can be achieved without a keyboard, which can be handy in certain situations.
To do this, follow these steps:
1. Select the Start
».
2. Look at the icons in the left menu and select the top icon that represents your user account.
3. In the additional menu that appears, select “ Block”
" to go straight to the Windows 10 lock screen.
How to Automatically Protect Your System with a Screen Saver
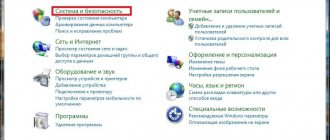
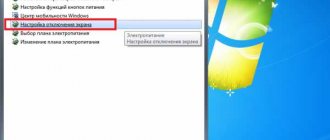
There is a Windows 10 lock screen timeout that automatically sends you back to the Windows login screen after a certain amount of time. You can set it up in Windows' power settings by searching for "power and sleep settings" in the Windows search bar, selecting power and sleep settings, then screen adjustments and sleep timers.
Alternatively, you can have the screen saver lock the screen for you. Here's how:
1. Find “ Screen Saver”
" in the Windows search bar and select "
Change screen saver
" from the results.
2. In the window that appears, make sure that the screen saver is selected in the Screen Saver drop-down menu.
3. Select how long you want the system to wait before the screen saver turns on.
4. Oh, display the login screen.
If you want to customize any information about the screen saver itself, select Settings, then select Preview to test out any changes you might make to it.
Uninstall LockApp to deactivate the lock screen
See also: “Monitor size in Windows 10: how to find out or change”
There is another method for disabling the lock screen in Windows 10. The essence of the method is to remove from the system the program that is responsible for launching the screen lock.
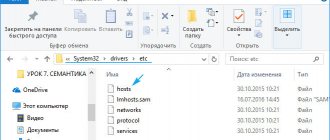
- In order to find this program, open the folder “Microsoft.LockApp_cw5n1h2txyewy”, the full path to which is as follows: C:\Windows\SystemApps\Microsoft.LockApp_cw5n1h2txyewy .
- To disable the lock, it is not at all necessary to delete the program; it is enough to simply rename the folder, after which the system will not be able to determine the path to it, and, accordingly, will not be able to start the screen lock process.
Note: To perform these actions, you must work from an account with administrator rights.
How to customize your lock screen?
We looked at all the ways you can lock a computer running Tens. Now let's learn how to customize this screen at our own discretion. To do this you need to do the following:
- Open Settings again using the above method.
- Now go to the “Personalization” section.
- Go to the "Lock Screen" tab.
- At the top there will be a preview of the screen when the operating system is locked. In the “Background” line, you can select the type of image - one static photo or a slide show.
- Below you will see standard pictures and those images that have already been used for you. To install another image, click on “Browse” and specify the path to the files.
- Next are the settings for the displayed information and brief information about standard applications. You can lock your computer and monitor notifications without logging into your account.
- For additional settings, click on the “Screen saver settings” button and specify the interval for changing images and other nuances.
Configuration via the Local Group Policy Editor
Despite the fact that this editor is not provided in the home version of Windows 10, and using it, as we mentioned above, it is no longer possible to disable the lock screen starting from certain versions, it is still necessary to mention this method.
- Call up the “Run” window by pressing the Win+R keys. Type the command “gpedit.msc” and press Enter.
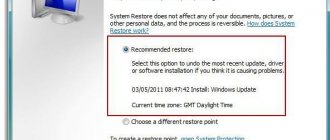
- In the editor window that opens, expand the contents of the “Personalization” folder, which is located along the path: Computer Configuration\Administrative Templates\Control Panel . Then double-click the properties of the line “Prohibit display of the lock screen”.
- Place a checkmark next to the “Enabled” item and confirm the action by pressing the OK button.
Setting up the lock screen: possible problems and their solutions
Let's look at the problems you may have when setting up your lock screen:
- The background on the lock screen does not change - a fairly common problem. It is caused by a crooked system update and has already been fixed in the latest version of Windows. Hence, if you are facing this problem, simply update your Windows 10 operating system to the latest version;
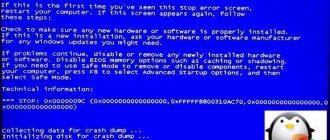
- There is no image on the lock screen - this bug occurs when some settings conflict. In such a situation, the user needs to: go to the performance settings (“Control Panel” - “All control panel elements” - “System” - “Advanced system settings” - “Performance”);
- enable the item “Animation when minimizing and maximizing windows”;
Enable window animation when minimized to fix the lock screen background display issue