In this article, we will look at ways to disable the Windows Firewall in the Windows 10 operating system. In some situations, users need to disable the firewall, for example, to diagnose problems with certain programs or to troubleshoot other problems.
Windows Firewall is a firewall that controls network packets and program access to the Internet, protecting the computer from attacks by intruders. This is a kind of wall between your PC and the Internet.
Windows Firewall (Windows Defender Firewall) is included with the Windows 10 operating system. Unless you are using a third-party firewall on your computer, it is advisable to always have Windows Defender Firewall enabled to ensure network security.
If a user has a question about how to disable the firewall, then a solution must be found. In this guide, you will find instructions on how to disable Windows 10 Firewall in different ways: in Windows Defender settings, from Control Panel, in the Local Group Policy Editor, in the Command Prompt, in Windows PowerShell, by disabling the service.
Please note: The Windows Firewall performs the task of protecting the computer from intruders and malware from the Internet or local network, therefore, after carrying out certain activities on the PC, it is recommended to turn on the standard firewall again to ensure network security.
How to disable Windows 10 Defender Firewall
First, let's look at how to disable Windows Firewall from the Windows 10 operating system settings.
Follow these steps:
- Go to the Start menu and launch the Settings app.
- Click on the Update & Security option.
- Open Windows Security.
- In the "Security Areas" section, click on "Firewall and Network Security."
- Click on your active network; in most cases, home computers use a private network.
- In Network Settings, under Windows Defender Firewall, move the switch to the Disabled position.
A message appears from the notification area warning you that the firewall is disabled.
If necessary, you can perform a similar operation for other inactive networks on the computer.
Why turn it off?
This security tool protects the operating system from viruses, hackers and other external attacks. Unlike antivirus programs, which are designed to delete existing files, a firewall primarily filters all traffic entering the computer, and blocks potentially dangerous files and connections on the fly.
By default, all traffic from all connection types is filtered:
- Wired Internet;
- Wi-Fi, Internet distribution from mobile devices, wireless modems;
- VPN, proxies and other complex connection schemes.
If the system considers the program to be malicious, it blocks it and sends the user a message urging him to make a final decision. The user can agree with the opinion of the system, or can allow the program to be active by removing protection or adding the file to exceptions. The firewall does not do anything without the user's permission , but frequent system conflicts with third-party software force users to either carefully configure the exclusion list or disable the firewall altogether.
You should definitely read about how to clean your keyboard at home.
How to disable Windows 10 Firewall from Control Panel
Next method: turn off the firewall using the Windows 10 Control Panel.
Follow these steps:
- Launch Control Panel in Windows 10 using one of these methods.
- Click on the Windows Defender Firewall icon.
- In the Windows Defender Firewall window, in the left column, click on the link “Turn Windows Defender Firewall on or off.”
- In the "Configure settings for each network type" window, enable the "Turn off Windows Defender Firewall (not recommended)" options for private and public networks.
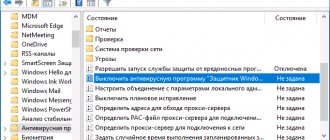
Why is it necessary to stop the service, and how to do it?
Now that the Windows firewall is stopped, you can start disabling the built-in service, which is enabled by default and is still running. Each running service of the operating system loads RAM and represents a process or part of it.
Simply disabling the firewall only means stopping it from working. The software part will continue to work while the service is enabled, and therefore use system resources. To disable the Windows Firewall service, you must perform the following steps:
- To change the settings, you need to go to the “Control Panel” and go to the “Administration” setting;
- Select “Services”;
- In the list you need to find “windows firewall”;
- Double-click on it to enter into changing parameters;
- Change the startup type to “Disabled” and click the “Apply” button.
You can also change the startup type to “Manual” and “Stop” the running service. After rebooting the operating system, the firewall will remain disabled, but applications and local services associated with it will start without problems.
After you have configured everything and restarted your PC, you can begin installing an antivirus or firewall.
Result:
The built-in protection of the operating system is not very productive, so it is better to use a separate firewall or one built into antivirus software. However, before doing this, you must disable the standard firewall in order to avoid incompatibility and delays due to double filtering.
How to disable the Windows Defender Firewall service
After disabling the firewall, the firewall service will continue to run in the Windows operating system, so in some cases you may need to disable the firewall service in the OS settings.
In order to disable the Windows Firewall service, we will need to make changes to the system registry.
Do the following:
- Press the "Win" + "R" keys.
- In the “Run” dialog box, enter the command: “regedit”, click on the “OK” button.
- In the Registry Editor window, follow the path:
HKEY_LOCAL_MACHINE\SYSTEM\CurrentControlSet\Services\mpssvc
- Right-click on the “Start” parameter and select “Edit...” from the context menu.
- In the “Change DWORD (32-bit) parameters” window, set the “Value” field to “4”, click on the “OK” button.
Close Registry Editor, and then restart your computer.
Finally turning off the protection
We have prevented the firewall from performing its direct functions, but its service continues to run and consume system resources. It's not difficult to turn it off. This is not necessary if you are disabling it temporarily.
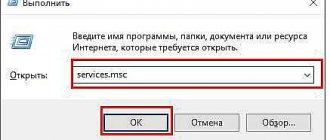
All services can be easily found by entering “services.msc” into the search and pressing “Enter”. On Windows 8, you should use the keyboard shortcut “Win + R” to open the “Run” window, where the specified command is entered.
In the “Services” window that appears, look for the desired line “Windows Firewall” and click on it 2 times.
Select “Disabled” in the “Startup type” drop-down menu and stop the firewall by clicking the corresponding button. Click "OK".
To be on the safe side, you can disable auto-boot in your firewall. To do this, enter “msconfig” in the search bar and press “Enter”.
In the “System Configuration” window that appears, click the “Services” tab. In the list, find the “Windows Firewall” item and uncheck it. Click "OK". When prompted to restart the computer, respond with “Exit without reboot.”
The listed algorithm for disabling protection also applies to Windows 10.
If there is a need to enable it, then first this is done in services, then a checkbox is checked in the configuration and launched through the control panel.
If you are tired of the constantly occurring error 0xc0000006, then read how to quickly get rid of it in our article.
In this article we will tell you in detail how to quickly and easily find out your IP address, read on.
Conclusion
Some users may be confused by the need to disable the firewall in services, but in fact this is a necessary measure if you do not want it to consume system resources. It will take you 1-2 minutes to do everything. But do not forget that the system still needs to be secured by installing another reliable firewall.
Disable Windows Firewall from the Command Prompt
Now we will disable the standard firewall for all profiles using another system tool: the Windows command line.
Do the following:
- Run Command Prompt as Administrator.
- In the command line interpreter window, run the command (after entering the command, press the “Enter” key):
netsh advfirewall set allprofiles state off
After executing the command, the word “OK” will appear, and a window will open from the notification area warning that the firewall has been turned off.
To enable a disabled firewall from the command line, run this command:
netsh advfirewall set allprofiles state on
Another way to disable the firewall
- Open the Start menu and type msconfig in the search bar. Press Enter.
- In the window that appears, go to Services.
- LiveJournal
- Blogger
Find the Firewall item and disable it by removing the selection from the box
- Restart your computer.
Firewall is now disabled as a system service.
How to disable firewall in Windows PowerShell - 1 way
Similar to Command Prompt, you can disable the firewall using Windows PowerShell. This system tool uses a similar command for this method.
Do the following:
- Right-click on the Start menu.
- From the menu that opens, select “Windows PowerShell (Administrator).”
- In the "Select Administrator: Windows PowerShell" window, enter this command:
netsh advfirewall set allprofiles state off
- On your keyboard, press the “Enter” key.
After executing the command, the built-in firewall will be disabled on the computer for all network profiles.
Second method
Open Command Prompt with administrator rights in any convenient way:
- Press the Win + R key combination on your keyboard. In the Run , type cmd .
- You can also find Command Prompt through the Start by selecting “ All apps ”, then going to “ System ”. Right-click on the program icon and run it as an administrator using the corresponding menu item.
A command prompt window will open on your desktop.
To disable the utility, enter netsh advfirewall set allprofiles state off in the window that opens as shown in the screenshot.
To perform the operation, press the Enter key. After completing it, close the Command Prompt .
Now you know another way to disable the Windows 7 firewall.
Disabling the firewall in Windows PowerShell - method 2
Let's try the second method to disable the system firewall from Windows PowerShell.
You may also be interested in:
- How to disable Windows Defender - 7 ways
- Windows Command Line Commands: List
You need to do the following:
- Run Windows PowerShell as an administrator.
- In a Windows PowerShell window, run the command:
Set-NetFirewallProfile -All -Enabled False
This command disables all profiles: Domain Network, Private Network, and Public Network.
Enabling the firewall in Windows PowerShell is done using the command:
Set-NetFirewallProfile -All -Enabled True
What is a firewall
A firewall is a firewall (a kind of filter), a special program that protects your computer from external threats, various viruses and hacker attacks. A firewall is also often called a firewall - the literal translation from English is a wall of fire.
Every operating system has its own firewall and starts working after the first start of Windows. Most computer users have anti-virus protection installed, which replaces the functions of the Windows firewall.
In this article, we will disable the firewall in two operating systems such as Windows XP and Windows 7. In the previous article, we talked about how to crack a password on a computer. So, let's begin.
Disabling the firewall in Windows XP
Turn on our computer, go to “Start Menu” >>> “Control Panel”.
Let's go to the Security Center.
Go to “Windows Firewall”.
In the window that opens, check the “Disable (not recommended)” checkbox and click OK.
To prevent us from constantly being reminded of security alerts, we need to go to “Change how the Security Center alerts you.”
In the window that opens, you need to uncheck all three checkboxes and click OK, after which we close all open Security Center windows.
How to disable the Windows XP firewall | Moicom.ru
The shutdown is complete and you can safely work on your computer.
Disabling the firewall in the Local Group Policy Editor
In this way we will disable the system firewall using the Local Group Policy Editor.
You need to make the following settings:
- Press the keyboard shortcut “Win” + “R”.
- In the Run window, run the command "gpedit.msc".
- In the Local Group Policy Editor window, follow the path:
Computer Configuration → Windows Configuration → Security Options → Windows Defender Firewall Monitor with Advanced Security → Windows Defender Firewall Monitor with Advanced Security - Local Group Policy Object
- In the folder tree, right-click “Windows Defender Firewall Monitor with Advanced Security - Local Group Policy Object” and select “Properties”.
- In the window that opens, go to the “Private Profile”, “Public Profile” and “Domain Profile” tabs, and in the “Status” section, in the “Firewall” option, select the “Disable” option.
- Click on the "OK" button and then close the Local Group Policy Editor.
How to turn off Windows 10 Firewall notifications
After disabling the standard firewall, Windows 10 Defender Security Center will show alerts about the system firewall being disabled. To ensure that you are no longer bothered or annoyed by prompts to enable, you will need to disable firewall notifications.
To disable notifications, you will need to make changes to the registry of the Windows operating system.
Make the following changes to the registry:
- Type "regedit" (without quotes) into the search field, then launch the application.
- In the Registry Editor, go to the following path:
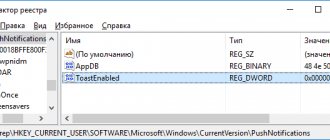
HKEY_LOCAL_MACHINE\SOFTWARE\Microsoft\Windows Defender Security Center\Notifications
- Right-click on an empty space in the Registry Editor window.
- From the context menu, first select New and then DWORD Value (32-bit).
- Name the parameter "DisableNotifications" (without quotes).
- Double-click on the “DisableNotifications” option with the left mouse button.
- In the “Change DWORD Value (32-bit)” window, insert the value “1” and click on the “OK” button.
- Exit Registry Editor and restart your computer.
If this problem ceases to be relevant, notifications can be turned on again. To do this, in the Registry Editor, follow the path:
HKEY_LOCAL_MACHINE\SOFTWARE\Microsoft\Windows Defender Security Center\Notifications
From the Notifications folder, remove the DisableNotifications option.