2019-05-12
Installing/Recovering the Windows Recovery Environment
In addition to the previous article, we will look at how to install Win
dows
R
ecovery
Environment
(hereinafter referred to
as WinRE
), and register their loading in the
Windows
.
Content
Preface
The previous article discussed the topic of restoring the Windows
.
In one of the test situations, the boot partition was deleted. For an operating system booted in BIOS/MBR
mode, the boot partition, in addition to bootloader files, also contains
WinRE
. Restoring these files was not considered, since this was not the main topic of that article.
WinRE recovery environment from scratch.
to the specified section.
Required Tools
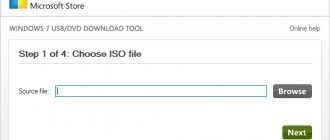
To install the recovery environment, you only need an installation disk with the Windows
.
You can download the image to create an installation disk/flash drive on the official Microsoft
at https://www.microsoft.com/ru-ru/software-download.
Recovery Environment
Win
dows
R
ecovery
Environment
(
WinRE
) -
Windows
, designed to fix the main problems of the inability to boot the operating system. You can read more here.
What is WinRE
?
This is a regular Windows
P
reinstallation
Environment
(
WinPE
), an image of a preinstallation environment, but containing a minimal set of software tools designed to restore the ability to boot the
Windows operating
.
This set includes automatic troubleshooting programs, the ability to work on the command line with an accompanying set of console utilities, as well as tools for creating/restoring backup copies.
WinRE environment
is represented by the
winre.wim
, the
boot.sdi
, and the
ReAgent.xml
. This archive is usually located on a separate partition, i.e., regardless of the partition on which the operating system is installed.
But this does not mean that WinRE
cannot be installed in any other location on any of the existing partitions.
These files can be found on the installation disk, in the sourcesinstall.wim
(*.
esd
).
boot.sdi file
can be taken from the
WindowsBootDVD
.
Winre.wim files
and
ReAgent.xml
from the
WindowsSystem32Recovery
.
Or, you can download them from here https://yadi.sk/d/KwDqattY1T3VPQ. The following link contains WinRE
Windows 10 1809 October 2020 Update x86/x64
installation disc .
Important!
The WinRE environment files to be installed must match the characteristics (version and bit depth) of the operating system that they will possibly be restoring.
The loading of the specified files is carried out by the loader, i.e. all of them are registered in its configuration file, subject to certain conditions being met. For example, several incomplete operating system downloads.
How to get into the WinRE
without existing problems loading the operating system? There are two ways:
1. Go to the Start
.
Press the shutdown
, in the menu that appears, press the
SHIFT
and click on
Reboot
.
Windows 10 only
.
Go to the Start
⟶
Settings
⟶
Updates and security
⟶
Recovery
⟶
Special boot options
⟶
Restart now
.
Installing the Recovery Environment
WinRE installation principle
for
BIOS/MBR
, or
UEFI/GPT
similar. The algorithm of actions is as follows:
1. Create a recovery partition if it is missing or deleted. WinRE environment files
to the recovery partition.
3. Register the loading of the WinRE
in the operating system loader configuration file.
Let's start by installing the WinRE
for the
Windows
booting in
BIOS
mode. In this case, the recovery environment is located together with the bootloader files on the same partition.
The process of creating such a partition and installing the bootloader on it has already been discussed earlier. Therefore, I will not repeat myself, and will go straight to installing the WinRE
.
Booting into Windows RE using the installation disc
Another way to boot into Windows RE involves using the Windows installation disc. This method works in all versions of Windows, but you need to have it, and not all users have it. However, we will also consider it.
Loading will take a little longer than directly from disk, but not by much. Install the Windows installation disc into the optical drive and turn on the computer. If your BIOS says to boot from a CD-ROM, then simply continue booting from it. Otherwise, you need to go into the BIOS (usually the Del key) and set the first boot device to the drive into which you inserted the installation disk and save the changes.
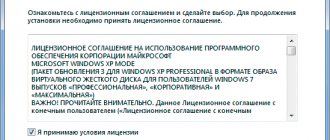
The system will now try to boot from the optical drive first. In this case, after a while you will see a window asking you to select language options, after which the following window will appear.
Here we are interested in the “System Restore” link in the lower left corner of the window. Click it, the system will search for installed operating systems. Select the one we need, check the “Use recovery tools...” radio button and click the “Next” button.
The “System Recovery Options” window will appear, exactly the same as in the figure in the first method.
What is a recovery partition and is it necessary?
The partition itself, as is already clear, is reserved space on the hard drive, moreover, in the system partition where the installed OS is located.
As a rule, depending on the modification of the system, its size may vary, but usually it is approximately 300-500 MB. The Recovery folder is located here, which contains a WindowsRE directory with a Winre.wim image embedded in it. It also seems completely logical that all this is hidden from the user’s eyes, so that he does not accidentally (or intentionally) delete the necessary recovery tools.
But the matter does not stop there. There are two more hidden partitions on the disk, the existence of which the user does not even know. This is an EFI system partition with a size of about 100 MB and an MSR partition with a size of 128 MB responsible for GPT partitioning. Thus, for example, the question of how to remove the recovery partition in Windows 10 comes down to removing not one, but three whole partitions from the system disk in order to attach them to the available space.
It must be said that not all users realize that system recovery tools can be found both on installation media and on special disks for rolling back and eliminating system errors. Therefore, in some cases, you can not only hide the recovery partition, but also delete it, as they say, without a twinge of conscience. Several methods can be proposed for this.
Booting into Windows RE using a recovery disc
This method is very similar to the previous one, with the difference that a pre-created system recovery disk is used, and also takes a little less time and the windows displayed are slightly different. Suitable for users who do not have an installation disk, but the operating system was pre-installed on the computer. How to do it is described in detail in this article.
Likewise, the BIOS must be set to boot the computer from a CD-ROM and the system recovery disc must be inserted into it. The boot process from the recovery disk will begin, at the end of which you will be asked to select a language, as in the screenshot when booting from a hard drive. Select a language and click the “Next” button. A new window will open, as in the last image when booting from the installation disk. Select your operating system and click “Next”. The System Recovery Options window will open.
Now you know the various ways to boot into the Windows Recovery Environment. As you can see, there is nothing complicated and is quite accessible to novice computer users. The only thing is that perhaps you should try them in advance, so that in case of real problems you feel more confident.
Reinstalling Windows 10: Will the recovery partition be deleted?
First, a few words about reinstalling the system. Some users naively believe that reinstalling Windows 10 or any other modification with full formatting of the system disk will destroy the above partitions.
Nothing like this! Yes, at the stage of selecting a disk for installing the OS, absolutely all partitions will be displayed, and formatting will actually combine them into one. But in a “clean” system, which the user receives immediately after installation, automatic system recovery is activated by default, so the OS itself, whether you like it or not, again reserves space on the hard drive, where it writes the necessary information immediately.
Windows Recovery Environment Tools
As before, the recovery environment is built on Windows PE, but there are more tools in it, which is associated with innovations in Windows 8. In the picture, the environment corresponds to version Windows 10 1809 and later (picture for version 1803 and older
).
See the same pictures and note about localization for Windows 8.1
While keeping the Windows 7 backup features, Microsoft has redesigned the recovery environment screens. And the point here is not only that the interface has now become more convenient for finger control. Pay attention to the picture - do you see a division by operating system in the “Diagnostics” section?
Unfortunately, when translating the recovery environment interface into Russian, Microsoft did not pay enough attention to the unity of terminology. In the English OS everything is clear - in Windows RE and the control panel the function is called Refresh Your PC. And in a localized system there are already three options - “Recovery”, “Computer recovery” and “PC recovery”.
Of course, you only need to read what is written on the screen to understand that these three things mean the same thing. Moreover, the explanations in the recovery environment have become more detailed. Unfortunately, novice users often panic and get lost when they see the letters.
For those two poor guys with whom I started the story, system image recovery (bottom picture) did not find the computer recovery image (top picture). It’s good that they didn’t roll back to the original state, because there, along with the system disk, you can format all the others if you wish.
Restoring your computer to its original state appeared in Windows 8. And in additional options there is everything that was previously in Windows 7, plus uninstalling updates and boot options, which will be discussed below.
Recovery partition: how to delete via command line?
So, let's start with the most complex, but absolutely effective method, which involves using the command console (cmd), which must be run with administrator rights.
But before that you need to follow a few simple steps. First you need to create a recovery disk. If the “Recovery” menu is used in the “Control Panel”, you will need a flash drive; if the backup and recovery section is used, optical media will be used. A flash drive with a capacity of 64 GB or higher is convenient because you can perform a full backup of data from the recovery partition itself (but more on that later).
Next, the solution to the problem of how to remove the recovery partition from the hard drive is to select the line of special boot options (for Windows 10) in the update and security menu, which is located in the settings section, or install removable media as the first boot device in BIOS.
After the restart, at the beginning of the installation of the operating system, use the combination Shift + F10 to open the command line, in which the following commands are written sequentially:
- diskpart;
- lis dis (list of all partitions);
- sel dis 0 (select a drive with the installed OS);
- lis par (view sections);
- sel par 1 (select first section);
- del par override (deleting the first partition);
- sel par 2 (select second section);
- del par override (deleting the second partition);
- sel par 3 (select the third section);
- del par override (deleting the third partition);
- create par efi size=100 (creates an encrypted EFI partition with a size of 100 MB);
- fs=fat32 (formatting in FAT32);
- create par msr size=128 (creates an MSR partition with a size of 128 MB);
- lis vol (view sections);
- exit (exit diskpart);
- bcdboot C:Windows (installation of boot partition);
- exit (complete exit from the console).
Booting to Recovery Environment from Hard Drive
In the Windows 7 operating system, there is a special partition on the hard drive that allows you to boot into the recovery environment directly from the disk (this feature is not available in earlier operating systems) without using anything else. To do this, at the initial stage of booting the computer (while various lines are shown on a black background), press the F8 key on the keyboard to get to the “Additional boot options” menu.
We are interested in the item “Troubleshoot computer problems”, select it and press the Enter key on the keyboard. The download process will begin, after which a window will appear asking you to select a keyboard layout. From here you can also boot into another very useful mode of computer operation, but we’ll talk about that another time.
You must specify the language in which your account password is entered, otherwise you will not be able to enter it in the next step. An administrator account is required to access the command line. What to do if you have lost your admin password, see this article.
Now we are prompted to log in. Select your account and enter its password.
If you did everything correctly, the “System Recovery Options” window will open, for which everything was started.
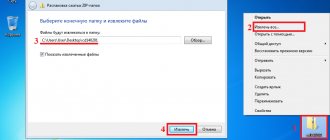
Disk management using AOMEI program
The reboot field should, for ease of further operations, use the AOMEI application, select the disk to which you want to attach the space, and then use the resize/move line in the menu on the left side.
Next, you select moving the partition, and drag the slider to the limit (to completely allocate all the space for drive C. Be sure to pay attention that after such actions there are zeros on the “Unallocated space before” line.
Click “OK” and “Apply”. In the window of pending operations that appears, click the go button, after which you need to agree with the instructions in the message. After this, a black space freeing mode window will appear. Once the process is complete, the recovery partition will be deleted and the free space will be added to the system partition.
Test loading the DaRT 10 disk
Set the BIOS to boot from a flash drive and a blue window will appear in front of you with a choice of keyboard layout.
Select the “ Troubleshooting ” section.
Next section “ Microsoft Diagnostics and Recovery Toolset ”
You will see a list of all the utilities that we added during creation.
This is what it looks like in the English version
That's all for me. In the following articles I will tell you how to use the Microsoft Diagnostics and Recovery Toolset (DaRT 10), how to integrate it into the operating system itself that you are installing, we will look at connecting to it remotely. Ivan Semin, author and creator of the IT portal Pyatilistnik.org, was with you.
Method for Windows 8 and higher
Now let’s talk about how to delete the recovery partition in versions of Windows 8 and higher (in the seventh modification and lower, this solution does not work).
Remember when we talked about creating a bootable flash drive at the first stage? So, if you check the box next to the backup line, the entire partition, user files and programs can be transferred to this particular media. True, this may even require several hours and a flash drive larger than 64 GB.
But at the end of the process, the system itself will offer to delete the desired recovery partition. We agree and immediately see how much space is freed up.
On the command line
Unfortunately, for unknown reasons, the method described above does not always work, so let’s figure out how to do this using the DISKPART console command. Launch a command prompt (with administrator rights) and enter diskpart
.
When the diskpart shell starts, display a list of disk partitions using the list volume
. We find there the section that will need to be hidden (as in the previous paragraph, pay attention to the RECOVERY label), and remember its number.
select volume Z
where Z is the volume number.
Introduction
So, you have finished installing the operating system, drivers, updates and programs, checked its performance and stability, were satisfied with the result obtained and want to be able to “roll back” to this system state in case of unforeseen circumstances.
Windows 7 is equipped with fairly powerful backup tools that can reduce the time it takes to restore the system.
Those who have bought new computers with Windows 7 pre-installed are familiar with the restore function, after which the operating system, and sometimes the contents of the entire hard drive, is returned to its factory state. In this case, user files located on the hard drive may be lost.
If you have an installation disk with the operating system, you are spared from such losses (How to reinstall Windows 7, saving settings and installed programs), but subsequent installation of drivers and updates is inevitable.
I offer you a method that will significantly reduce the time spent setting up the system after reinstallation; moreover, it does not require an installation disk.
The article uses materials from Vadim Sterkin's blog and Valery Volobuev's video report Setting up the Windows Recovery Environment in Windows 7.
The algorithm described below does not require specific knowledge and is relatively easy to implement for a home user. We will perform the task in the following order:
- prepare a partition for the future recovery partition;
- create a system image in the Windows RE environment;
- configure the recovery environment;
- Let's reinstall and reconfigure the recovery environment.
Preparing the recovery partition
First of all, we need to create a partition on which we will subsequently place the operating system image file, as well as the file for deploying the recovery environment.
There are many ways to perform this operation; I will use standard tools: Disk Management and the DISKPART
. You can read about this in the article.
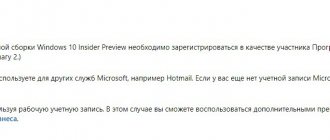
We will determine the partition size based on the current occupancy of the partition with the operating system and the availability of free space. For example, if the system takes up about 20 gigabytes, the optimal size would be from 5 to 10 gigabytes.
In my example, partition D:\
was first compressed
Figure 1 - compression of partition D:\
then in the resulting unmarked area
Figure 2 - unallocated disk space after compression
using the DISKPART
a primary partition was created, formatted, and assigned the
Recovery
and the
letter R. (DISKPART was used because the fourth partition created by Disk Management will be an additional partition. You can experiment with placing the recovery partition on an additional partition.)
Run sequentially:
::Start DISKPART Diskpart::Select a disk. If there are several of them, then the number of the required disk is determined by the command LIST DISK Sel disk 0:: Creates a primary partition on the entire unallocated area of the disk. If necessary, specify the partition number using the LIST PART Create partition primary::Quick formatting of the created partition and assigning it the “Recovery” label Format LABEL=”Recovery” quick::Assigning the letter R to the partition Assign letter=R::Completing work in DISKPART Exit
Figure 3 - work in DISKPART
Here and in what follows we will work on the command line.
Before moving on to capturing an operating system image, create a
WinRE
folder to store it.
Figure 4 - WinRE folder at the root of the future recovery partition.
Creating an operating system image
Once downloaded, launch the command line and text editor:
Using the "Open" menu (keyboard shortcut Ctrl + O) define the partition letters.
In my example, as can be seen from Figure 7, the system partition received the letter D:\
,
the imagex .exe
is located in the
E:\WAIK Tools\
, and the
Recovery
the letter
F:\
.
Figure 7 - partition letters in the WindowsRE environment.
One note: since we will not need to transfer the customized image to another computer, we will use the command given in the “Boot to Windows PE and save the image using the ImageX utility” section of the above article. Run the command:
"E:\WAIK Tools\amd64\imagex.exe" /capture D: F:\WinRE\install.wim "Windows 7 Ultimate SP1 Custom"
Necessary clarifications:
- “E:\WAIK Tools\amd64\imagex.exe”
— Path to the imagex.exe utility. Quotes are used to avoid problems with spaces in the folder name. - /capture D:
- The key indicates the capture of an image of the system located on the D: partition (as seen in WindowsRE). - F:\WinRE\install.wim “Windows 7 Ultimate SP1 Custom”
- Saving the captured image to the install.wim file (this is important, since in this case only this name is valid) in the F:\WinRE folder. A file comment is specified and the default compression method is used. For more information, see the TechNet knowledge base article ImageX Command Line Options
Figure 8 - creating an operating system image in the Windows RE environment
Quit WindowsRE and reboot. Let's move on to the final stage of creating a recovery partition.
Setting up the recovery environment.
In addition to the operating system image file, I decided to place a file on the new partition that would boot into the recovery environment. With this arrangement, it will not depend on the partition with the operating system.
As you know, the recovery environment is deployed from the WinRE.wim
, located in the
Recovery
at the root of the system partition. Access to this folder is blocked through Windows Explorer. The file attribute is hidden system. How to place the file in the location we choose? Let's use command line utilities.
First, disable the recovery environment. Please note that any actions with the recovery environment must be preceded by turning it off!
To do this, on the command line run
Reagentc /disable
After running this command, the WinRE.wim
will move to the
c:\Windows\System32\Recovery folder.
From it we will copy the file to the
R:\WinRE
.
Use the xcopy
with the
/h
:
Xcopy /hc:\Windows\System32\Recovery\winre.wim r:\WinRE
Figure 9 - copying the WinRE.wim file
And finally, a few final chords:
::Setting a custom path (key /path
) to the system image file located in the folder specified by the key
/target
Reagentc /setosimage /path R:\WinRE /target c:\Windows::Setting a custom path (key
/path
) to the system recovery environment deployment file located in the folder, specified by the key
/target
Reagentc /setreimage /path R:\WinRE /target c:\Windows::Enabling the Reagentc recovery environment /enable::Checking the Reagentc recovery environment settings /info
As can be seen from Figure 10, the setup was successful. Do not close the window - the command line will still be needed.
Figure 10 - Setting up a custom recovery environment.
It's interesting to see what changes have occurred on the Recovery
. To do this, enable the display of hidden and system files.
Figure 11—Changing the contents of the R section.
As you can see, the WinRE.wim
WinRE
folder , but a
Recovery
at the root of the partition. Believe me, the file is now in it. I will not dwell on the structure of the Recovery folder - if you wish, you can study its contents and also compare it with the BCD parameters (using the bcdedit / enum all command).
All that remains is to protect the section from accidental impact from users. To do this, you need to hide it from Explorer and exclude the ability to work with it in Disk Management. Diskpart utility will help us with this again.
. On the command line, run sequentially (the disk and partition numbers correspond to the configuration given in the article):
::Start DISKPART Diskpart::Select a disk. If there are several of them, then the number of the required disk is determined by the command LIST DISK Sel disk 0:: Select a partition. If necessary, specify the partition number using the command LIST PART Sel part 4::Removing a letter - the partition will be hidden in Windows Explorer Remove::Setting the partition identifier ID=27. This ID is set specifically for recovery partitions. It becomes impossible to work with such a partition in Disk Management, which provides additional protection for it Set id=27
Figure 12 - working with the recovery partition in DISKPART
Changes that have occurred in the system
Firstly, the partition is not visible in Windows Explorer, and it does not have a context menu in Disk Management.
Figure 13 - Explorer and Disk Management Manager.
Secondly, in the Advanced Recovery Methods window in the description of reinstalling Windows, there is no requirement to have an installation disk.
Figure 14 - Windows advanced recovery methods menu.
Thirdly, the recovery environment menu has changed:
Figure 15 - additional menu item in Windows recovery options in the recovery environment
This could have been the end of it. But there is a need to dwell on several nuances that arise after reinstalling the system in this manner. I will reinstall the system from the recovery environment.
Setting up a recovery environment after reinstalling the system
For the purity of the experiment, I will format the partition with the system and the partition with the download files. Moreover, I strongly recommend formatting the “System Reserved” section to avoid confusion with loading in the future.
Figure 16 - formatting partitions in the WindowsRE environment.
No user participation is required during the reinstallation process. You will receive a system identical to the one you had at the time you took the image.
Figure 17 - beginning of system reinstallation.
The only thing is that after reinstalling you need to make a few changes:
- Due to a complete rebuild of the BCD, the recovery environment must be reconfigured.
- the Recovery
section in Explorer .
Disable the recovery environment with the command
Reagentc /disable
Enable display of hidden and system files, open the WinRE
on the
R:\
Winre.wim
file is present .
If necessary, copy it from the Windows\System32\Recovery
or from the
R:\Recovery \xxxxxxxx -xxxx -xxxx -xxxx -xxxxxxxxxxxx
.
After that, delete the Recovery
on the
R:\
.
Figure 18
- deleting the Recovery folder
Then enable the recovery environment:
Reagentc /enable
Make sure the settings are correct (note that the name of the folder in which the WinRE.wim file is located in the Recovery folder is different. Therefore, before connecting the recovery environment, you can safely delete the old one.):
Reagentc/info
Figure 19—connecting the recovery environment after reinstallation.
Remove the letter from the R:\
Diskpart Sel disk 0 Sel part 4 Remove Exit
Your computer is ready for a fresh reinstallation.
One final note. While performing numerous reinstallations while preparing this article, I noticed the appearance of an incomprehensible folder in the list of available drives on the “System Protection” tab. This may be due to the absence of the System Volume Information
or changing section IDs.
Figure 20 is a phantom partition in the list of available disks on the “System Protection” tab.
To get rid of the strange folder, disable system protection on this phantom partition and enable it on the partition with the current system.
Registry Repair
A special utility that deals with registry problems. Registry Repair can recognize and correct almost 20 types of errors, and therefore will be indispensable for those who like to edit registries at their own risk. The utility will find all errors and fix them automatically. It works neatly and does not load the RAM and processor.
Registry Repair can:
- Check the entire registry for errors or individual sections of it. Using the utility, you can check file extensions and history,
- Custom elements and services launched by the operating system, fonts, application directories, the Start menu and much more;
- Find and destroy everything left behind by spyware and adware applications;
- Scan the entire system partition and check all users on this computer;
- Create a list of events that do not need to be checked;
- Undo all previously made changes (a backup copy is created before each change);
- Create a text file of all changes made to the registry.
Registry Repair is a good solution for beginners and experienced users. The utility is free, and the developers guarantee correct operation.
To download Registry Repair, follow the link.
When you start the program, it will automatically scan the system for errors, after which you can launch the fix using the “Fix Registry” button.
All existing errors in windows xp, 7, 8, 10 will be corrected.