Nowadays, almost every person has a computer and uses it both at work and at home. For ease of use and data transfer, there is such a wonderful device as a flash drive. Modern man practically cannot do without this device in everyday life. However, there is a nuance - depending on the operating system, it is necessary to change the format of the flash drive. How to make using removable media convenient for both a Macbook and a regular computer?
If you are the proud owner of a MacBook or MacBook Air, you will definitely need to configure a flash drive for use with this particular type of device. In fact, it all depends on the operating system of your computer. Since the macbook has its own operating system, it requires a different flash drive format than computers whose OS is Win.
In order to format a flash drive for a macbook or MacBook Air, you need to do the following:
Setting up a flash drive for MacOS and Windows
To conveniently use a flash drive on both operating systems, you need to configure the flash drive. First, you should decide which computer you use most often and where you will most likely need formatting.
In order to reformat a flash drive to a new format, you need to open the same path as in the previous option: “Programs” - “Utilities” - “Disk Utilities” - “Erase”. Open the “Erase” menu; there are several types of formatting the media and changing the file system:
- Mac OS Extended (journaled);
- Mac OS Extended (registration of keyboard, journal);
- MS-DOS(FAT);
- ExFAT.
How to divide a flash drive into several partitions when formatting
You can also split the flash drive into several sections, each section can be formatted in its own format. For example, one partition will be Mac OS Extended, and the second will be ExFAT. When partitions are changed, data from them is also deleted.
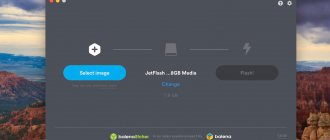
1. Connect the USB flash drive to your Mac and launch Disk Utility. 2. In the sidebar, select your flash drive and switch to the Disk Partition tab. 3. In the partition scheme, select the number of partitions and use the mouse to adjust their size by moving the partition between the partitions up or down. 4. Set each section to the desired name and format and click Apply.
NTFS
NTFS is N
ew
T
echnology
F
ile
S
ystem. Its difference from the previous format is the completely reverse principle of operation. If you are a user whose personal computer runs the Windows operating system, but sometimes you still have to use Macs, but they are not your main computers, this format suits you like no other. Using it, Mac OS will only have access to files on the flash drive and it will not be possible to reformat it to any other one.
MacBook doesn't see flash drive
Stay home during self-isolation! It is possible for a courier or specialist to arrive. Call!
Mac OS is a fairly convenient and simple system to work with. But when you try to write files to a simple flash drive or transfer something from it, some problems may arise. Very often the MacBook does not see a flash drive, which is perfectly recognized by the Windows system.
There are several reasons:
- The flash drive is formatted in an inappropriate system.
- The USB socket on the MacBook itself is faulty.
- The flash drive is faulty.
Different file systems
There are two main file systems for flash drives - FAT32 and NTFS. Flash drives in the first system are easily recognized by any operating system, but its capacity is only 4 Gb. But with NTFS, Mas OS drivers can only read data, but cannot do anything with it: neither write nor transfer files from it to the MacBook.
Using additional formatting programs
If none of the formats is convenient and universal for you, and you constantly need access to the settings of a removable drive from any device, there is a paid program “Paragon NTFS for Mac OS X”. Quite intuitive in its own way. To use it you need to install it on your computer. When you do this, a new formatting option will appear in your Disk Utility settings:
- Windos NT Filesystem (compressed);
- Windos NT Filesystem.
The “compressed” option means data compression. Any of these options is suitable for use on both Win and MacOS. It becomes possible to format an NTFS drive for Mac OS. When you finish working with the flash drive, be sure to safely remove it. A formatted flash drive can be written to absolutely any format.
Option 1: macOS and FAT file systems
To format a flash drive into systems other than NTFS, you don’t even need to install third-party software - the standard Disk Utility will handle the task.
- Connect the target drive to your MacBook and make sure it is recognized - a shortcut shortcut should appear on your desktop.
- Next, launch the Disk Utility tool - for example, from the Utilities folder, which can be accessed by pressing Shift + Command + U.
Why doesn't my MacBook see the flash drive?
When your computer does not see the media, the only solution is in the “Disk Utility” section, go to the “First Aid” item and work with the “Check disk” and “Fix disk” solutions. Also, when you do not use the safe removal of the drive, data may be erased or “crumple”.
When you finish working with the flash drive, be sure to safely remove it.
If you have to work on both Mac and Windows, then you have probably encountered a situation where files written to a flash drive on one of the computers cannot be read on the other. What's the matter and how to solve this problem - read below.
If the files on a flash drive are not readable, do not rush to blame the flash drive itself. The thing is that Mac and Windows use different default file systems by default. If the flash drive is recorded on a Windows computer, then it is formatted in NTFS or FAT32, on a Mac - in NFS+. It is because of this difference in formats that problems arise.
Let's look at a common case when on a Mac you need to work with a flash drive recorded on a Windows computer.
Most likely, the flash drive is formatted in NTFS (FAT32 is found mainly on older computers). By default, a Mac can only work with this file system in read mode, which means you won’t be able to write data to a flash drive. This is where special software can help out—namely, a program from the famous company Paragon. The program is not free, it costs $19.95, but it has a trial period during which you can decide whether to buy the application or not. After installing the program, the Mac will fully work with flash drives formatted in NTFS.
If the flash drive is formatted in FAT32, then everything is much simpler here, since Mac supports this file system. True, there is still one limitation, but it is not associated with Mac or Windows, but with the FAT32 standard. The fact is that this file system was developed quite a long time ago and did not involve the exchange of large amounts of data. Therefore, it will not be possible to write a file larger than 4 GB onto a flash drive formatted in FAT32.
To eliminate this drawback and maintain compatibility with Mac, a new format was developed - ExFAT, which can be considered ideal for removable drives, often used interchangeably on Mac and Windows. Both operating systems work with it without problems, the only point is that this file system is not recognized by very old computers - with OS X 10.6.5 and lower and Windows with versions lower than XP with SP2. To format a flash drive in ExFAT on a Mac, just open Disk Utility, select the desired flash drive, then select erase and specify the ExFAT file system in the Format section. In the same way, you can format a flash drive in any other format.
For Windows users faced with the need to work with flash drives created on a Mac in the NFS+ (Mac OS Extended) format, you will need the program. It is also not free, and even quite expensive - $49.99, but there is also a trial period, although only for 5 days.
It is hardly possible to find a person who actively uses computer technology, but does not have any removable storage available. Indeed, a flash drive is currently serving as an excellent tool for quickly copying content and its subsequent successful storage. By always having a flash drive with you, a person allows himself to never part with important documents, to always have them with him so that he can use them instantly if necessary.
The principles of working with a flash drive on a MacBook are simple and clear.
However, if almost everyone knows how to use removable drives on Windows, the principles of working with them on a MacBook remain beyond understanding for many. We invite you to read the recommendations that will help you understand the issues of how to format a flash drive on a MacBook, how to transfer photos, audio recordings or video materials to a removable drive.
If you become the owner of a MacBook, it is really useful for you to know how to work on such a device with removable drives. If in Windows it is enough to right-click and select the “Format” option, then on a MacBook such actions are impossible, since there is simply no such option. However, this does not mean that it is impossible to format a flash drive on a MacBook. Using such a gadget, you just need to perform slightly different manipulations, we will help you figure out which ones.
Formatting a flash drive
If you have a flash drive that you intend to actively use, transferring materials to it, as well as from it to the MacBook, then you need to format your new flash drive. The fact is that the drive format is designed for Windows, but you need to “adapt” to the MacBook. Changing the drive format is not difficult if you familiarize yourself with the algorithm of actions.
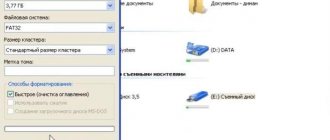
Insert your USB flash drive into the MacBook, then go to “Programs”, go to the “Utilities” line, there you will find the “Disk Utilities” option. Enter it. Turn your gaze to the side panel, there you will see your removable drive, select it. Now at the top you will find four tabs, you should go to the second one called “Erase”.
On this tab, you can read the short instructions again if you suddenly experience “shaky knees.” Now just below you need to select the format that you would like to endow your drive with. For working on a MacBook, the optimal format is “Mac OS Extended (Journal)”, so select it from the drop-down list. All you have to do is click on the “Erase” button located at the bottom of the window, and the process will start, thanks to which you will be able to quickly format your flash drive.
We remind you that any formatting process is accompanied by the complete destruction of all data from the drive. If you want to format a drive that you have already used, it contains important information, photos, videos that you would not want to part with, then before starting the process, copy all the content to another source where you can ensure its storage.
Using exactly the same method, you will be able to format the memory card, since it is also defined as a removable storage device. Before starting the process, also consider which format option will be preferable for your memory card.
It's no secret that a flash drive is often used as an excellent boot tool. If you need to boot from a flash drive too, then you need to follow certain steps. First, connect your removable drive, then turn on your MacBook. If it was already turned on, then be sure to reboot it. When the system starts, hold down the “Option (Alt)” key and continue to hold it until you see a menu on the screen in which you will be asked to select a boot option.
It is in this menu that you must point to your flash drive. Sometimes it may not be on this list. Don't panic, just wait a few minutes to allow your MacBook to scan and identify all the devices connected to it. Your removable drive will definitely appear in the boot menu. All you have to do is select it using the mouse, arrows on the keyboard or trackpad. Now all you have to do is confirm that you really want to run your MacBook from the dedicated flash drive. To do this, you just need to press the “Return (Enter)” key. As you can see, you don’t have to experience any difficulties when performing this process.
Copying files
It is clear that if you decide to use a flash drive, then you need to write and copy some information. Unfortunately, beginners often encounter a problem due to which they manage to copy any content, including photos, videos, audio, to a MacBook, but in the opposite direction the process stops. When hovering the mouse and another attempt to copy something to a flash drive from a MacBook, the user sees a clear “prohibition” icon. Even trying to continue the process of copying photos to a removable drive, nothing works.
IMPORTANT. Indeed, such a problem exists, but it is often due to the fact that your drive is in a format not designed to work with a MacBook. In most cases, this problem occurs if your flash drive was formatted in NTFS.
Of course, to fix this problem, you just need to format your drive. You can choose any format that is accepted by the MacBook. It can be FAT32 or exFAT. After formatting the flash drive is completed, try copying photos, videos, and audios to your drive again. Now you will be convinced that everything works without a single glitch.
So, working with flash drives when using a MacBook has its own characteristics, but you should not be afraid of them, since you will not need to take any super-complicated actions; it is enough to read our recommendations.
No matter what cloud technologies you use, sometimes you still need a very ordinary flash drive, with which you can transfer data from one computer to another and back.
This is quite difficult to do with the MacBook Pro 2016+ (MacBook 2015+), because Apple engineers replaced the usual USB-A with Type-C. But you can’t buy a regular C-type flash drive due to backward compatibility issues with other devices. Problem.
I found an easy way out
, which turned out to be as inexpensive and convenient as possible.
Which file system to choose: NTFS, FAT32, exFAT
NTFS is the most common file system type for external drives. This format allows you to record a huge number of files at high speed and provides free space of over 4 GB. However, to use it on Mac OS, you need to install the additional Paragon NTFS driver, since Disk Utility is a standard application, where, unfortunately, this format is not provided, and without the installed driver you will not be able to format in NTFS. After installing the driver, you will also need to restart your computer.
When the operating system is restarted, open Disk Utility. Select your device in the left menu of the application to format. Next, the “Erase” operation will be displayed and in the area to the right, click on the list of formats, among which “Windows NT FileSystem” (NTFS) should appear - select it. Then perform the formatting operation by clicking the “Erase” button. Your device is now formatted and converted to NTFS format.
When choosing the FAT32 file system, you must take into account its main drawback, namely, the limited amount of memory, the standard size is 4 GB. However, on many devices, such as TVs, recorded files can only be read in FAT format.
We format the device according to the same previous instructions. FAT32 is signed in the Disk Utility format list as MS-DOS. If you need to write various programs, large files, movies, large projects or databases to a flash drive, then you should not bind the flash drive to this system; it is better to give preference to NTFS or the identical exFAT. True, the latter is not so common, therefore it is not used and readable on all devices, but it is excellent when working as a “trouble-free” device connection in Windows OS.
Branded USB-C - USB-A flash drives are quite expensive
Of course, the most obvious solution in this case is to purchase a branded universal flash drive for USB-C and USB-A. And top manufacturers offer plenty of similar solutions.
One of the smartest options I considered was the Kingston DataTraveler microDuo 3C flash drive. But its cost starts from 1 thousand rubles, which seemed to me a rather expensive purchase
.
But the most annoying thing is that, like many of you, I already have dozens of different flash drives that I bought, received as a gift, and even just found by accident earlier.
Do we really have to just take them all and throw them away? As you can see from the photo, no!…
We turn a regular USB-A flash drive into USB-C for cheap
To make a universal flash drive for the new MacBook, I took a minimal-sized drive from SanDisk, which used to stick out in my radio in my old car.
In addition to this, I needed the simplest adapter from USB-A to USB-C
in the same compact format. My colleague Yuri Andreev talks about a good option in detail.
There are plenty of options on AliExpress. I bought an adapter for 100 rubles, Yura came across a similar one for 70. Look, I advise you to just pay attention to support for the USB 3.0 standard.
And don’t take those that are outlined with left logos, they look ugly.
Unobvious advantages, if you don’t look at the price
As a result, I got a compact universal flash drive that is always lying around in my backpack, just in case of emergency. As I said above, sometimes you still need it.
But, unlike a proprietary solution like the Kingston DataTraveler microDuo 3C, this has an obvious advantage - in addition to the flash drive, you always have an adapter with
.
By and large, most of the other bulky adapters (like this one) now you don’t have to carry with you at all. To connect anything to a new MacBook via USB-A, this solution is enough.
However, my “incredible invention” still has some drawbacks.
Disadvantages of the solution that I finally came up with
The adapter I'm using doesn't fit USB-A all the way.
. It turned out to be smaller than necessary, so not only the top of the flash drive sticks out a little, but also part of the “pin”. Strange.
And the flash drive in the adapter is not held 100% tightly. In the backpack, the “father” does not fly out of the “mother”, but in the hands it seems that the design is not reliable enough.
And lastly, if someone needs to reset something from their USB-A, it is better to give them a flash drive without an adapter. And she is very small and can easily get lost.
But in total I was more than satisfied, and I recommend a similar solution to you. Try it.
Apple's policy, according to which the company installs its own operating system on computers produced under its brand, makes them extremely stable. By purchasing a MacBook and regularly updating the OS, you may never have to reinstall it. If you have Internet access, the system can be easily reinstalled over the network. If circumstances require you to install macOS from a flash drive, you need to do it correctly.
Since 2013, Apple has stopped selling the operating system to users. By purchasing any Mac, be it a laptop or a mini version, you receive macOS for rent and are provided with free updates for the entire life of the device.
- Find the App Store icon in the Dock and open it.
- On the main page on the right side, under the account settings, there is a link that can take you to the site with the current OS. Currently the latest version is 10.3 High Sierra.
- Click on the “Download” button. The distribution weighs more than 5 GB, so the time it takes to receive it will depend on the speed of the connection used.
- When the download is complete, the installer will automatically launch.
- We don't need it at the moment. Since we are going to create an offline bootable media, we need to close it. Click on the program window so that the controls appear on the top panel. Select the marked item. A similar operation can be performed with the keyboard shortcut ⌘Q. In macOS, this is a standard shortcut that allows you to close any active window.
Old OS versions
If you want to install another, older version of the operating system, you can also find them in the App Store. El Capitan, Yosemite or Mountain Lion are placed in the purchase section, provided they have been used before. This is due to the company's licensing policy. The operating systems shown in the screenshot are considered purchased, and subsequent ones are rented by the user from Apple.
File systems and partition schemes
Note! It's worth talking more about file systems and partition schemes in macOS. It all depends on where and how you plan to use your flash drive in the future.
Let's start with partition schemes:
- GUID partition scheme. Works ideally with macOS of all versions and Windows starting from 7. If your flash drive will be used on these systems, choose this option, because the speed of the flash drive will be much higher. But in this case you will have to put up with incompatibility with older versions of Windows;
- Master Boot Record (MBR). This partition scheme is compatible with all versions of Windows and macOS, but is slightly slower than the previous point. If you need compatibility - your choice;
- Apple partition scheme. Specific scheme, compatible only with macOS. Practically not used. I highly do not recommend using it.
Partition schemes on Mac
Now let's look at file systems. Everything is quite simple here:
- MS-DOS (FAT). A file system compatible with all platforms, from the oldest versions of Windows to the newest versions of macOS. Quite slow, and also has a limit on the file size - a maximum of 4 GB, and on the file name - a maximum of 255 characters. It’s worth choosing if you need to work with a flash drive on a variety of computers;
- Mac OS Extended. This file system is only supported by computers running macOS. It is worth choosing this option if you do not need compatibility with Windows machines. Also, this FS is devoid of FAT restrictions;
- ExFAT. Quite an unpopular option. Supported by the latest versions of Windows and macOS, has no FAT restrictions, and has good speed. I recommend using it if you plan to connect a flash drive to a Mac and a computer with Windows 7 or older.
File systems on Mac
Find out in the new article - How to recover a flash drive without formatting
Creating a bootable USB flash drive
To create an installation disk on a MacBook, just use the terminal. macOS works perfectly with the Windows FS and does not require the installation of Transmac analogues. The NTFS format is supported out of the box in read mode, and FAT32 and exFAT are fully supported.
You will have to format the flash drive if it uses any Linux file system, for example, ext3. Before use, the removable disk must in any case be cleaned of the information on it.
Formatting
Formatting in macOS is done using Disk Utility. You can find it by opening Launchpad in the Others folder or using Finder. Let's choose the second option as it is more convenient. Traditionally, a flash drive for modern operating systems should be at least 8 GB.
- Open Finder and select “Applications” in the navigation area. Open the folder marked in the screenshot.
- Select the specified utility.
- We are looking for external drives. Select the name of the flash drive specified by the manufacturer, highlighting it. In the top control menu, the “Erase” button is activated. Click on it to open the next dialogue.
- The system will automatically offer us the format and layout of the sections. They should match those shown in the screenshot. To clean and format the flash drive with the selected parameters, press the marked button.
Now there is zero information left on the external media and you can write the distribution kit to it.
Recording a distribution
The file we downloaded from the App Store is not an ISO image. This is a full-fledged installation wizard with its own set of utilities. For this reason, the system places it in the programs folder and not in downloads. From there we will record it onto external media.
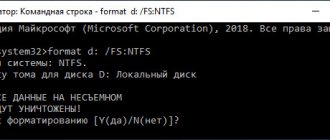
- We return to the “Utilities” folder and launch “Terminal”.
- Enter the following write command on behalf of the system administrator:
sudo /Applications/Install\ macOS\ High\ Sierra.app/Contents/Resources/createinstallmedia –volume /Volumes/Kingstone
Quotes are not required, but instead of Kingstone we indicate the name of the flash drive used.
- Enter the password. The symbols will not be displayed. We complete the set by pressing the Enter button.
- The system will ask you for confirmation to clear the selected volume. Type “Y” and press the enter key.
- Before copying data, the system erases the flash drive.
- The recording ends with the appearance of information messages about the creation of bootable media and the transfer of the data required by the installer to it.
The write command syntax varies for each distribution. Therefore, if you are planning to make a flash drive to reinstall macOS other than High Sierra, please visit the Apple support page provided. The finished command from there can be immediately copied to the terminal.
Formatting a flash drive on Mac OS: all methods
The first thing you will have to do is launch Disk Utility. To find it, go to the following path: Programs - Utilities - Disk Utility.
How to format a flash drive in Mac format
- Insert the drive into your Macbook and open Disk Utility.
- In the list of available devices, select the desired flash drive and go to the “Erase” section.
- We change the way files are written on Mac OS Entended, confirm the action by clicking “Erase”.
Formatting to Mac Os Entended format
Formatting a flash drive in FAT, ExFAT, eFAT
We perform all the same actions as in the previous instructions, except for the last one.
- Insert the USB flash drive into the Macbook and open Disk Utility.
- In the list on the right, select the USB flash drive that you are going to format and go to the “Erase” section.
- Change the format of the Mac OS Entended flash drive to FAT, ExFAT or eFAT and confirm the operation by clicking “Erase”.
Formatting a flash drive in FAT, ExFAT or eFAT formats
Convert to NTSF format from MacBook
All previous file systems had an available memory limit of 4 GB. If it interferes, you will have to change the format to NTSF. To do this, download special drivers for Mac OS.
- Download and install NTFS Seagate or NTFS Paragon drivers.
- We restart the computer.
- Insert the USB flash drive and launch Disk Utility.
- In the list of available devices, select the flash drive and go to the “Erase” tab.
- We select the Windows NT Filesystem flash drive format, it appeared there after installing the drivers. Click the “Erase” button.
Formatting to NTSF Format
Video tutorial: “How to format a flash drive on Mac OS”
Splitting a USB flash drive into several disks
Dividing a flash drive into two or more partitions will give you the opportunity to format each partition separately into its own format. Let's say one disk will have the ExFAT file system, and the second NTFS. When the flash drive is divided into parts, all data will be erased. Follow these steps to get a flash drive with multiple disks:
- Connect the flash drive to the computer and launch Disk Utility.
- Select your flash drive from the list of available devices.
- Go to the "Disk Partition" section.
- Under Partition Scheme, select the number of disks you need. Change the size of the squares to indicate the amount of memory for each partition. Give each part a name and format.
- Click the "Apply" button.
Divide a USB flash drive into several disks
Formatting a flash drive deletes all existing files on it, and along with them viruses. Thanks to it, you can change the file storage format on flash drives, which makes it suitable for different operating systems. A USB flash drive can be divided into several disks, each of which can have its own format and memory capacity.
Why doesn't iTunes see or sync with iPhone, iPad, iPod?
How to format a drive on Mac: simple, fast, effective
Installing macOS
After connecting the media to the USB port, we reboot. Mac computers do not use the usual BIOS, so there is no additional configuration required.
- Our task is to prevent the computer from booting from the SSD and launching the initial volume selection menu. Therefore, immediately upon reboot, hold down the “Option” key. Hold it until the dialogue shown in the screenshot appears. The Windows volume will be present if it is installed on the Boot Camp partition. Here you will need to translate the specified arrow symbol from Macintosh HD to the installer icon.
- Select the language in which menus and dialogs will be displayed.
- For a “clean” installation, we need to open Disk Utility.