How to change
You can change your account picture by going to the Start menu and selecting your avatar picture. Then click "Change account settings."
This will take you to the Options section where the image you are using is displayed. Next, click browse and select the file that you would like to see when logging into the operating system.
Important! If you are using a laptop or have a camera connected to your computer, you can take a photo for your avatar. For this purpose, in the “Options” section there is a special “Create an avatar” button.
How to set an avatar in windows 10
Hello, dear readers of my blog mixprise.ru, once again we will consider a topic that concerns the Windows 10 operating system, namely, we will analyze in detail how to install an avatar in Windows 10
What is an avatar in Windows 10? This is a certain image that will be displayed when you log into Windows 10 and, in fact, next to your account. Let’s say you have several accounts on your computer and if you link an individual picture to each account, then undoubtedly it will look cool.
In the Windows 10 operating system, you can install an avatar in literally 2 clicks, you don’t need to carry out any complicated procedures, so let’s get started:
Setting up a Windows 10 avatar
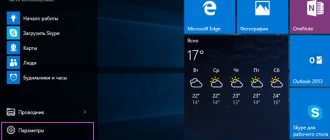
Open the start menu in the top corner and click on your account as shown in the picture below:
As you can see at the moment I have the standard image set
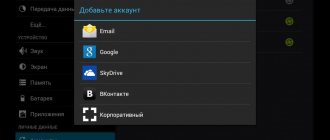
Next, in the drop-down window, select “Change account settings”
In the window that opens, in order to change the avatar, click the “Browse” button
Next, select the picture you like, which will subsequently be displayed as your avatar
That's it, installing an avatar in Windows 10 is complete.
To check, you can lock your computer, or simply open the start menu and see the changes made
That’s all for me, if you still have questions regarding the topic: How to set an avatar in Windows 10, write in the comments and don’t forget to subscribe to the newsletter, thank you all and good luck!
mixprise.ru
Deleting old images
In Windows 10, there is a function to remember the last three pictures that were used for the avatar. You can see them when you get to the Settings menu by clicking on the Change account settings image.
Important! The operating system does not have a function for directly deleting these files, but this can be done by going to the root folder of the system drive.
Go to Explorer and enter C:/Users/User-Name/AppData/Roaming/Microsoft/Windows/AccountPictures . Instead of User-Name, enter the name under which you registered when logging into the operating system.
The second option is to try entering the following %appdata%\Microsoft\Windows\AccountPictures . This option is simpler, since the " %appdata% " variable will automatically replace the correct address. In addition, this method of writing saves time.
After this, you will be taken to the folder in which the Windows 10 account pictures you previously used are stored. Delete those files that you do not need by pressing the Delete button on the keyboard, having first selected them, or by right-clicking and selecting “Delete”.
How to remove previously installed avatar images
In the “Options” window, where we change the avatar, there is no button for deleting the pictures that we previously placed on the profile. By the way, the system saves the last three images that were on the avatar. To delete these pictures you need to go to the Windows system directory:
- Open any page in Windows Explorer (where you look for all the files on your PC). In the search bar at the top, type or paste the command %AppData%\Microsoft\Windows\AccountPictures.
Go to Account Pictures section
- A catalog will open with your three latest avatar pictures. Select them with the left mouse button and the cursor (you can select one or two past ones), right-click on the selected one and select “Delete”.
- Confirm moving items to the trash can. After this, you can empty the trash can itself on the “Desktop”.
Even if you delete three pictures at once, you will still have the most recent one on your avatar (the one that was current before deletion). To make it disappear from the profile, you need to install either a new one or a standard one.
Restoring the standard picture
If you don't want the previously set image to be displayed when you log into Windows 10, restore the default image. The standard picture is stored in the root folder of the system, but after you change the avatar, the directory disappears because it is hidden.
To set a default avatar, open "Browse" in the "Change Account Settings" menu and go to C:\ProgramData\Microsoft\User Account Pictures , adding it to the File Explorer search and first turning on the display of hidden files and folders in the "Folder Options" section " Select an image of appropriate size from the catalog and save it as an avatar.
How to remove a Windows 10 avatar
There are some difficulties when it comes to deleting a Windows 10 avatar. If we are talking about a local account, then there is simply no option to delete it in the settings. If you have a Microsoft account, then on the account.microsoft.com/profile/ page you can delete your avatar, but for some reason the changes are not automatically synchronized with the system.
However, there are ways to get around all this, simple and complex. A simple option looks like this:
- Follow the steps in the previous part of the instructions to select an image for your account.
- Set the image to user.png or user.bmp from the C:\ProgramData\Microsoft\User Account Pictures (or "Default Avatars") folder.
- Clear the contents of the C:\Users\username\AppData\Roaming\Microsoft\Windows\AccountPictures folder so that previously used avatars do not appear in your account settings.
- Restart your computer.
A more complex method consists of the following steps:
- Clear the contents of the folder C:\Users\username\AppData\Roaming\Microsoft\Windows\AccountPictures
- From the C:\ProgramData\Microsoft\User Account Pictures folder, delete the file named user_folder_name.dat
- Go to C:\Users\Public\AccountPictures and find the subfolder corresponding to your user ID. This can be done in the command line running as administrator using the command wmic useraccount get name,sid
- Become the owner of this folder and give yourself full rights to act on it.
- Delete this folder.
- If you are using a Microsoft account, also delete your avatar at https://account.microsoft.com/profile/ (click on “Change Avatar” and then “Delete”).
- Restart your computer.
Instructions for setting an avatar for an account in Windows 10
- Turn on the computer, log in to the account for which you need to set an avatar (a picture or photo that will represent the user of the account).
- Now you should click on the Start so that its menu appears. In this menu on the left side there are small icons, among which there is an icon with the image of a man - click on it.
A small menu will be displayed in which you should click on the item Change account settings .
A system window will open in which, among other things, it is possible to create or upload an image or photograph that will be used as an account avatar.
Camera item located there , the application of the same name will open, in which you can quickly take a photo using the Web camera built into the laptop (or an external one that connects to the computer).
And by clicking on the item Select one element , a file manager window will open in which you will need to specify a graphic file, which will be used as the avatar image of your account in Windows 10.
Important note: the picture or photograph that will be set as an avatar must be square in order to fit correctly and subsequently be displayed.
Installing an avatar in Windows 10
Greetings, dear readers of my blog. While visiting various sites on the Internet, I began to notice a huge number of reviews from users of the new Windows 10 who could not change the background image of their account. But it was impossible to find an article on the Internet that would perfectly cover the topic. Therefore, I decided to publish material that will give a detailed answer to one of the most frequently asked questions from users, namely: how to delete an account photo in Windows 10.
What is an avatar and how can I change it?
This is a user screensaver that can be replaced when starting a personal computer, laptop or any other device running the Windows operating system. And in order to make your device more unique, you need to be able to properly handle the images that are attached to your profile.
To upload a new picture you need to:
- Start your computer and go to the Start menu.
- Right-click on the old profile picture.
- In the menu that appears, select “Change account settings.”
- While in the tab in which the old or standard screensaver will be displayed, find the “Browse” item.
- Select the location disk and the image itself.
The developers have added one very pleasant surprise - everyone who uses the tenth version of Windows and who has a connected web camera can take a photo and set it as an avatar. This can be done quite simply - you just need to find a tab specially designed for this - “Create Avatar”.
Operation to delete old images
The operating system also has a function with which anyone can see the last three pictures previously used for the screensaver (the function of remembering 3 pictures). We must not forget that this OS does not have a function for directly deleting all these files. To change pictures, you can use the following advice:
- Go to Windows Explorer.
- In the address bar that appears, enter the command without errors:
C:/Users/ User-Name/ AppData /Roaming /Microsoft /Windows/ AccountPictures, where “User-Name” is the name of your profile.
There is another interesting and new option - enter the following command into the line: “%appdata%\Microsoft\Windows\AccountPictures” This method will help save a little time, because the variable that will be printed in the search bar will automatically replace the appropriate address.
- At the final stage, you will be transferred to a folder that contains all the pictures that were previously used by the PC user. All unnecessary images can be deleted very quickly. Just select all the necessary files and press the “Delete” key.
Avatars for Windows 10 profile
Adding a new, changing or deleting profile picture is a very easy and quick process. Therefore, I really hope that my article answered all your questions and, of course, helped install a new image on your Windows 10 OS. I have to say goodbye to you, I will be very grateful for subscribing to my blog and its advertising on social networks.
Sincerely, Victor
it-tehnik.ru
Deleting a picture
There is no option to delete an avatar for a local account. If you remove it for a Microsoft account, the settings will not be synchronized with the computer.
An easy way to remove a picture
1. Open the window where the picture selection button is located as in the previous instructions.
2. Specify the document user.bmp or user.png from the C:ProgramDataMicrosoftUser Account Pictures (or “Default Avatars”) directory.
3. Delete everything from the “C:UsersUsernameAppDataRoamingMicrosoftWindowsAvatars” directory so that the previously used images will no longer be displayed.
4. Restart your PC or log out and log in to Windows 10 again.
The second method is more difficult
1. Erase the contents of the folder “C:UsersUserNameAppDataRoamingMicrosoftWindowsAvatars”.
2. Delete the document “user_name.dat” from the C:ProgramDataMicrosoftUser Account Pictures folder.
3. Open the directory with the current user ID along the path C:UsersPublicAccountPictures: launch a command prompt with elevated privileges and execute the code: “wmic useraccount get name,sid”.
How to remove an avatar in Windows 10, change it or return it to default
Many users have questions about how to remove an avatar in Windows, replace one image with another, or return the original default avatar. The avatar image is displayed when Windows boots, when logging in, and in the operating system settings.
Windows avatar is a graphic image (ava, avatar, userpic) of a computer user in the operating system. Any image is used as an avatar: a photo of the user himself, another person or animal, an image of a character, a beautiful picture, etc.
Some users choose not always good images for their avatars, so they want to remove the avatar in Windows, change it to another picture or photograph. Another option: the user is tired of looking at the old image and needs to install something new instead.
An avatar for a Windows account is displayed above the account name when Windows starts, in the Start menu, in the operating system settings settings. If the user has not chosen a personal avatar, then in Windows 10 the default image is shown, in the form of a certain silhouette on a dark background.
In this article, you will find instructions on how to remove an avatar, how to change an avatar, how to remove an avatar in Windows 10.