What is a "Network Drive"?
First of all, before connecting a network drive, you should understand how it differs from a network folder. These concepts are similar in name and functionality, but nevertheless slightly different from each other.
A network folder is a directory that can be accessed over a network. The transition can be made by entering the full address, or through the appropriate section of the network environment.
A network drive is a virtual device that has permanent access to a specific network folder. Such devices can be connected one-time or permanently. Most often they are located on my computer in the list of drives.
In general, the concepts are very similar, but there are differences. The main one is that you can access the drive by entering its letter (for example, Z:\), and you need to enter the full path to the folder (\\composs\my_file.txt).
Allowing access to PC resources through the Toolbar
To share a folder, you need to configure your computer system properly. You must also specify the names of allowed users (or groups), and set a login password (if necessary). The setup process is almost identical for Windows 7 and 10.
We perform the following actions:
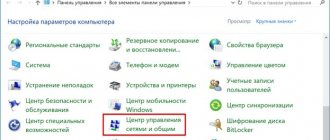
- Open the “Network and Sharing Center” menu by going to “Start/Control Panel/Network and Internet”. There is an easier option - click on the Internet connection icon and select the item mentioned above.
- Select the “Change advanced sharing settings” menu.
- Depending on the network you use, we make PC access settings. In our case, the “Home Network” profile is used.
After checking the boxes next to the indicated items, click the “Save Changes” button.
If you want to protect your data from strangers working on the network, enable password protection (the penultimate option). Your computer is now visible on the local network. To verify this, go to the “Network” menu through “This Computer” or “Computer”.
Sharing
Before connecting a network volume, the target directory must be properly prepared. To do this, you should give it public access:
- Right-click on the directory and find “ Properties ” in the context menu.
- Open the “ Access ” tab and click on the “ Sharing ” button. The user selection window will open.
- In the list of users , assign the necessary rights and click “ Sharing ” again.
- After some time, a message indicating the successful completion of the operation . We confirm and go to the previous “ Properties ” window.
- Go to the “ Security ” tab, where there is a list of users and their permissions.
- To change them, just press the button of the same name. If the required users are not in the list, you can click on the “ Add ” button, where you will be able to enter the name of an existing account that will be added to assign permissions.
- After the necessary permissions are set, we complete editing .
Proxy server: what is it and how to use it
To find out the path of the created directory, just go to its properties and look at the necessary information on the “ access ” tab.
How to set up a shared folder on Windows with a password
On home networks, it is convenient to use shared folders with password-free access. But in corporate networks, or in other cases when not all users should have access to a shared folder, you can configure login to the shared share using a password.
Setting up a network folder with a password almost completely repeats the process described in the previous section. The differences are as follows:
- Password Protected Sharing setting —you can leave the default setting, which prevents access to shared resources without a password.
- When opening public access to the share, specify a user with a password as the owner. You can specifically create a new user with a password to be used as the owner of the shared folder. And in Windows 10, creating a local account both during system installation and after has become really difficult. If you have similar problems, then see the articles:
- How to create a local account when installing Windows 10
- How to create a new local user account in Windows 10
Now you need to create a folder whose owner will be the newly created user (ShareOverlord). It's possible to restart your computer, log in as that user, and create the folder, but I'm guessing there will be a few problems:
- This user has limited rights (I did not upgrade his account to administrative), so he probably will not be able to create a folder in the root of the C: and will then have to look for this folder
- Again, due to the limited rights of the new user, problems may arise with opening network access to the created folder. That is, you will have to reboot again under an administrative account and look in the depths of the user folders for the one you need. Moreover, problems may arise with access rights to another user’s folders...
Basically, I'll create a folder under the current administrator account. To ensure that the user who will log in to access this folder has rights to this folder, you can do this in two ways:
- Make the user created for this purpose the owner of this folder
- Add this user permissions to this folder
Since in Windows, by default, administrators still have full access to any user's folder, these methods are very similar in results.
Let's say you decide to change the owner of a folder, then see the article “How to change the owner of a folder in Windows 10.”
Now right-click on the folder again and select the “ Access ” → “ Sharing ” tab. If you wish, you can remove the current administrator's access rights. Click the " Share " button.
Please note that sharing is removed for the current administrator only when he tries to view the folder over the network. With local access, the administrator can still view and change the contents of this folder - this can be changed in the “ Security ” tab in the folder properties.
There is a nuance if, instead of changing the owner, we add access rights for a specific user, so we will consider the second option. I deleted and recreated the C:\ShareRestricted\ , so the current administrator is the owner again. Right-click on the folder again, select the “ Access ” → “ Sharing ” tab and add read and write rights for the ShareOverlord user:
Click the “Share” button.
Now click “ Advanced settings ”:
There we click the “ Permissions ” button:
In the window that opens, click “ Add ”:
Enter the username under which you must log in to access the folder (for me this is the user ShareOverlord ) and click the “ Check names ” button:
Now click “ OK ” and return to the previous window:
If you want this user to not only have the right to view the contents of the folder, but also to change it, then check the appropriate boxes:
Now in all open settings and properties windows, click “ OK ” to close them.
See also the complete Guide to SMB and Samba.
How to connect a network drive?
Now let's move directly to connecting a network drive in Windows 7, 8, 10, since the procedure is completely identical on all versions of the system. A similar procedure can be performed in different ways.
Via computer
In modern versions of Windows, you can connect a network resource directly from My Computer . To do this you need:
- Open My Computer . Map network drive button at the top of the window . Please note that it can be placed on the control panel , or it can be hidden in the menu .
- A window will open where you will need to specify resource settings .
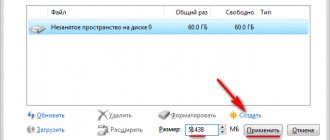
- First you need to set the drive letter - it can be anything.
- Below we enter the address of the folder on the network to which you want to establish access. Where to watch it is discussed above. In addition, you can click the “ Browse ” button and manually find the desired directory.
- The “ Repair at logon ” option allows you to connect the device automatically every time you boot Windows. If you do not enable it, then similar actions will need to be carried out every time you restart or turn on the computer.
- The “ Use other credentials ” item allows you to enter a login and password that will be automatically used when connecting. If this item is left blank, then the current account data will be used when trying to gain access to a remote directory. Most often, each computer has its own credentials, so sometimes it is useful to register a login and password immediately so as not to enter them every time you connect.
- We confirm our actions, after which a new virtual drive will appear in “My Computer”.
Via network location
Another option, practically repeating the previous one, the difference is that it is launched from the network location window, so creating disks this way is a little more convenient.
What is Telnet and how to use the utility
First, open Start and write “ Network ” in the search, after which we launch the application of the same name.
In the window you need to find the computer whose folder we will connect as a drive and go to the desired directory .
All that remains is to right-click on the folder and call up the context menu , then find the option to connect a virtual drive .
After selecting the item, the window discussed above will open. All settings are also identical to those described above . The only difference is that the path to the directory will already be set and you cannot change it.
Using the command line
The command line method is much more complicated than the previous ones, since all actions will have to be written using commands . The main command used is net use.
The general syntax for the drive creation command is simple:
net use
Here disk is the letter of the desired drive, and directory is the path to the mounted folder.
Let's start connecting:
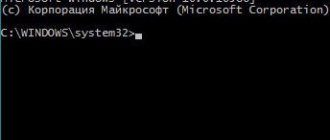
- Open Start and write cmd , then call the context menu on the command line and select “ as administrator ”.
- Enter team:net use z:\\HOME\Composs
Here “ Z:” is the letter that we will assign to the drive, and \\ HOME \ Composs is the path to our directory.
- After pressing Enter , a new drive will appear in “ My Computer ”.
It's also worth knowing other commands that may be useful.
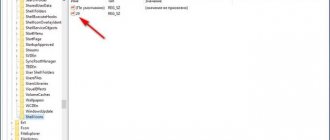
An analogue of the visualized item discussed earlier “ Restore at login ” is the persisten , which can take the values yes and no . If you specify yes, then the connection will be restored, if no, then it will not.
It must be written as follows :
net use z: \\HOME\Composs /persistent:yes
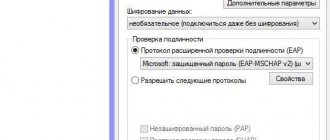
An analogue of the “ Use other credentials ” item is the “/ user:” , followed by the login and password separated by a space, for example:
net use z: \\HOME\Composs /user: admin password Both commands are used simultaneously like this:
net use z: \\HOME\Composs /user: admin password /persistent:yes
Disabling the drive
Disconnecting a network drive is quite simple. right- click on it and select the appropriate item.
Or select this item from the “ My Computer ” menu.
On the command line you need to enter the command :
net use z: /delete
or
net use * /delete
the specified local volume will be deleted ; in the second, network drives completely
How to enable folder sharing
In this case, I created a folder named “General”. Right-click on this folder and in the folder properties window, open the “Access” tab.
Then click on the “Advanced setup” button.
In the “Advanced sharing settings” window, activate the “Share this folder” option, and then click on the “Permissions” button.
Select permissions to use shared folder data from another computer. There are three options to choose from:
- Full access
- Change
- Reading
To save the settings, click on the “OK” button.
Go back to the folder properties, open the “Security” tab, and then click on the “Change...” button.
In the window that opens, enter the name “Everyone” (without quotes) in the “Enter names of selected objects” field, and then click on the “OK” button.
In the folder properties window, in the “Security” tab, configure the permissions that you previously selected for the shared folder.
To change the permission for the “Everyone” group, click on the “Advanced” button. In the “Advanced security settings for a shared folder” window, select the “Everyone” group, and then click on the “Change” button to change permissions.
Setting up a local network in Windows is complete. In some cases, you may need to restart your computer for all changes to take effect.
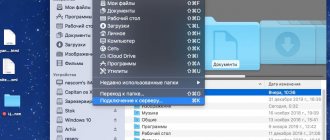
How to connect Yandex.Disk as a network
If the user uses Yandex.Disk, then it can also be connected as a network volume.
In this case, launch the creation window as indicated above. Be sure to set the item to automatically connect on reboot, and then click on “ Connect to the site ”.
After clicking the “ Finish ” button, a wizard window will appear, where you must first click “ Next ”, and then “ Select location ” and “ Next ” again.
In the line, enter the address “ https://webdav.yandex.ru ” and click “ Next ” again.
You will be prompted to enter your Yandex account login and password
Also, entering the address “ https://webdav.yandex.ru ” in the very first window works. By clicking “ Finish ”, an authorization window will also appear.
After confirmation, not a folder, but a disk will appear in “ My Computer ”.
Checking the integrity of system files in Windows 10