Reasons to remove old updates
The reasons for deleting old updates can be very varied:
- saving disk space;
- low-quality (disturbing the operation of the system), outdated update;
- update files were installed with an error, etc.
Each of the reasons stated is sufficient to interfere with the operation of the system in order to debug it.
As my experience shows, in operating systems that have been running for six months or more, it is almost necessary to remove old updates. Firstly, updates clutter up the system disk, and the more space there is, the better Windows works. Secondly, updates can overlap each other, which causes file paths to become confusing, which also incorrectly affects the system’s performance.
Is it possible to remove updates?
Of course, updates can be removed, but with some nuances:
- the update must be removed correctly. Regular deletion of files will lead to undesirable consequences, including the crash of the operating system;
- Not all updates can be removed. Some, especially those related to Windows Defender, are vital to the secure operation of the system;
- You need to be careful when choosing which update to remove. It is quite possible that it is not old and unnecessary. This means that the system will install the update again.
Proper removal of updates is the key to system performance
Programs to remove Windows 10 updates
Windows Update MiniTool is a free, easy-to-use program that helps you customize the Windows 10 update environment to your liking.
Windows Update MiniTool - a program for working with Windows updates
This utility looks for the latest updates, can remove old ones, reinstall upgrades, and much more. This software product also allows you to refuse updates.
Revo Uninstaller is a powerful program similar to the Windows Add or Remove Programs service.
Revo Uninstaller - a program for working with software and OS updates
This is a functional application manager that allows you to track how and when the operating system or any individual application was updated. Among the advantages is the ability to remove updates and applications in a list, rather than one at a time, which significantly reduces the time it takes to clean your device. The disadvantages include the complex interface and the general list for programs and updates, which is divided in the Windows service.
Removing old updates
If it comes to removing irrelevant updates, the user has a whole range of options to complete the uninstallation procedure. You don't have to deny yourself anything: the command line, the good old update log, and even the rarely used disk cleanup tool. The uninstallation process itself is similar to uninstalling a simple program, with only one exception - after that you need to restart the computer.
Removal via "Control Panel"
The interface of the “Control Panel” (CP) element is increasingly reduced in capabilities with each update of Windows 10. However, it is impossible to completely replace it with the “Settings” of the computer, and most applets are still in full working order. Uninstalling programs and updates is no exception.
- Open the “This PC” window, click on the down arrow in the address bar and select “Control Panel” in the window that appears.
Through Explorer, open the “Control Panel”
- In the “Programs” column, click the “Uninstall a program” link.
In the “Programs” column, click the “Uninstall a program” link
- In the column on the left, click on “View installed updates.”
Open the list of updates through “View installed updates”
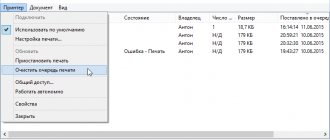
- Next, by clicking the mouse, select the update that needs to be deleted and click the button of the same name that appears next to “Arrange”.
Select the update, click “Uninstall” to begin uninstallation
- Then it’s simple: we agree to the deletion and wait for the process to complete. Afterwards, it is recommended to immediately restart your computer.
Some updates, especially Office service packs, do not require a restart. But my experience shows that if you do not restart your computer immediately and access deleted files, you may experience some freezes and slowdowns of the computer.
Removal via Settings Windows 10
The Settings environment also includes the ability to remove programs, components, and system updates.
- Press the key combination Ctrl+I and select the “Update and Security” item in the window that opens.
Select the “Update and Security” applet
- In the “Windows Update” tab, click on the “View the history of installed updates” link.
Open the list of updates using the “View log of installed updates” button
- Next, click the “Uninstall updates” button, which will open an element with the “Control Panel” interface, as shown above in point 4. Uninstallation occurs in the same way.
Uninstall via command line
The Command Line tool allows you to do almost everything with the operating system - from restarting processes and the system as a whole, to uninstalling programs and updates.
- Right-click on the Windows icon in the lower left corner of the screen. In the drop-down menu, select “Command Prompt (Administrator).”
In the drop-down menu, select “Command Prompt (Administrator)”
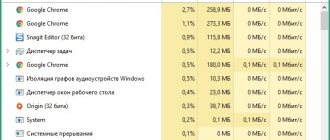
- In the terminal, enter the command wmic qfe list brief /format:table and launch it with the Enter key. The command will show a list of all installed updates with indexes.
The wmic qfe list brief /format:table command displays a list of installed updates
- Next, enter the command wusa /uninstall /kb:[ID], where instead of [ID] we enter the numbers after KB from the second column of the table displayed on the command line.
- Reboot the computer.
Removal through a third-party program
The modern software market offers almost a full range of “substitutes” for standard utilities from Microsoft. Removing programs and components is no exception. Such products are often more convenient in terms of interface and functionality compared to Windows utilities. One such program is Revo Uninstaller.
Revo Uninstaller is a program that replaces the Uninstall Programs tool.
- Download and install the program.
- We launch the executing file. In the “All Programs” tab, find the required update, right-click on it and select “Uninstall” to begin uninstallation.
Right-click on the update and select “Uninstall”
- After the removal is complete, restart the computer.
Through system disk cleanup
The only "true" way to remove really old, old and unnecessary updates is the system's Disk Cleanup utility. In this case, the system itself will automatically determine which updates can be removed.
- Open the “Control Panel”, click on the “System and Security” column.
Open the “Control Panel”, click on the “System and Security” column
- In the “Administration” applet, click on the “Free up disk space” button.
In the “Administration” column, select “Free up disk space”
- We are waiting for the program to collect all the data on the system. Then we check the checkboxes for the groups of files that need to be deleted and start the cleaning process with the OK button.
Check the box next to “Clean up Windows updates” and click OK
The process of removing updates is very long and should definitely not be interrupted. The case shown above, with the deletion of 2.66 GB of update files, lasted more than an hour.
If that doesn't work, try using advanced options.
you are unable to uninstall the update through the Settings This allows you to avoid downloading programs that may block or otherwise interfere with the update removal process.
Open the Settings , go to the Update & Security . In the left panel, go to the "Recovery" . At the bottom of the window there is a section “Special download options” . Click Restart Now to boot your computer with additional options.
How to clear the update cache, fix the error of uninstalled or stuck updates in Windows 10
Often, in cases where the Internet blinks, power surges occur, and in some others, downloading updates may occur with errors. In such situations, the operation of the update service is disrupted; it tries to access files that contain an error, which causes the whole process to go wrong. Updates cannot be installed, or they can, but at the same time they carry an error, which can affect the performance of the entire system. User intervention is required to troubleshoot.
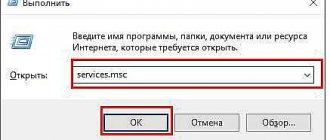
- Open the “Control Panel”, follow the path “System and Security” - “Administration” - “Services”.
Go along the path “System and Security” - “Administration” - “Services”
- In the list of services we find “Windows Update”, double-click the service properties. Change the “Startup type” filter to “Disabled” and save the changes with the OK button.
In the service properties, change “Startup type” to “Disabled” and click OK
- Reboot the computer. Then, using any file manager, go to the C:\Windows\SoftwareDistribution\Download folder and delete all its contents. This will delete the entire update cache.
Select and delete all files in the folder
- If the problem with already installed updates is also present, delete the contents of the C:\Windows\SoftwareDistribution\DataStore folder.
Select files in the folder and delete them
- Next, similar to shutting down, turn on the Windows Update service and restart the computer.
- We repeat the search procedure and install updates.
Completely disabling the update system using:
Now there is no one way to turn off Windows 10 update forever. A set of measures will be required; one method alone does not guarantee the expected effect.
Windows Update
Deactivation through the update center is the only officially recommended method for disabling updates on a laptop and desktop PC. At the same time, the method does not give 100% results. After resetting the network settings or switching to another network point, updates will begin downloading immediately.
How to stop downloading Windows 10 update:
- Launch Settings from Start and go to Network and Internet.
- Open the Ethernet tab for cable or Wi-Fi for a wireless connection.
- Click on the currently active connection.
- Activate the “Set as metered connection” option.
Disable via the registry
This is an effective technique, because by acting directly on the registry there is a greater chance of success of the procedure. However, this is a potentially dangerous procedure; changing the wrong parameters can lead to negative consequences.
How to refuse updates in Windows 10:
- Enter the name of the file regedit.exe into the search and run it.
- Go to the path HKEY_LOCAL_MACHINE\SOFTWARE\Policies\Microsoft\Windows.
- Right-click on the internal WindowsUpdate directory, select “Create” – “Partition”, to which we specify the name AU.
- Open the newly created directory and in the right area using RMB, create a QWORD (64-bit) parameter. Let's call it NoAutoUpdate and set the value to 1.
Using Group Policy Editor
The method cannot be used for the Windows Home version and some unlicensed OSes, but its advantage is the ability to automatically launch updates.
How to cancel Windows 10 updates:
- Press Win + R, paste gpedit.msc and click “OK”.
- Among the “Administrative Templates” in the “Windows Components” directory, click on “Windows Update”.
- Switch to the working window, look for “Setting automatic updates”, and double-click on the option.
- Switch it to the “Disabled” position and exit the editor.
How to remove the update icon
Users of Windows 7, 8, 8.1 will sooner or later have an icon appear on the notification panel that will say that the system can be updated to Windows 10. In fact, this means that sooner or later the update will happen almost forcibly, against the will of the user. If you don't want this to happen, you just need to uninstall one update.
- Go to the list of installed Control Panel updates, as shown above.
- In the table we find the update with number KB3035583 and delete it.
Find the KB3035583 update and remove it
- To be sure, you should also remove:
- Windows 7 - KB2952664, KB3021917;
- Windows 8 - KB2976978.
- Reboot the computer.
Prohibition of installing individual updates
Microsoft has provided a special mechanism for uninstalling certain updates. This feature is not particularly replicated to ensure that users install absolutely all expected updates.
- Download the utility from the official website. It is not recommended to use other sources to avoid the introduction of malicious code.
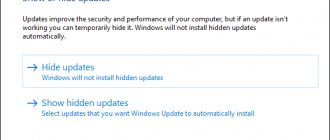
- Launch the downloaded file. Click the Hide updates button.
Click the Hide updates button
- We check the boxes next to the updates that we do not want to receive. And click the “Next” button. We wait until the utility applies the changes, after which it is recommended to restart the computer.
Check the boxes next to the updates that do not need to be installed and click “Next”
Problems uninstalling updates
As my extensive experience with Tens updates shows, there are practically no problems with deletions. The only thing that can harm the system is the removal of current and necessary updates. This will lead to undesirable consequences and incorrect operation of system files. Therefore, it is very important to delete only old and unnecessary updates and to properly clear the update cache.
The system is subject to so-called external risks, when software failures cannot correctly perform their tasks. Problems with removal in the vast majority of cases occur in two cases:
- when system files are damaged by viruses;
- when system or update files are damaged by disk errors.
First of all, if any operating system errors occur, you need to check your computer for viruses and malware. To do this, you need to use more than one program, this will increase the possibility of detection.
After checking, you need to scan system files, as well as the file system.
- Open the command line as administrator.
- We enter two commands one by one:
- sfc /scannow - checks system files and, if necessary, restores missing elements;
- chkdsk C: /f /r - checks the disk for errors and, if necessary, corrects damaged sectors.
- We definitely wait until the process is completed. Each running utility runs for quite a long time, sometimes more than one hour.
Method 2: Command Line/PowerShell
A universal tool with which you can probably achieve everything within your system. Right-click on the Windows icon and select “ PowerShell (Administrator) ” in the menu that appears, or run the command line as Administrator, whichever is more convenient for you. In the window that appears, enter the command “wmic qfe list brief /format:table” and press Enter. The answer will be to display updates in the form of a table, where each update is marked with a unique ID; it is these numbers that interest us. The next command will be “wusa /uninstall /kb:ID”, where instead of ID there will be a seven-digit code that we see in front of us. After removal, do not forget to restart the computer if necessary.
System rollback after unsuccessful updates
System updates often affect core system files. Therefore, if there are possible failures during the update, important components of the OS may be so damaged that Windows simply stops loading. In order not to lose important data, it is recommended to regularly create system restore points. This tool will help you get your OS back up and running if updates, viruses, or disk errors cause Windows to crash.
In order to use the restore point tool when the OS is not working, you need to have a bootable Windows 10 USB flash drive.
- In the BIOS settings, we change the method of loading the OS to USB-HDD or similar, depending on the manufacturer of the motherboard.
- In the installation window, click the “System Restore” button.
On the installation screen, click “System Restore”
- Next, select “Troubleshooting”.
Go to the “Troubleshooting” element
- The following items: “Advanced options” - “System recovery”.
Go along the path: “Advanced options” - “System Restore” and select a point to restore
- Next, select one of the last saved restore points and wait until the installation program returns Windows to a working state.
In my personal experience, sometimes a restore point is not enough to get the system back to working order. Personally, I think it’s better to accept it and do a clean installation of the system from the latest distribution, which already has all the necessary updates installed. If the update became so crooked that the operating system crashed, there is no guarantee that re-installation will not lead to the same result.
Video: how to launch a restore point
Clearing the update log
The update log contains information about all attempts to install updates, drivers and programs by the system. Essentially this is useless information that can also be deleted.
- We clean drive C, as shown above, after checking the boxes next to each item proposed for deletion.
- Launch the command line. We write and execute the commands one by one:
- net stop wuauserv;
- del %systemroot%\SoftwareDistribution\DataStore\Logs\edb.log;
- net start wuauserv.
Enter the commands one by one to clear the update log
- Reboot the computer.
It is worth clarifying that the above instructions will only delete the update log, that is, information about them. The updates themselves will be in perfect order, their list with the ability to delete each individual update will still be present in the Control Panel applet.