The Microsoft Word program has many functions for text editing, directly accessible and many more indirect, non-obvious. Thanks to them, you can answer any user’s question about how he can edit what he has written. For example, among the frequent questions that arise is “How to rotate text in Word?” And its solution lies precisely in non-obvious functions, which will be discussed further.
Figure 1. Guide on how to rotate text in Word
How to reverse text in a Word table - 1st method
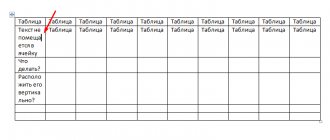
First, let's look at how to flip text in a table or using a table. In this method, we will create a table cell, type text in the cell, rotate the text in the desired direction, and then remove the table borders. If you rotate text in the table itself, you should not remove the borders in the table.
- Go to the "Insert" menu, select "Table".
- Select a cell from the proposed table, or several cells if you are creating a table that will have upside down text in its cells.
- Write the desired text inside the cell.
- Select the text in the cell, right-click inside the cell.
- In the context menu, select “Text Direction...”.
In the Text Directions - Table Cell window, there are three orientation types to choose from. Using the built-in setting, you can flip the text 90 degrees and 270 degrees.
- Select the appropriate text orientation and click on the “OK” button.
The text changes its position in a table cell.
If you are not creating a table, then you need to remove the table borders:
- Move the mouse cursor to the upper left edge of the table, in the menu window that opens, click on the triangle next to the “Border” element.
- In the context menu, click on the “No border” item.
The text will appear upside down without borders in your Word document.
Rotate the image mirror or 90 degrees
If you need to turn exactly 90 degrees, then achieving such accuracy using the first method will not be easy. Therefore, select the picture and at the top go to the “Working with Pictures” – “Format” tab. In the “Arrange” group, click on the “Rotate” button - triangles are drawn on it. Next, select the desired item from the list that opens and click on it.
Here, in addition to the 90 degree angle, you can flip the image as a mirror, or reflect it along the horizontal axis.
In MS Word 2020 everything is done exactly the same. Only the group in which the “Rotate” button is located is called “Arrange”.
How to flip text in Word using an inscription - method 2
When working in the program, the user will be able to flip the text in any way with any inclination, at his discretion.
- Go to the "Insert" menu, click on "Shapes".
- From the proposed options, select the “Inscription” element.
- Select the text field anywhere in the MS Word document, and write the desired text inside. If necessary, it is possible to change the markup parameters.
- Move the mouse cursor to the round arrow, click on the left mouse button, and use the mouse to rotate the inscription to the desired arbitrary position.
- Go to the “Shape” menu, click on the “Shape Outline” button.
- In the menu that opens, check the “No outline” box.
The outline around the piece of text will disappear.
Using inscriptions
The second way is using inscriptions. Open the “Insert” tab and click on the “Inscription” button. Select "Simple Caption" from the menu. An area will appear in the window, remove the text from it and type your own.
If you have Word 2020 installed, then the button is not called “Table Box”, but “Text Box”.
You can also select the “Draw inscription” item from the menu. Then, anywhere in the document, draw a text box and enter text into it.
Put italics in the printed text, go to the “Drawing Tools” - “Format” tab. Click on the “Text Direction” button and select the appropriate option from the menu.
To remove the outline for the label, right-click on it and select “Format Shape” from the menu.
The following dialog box will open. In it, go to the “Line Color” tab and put a marker in the “No lines” field.
For Word 2020, the actions are different, since instead of a window on the right, a block with settings opens. Open the “Shape Options” section (1) and go to the “Fill and Borders” tab (2) (paint bucket). Expand the “Line” menu (3) and put a marker in the “No...” field (4).
Sometimes in Word you need to turn text upside down or place it diagonally. To do this, insert a “Simple Inscription” into the document, following the recommendations above. Then click on it with the mouse. The outline will be highlighted and a small green circle will appear on top. Hover your mouse over it so that the pointer changes to a black circular arrow. Hold down the left mouse button and rotate the inscription. If you hold down Shift, the rotation will occur with a certain step.
In Word 2020, you need to add a "Text Box". There will be a circular arrow icon above it. Click on it and rotate the block as you wish.
You can also hover your mouse over the outline and right-click on it. Select "Advanced Layout Options" from the context menu.
In the next window, go to the “Size” tab, enter the desired value in the “Rotation” field and click “OK”.
This way you can flip the text by specifying the exact angle to rotate.
Choose any of the described methods and turn the text in Word upside down, vertically, or at a specific angle.
Watch the video on the topic:
Rate this article:
( 2 ratings, average: 5.00 out of 5)
About the author: Oleg Kaminsky
Webmaster. Higher education with a degree in Information Security. Creator of the portal comp-profi.com. Author of most articles and computer literacy lessons
- Related Posts
- Initial letter in Word
- How to select all text in Word
- How to make an arrow in Word
Discussion: 3 comments
- Daria:
02/01/2018 at 00:00Cool, I didn’t know how to turn the number on the ad below, but here everything is clear and there are so many ways. Thank you very much it helped)
Answer
- Administrator:
01/30/2018 at 00:00
Anonymous-8, use the latest method: on the Size tab, specify the desired degree of rotation
Answer
- Anonymous-8:
01/24/2018 at 00:00
What if you need to rotate 180 degrees? I really wanted him to be upside down! So what should I do?
Answer
How to flip text vertically in Word using an inscription in a shape - method 3
If you need to flip text vertically, the office editor has built-in settings for doing this job according to certain values set in the program by default.
In Microsoft Word, do the following:
- From the Insert menu, click on the Shapes button.
- In the menu that opens, select “Inscription”.
- Create a custom caption field and then write text inside.
- Open the “Format” menu, in the “Text direction” option, select the appropriate option for rotating the Word text in a given direction: “Rotate 90°” or “Rotate 270°”.
- Click on the “Shape Outline” button, select the “No Outline” option.
Let's turn over just one sheet
Various scientific reports provide examples of tables, but they will not fit into a book format. In this case, it will be necessary to change the position of only one leaf.
The instruction to rotate only a portion of the content would be appropriate here. The process is the same, but you highlight not a couple of paragraphs, but the entire page.
How to flip text in a given direction in Word? You can use the universal method, or you can apply the instructions separately for your version of the text editor.
How to turn text upside down in Word - method 4
In some situations, you may need to rotate the text 180 degrees, or some other specified degree value. This can be done using the shape label function.
- Open the "Insert" menu, click on "Shapes".
- Select the Caption item.
- Create a text box and enter text inside the shape.
- Open the “Layout” tab, click on the “Rotate” option.
- Select one of the standard settings: “Rotate right 90°”, “Rotate left 90°”, “Flip top to bottom”, “Flip left to right”, or click on “More rotation options...”.
The Flip Top to Bottom option will flip the text 180 degrees.
- To select the required rotation angle, click on the “Other rotation parameters...” item.
- In the “Layout” window, in the “Size” tab, in the “Rotation” parameter, select the desired degree of rotation of the shape with text. Here you can select a rotation of 180 degrees or any other arbitrary value.
- Go to the “Format” menu, click on the “Shape Outline” button.
- In the open menu, check the box next to “No outline”.
Rotate the drawing by a certain angle
To do this, select it, go to the “Working with Pictures” – “Format” tab, click on the “Rotate” button and select “Other rotation options” from the list.
The "Markup" window will open. In it, in the “Rotation” section, in the corresponding field, enter any value from 0 to 360, that is, select an angle. Then click "OK" and the drawing will be rotated.
In Word 2020, this window opens in the same way, only it is called “Layout”.
Rotate images and format your documents according to the rules, or simply make Word documents with pictures and text interesting to look at.
Rate this article:
( 1 ratings, average: 5.00 out of 5)
About the author: Oleg Kaminsky
Webmaster. Higher education with a degree in Information Security. Creator of the portal comp-profi.com. Author of most articles and computer literacy lessons
- Related Posts
- How to put quotes in Word
- How to combine or split tables in Word
- Word Document Author: How to Edit, Add, and Delete
Discussion: 2 comments
- Eugene:
02/19/2020 at 17:03Good afternoon Can you tell me how to rotate them in Word after inserting several photos, since the photos are in a horizontal position when inserted, then change the size for all photos to the same size, otherwise flipping each one is time consuming.
Answer
Anya Kaminskaya:
02/22/2020 at 17:08
You can change the size using a program such as Image Compression. Indicate in it the folder where the photos are saved and select the desired width and height. Set compression to 100%. You can search for other utilities on the Internet. Then just paste it into Word and rotate it. To rotate everything at once: for each photo, set Text Wrap - Before text or Along contour; then hold down Ctrl and select all the photos with the mouse; Go to Format - Arrange - Rotate - select an angle.
Answer
How to rotate an image in Word and a few more styling techniques
Hello, friends!
In the last article, we learned how to insert pictures into Word from your hard drive, from the Internet, as well as a copy of the screen. But this is not enough if you want to create a high-quality project. Fortunately, the developers have come up with many tools for working with images for us! Today we understand them and try to apply them.
When there is a picture on the sheet, click on it to highlight it. The Format tab will appear on the ribbon, which contains most of the settings for images in Word. And these are the opportunities it provides us.
