Removing Windows 10 from a hard drive You cannot remove Windows 10 from your computer using standard operating system tools—you need to resort to third-party software. The process of formatting a disk is a set of tasks that is performed through the interaction of a number of specialized software. Cleaning is carried out outside of Windows, so the computer should be started from a boot drive on which a special program has been pre-recorded.
Reasons for deletion
Incorrect operation of system elements, external software, etc. can serve as a reason to remove the operating system:
- broken firewall;
- influence of viruses;
- incorrect operation of games;
- uninstallable programs ESET NOD or Norton Security;
- application conflict after an operating system update error.
After completely clearing the disk of Windows 10 files, you can begin installing versions of XP, 7, 8, 10.
How to completely remove Windows from a bootable USB flash drive/disk
When installing Windows, we always use a disk or bootable USB flash drive where we recorded the system image. When we go directly to the installation, a window opens with partitions and disks. Select the system disk and format it, and then install the system on it. So you uninstalled Windows 10 and installed Windows 7 or vice versa.
If you have more than one system on your computer, but they are located on different disks or partitions (this is what you should do, and not install several systems on one partition), then you simply get rid of one system by formatting the disk using a bootable USB flash drive or disk, or from another system using the Disk Management utility.
You simply right-click on the desired partition and select “Delete volume” or “Format”. Of course, if you no longer need the volume, you need to merge it with another partition.
Removing 1 of 2 systems using System Configuration
The second way to remove one of several installed systems is the System Configuration utility. Open the Run window using the Win+R keys and enter the command:
msconfig
Next, go to the “Download” tab, where the installed Windows systems should be displayed. First, install the Windows you use by default. Select it with the mouse and click the “Set as default” button.
Next, select the system that you want to delete and press the corresponding button. Then we apply the changes.
A window should appear asking you to restart your PC. Be sure to reboot so that the system is deleted.
How to remove Windows XP 7 8.1 or 10 using LiveCD
By LiveCD I mean some kind of image of a program that works with disks. I suggest using the GParted LiveCD distribution. It can be downloaded from the official website and written to a flash drive, for example, using the Rufus utility. Once you've done this, boot from the drive.
A window will appear where you need to select the very first option – GParted Live (Default setting).
Now you need to format the system disk. The main thing here is not to make a mistake, since the names of the drives are indicated in a way that is unusual for ordinary users. First you need to focus on the volume of the partition and the file system - in Windows it is always NTFS or FAT.
Right-click on the desired partition and select “Format to”, selecting the NTFS file system.
Complete cleaning of the hard drive and removal of Windows 7 – 10 | CMD
Here I will consider the option of completely wiping the hard drive, after which all partitions of this particular drive will be deleted along with the files and the drive will be put back together. Keep in mind that this method is used only if your files have already been transferred to another medium or are of no particular value to you.
We boot from a bootable flash drive or disk and reach the window where disks and partitions are manipulated.
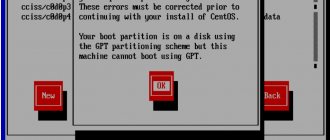
Interesting: It is impossible to install Windows on disk 0 partition 1
Press the Shift+F10 keys so that the command line appears, and then execute the following commands. Be very careful.
- diskpart – utility for working with disks;
- list disk – display disks
- select disk 3 – select the desired disk. Be very careful, look at the size of the shared disk, for example, 512 GB, or 931 GB. Not a partition, but a disk;
- clean – complete disk cleanup.
That's all, you have completely cleaned the disk, including the partitions. Now you know how to remove Windows 10, 7, 8 and any other system and their files. All methods are effective and at least one of them will work.
Complete removal of Windows 10
A powerful tool for working with disks is used - GParted, which must first be written to a flash drive using a program for creating bootable drives. Before you remove Windows 10, you need to download a special application to your computer. Actions:
- Open the GParted download page.
- In the GParted Live CD/USB/HD/PXE Bootable Image Stable Releases table, follow the Download link, the name of which contains the corresponding system bitness (i686 – 32-bit; amd64 – 64-bit).
- Confirm downloading to your computer.
- Open the Rufus program page.
- In the Download block, click on the link Rufus <version> Portable.
- Confirm download.
Downloading GParted and Rufus
Note! You can use Google or Yandex to search for programs.
You should also prepare an external drive, which can be a 4 GB flash drive.
Creating a bootable GParted USB flash drive
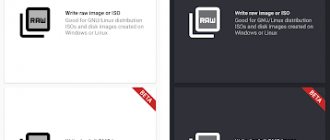
The GParted installation image is written using the Rufus program. Need to:
- Launch the application.
- Select the flash drive in the Device list.
- Press the SELECT button and open the previously downloaded GParted ISO image in the file manager.
- Determine the Partition Scheme corresponding to the disk.
- Press the START button.
Creating a bootable GParted Live flash drive
Note! You can find out the partition layout of your hard drive in the standard Computer Management application. Go to the Disk Management section, open the properties of Disk 0. The necessary information will be displayed on the Volumes tab.
Determining the partition scheme
After completing the transfer of image files to the flash drive, a system signal will sound. The program can be closed.
Launching the LiveCD program
It is impossible to remove Windows 10 while working on your computer. The GParted program must be launched from a flash drive. This is done when the computer is rebooted. When the inscriptions appear on the screen, you need to press a special key. Depending on the model of the desktop computer motherboard or the laptop manufacturer, the boot menu button is different. You need to refer to the table:
| Manufacturer | BIOS | Key |
| Laptops | ||
| HP | — | Esc → F9 |
| Asus | — | Esc |
| Dell | Dell | F12 |
| Lenovo | AMI | F12 |
| Sony Vaio | Inside H2O | F11 |
| Acer | Phoenix | F12 |
| Acer | Inside H2O | F12 |
| Packard Bell | Phoenix Secure Core | F12 |
| Toshiba | Phoenix | F12 |
| Toshiba | Inside H2O | F12 |
| Samsung | Phoenix Secure Core | Esc |
| Motherboard | ||
| MSI | AMI | F11 |
| Gigabyte | Award | F12 |
| AsRock | AMI | F11 |
| Intel | Phoenix/Award | Esc |
| Asus | AMI | F8 |
Important! If there is no information about the manufacturer, you can press the designated buttons one by one until you find a suitable one.
Next, you will need to select a flash drive to launch. Moving between items is carried out using arrows, selection is made by pressing the Enter key.
Presetting parameters
After determining the priority disk, the main menu of GParted LiveCD will appear, where you will need to set the program operating mode and set the parameters:
- Select GParted Live (Default settings), press Enter.
- In the Configuring console-data window, select the line Don't touch keymap. Press Enter.
- In the console, determine the localization of the program. Enter the language number from the list and press Enter.
- Enter 0, confirm by pressing Enter.
Launching GParted from a bootable USB flash drive
In the program window, you will need to make preliminary settings: define partitions, specify a command to change the format.
Important! At this stage, changing settings does not affect the operation of Windows 10.
Windows 10 is located on just one disk partition where system files are located. The rest are the recovery partition, EFI data and volumes for user needs. Additional information will help determine which one is correct for deletion:
- size over 40 GB;
- file system - NTFS;
- sometimes labeled as Windows 10.
After determining the desired section, you can proceed to setting the parameters. Actions:
- Right-click on the section.
- In the menu, hover over Format to.
- Define the file system as ntfs.
Formatting a partition in GParted
The selected configuration will clear the disk of Windows 10 files. To completely delete the partition, select the Delete option in the context menu.
Note! To return a disk to factory settings, you need to apply the Delete option to each partition one by one.
Applying changes
Formatting options are selected but not applied. At this point, you can override the settings. To cancel actions, use the Undo last operation button.
Button to cancel action
If the specified configuration is correct, you can clear the disk of Windows 10 files by clicking the Apply all operations button. Next, you just need to confirm the action by clicking Apply.
Button to apply operations in GParted
Important! Once the changes are applied, the data will be deleted. To avoid loss, important information must be moved to backup media.
After completing the cleaning operation, you can close the window: press the Exit button on the desktop, select Shutdown and remove the flash drive after turning off the computer.
System reset
Major failures in the OS cannot be fixed using the previous method. To remove damaged data, you will have to perform a full system reset. In addition, this method is relevant if the user switched to a new version of the OS through an update, and less than a month has passed since the upgrade. To return to a previous version of Windows:
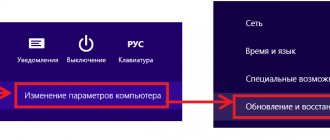
- Go to “Settings” – “Update and Security” – “Recovery”.
- In the “Restore the computer to its original state” item, click on “Start”.
- A new window will open with several options for action. To fix the problem (while still being able to continue using your PC), click “Keep my files.” If all important data has been transferred to removable media, a backup copy has been made, then to completely reset the system, click on the “Delete everything” item. Depending on the OS version, there may be a third option - returning to factory settings (this will reinstall the applications that were pre-installed when you purchased the PC).
- When you select the first option, a window will open with information about the applications to be deleted (after restoring the original state of the OS, the list of deleted programs will be displayed on the desktop in the form of an HTML file).
- The second option involves both deleting all data and erasing the place where the deleted files were located. The process takes at least several hours.
- After selecting the desired option and all additional settings, confirm your consent by clicking on the appropriate button.
- When the process is complete, the PC will reboot.
The system can be reset using the WinRE tool. In the “Recovery” section there is a “Special boot options” item, click on the “Restart now” button. Then: - A window with action options will open.
- Go to “Diagnostics” (this item may be called “Troubleshooting”).
- It is necessary to return the PC to its original state.
- Next, “Delete everything” - “Local reinstallation” - select the desired settings - perform a reset. The Windows reinstallation procedure will begin.
Removal during reinstallation
It is possible to remove Windows 10 during the installation of another system at the disk partitioning stage. You will need to create a bootable USB flash drive, start the computer from the drive and perform a cleanup.
Creating a boot drive
You can create a Windows installer using Rufus. Procedure:
- Run the program.
- Select a flash drive from the drop-down list.
- Click SELECT and open the distribution image in Explorer.
- Define the Partition Scheme.
- Press START.
Creating a bootable Windows USB flash drive
Running the installer
To perform the operation, when starting the computer, you will need to click on the button that brings up the Boot Menu. In the Windows Installation window, you need to do the following:
- Select the installer language from the drop-down lists.
- Click the Install button.
- Check the box I accept the license terms and click Next.
- Define the Installation Type as Custom or Full (depending on the version of Windows).
Starting disk partitioning in the Windows installer
Disk partitioning
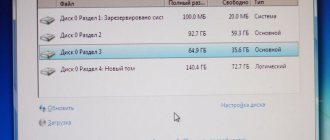
After the disk partition menu appears, you can begin removing the operating system:
- Select the section that is designated in the Type column as Main or System (not to be confused with System).
- Click on Disk Settings.
- Apply the Format or Delete option.
- Confirm the action by clicking OK.
Formatting a disk partition in the Windows installer
Note! If you need to clean the hard drive completely, the same manipulations must be carried out with the remaining partitions.
After cleaning, you can close the installer: click on the red button in the upper right corner and confirm the action in the dialog box.
Complete OS reinstallation
Before we consider the barbaric removal of Windows 10 from a work computer, it is worth recalling that you can simply reinstall the system from scratch with a complete formatting of the system partitions. Stock up on DVDs with Windows 7 (if that's what you need) or make a bootable USB flash drive. The system image can be found on the Internet (official, with a trial period of 30 days).
See also: Consider Windows 10 Music
How the OS from Microsoft is installed is a topic for a separate large article. It is only important to mention two points:
- It is worth disabling the Secure Boot option in UEFI (usually in the Boot section - all UEFI BIOS are different on different models of motherboards and laptops);
- Be sure to format the hard drive partition on which the system will be installed. Select the partition, click “Disk Settings” - “Format”:
Disabling Secure Boot is necessary if the laptop was sold with the factory “top ten”. Otherwise, the machine may not allow you to install an alternative operating system.
Using the Command Line
Disk cleanup using the Command Line involves using the DISKPART utility outside the installed operating system. To perform the steps you will need a flash drive and an image of any version of Windows.
Presets
Before deleting, you need to determine the number of the corresponding partition. This is done on the installed operating system through the DISKPART console utility. Procedure:
- Press Win + R.
- In the Run window, enter CMD and click OK.
- In the console that opens, enter DISKPART and press Enter.
- Display a list of disks using the list disk command.
- Select the drive partition with the operating system. To do this, enter sel disk #, where # is the disk number.
- Display a list of partitions using the list partition command.
Defining the system partition in the Command Line
A list of partitions will appear. You can determine the system one by comparing the occupied volume, which is clearly visible in the file manager.
Launching the console
The console to uninstall Windows must be opened outside the system. First you need to create a bootable drive with any version of Windows and start the computer through the Boot Menu.
When the installer main menu appears, press Shift + F10.
Removing the operating system
In the open Command Prompt to clean up the disk you need to:
- Type DISKPART and press Enter.
- Select the desired disk with the command sel disk #.
- Use the command sel part #, where # is the partition number, to select the required one.
- Enter the del part override command and press Enter.
Removing Windows 10 system partition via Command Line
Note! If you need to clear the entire disk, you need to select each partition one by one and run the del part override command.
At the end, you can close the installer: press Alt + F4 and confirm the action in the dialog box.
Removing a previous installed system
By default, when migrating from an old operating system to a new one, the Windows.old folder is created, which contains all the necessary files to restore the previous installed OS. It is needed so that, if desired, the user can easily return to the old version of the system, using standard Windows capabilities and without resorting to reinstalling the system. The folder is automatically erased after 30 days from the date of switching to the new OS, but you can delete it earlier by following these steps:
- Using the Win+R key combination on your keyboard, launch the Run window.
Press the Win+R combination to open the Run window - Use the cleanmgr command to go to the disk cleanup program.
Run the cleanmgr command - Click on the “Clean up system files” button. Please note that for this action you must be logged into the system under an administrator account.
Click on the “Clean up system files” button - Check the box next to "Previous Windows installations". Don't forget to uncheck all other checkboxes so you don't accidentally delete unnecessary files.
ABOUT - Start the process and wait for it to finish. Done, all references to the previous system are erased.
Confirm deletion of the Windows.old folder
Video: how to delete the Windows.old folder
Reinstalling the operating system
To install a new system, you need to create a bootable USB flash drive and start the computer through the Boot menu. Installation procedure:
- Select the installer language and click Next.
- Click the Install button.
- Accept the agreement.
- Define the installation type as Custom or Full (depending on the version).
- Select an empty section. If the item is marked as Unallocated disk space, click Create, Apply.
- Click Next.
Installing Windows 10 on a new disk partition
The process of installing the operating system on the hard drive will begin. After all steps are completed, the computer will restart and automatically log in.
How to remove Windows 10 when installing another OS
Most often, Windows 10 is removed while simultaneously installing another operating system, usually another version of Windows, sometimes one of the Linux distributions. When installing Windows 7 or 8.1, to completely remove Windows 10, just follow these steps ( note - the steps described may lead to the loss of important data if it is on the disk):
- When booting from a bootable USB flash drive or disk with a different version of Windows, at the “Select installation type” stage, specify "Full installation". To prepare the installation drive and boot from it, you can use the following programs to create a bootable USB flash drive, and then use the Boot Menu.
- On the next screen, click Disk Setup.
- Then you have options: you can format the Windows 10 partition, but other data from this OS will remain on other small system partitions. The best option is to delete all partitions from the disk, selecting each one in turn and clicking “Delete” (if there is no important data, and if there is, only the partition with Windows 10 and hidden system partitions), then either create new partitions with the necessary parameters, or select one large unallocated space and click “Next” (the necessary partitions will be created automatically and formatted).
As a result, Windows 10 will be completely removed from your computer or laptop. All of the above is true for the case when the computer has only one physical hard drive or SSD and one operating system. If there are several disks, and the system is installed on a disk designated as Disk 1, or several operating systems are installed, this approach can lead to problems with loading the remaining OS - here you will need to figure out what is located on which partitions so as not to affect important data.
It will be approximately the same when installing Linux - almost any distribution will offer you to prepare partitions for installation either by manual partitioning, where you can remove partitions with Windows 10, bootloader and recovery environment, or by completely deleting all partitions.
The interface for setting up partitions when installing different versions of Linux may look different, but it is usually not difficult to figure out.
Function Shrink disk to free up space
To save space, Windows has the ability to shrink the disk, which will free up some space. In this article, we are looking at cleaning up the system drive, so we will be shrinking the “C:” drive.
- After right-clicking on the system disk, select “Properties” from the context menu.
- In the “Properties: Local Disk (C:)” window, go to the “General” tab.
- Check the box next to “Shrink this disk to save space,” and then click the “OK” button.
- In the “Attribute Change Confirmation” window, click the “OK” button.
In Windows 10, it is better to use the Compact OS function to compress files on the system drive. Read more about disk compression in this article on my website.
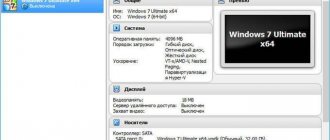
Instruction No. 2. Erasing duplicate operating systems.
- Find the “My Computer” on the desktop
- Select the “Properties”
- Next select the item "Advanced system settings"
- Let's open the tab "Additionally". At the very bottom in the section "Download and Recovery" there is a button "Options"
- The next window allows you to choose to boot from Windows 7, which corresponds to our goal
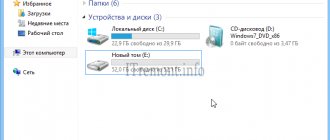
- The next step is to format the partition of the disk that contains Windows folders and files. Select the hard drive partition containing Windows 10 files, right-click to open the context menu and click “format”
In this way, only one Windows 7 will remain on the computer to boot.
How to remove Windows 10 from a laptop: the simplest method
But now let's get back to the main question. And when solving the problem of how to permanently remove Windows 10 from a laptop, let’s start with what is considered to be the most barbaric method.
It consists of installing an operating system of a lower rank. Here, of course, you cannot do without formatting the partition in which the tenth modification was installed. You can use the most common installation distribution, recorded on removable media, which in the BIOS is set as the first device to boot, after which the installer starts, and when you select a partition, it is formatted. But here it is worth paying attention to the fact that if you have a hard drive with a capacity of more than 2 TB, which is in GPT format, when converted to MBR to install versions 7 and lower, the hard drive may become unreadable, or space exceeding the specified volume will simply be hidden (the outdated system simply does not recognize it).
But the most basic problem in deciding how to remove Windows 10 from a laptop is that the system, whether you like it or not, will create its own backup copies before deleting and save some objects that are displayed in the same Explorer will not. But in order to avoid conflicts with the new OS, they also need to be removed. And not everyone, even the most advanced user, knows which components need to be gotten rid of. Therefore, the only way out is to format the system partition in NTFS and delete the space reserved by the system for copies. If the hard drive is 2 TB or more in size, it should be divided into logical partitions.
Using a bootable USB flash drive
Since the bootable USB flash drive is already ready, and the priority is set in the BIOS, all you have to do is follow the steps described correctly:
- Turn on your computer and wait for the Windows Setup window to appear. On the second screen, click on “Install”.
- Skip the step of entering the license key.
- Select any version of Windows 10 and click on “Next”.
- Accept the terms of the license agreement.
- Click on the custom installation method.
- Select the required partition with the operating system and click on “Disk Settings”.