Verification code is the main data protection measure
If your device requires a verification code, it means two-step verification . This is quite normal, since such login confirmation is the most convenient means of protecting data.
There are, of course, similar options with trusted devices, but the verification code is the most optimal and popular among users. Therefore, if you are faced with a similar situation and do not know where to get it, then further instructions will help you understand this issue.
Receiving a verification code
If you don’t know how to get a verification code, then you don’t need to worry, because when you activate two-factor authentication, you need to enter your mobile phone number, to which information will subsequently be sent.
Therefore, if you have activated this function yourself, you can proceed to the next step
If you didn’t do this, then you will have to look for the person who did it so that he can correct the situation. Or, in extreme cases, you will have to contact support.
Code entry procedure
If you are the sole owner and know for sure that you have personally activated two-step verification, then all you have to do is use the following instructions:
- Launch the function of accessing the Internet or entering account data. In this case, the mobile device will require authentication.
- A special window will appear where you just need to click on the item “Didn’t receive the verification code?”
- The system will send a message.
- You open it.
- Memorize or copy information.
- Go to the window where you need to enter data.
- Enter your details.
- The system checks the code and opens access.
Important! Not on all models the verification code comes based on the specified data. Sometimes they are not requested, and the system itself recognizes the device
True, such a function can cause a lot of problems. And to get rid of it, you will need to use an alternative option for obtaining the code.
Now you know how to enter the verification code to gain full access. There is nothing complicated about this. Use the available recommendations and you will definitely succeed.
Alternative way to get the code
Innovative technologies do not always simplify the procedure of use. Sometimes they become the cause of some inconveniences and problems. As you already know, there may be a problem with automatic device detection and to solve it, you just need to manually request a verification code.
The instructions look like this:
- Go to item "Settings".
- Use the iCloud section.
- Click on the username.
- If you are not currently connected to the Internet, then click on the “Get verification code” item.
- If the device is active and on the network, then use the section "Passwordand safety" and there you click on the item "Get verification code."
This procedure has many implementation options, so you need to remember all the recommendations and actively use them in the future. And in conclusion, we will consider the situation when the verification code does not arrive or when entered it is incorrect.
Getting rid of a technical glitch
It may happen that the verification code arrives incorrectly or does not arrive at all. In this situation, the main thing is to control yourself and not swear, since there is an opportunity to solve this problem.
Simply use the support service and request access restoration . Yes, the procedure may take several days, but after restoration you will be able to safely use your account.
How to Change Apple ID Account Password on iPhone
To have access to Apple services, each user must register an account, which is commonly called an Apple ID. Like any other account, this one also consists of a login and password. An email address is used as a login, which users “shine” always and everywhere, so it is not difficult to recognize it. Given the large range of programs for selecting and cracking passwords, it is possible to gain access to Apple ID today. Apple understands this, which is why they offer users the protection that is relevant today - two-step authentication. True, this requires a special code, and many users simply do not know where to enter the Apple ID verification code.
By the way, Apple offers two-step verification for iOS 8 (and earlier) users, and for those luckier (iOS 9 and older), two-step verification. You should still know where to enter the Apple ID verification code, because both methods are similar to each other.
Set up two-factor authentication for your Apple ID
Two-factor authentication is available for Apple ID accounts associated with at least one device running the latest version of iOS, iPadOS, or macOS. Additional Information.
To enable two-factor authentication, you can do the following on your iPhone, iPad, or iPod touch.
Enable two-factor authentication in Settings
If your device is running iOS 10.3 or later, follow these steps:
- Go to Settings > [your name] > Password & Security.
- Click "Turn on two-factor authentication."
- Click Continue.
If your device is running iOS 10.2 or earlier, follow these steps:
- Go to Settings > iCloud.
- Select your Apple ID > Password & Security.
- Click "Turn on two-factor authentication."
- Click Continue.
You may need to answer Apple ID security questions.
Entering and confirming a trusted phone number
Enter the phone number to which you would like to receive verification codes when logging in. You can choose to receive codes via text messages or automated phone calls.
When you click Next, Apple sends a verification code to the phone number you provided.
Enter the verification code to verify your phone number and enable two-factor authentication.
Enable two-factor authentication on your Mac
If you have macOS Catalina installed:
- Choose Apple menu > System Preferences, then click Apple ID.
- Click Password & Security (under your name).
- Click "Enable Two-Factor Authentication."
If you are running macOS Mojave or earlier:
- Choose Apple menu > System Preferences, then click iCloud and choose Account Information.
- Click the Security icon.
- Click "Enable Two-Factor Authentication."
Some Apple IDs created with iOS 10.3 or macOS 10.12.4 and later are protected by two-factor authentication by default. In this case, two-factor authentication will already be enabled.
What is two-step verification?
This is additional protection, thanks to which no one will gain access to the Apple ID even if he knows the login/password pair. To access it you will still need a specific set of numbers, which he will not have.
If you don't know where to enter your Apple ID verification code, see the following instructions.
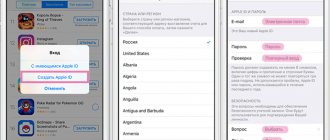
- Go to the official website appleid.apple.com. Enter your login and password, secret code.
- We study the information about the verification that is issued automatically. Next, click “Continue”. It may happen that information about two-step verification will not be displayed. You can find it in the section “Edit - Security - Configure - Two-step verification”.
- In the next window you must enter your phone number. It will receive codes via SMS to complete the verification. It is not necessary to choose your phone number. You can indicate the number of your parents, wife, etc.
- On the next page you need to check the phone number you specified. You should receive a code via SMS. Enter it in the window that appears. If it is not there, then click on the “Resend code” button.
- After entering the code, the program will prompt you to select auxiliary gadgets to receive a verification code. Here you can specify additional trusted smartphones. Each trusted smartphone will have to be confirmed via SMS.
- After confirmation, you will see the recovery key. It is complex and unchangeable. It needs to be kept in a safe place - it will be used if you suddenly forget the password to your Apple ID account or simply lose your trusted smartphone.
- In the next window you will have to enter the recovery code again. This may seem strange to some, but it's normal. This step focuses the user's attention on the importance of the key. Enter the code from the sheet without copying it programmatically.
- Lastly, we accept the verification conditions.
That's it. The check is activated. Now, when you try to sign in to your Apple ID account, you will need an Apple ID verification code. You now know where to enter it. The attacker also knows, but he will not be able to log into the account, because he simply does not have a trusted smartphone.
By the way, it is best to indicate a trusted phone number not of your own, but of a close relative. If suddenly someone steals your iPhone, they can easily log into your Apple ID, because the verification code will be on the same phone.
Why did you need to wait before setting up two-step verification?
As a basic security measure, Apple does not allow you to continue setting up two-step verification if you have made significant changes to your Apple ID account information. A significant change may be a change to the password or the addition of a new security question. The wait period allows Apple to ensure that only you can sign in and make changes to your account. During the waiting period, you can still use your account for all Apple services and stores.
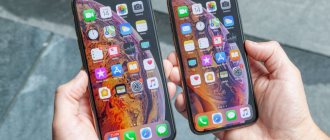
All of your email addresses will receive an email from Apple notifying you of the waiting period and inviting you to contact Apple Support if you think someone has gained unauthorized access to your account. You'll be able to set up two-step verification after the date specified on your Apple ID account page and in the email you sent. New Zealand Nicaragua Norway Panama Paraguay Peru Philippines Poland Puerto Rico Portugal Russia
Singapore South Africa Spain Suriname Sweden Switzerland Taiwan Thailand Turkey United Arab Emirates UK USA Venezuela Vietnam
Two-Step Verification
There is no practical difference between verification and authentication. At least the user won't notice them. In both cases, you need to know where to enter the Apple ID verification code. In both cases, an SMS with a verification code is sent to the phone, after specifying which access to the account is granted.
Authentication is enabled in the settings. There is a menu item “Password and...”. Authentication may also be available in iCloud settings, in the Apple ID tab - “Password and Security”. Click on “Enable”. The protection will be enabled, but not yet activated.
Now we need to configure authentication. We enter a trusted number, wait for the code, and confirm the smartphone. Now the protection is activated, next you need to figure out where to enter the Apple ID verification code. When logging into any Apple service, you will need to provide a login and password. And then the code will be sent via SMS. It must be entered after the login/password pair.
Reasons for failure
There are many problems that prevent the system from accepting a specific phone number for registration. Having familiarized yourself with them, you may be able to find the reason.
So, the grounds for refusal may be:
- technical failures of the site itself;
- problems with the number: it is inactive or outdated, blacklisted by this or other services (for example, Microsoft, Gmail, Google or any others);
- the device is not capable of receiving SMS messages;
- an error was made when entering (incorrect format);
- combinations are filled in not manually (as is required according to the rules), but using auto-fill or a bot;
- The ip from which you enter the site does not allow you to do this correctly or it is prohibited to perform such manipulations from it;
- Beeline mobile operator subscribers often cannot confirm their ID in Google;
- The Mozzilla browser is not suitable for such purposes.
This is such a big list. You need to carefully consider each of them, and on the basis of this, make a decision regarding your further actions.
What is the difference?
It’s easy to see that there are practically no differences between two-step verification and authentication. Both require an Apple ID verification code to sign in, so what's the difference?
Apple claims that two-factor authentication is more reliable and modern security. And although the user does not see the difference, the authentication system more effectively verifies devices and sends verification codes. Overall the optimization is much better.
Now you know where to enter your Apple ID verification code. But first the protection needs to be turned on.
Two-step verification and two-factor authentication: is there a difference?
The attentive reader could not help but ask a question: if the operation of the above Apple ID security systems is so similar, then what are their differences and why authentication is declared a more advanced mechanism for ensuring user security. Frankly speaking, there is no direct answer to this question.
Apple itself on its official support page says something like the following. Supposedly, two-factor authentication is an updated security service that uses more advanced ways of specifying verified devices and sending verification codes, and the overall experience has been optimized.
That is, as you can see, the differences seem to be indicated, but nothing is clearly understood. So all you have to do is trust the company and, if your device supports two-factor authentication, choose this type of protection. At the same time, it is important to note that before activating this type of protection, you must first disable two-step verification, if it was enabled.
Conclusion
I highly recommend using this protection. Regardless of what operating system you have (old or new), use two-step authentication or verification, as this protection negates any efforts of thieves to find out access to your account. Well, if you don’t know where to enter the Apple ID verification code, then there will be no problems with this, because the user interface is so simple that even a child can figure it out.
Apple gadgets are famous for their ability to ensure the security of users’ personal data - on iPhones you can “password-protect” literally everything. However, this sometimes backfires on the users themselves. Having set a lot of passwords, they will forget some of them.
We will talk about how to set and change various passwords on an iPhone, as well as ways to recover forgotten codes.
What passwords protect iPhone?
There are 3 passwords that owners of Apple products are at risk of forgetting:
- Lock screen password. The iPhone owner has to enter it every time he unlocks the device.
- Restrictions password – protects applications from accidental deletion, restricts access to sites containing 18+ content. Through the “Restrictions” section in the “Settings” of your iPhone, you can remove the browser and camera from your desktops - only someone who knows the restrictions password can return these elements.
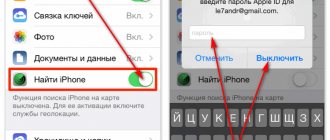
- Apple ID password. Without an account password, you will not be able to download an application from the AppStore or deactivate the Find iPhone function.
iPhone lock screen password
The owner of an iPhone enters the lock password many times every day, so cases where this code is forgotten are rare. Any combination of 4 digits can serve as a locking password, but it is better to avoid very primitive ones (like 0000). The user needs to remember that the locking password protects his photos, which may include incriminating evidence.
How to put
Setting a password for the lock screen is done as follows:
Step 1 . Go to the “Settings” of your iPhone, find the “Password” section and go to it.
Step 2 . Click on the “Enable Password” item.
Step 3 . Come up with a 4-digit combination and enter it twice.
After this, the lock password will be set.
Please note the other options present in the Password section. For example, through the “Password Request” menu you can set a time period. The gadget will have to be locked for that long to ask for a password.
This option allows an active gadget user to avoid the need to waste time entering a digital code several times per minute. The optimal time period for requesting a password is 5 minutes .
You can also set a 4-hour period - but is a password needed at all ?
Apple warns that the shorter the time period for asking for a password, the more secure the data on your iPhone is.
Another interesting option is “Erase data”. The slider for activating it is located at the very bottom of the “Password” section.
If the “Erase data” option is activated, then after 10 unsuccessful attempts to enter the password, all information stored on the mobile device is destroyed. Need I say that a user who dares to enable this option should back up data on an ongoing basis?
How to change/disable password on iPhone
You can change the unlock code in the same “Settings” section. Log in and enter your current password. Then click on the “Change Password” item.
Enter the current code again, then enter the new combination twice.
The password will be changed.
The user can set as a password not only a combination of 4 numbers, but also a more complex set of characters - including letters and punctuation marks. To do this, you need to move the “Simple Password” slider to the inactive position.
The iPhone will ask you to enter a valid security code - then give you the opportunity to set a complex password.
The complex password entry screen looks like this:
Removing the password from iPhone is very simple. You just need to click on the “Turn off password” item and enter the current security code once.
How to reset if you forgot
The consequence of resetting the unlock password will be the deletion of all information on the iPhone. Therefore, before starting this procedure, it is worth creating a backup copy of your data.
You can reset your lock password in 2 ways: through iTunes and through the iCloud website. If you decide to use a media combine, you need to proceed like this:
Step 1 . Launch iTunes.
Step 2 . Enter your mobile device into Recovery Mode.
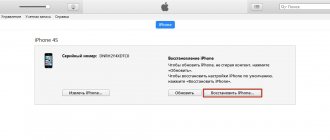
Step 3 . Connect your iPhone to iTunes with a USB cable. Something like this will appear on the screen:
Step 4 . Click the "Restore iPhone..." button and in the window that appears, select the "Restore and update" option.
Next, all you have to do is wait for the software installation/download procedure to complete.
If the speed of your Internet connection leaves much to be desired, you should be prepared to wait a long time - after all, you have given iTunes the task of downloading firmware, which weighs about 1.5 GB.
Upon completion of the procedure, you will receive a gadget that you can configure as new, including protecting it with a new password.
You can reset your lock password through the iCloud website only if Find My iPhone is enabled on your mobile device. The algorithm of actions is as follows:
Step 1 . Go to www.icloud.com.
Step 2 . In the main menu, find the “Find iPhone” icon and click on it.
Step 3. Enter your Apple ID password and click “Sign in.”
Step 4 . In the All Devices menu, select the device you want to reset.
An image of the device will appear on the screen, as well as a list of actions that can be performed with it remotely.
Step 5 . Click on the “Erase iPhone” button.
Then confirm your intention - click on “Erase” in the window that appears.
Step 6 . Enter your Apple ID password again and click on the arrow button.
The procedure will begin to delete all data from the iPhone, including set passwords.
How to correct a number error for proof of ID
To remove the error “This number cannot be used to prove your id” in Google, you need to find the reasons for its appearance. If the cause is found, we move on to troubleshooting the problems. There are many methods to solve this problem. You can use the tips in order or randomly. at your discretion.
You need:
- check the website for functionality by refreshing it a couple of times (via CTRL+F5) and re-entering the data;
- check your own mobile phone (it may be blocked, out of date, on the Microsoft blacklist, tied to unnecessary applications and services, or seen as a scam). Please note that Gmail services have a limit on the number of accounts created per phone;
- maybe your phone can't receive SMS;
- if you use a virtual number, we recommend changing it to an existing one;
- change browser (it is not recommended to use Mozilla Firefox);
- set the phone country in the browser itself, VPN services will help with this;
- change the ip of the country where the mobile is registered (for Russian the country is Our Motherland);
- If you don’t want to change your IP, you can install a proxy server (vpn) for the country whose code is indicated. If possible, use official VPNs. Google knows all free proxy servers;
- clear browser cache, cookies, all garbage;
- disable Flash/Java and other add-ons (especially unofficial ones);
- Do not use a “clean” browser, as Google may consider this automation (you should not delete your history). Be sure to authorize the user in the browser;
- on your phone (Droid) go to “Options” - “Accounts” - “Add” - “Google”. After adding, you will be asked to enter the phone numbers, but you can skip this point for now. If you don't have a suitable phone, use Droid emulators.
If all the options listed above do not help, you can try changing your mobile operator. We don’t guarantee that this method will work 100%, but it’s definitely worth a try.
Be careful, Google services may not accept online mobile numbers and numbers associated with various unofficial sites. This is a fairly common problem when users encounter such an error. Internet users associate the problem with Beeline numbers. This problem is not observed with MTS and other mobile operators.
Try the proof via voice call
Restrictions password on iPhone
Users of Apple technology constantly have problems with restriction passwords. You have to enter the restrictions password much less often than the unlock code, so it’s easy to forget it.
How to put
To set a restriction password on an iPhone, you need to follow these steps:
Step 1 . Go to the “Settings” of the gadget and follow the path “Basic” - “Restrictions”.
Step 2 . In the last subsection, click on “Enable restrictions”.
Step 3 . Create and enter a 4-digit restriction password twice. You cannot set a more complex combination that includes letters (as is the case with an unlock code).
After setting the password, you will see that all the sliders in the “Restrictions” subsection have become active.
By controlling these sliders, you can customize your restrictions. For example, by switching the Safari toggle switch to the inactive position, you will remove the browser icon from the iPhone screen. By deactivating the “Uninstall programs” slider, you will prohibit the corresponding operation.
How to disable/change
Disabling the password restrictions on an iPhone is done in just two steps: you need to click on the “Turn off restrictions” item, then enter the password.
You can change the restrictions password by disabling it and reinstalling it. There are no other ways - however, this one takes less than a minute.
How to find out if you forgot
If you forgot your restrictions password, you don't have to reset your iPhone. You can find out the password using special software. Pinfinder program is suitable , which you can download here. The utility weighs only 1 MB and is downloaded in archive format - so to use it you must have WinRAR on your PC.
You can find out your forgotten restrictions password using Pinfinder by doing the following:
Step 1 . Back up your iPhone data via iTunes. If you have already made a backup that includes the restrictions password before, you can skip this step.
Step 2 . Open the archive and run the executable file Pinfinder.exe .
Step 2 . The following window will appear:
The Backup Time column lists the dates of the most recent backups. Find the current date, then pay attention to the combination of numbers that appears opposite it in the “Restrictions Passcode” column. This combination is the current restrictions password .
Restriction and blocking passwords consist of 4 digits, so quite often users use the same combination. If you have forgotten the restrictions password, you should first try entering the unlock code instead - maybe this will yield results.
Apple ID password
The Apple ID password is set when creating an account. We won’t write here how to register an Apple ID - there is an article on our website that tells in detail how to create an account through iTunes and directly from your smartphone. A more pressing issue is the issue of recovering a forgotten Apple ID password.
How to change your password if you remember your credentials
To change your Apple ID password, you need to do this:
Step 1 . Go to the account management page and log in - enter the Apple ID itself and its password.
Step 2 . Answer a couple of security questions - the same way you answered them when registering.
If you do not remember the answers to the security questions you have asked, you can reset these questions and set new ones. To reset, it will be enough to answer just one of 3 questions - any of the user’s choice.
Step 3 . After logging in, you will see a page with your personal data. Find the “Password” item in the “Security” block and click on the “Change password...” link located next to it.
Step 4 . A window will appear - in its fields you will need to enter the current password (once) and the new one (twice).
The Apple ID password requirements are quite strict. The new password must consist of 8 characters (minimum), include numbers, upper and lowercase Latin letters, and must not be similar to any password that has been used with this identifier over the past year.
Step 5 . Having managed to select a combination that meets the requirements, click on “Change password...”.
No more confirmation is needed - the next time you try to download the application, you will have to enter a new Apple ID password.
How to reset your password if you forgot it
You can reset your Apple ID password in 2 ways: via email or by answering security questions. The reset is done as follows:
Step 1 . Go to the Apple ID website.
Step 2 . Enter your Apple ID (the email address to which your account is attached) and the captcha in the appropriate fields. Pay attention to Apple’s customer focus: a user with poor vision can force the service to call - if he clicks on the “For the visually impaired” item.
After entering the captcha, you need to click “Continue”.
Step 3 . On the next page, select the “I want to reset my password” option and click “Continue” again.
Step 4 . At this stage, you have to choose a reset method. If you have access to the email to which your Apple ID is linked, you should choose the “Receive message by email” option - this method takes less time.
Click "Continue" and check your mailbox. There will probably be a letter like this:
Click on the “Reset Password” link contained in the email. On the page where you will be transferred, set a new password.
If you do not have access to your mailbox, you will have to indicate your date of birth and answer a couple of security questions.
For the most forgetful
If a user has forgotten his Apple ID password, forgotten the answers to security questions, and cannot check the mailbox to which the account is linked, he will be forced to contact Apple technical support.
The technical support number for Russian iPhone and iPad users is . The call is free. The client will be served faster if he calls the request code. You can get the code by filling out a short form:
The user needs to be prepared for the fact that Apple employees will ask him to provide a receipt for the purchase of an “Apple” gadget and only after that will provide his credentials.
Benefits of using two-factor authentication.
Your account will be as secure as possible. You no longer have to memorize the answers to various security questions. Your identity will be verified using a password and verification codes. Initially, when you try to activate a new gadget, a password code will be sent to your trusted device; if you do not currently have access to it, then click on “Code not received” and the confirmation numbers will be sent to you to your trusted number. In this case, you can easily activate any device quickly even without access to all trusted gadgets.