The “WinSxS” folder is located in the “Windows” system folder located on the computer’s system drive. Some users have a question: what is this WinSxS folder? This is a service folder - a repository of system components necessary for the normal functioning of the Windows operating system.
The WinSxS folder stores backup copies of operating system components previously installed on the computer, files and other information necessary for system recovery.
Many users are interested: is it possible to delete the “WinSxS” folder from the computer? Users believe that the WinSxS folder takes up a lot of space on the PC hard drive, so it needs to be deleted or completely cleared to save space.
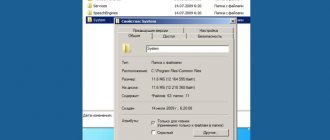
The WinSxS folder is located at the path: “C:\Windows\WinSxS” on the disk with the installed operating system.
Thanks to the WinSxS folder, it is possible to return the system to a previous state to the old version of the update. In Windows 10, the WinSxS folder stores the data necessary to reset the system to the original settings of the Windows operating system. Therefore, it is not recommended to delete the WinSxS folder from your computer manually or using programs.
If the WinSxS folder is deleted on the computer, or necessary files are deleted from it, problems or failures in the operating system may occur, and Windows may not load. It will be impossible to perform a system restore due to missing required files.
In order to look at the size of the WinSxS folder, you should enter the Windows folder, and then right-click on the WinSxS folder. In the context menu, select “Properties”, in the “Properties: WinSxS” window that opens, in the “General” tab information will be displayed on how much disk space the files in the WinSxS folder occupy.
Please note that the folder size in Explorer does not take into account the fact that most of the files in the WinSxS folder are “hard links”, and the files themselves are located in other directories of the operating system. Therefore, the true size of the WinSxS folder is smaller than what Explorer or other file manager shows, because they add up the size of files from two places.
Due to the fact that the operating system is constantly updated, old versions of updated system files accumulate in the WinSxS folder, so the folder size increases.
If the WinSxS folder takes up a lot of space on your hard drive, then clearing the WinSxS folder of unnecessary files will free up some disk space from data. To do this, you need to use the built-in tools of the Windows operating system.
How to shrink the WinSxS folder? To clean the WinSxS folder, system tools are used:
- Disk Cleanup utility (cleanmgr.exe).
- Commands executed from the command line.
- DISM.exe utility.
- Task Scheduler.
In this article we will look at instructions on how to clean the WinSxS folder in the operating systems Windows 10, Windows 8.1, Windows 8, Windows 7.
Cleaning the WinSxS folder in Windows 10
In Windows 10, the WinSxS folder stores not only backup copies of system components and updates, but also other important operating system data, so emptying the folder unless absolutely necessary is not recommended. This method can be used on Windows 8.1 and Windows 8 operating systems.
Run Command Prompt as Administrator. Read about how to do this in Windows 10 here.
In the command line interpreter window, enter the command that analyzes the system component store, and after entering the command, press “Enter”:
Dism /online /cleanup-image /AnalyzeComponentStore
After the analysis is completed, the command line window will display information about the state of the storage: files compatible with Windows and files that can be deleted (backups and disabled components, cache and temporary data) from the operating system.
To run WinSxS cleanup on Windows 10, enter the command:
Dism /online /cleanup-image /StartComponentCleanup
Running this command with the additional “/ResetBase” switch removes outdated versions of components:
Dism /online /Cleanup-Image /StartComponentCleanup /ResetBase
After the operation is completed successfully, restart your computer.
Cleaning
If you are wondering how to remove WinSxS, give up this idea. This folder cannot be completely erased. It is also not recommended to manually remove files from there. There will be unpleasant consequences. But clearing some of the contents and slightly reducing the size of the directory is a very real task.
Disk Cleanup Function
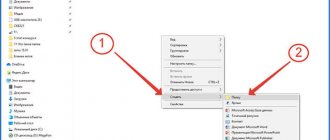
- Right-click on the system disk. A context menu will open.
- Select the "Properties" line.
- General tab.
- "Disk Cleanup".
Click on Disk Cleanup
- A. If it is not there, click on the “System Files” button. The required line should appear.
- Confirm the action by clicking on “OK” and then on “Delete”.
- Wait for the process to complete. Next, you may need to restart your PC.
- The service only gets rid of unnecessary updates. It is not possible to erase the entire folder.
Command line in Windows 10
WinSxS in Windows 10 can be cleared if you use the console.
- Right-click on the Start menu. It looks like the Win logo.
- Select "Command Prompt" and run it as an administrator.
- Enter the command “Dism.exe /online /cleanup-image /AnalyzeComponentStore”.
- The system will analyze and make recommendations.
- If it prompts you to delete unnecessary files, use the command “Dism.exe /online /cleanup-image /StartComponentCleanup”. The cleaning will begin.
- If the directory weighs less than 5 GB, it is better not to touch it. Otherwise, you will get the opposite effect - an increase in volume instead of optimization.
If the WinSxS folder takes up too much space, you can clean it up. This is done through special OS services or the command line. You should not change the contents of the directory directly. If you delete all files using the “Delete - Enter” method, serious problems will arise.
How to clean up the WinSxS folder in Windows using the Disk Cleanup utility (cleanmgr.exe)
Cleaning the WinSxS folder in Windows is carried out using the Disk Cleanup system utility (cleanmgr.exe). This method works on Windows 7, Windows 8, Windows 8.1, Windows 10 operating systems.
If on your computer running Windows 7, the Disk Cleanup utility does not have an option to clean up updates, install the optional update “KB2852386”, which adds this item to the system application.
Run the Disk Cleanup utility and follow these steps:
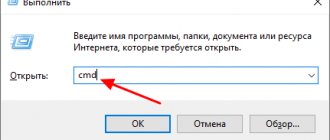
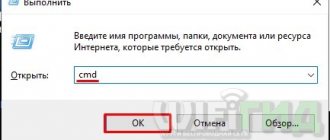
- Press "Win" + "R" on your keyboard.
- In the Run window, enter the command: “cleanmgr” (without quotes), click OK.
- Select the drive to clean. By default, the system drive is selected.
- In the “Disk Cleanup (C:)” window that opens, click on the “Clean up system files” button.
- Select the drive to clean again.
- In the “Disk Cleanup (C:)” window, check the boxes next to “Windows Update Cleanup” and click the “OK” button.
- In the warning window, agree to delete the files.
- Wait for the data deletion process to complete, and when the WinSxS folder in Windows is cleared, restart your computer.
This will slightly reduce the size of the WinSxS folder on the computer disk.
What is the WinSxS folder for?
The WinSxS directory first appeared in Windows Vista. It contained configuration files of the system and its components; later other system files were added to it, which, however, did not change its original purpose. In Windows 7, 8.1 and 10, the WinSxS folder stores backup copies of system files, automatically created when installing major and cumulative updates, thanks to which the user can roll back to a previous version of Windows if he doesn’t like the new one or if some bugs are found in it.
Since updates are installed regularly, WinSxS increases in size, which, of course, cannot but bother particularly meticulous users. And here the questions begin: is it possible to remove WinSxS, if so, how to do it, whether this will affect the operation of the system, etc. Let's start with the fact that you can remove anything, but the results of such cleaning can be disastrous. The WinSxS folder stores not only backup copies of previous versions of the system, but also the data necessary to reset it to its original state. It also contains shared files with the Windows directory, cache and temporary system files, and while the latter can still be cleared without any consequences, deleting the former may well result in Windows not booting at all.
How to clean WinSxS in Windows 7/10 without damaging the system and is there a need for such cleaning at all? The last question is quite reasonable, since the true size of WinSxS may differ from what is shown by Explorer or another file manager.
The reason for this is simple: approximately 40 percent of the contents of the WinSxS folder are symbolic links to objects in the Windows directory, which are displayed and identified as real files, but have no weight. Of course, you need to understand that this ratio is very conditional; it changes as the folder grows due to backup copies.
Cleaning the WinSxS folder in Windows 8.1
In Windows 8.1 (Windows), the WinSxS folder can be cleaned up using the Task Scheduler. This method also works in the Windows 10 operating system.
You may also be interested in:
- How to delete temporary files in Windows 10
- Windows 10 Cleanup: Automatically and manually remove unnecessary files
To clean the WinSxS folder, follow these steps:
- Start Task Scheduler using one of these methods.
- In the left column, open the “Task Scheduler Library”, and then alternately go to the “Microsoft” section and then to the “Windows” section.
- Click on the “Servicing” section, the “StartComponentCleanup” component, which is responsible for cleaning the component store, is ready to perform the task.
- In the right column, under Selected Item, click Run.
Wait until the removal of unnecessary files from the system folder is completed, and then restart your PC.
To automatically run a job to clean up the WinSxS folder, do the following:
- In the “StartComponentCleanup” component window, in the right column, in the “Selected Element” section, click on “Properties”.
- In the “StartComponentCleanup (local computer)” window, open the “Triggers” tab and click on the “Create” button.
- In the Create Trigger window, set up a schedule to automatically run the task at the desired frequency at a specific time.
Features on demand in Windows 10 and 8.1
In the article "Securely Emptying the WinSxS Folder in Windows Server 2012," we looked at the Features on Demand , which provides the ability to remove unused role binaries from the WinSxS directory. To remove unused roles from disk, there is a special Powershell cmdlet - Uninstall -WindowsFeature . However, in the case of Windows 10 and 8.1, everything is not so simple. The problem is that the Uninstall-WindowsFeature cmdlet is missing in these versions of Windows. And Features on Demand is only implemented using DISM or the DISM PowerShell cmdlet. It is also important to know that the DISM command, unlike the Uninstall-WindowsFeature cmdlet, does not analyze package dependencies on each other. So, when you remove a Windows package using DISM, only the component specified in the command will be removed, and all packages that depend on it will remain on the system. It is for this reason that you should not use DISM to remove roles from disk in Windows Server 2012, because There is a much more convenient and functional tool.
A complete list of available features in the Windows 10/8.1 image can be obtained using the command: DISM.exe /Online /English /Get-Features /Format:Table
Let's assume, for example, that the TelnetClient in the future. Let's remove this component from the disk (essentially from the WinSxS directory) with the command: DISM.exe /Online /Disable-Feature /Featurename:TelnetClient /Remove
If you list all available on-demand features in Windows again, you will see that the feature status changes to Disabled with Payload Removed .
Thus, in Windows, you can significantly reduce the size of the WinSxS folder by removing unused components from the disk. The only caveat is that this option for cleaning the WinSxS directory is suitable for fairly advanced users who understand the components of Windows 10 and their purpose.
Removing old updates using Disk Cleanup
This method can be applied to all operating systems Windows 7 and older. You can launch the Disk Cleanup component using any of the following methods.
Open My Computer, select the system drive and right-click on it. Afterwards, open the “properties” item in the context menu. Go to the “general” tab. Here you need to remember the amount of free and used space on your hard drive. Next, click the “disk cleanup” button and wait for the procedure to finish.
The second method is carried out through the “execute” command. Press the key combination “Win+r”. In the text input field, enter the command “cleanmgr” and press “Enter”. Next, find the system drive and select it. Click “Ok” and wait for the system to finish counting the deleted data.
In the window that opens, click the “Clean up system files” button. If a UAC prompt pops up, click “yes”.
To ensure that the “winsxs” folder in Windows is cleared, make sure that the “Clean up Windows updates” checkbox is checked. This section is responsible for deleting files in this folder. You can mark all other points as you wish. Also in this window you will see the approximate amount of free memory after cleaning. After all the items you need have been checked, click “Ok”. The cleaning process may take a little longer. You may also need to restart your computer at the end of the procedure.
Clarification: The update cleaning function on Windows 8 and 10 is built in automatically. There is no such thing in the seven. But, there is an update that will help you carry out the cleaning procedure in this version of the software. To do this, you need to download the KV2852386 update package and install it on Windows 7.
The other methods that I will tell you about will not help you if you have seven installed.
Xenomorph
Cleaning the WinSxS folder in Windows 7 correctly
WinSxS folder
Annoys computer users with its size. Attempts to delete its contents usually ended in computer instability or complete system crash. Now there is a safe way to shrink the WinSxS folder in Windows 7.
As a rule, the hard drive capacity allows you to ignore a folder of several gigabytes. But perfectionists or owners of relatively small SSD drives may still want to free up space. The WinSxS folder is located in C:\Windows\winsxs
. This is a service folder of the Windows operating system used to store previously installed versions of system components. Thanks to its presence, it is possible to roll back to an older version of the update if necessary.
Why is the WinSxS folder so large and constantly growing in size?
Why is this folder so gigantic? The fact is that the vast majority of the contents of the WinSxS folder are “hard links” (A file can have several hard links: in this case, it will appear on the disk simultaneously in different directories and/or under different names. The number of hard links of the file is kept at the same level file system in meta information. Files with a zero number of links cease to exist for the system and, over time, will be physically overwritten), and Explorer and many file managers do not take this into account. The actual weight of this folder is much less than what is written in its properties. Therefore, an attempt to delete part of the contents of the WinSxS folder manually or using programs will almost certainly lead to errors in the operation of the operating system or to a complete loss of functionality.
Following from the purpose of this folder, it has one more property: it is constantly growing in size. Since when updating the system in WinSxS, old versions of the updated files are saved, so that you can roll back to the old version in case of problems. This significantly increases the reliability and fault tolerance of the entire system, but additional hard disk space is required. Accordingly, the size of this folder is different for everyone. It depends on when the system was installed and how often system components were updated. The longer the operating system is installed and the more regular updates occur, the larger the size of the WinSxS folder.
How to empty the WinSxS folder in Windows 7
When using this method, a prerequisite is that SP1 must be installed on the system. On October 8, 2013, Microsoft released the recommended update KB2852386, which adds the ability to clean up this folder. You can install it using Windows Update or download the package using Internet Explorer from the Microsoft website. If you are wondering how much space will actually be freed up, you need to compare the free space on the entire system drive before and after cleaning. To do this, right-click on the system disk in Explorer and select “Properties” from the menu. We remember how much free space is on the disk.
Now you can perform the procedure to clean the WinSxS folder. To do this, you need to run the Disk Cleanup utility with administrative rights. There are two ways to do this. Click the “Disk Cleanup” button in the above screenshot, and then in the window that appears, the “Clean up system files” button.
The second method is to use the command line running as administrator. Run the cleanmgr command in it. In the window that appears, select the system drive and click “OK”.
Uncheck all the checkboxes except the “Clean up Windows updates” item and click the “OK” button. The WinSxS folder will be cleaned; after completion, you need to reboot the computer. When the system boots, you can call up the disk properties again and see how much free space there is. The difference in readings before and after cleaning allows you to find out how much space has actually been freed up on your computer’s hard drive.
Naturally, the WinSxS folder will remain, and only old versions of files will be deleted. Moreover, all versions except the penultimate one are deleted. This leads to the conclusion that you shouldn’t expect miracles, for some people there may be nothing to delete at all, for others several hundred megabytes will be deleted, but if the system was installed a long time ago and was frequently updated, then most likely you can count on several gigabytes. By the way, in Windows 8, the ability to clean the WinSxS folder from old versions of updates has existed for a long time.
Disk Cleanup Wizard add-on allows users to remove outdated Windows updates on Windows 7 SP1 or Windows Server 2008 R2 SP1 - Hotfix KB2852386
For all supported 64-bit versions of Windows 7 Windows6.1-KB2852386-x64.zip [524.92 Kb] (downloads: 3449)
For all supported (x32) 86-bit versions of Windows 7 windows6.1-kb2852386-x86.zip [512.63 Kb] (downloads: 924)
* * *
Cleaning the WinSxS folder in Windows 7 correctly: beginpc.ru (2013)
Reducing the size of the WinVista & Win7 WinSxS folder: Geektimes.ru (10/14/09)
* * *
System cleaner
Download System Ninja: singularlabs.com
Download: system-ninja-portable-3_0_3.zip [1.89 Mb] (downloads: 155)
* * *
Intel® Chipset Device Software (INF Update Utility): Downloadcenter.intel.com
* * *
How to properly reduce the size of the WinSxS folder in Windows 10, 8.1 and 8: www.outsidethebox.ms
* * *
Windows 7
- Run the Disk Cleanup utility through search.
- Select your system disk on which Windows is installed, then click on the cleanup button. You will need to wait a little, then a window like this will open, where you need to select “Backup files for update packages.”
There is no such item
Through the search, launch the update center. If you cannot find it this way, then go to the “Control Panel”.
While connected to the Internet, click on the search for updates button and click on the link for optional and available updates.
We find the package KB2852386, select it and install it. Finally, we reload the car.