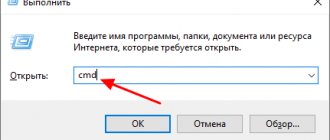
Hi all! I have been working as an engineer for several years now and recently began to notice that the main problem in Windows 10 is that computers on this OS do not see each other. In 40% of cases, this happens after updating: 1709,1803, 1809, 1903, 1909 - where support for “Computer Browser” and SMB 1 was disabled. In other cases, the problem may be due to incorrect sharing settings or network adapter address. First of all, go to the command line - press the “WIN” keys and the English letter “R” on the keyboard. Enter the command “cmd” and press “Enter”.
First of all, we need to make sure that the computers have IP installed on the same subnet. I will show the example of two PCs - on both we write:
ipconfig
We look at the line “IPv4” - you need the first three digits to be exactly the same on both devices. For example, 192.168.1.42 and 192.168.1.43 - the last digit can be anything in the range from 10 to 254 (also, as you understand, they must be different on the local network).
We have found out the IP addresses, now we need to ping one of the computers. On one of the computers you need to enter the “ping” command and, separated by a space, the IP address of the second machine. For example, in my case:
ping 192.168.1.42
Next you should see packets being sent and received back. If everything is fine, then try opening Explorer or “Computer” and entering the IP manually in the address bar - for example:
\\192.168.1.42
You can also use the computer name that is registered on the network:
\\COMP_2
If the packets do not arrive, check that the computers are connected to the network via cable or Wi-Fi to the same router or switch. Let me remind you that when connected via a LAN cable, the port on the computer should start to light up. Also, packets may not reach the destination if IP addresses are configured incorrectly - see the last chapter of this article for IP settings.
NOTE! If the indicator does not light, then most likely the cable is crimped incorrectly - I encountered this myself, so we simply re-crimp it or change it to a new one.
If the computer does not see other computers at all, but pings, and the IP settings are displayed correctly, then let's start by checking the shared access, as well as minor OS settings.
Checking sharing
First of all, you need to check the sharing in the “windows” settings. For this:
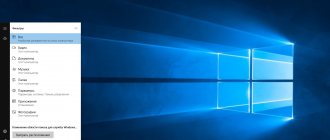
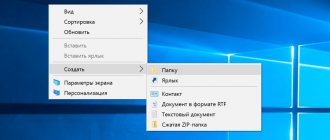
- Go to the “Control Panel” - this can be done through the “Start” menu, or by clicking on the “Win” and “R” buttons and typing the “control” command.
- Go to the Network Control Center.
- Go to the general access section.
- In the “Private” networks section, you need to enable network discovery and file and printer sharing - otherwise the PC on the network will be visible, but access to it will be denied
- Just in case, open the “All networks” section and enable the first option in the “Sharing public folders” section.
- Also be sure to remove password protected access.
- Next, you need to go to “Settings” (“Start” – gear icon).
- Go to the “Ethernet” or “Wi-Fi” section - depending on how you are connected. Click on network connection.
- Make sure that the slider for discovering this computer on the network is turned on (it is not in the new update). Also make sure that private network is enabled.
Next, we check the network connection. If there is no second computer, then move on.
Setting up a local network in Windows 10
This happens in two ways. You can access additional settings via the tray icon.
The example shows a wi-fi connection icon. If you have a cable connected via a network card, then a small monitor will be displayed. Next, setting up the network between Windows 10 is the same. Select the Sharing options section.
Setting up a network consists of the following steps: 1. Turn on network discovery so that our computer is visible to other network participants. 2. Enable sharing of those files, folders and devices (printer, scanner) that we want to open for the local network. Users will be able to not only download files, but also edit them and add their own (how to select specific files is described below).
3. Save the changes. Setting up a Windows 10 workgroup allows you to give free access and set a password for protection in the All networks section. Password protection is not required for a home network. If you install it, then to access the file from a remote computer you will need a name and password for each user.
At this point, setting up your home network is complete and you can move on to selecting folders that will be available to other users.
Reset DNS Settings and Enable Discovery
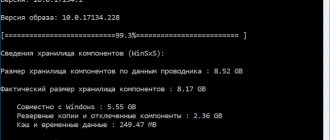
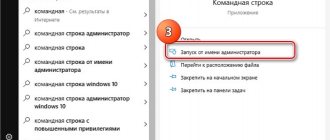
We need to launch the console - click on the “Win + R” buttons and enter the command: “PowerShell”. Charmingly check the box to launch the command line with administrator rights. If there is no checkbox for running as administrator, find the program using the Windows search bar.
Now we write the command:
ipconfig /flushdns
And one more command to enable detection if it is disabled:
English version: netsh advfirewall firewall set rule group=”Network Discovery” new enable=Yes Russian version: netsh advfirewall firewall set rule group=”Network Discovery” new enable=Yes
There is a second version of the command - it enables the same function through Windows Defender:
Get-NetFirewallRule -DisplayGroup “Network Discovery” -Enabled True -Action Allow -Direction Inbound
In update 1803, the developers for some reason removed the ability to set up a workgroup, replacing this function with the OneDrive cloud service. In this case, access can be obtained if you enter the address of the second computer in Explorer, but it may not be displayed on the network. You can solve the problem by enabling the appropriate services via the console with the command:
get- Service fdPHost, FDResPub| Set- Service – startuptype automatic – passthru| Start- Service
You also need to check the settings in “Defenders” - in the “Control Panel” find “Windows Defender Firewall”. Next, in the left section, click “Allow interaction with applications...”.
To check the boxes, you need to click on the “Change settings” button. Now we find “Network discovery”, “File and printer sharing” and “Networking basics” - you need to enable all the checkboxes.
How to disable network discovery
Network discovery is a mechanism that allows computers on a network to see other machines, their network drives and printers. If you don't want your machine to be visible on your home network, it's best to turn off network discovery.
- Check your account. The sections of the control panel we need are available only to the administrator.
- In the Control Panel, open the Network and Sharing Center, and from it open the dialog box we need.
Network Sharing Center in Windows 10 gives you access to disable network discovery
- For each network profile (private, guest, or all networks), enable or disable network discovery.
Disable network discovery for the selected profile
- Save the changes using the button of the same name at the bottom of the screen. There is no need to reboot the OS; network discovery will be disabled immediately.
Working group
ATTENTION! In new updates, Microsoft has removed the ability to set up a workgroup - skip this chapter.
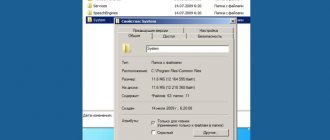
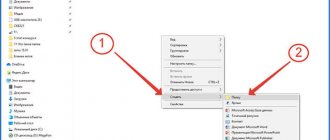
You also need to go to the system settings. To do this, right-click on “Computer” and select “Properties”, or press “Win” and the “Pause” key at the same time. Go to additional settings and on the “Computer name” tab, click on the “Identification” button.
- Selecting a corporate network.
- Using a network without a domain.
- On both computers you need to specify the same workgroup, by default it is “WORKGROUP”.
After this, we reboot both computers and then check the network.
Networking
The first step is to set the same workgroup name on all computers that you are going to connect to the network. On Windows 10 and other versions this is done the same way:
- Press Win+R to open the Run .
- Type " sysdm.cpl " to open system properties.
- Computer Name tab will immediately appear . Look at the name of the working group. To put the same name on other computers, click " Change ". Use only Latin letters!
The setup then continues in the “ Network and Sharing Center ”, which is launched through the Control Panel or the connection icon in the notification area. Next you should move on to changing additional parameters.
On Windows 10, you can still get here through the “ VPN ” section on the “ Network and Internet ” tab in the system settings.
Here you need to enable network discovery with automatic configuration, file and device sharing, and allow the system to manage homegroup connections.
Attention: Enable network discovery and passwordless sharing is required for all profiles! You'll set up your home or work profile first, then your general profile and all networks.
Next, proceed to setting up additional settings. Disable password protection when sharing so that the connection between computers can be established without additional barriers.
This operation must be repeated on all computers. As a result, local network participants should have:
- One workgroup name is assigned.
- Network discovery enabled.
If the home network into which the computers are connected is built on the basis of a single router, then the above steps are sufficient for the normal operation of the local network. If the computers are connected directly using a crossover cable or the DHCP service, which independently distributes IP addresses to machines, is disabled on the router, then additional configuration must be done.
- Open Network and Sharing Center , then go to the Change adapter settings .
- Select the network card in which the crossover cable is installed and open its properties.
- O and " Use the following DNS ". Fill in the lines with the values shown in the screenshot.
On the second computer you need to add the following data:
The IP address will be different on different computers. If on the first machine you wrote 192.168.0.2, then the second address will be 192.168.0.3 and so on, depending on the number of network participants. The rest of the data remains unchanged.
Network reset
If the computers still do not see each other, then in “Settings” we again go to “Network and Internet”. On the “Status” tab at the very bottom of the window, find and click on “Home Group”. Now click on “Change network location” and confirm the action.
If this does not help, then immediately click on “Network reset”. After that, reboot.
If this does not help, then the reset can be done through the “Power Shell” - enter three commands in a row:
netsh int ip reset reset.txt netsh winsock reset netsh advfirewall reset
Services
You can also turn network discovery on or off in Windows 10 through services. They can be deactivated by the user himself or by third-party programs. To quickly get there, hold down our favorite “Win + R” keys and enter: “services.mcs”.
Next you need to go and enable the following services:
- Discovery provider host.
- SSDP Discovery Service.
- DNS Client Service.
- Publishing function discovery resources – here you need to set the launch type to “Automatic with lazy loading”.
- Universal PNP device node.
After this we restart the computer.
setting up a network card in Windows 10 and firewall
If, after all the steps you have taken, you cannot access the folder from another computer, you need to check your antivirus. This must be done on the computer where the required file is physically located. To get started, just temporarily disable the firewall. If after this access is working, then we go to the settings. You need to find the section where permission to share is given in this version of the system. After confirmation, it should work fully. Network card settings in Windows 10 are registered automatically. Resetting network settings on 10 may only be necessary as a last resort. Usually, if there are network problems, updating the driver is enough.
Reinstalling drivers
Go to the “Task Manager” (Win+R= devmgmt.msc). Find your network adapter and remove it. After rebooting, the drivers should be installed again.
NOTE! If something goes wrong, you can download the driver from the Internet - for this, see the instructions here.
SMB
This is a protocol that works together with the Network Browser service. It is disabled by default on new versions of Windows, as it is quite leaky in terms of security. Also, when activating it, it should be enabled only on one computer, and on the second it should be disabled. You have two options:
First , if you have a computer on the network with Windows 7, 8 or some version of Server, then you shouldn’t turn it on, but it’s better to even go in and turn it off completely. On the “seven” and “eight” it is turned on automatically, so there is no need to change anything there.
The second is that if “ten” is installed on all computers, then you only need to enable it on one, then this computer will be the master, and the rest will be the slaves.
To disable or enable the function, you need to go to “Components” - which is located in the “Programs and Features” section (in the “Control Panel”). Find the folder that mentions SMB and enable all three checkboxes.
ATTENTION! I repeat once again that you need to enable this function only on one computer, and disable them on the rest.
Problem accessing a shared network folder via SMB1 in Windows 10 (my solution)
Let's return specifically to my problem. Everything I described above has been checked and rechecked 10 times already. I reset the network settings a couple of times, but Windows 10 never saw other computers on the network and, most importantly, the shared folder in the form of a flash drive connected to the router never appeared in Explorer. And on other devices on the network everything was detected without problems. Including my laptop.
I read somewhere that you can try opening a shared folder through the Run window. Pressed the Win + R key combination and entered the address of the network folder //192.168.1.1 (aka the router address).
I did not gain access to the drive, but an interesting error appeared:
You cannot connect to the shared folder because it is not secure. This shared folder runs on the legacy SMB1 protocol, which is insecure and may expose your system to attack.
Your system needs to use SMB2 or later.
And a link that you need to manually type