Screen resolution
How to make the font smaller on an Acer laptop and more? Let's start with the simplest thing - when it comes to the font for displaying information in the operating system as a whole. In this case, you will need to change the screen resolution.
To do this, it is recommended to do the following:
- Right-click on the desktop.
- Select “Screen Resolution” or “Personalization” - “Resolution...”.
- Click on the “Resolution” section in the menu that appears.
- Move the slider up or down. The higher the mark, the smaller the font will end up being.
- Save changes.
This approach is changing the screen resolution. During this operation, not only the font will change, but also the size of other OS elements.
Important: in the “Personalization” section there is an item “Font settings”. You can use them too.
For other versions of Windows
To set the desired font size, you need to go to the Start menu and select the “Control Panel” section. In the window that appears, click on the “Design and Personalization” item.
After completing the described steps, a window will open in which it is recommended to select “Change the sizes of text and other PC elements.”
To change the font to a larger one, go to the “Other font size (dpi)” section. Nearby there is an item “Setting ClearType Text”, it also allows you to make the text more comfortable.
In the window that opens, open the “Scale from normal size” pop-up menu and select convenient options. After completing the settings, you need to click on the “Ok” button.
Important! The selected settings will take effect only after the system is rebooted. It is recommended that you save all open text documents before you begin to change them.
You can remove bold font using the same scheme.
Changing screen resolution
Screen expansion affects image clarity and the size of icons and text. The easiest way to change the screen scale is by right-clicking on the desktop and selecting “Screen Resolution”.
In the window that appears, you need to select the “Resolution” section and set the maximum parameters.
Magnifier
If none of the proposed options allows you to see the letters clearly without experiencing discomfort, you can enable a function such as “Screen Magnifier”. To do this, go to the start menu and select the “All programs” section.
In the list that appears, select the “Standard” folder, then go to the “Special Features” section and select the desired application.
After clicking on the “Screen Magnifier” button, a small window will appear on the desktop in which you can adjust the screen magnification percentage.
Making the screen comfortable and making the font larger is not difficult. Using the suggested tips and watching the video, it will take no more than 5 minutes.
Mouse + keyboard
This is just one of several possible developments. Wondering how to make the font smaller on a laptop?
You can cope with this task using a mouse and keyboard. There is nothing difficult about it. True, the proposed method will not affect the screen resolution in any way - it will help adjust the text size in programs. This process is sometimes called scaling.
How to make the font on a laptop smaller? Instructions for achieving the corresponding goal will look like this:
- Open the program in which you want to see changes.
- Press Ctrl on the keyboard panel.
- While holding the mentioned control, scroll the mouse wheel forward or backward. In the first case, the text will increase, in the second, it will decrease.
- Release all controls once the desired result is achieved.
It is done. Now it’s clear how to make the font on a laptop smaller or larger. Nevertheless, there are still a number of interesting and simple solutions.
How to make cheat sheets using Microsoft Word
Reducing the font size
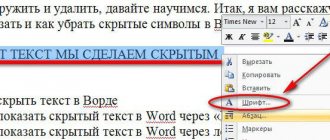
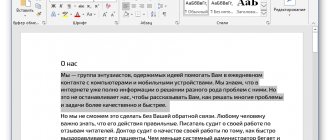
Method 1. Select all the text with the left mouse button or using the keyboard (place the mouse cursor at the beginning of the desired fragment and press three keys - ctrl, shift, end), and then open the “HOME” tab (most often it is open by default). In this tab at the top, select the font and its size for the text as shown in the screenshot:
In this option, the minimum font size is 8 point, so using the numeric keypad we type the required size and press “Enter”. As a rule, the optimal font for cheat sheets is 6-6.5 point.
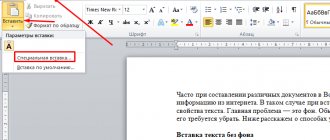
Method 2. The second method is even simpler. To select a font, select the text as described in the first method. Then right-click on any selected fragment and a menu will open where you need to find the “Font” button.
When you click the font button, a dialog box opens where you can set the font name and text style. Here you select the font, style and size, as shown in the figure. As a rule, Times New Roman is ideal for cheat sheets; it is best to choose the “Normal” style, since bold or italics take up a lot of space, which is not very good for cheat sheets:
Installing the Times New Roman font
Once you have installed the desired font, click the “OK” button, which is located in the lower right corner. If you click cancel, then all your work will be lost and you will have to re-set the necessary parameters:
Installing the Times New Roman font
After clicking the “OK” button, you will have the font installed as you wanted. See what the text looks like in the end.
Finished Fine Print
Interval
We started to figure out how to make a cheat sheet, but without spacing and other parameters it will be difficult to achieve the desired results.
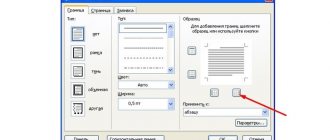
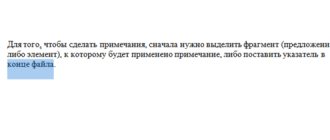
To fit more information on the page, you need to set the desired spacing. You need to do the same procedure as before: select all the text, right-click on any selected fragment, click the “Font” button and again go to the dialog box, where there are two tabs: “Font” and “Advanced”. We need a second tab: “Advanced”.
There are 3 types of intervals:
- Ordinary.
- Sparse.
- Compacted.
We select the third type - “compacted” and in the same window, opposite the word “Interval”, select 0.1 point, which is needed so that the text is as dense as possible and then even more information will fit on the page. Look at the sample where the places where you need to press are highlighted.
Setting the interval
Now you can click OK again and your selected text will become denser.
Hyphenation
The text can be made even denser, because when you start making cheat sheets, you will notice that the words are completely transferred to a new line and as a result there is a lot of free space left. To create hyphens, you need to select the required text and click on the “PAGE LAYOUT” tab, where there will be a “Hyphenation” button:
Hyphenation
After clicking “Hyphenation”, a window will open where you need to click “Hyphenation Options”. A window will open where you need to check the box next to the “Automatic hyphenation” offer:
Automatic hyphenation
Now you can make sure that long words are automatically divided into two parts and the entire page area is occupied.
Automatic word shortening
As a rule, you often come across words that are well understood in abbreviated form. Therefore, you can shorten frequently repeated words throughout the text. To shorten all the words manually, you need to spend a lot of time, but for a quick correction you can use a good method - autocorrect.
To autocorrect, you can use one of two methods:
- Method 1
- Press Ctrl + H and a dialog box will open.
- Method 2
- Open the “HOME” tab and in the upper right corner click the “Replace” button and a dialog box will also open:
How to replace text
Now a window has opened, where opposite “Find” we write the word that we want to shorten. Below it says: "Replace with" and here you need to write the abbreviated word. This is what it looks like:
Now click the “Replace All” button and then you can click the “Close” button. After this procedure, throughout the document the specified word will change to an abbreviated one. This way you can shorten as many words as you like, but don’t overdo it, because you need to make cheat sheets so that you can copy them successfully.
Reducing margins
In addition to text, it is worth paying attention to other parameters, for example, margins or column sizes. They can be configured in three ways:
On the old version of Word, there is a "File" menu, and there are Page Options. In the new version of the editor, you need to go to the “Page Layout” menu, where you will find “Margins” in the left corner, and under them an arrow that you need to click:
After clicking the arrow, a menu will appear where you need to select “Custom Fields” at the very bottom. A dialog box will open:
Setting up fields
Here you need to select page parameters for all four sides and it is advisable to specify a value from 0.5 to 0.7 cm. Sometimes a message may appear that the selected value does not correspond to the printer settings, but, as a rule, this does not affect the print quality if, Of course you didn't choose 0.2 or 0.3 cm.
Important! If you need double-sided printing so that when cutting the cheat sheets the columns match, you need to make sure that all the fields on both sides of the sheet are identical.
Setting up narrow columns
If the cheat sheet is only in one column, then the text size will be larger than you need. Therefore, it is advisable to make from 3 to 6 columns.
If you have Word 2003, then open the “FORMAT” menu and the “Columns” submenu, and in the 2013 version, open the “PAGE LAYOUT” menu and in the upper left corner click “Columns”, and here select the number of columns:
Speaker selection
Unfortunately, you can select no more than three columns in this way, so you need to click the “Other Columns” button and you will see a window where you can select the number of columns:
Set the number of columns
You can write the number of columns using the numeric keypad, or you can use the arrows to select from 1 to 12 columns. The default interval here is 1.27 cm, but it is advisable to set it to 0.2 cm.
Set the number of columns
In the same box, you need to check the box next to the word “Separator”, since then it is more convenient to cut out the cheat sheet:
Setting a separator
After all the above procedures, we will have these convenient cheat sheets that we just have to cut and successfully hide from the stern eyes of the teacher:
Ready cheat sheet
How to fold a crib sheet
When the answers to the tickets are ready, cut, they need to be folded successfully so that the teacher does not find cheat sheets on you. As a rule, many students use an accordion, since it is then convenient to hide and take out.
Take a long cheat sheet and fold it so that you don’t have to twist and turn it over for a long time during the exam.
How to fold a crib sheet
The photo shows an accordion from a whole A4 sheet, but if you make such a cheat sheet from a smaller sheet, then the accordion will easily fit in your palm, and you will successfully write off a ticket. Look how it looks in the photo:
What does a cheat sheet look like in action?
How to successfully hide cheat sheets
So, the cheat sheets are completely ready and all that remains is to hide them so that you can use them in time. There are several good options:
Option 1 . The first option is reliable, but is only suitable for girls. Wear a full skirt to the exam. Sew an elastic band around the hem and pin the tickets to it with pins. The main thing is to remember where this or that question (ticket) is located.
Option 2 . This option is also suitable for girls. Before the office, put elastic bands on your legs under your dress or skirt, and put cheat sheets under them by numbers so you don’t get confused during the exam. It is advisable to prepare the elastic bands at home so as not to waste time on them later.
Option 3 . It is advisable to wear long sleeves for the exam. Then you can put elastic bands on your wrists, and hide cheat sheets under them in a circle. However, you need to hide the spurs in order so that you don’t have problems finding them during the exam.
Option 4 . You can also tie an elastic band around your stomach and hide your cheat sheets in a circle. However, you need to take them out only when the teacher has turned his back, since from the outside it looks strange if the student starts to lift his sweater or jacket.
How to successfully pass the exam with cheat sheets: tips
You are already experienced and know how to make cheat sheets, but you need to take everything into account in order to successfully pass exams or tests. Therefore, we will give you some tips to help you navigate this thorny path:
- It is advisable to write cheat sheets by hand, because then you will remember something and will be able to pass the exam with at least a C grade.
- Fill out the cheat sheets briefly, that is, write down the most basic things (formulas, rules, short phrases, etc.).
- Try to write cheat sheets in such a way that you remember the material and then it will be easier for you in the exam.
- Write cheat sheets in small but legible handwriting.
- If you know the answer, try not to take out the cheat sheet.
- Do not study the spurs for a long time, as the teacher will suspect something is wrong and will watch you closely. Then you definitely won’t be able to hide the cheat sheet in time.
- If you don’t know the answer, try to pretend to be smart and write at least something, because otherwise, the teacher will suspect you of cheating.
- Don't leave evidence after the exam, as many students do. After all, the teacher will walk around the classroom after you, look under the tables and understand who cheated, and this threatens a retake.
- Try to go to the exam first, because then you will be able to quickly get a cheat sheet while the rest of the students come in after you. While the teacher writes down ticket numbers and invites other students, you can take advantage of the teacher’s busyness and successfully cheat.
Keyboard only: option #1
It's hard to believe, but a PC can actually be controlled by a single keyboard. And with its help, the user can change the font on the screen at any time. More precisely, change the scale of letters and other elements in the program.
A simple keyboard shortcut will help you achieve the desired result. It must be used while in the selected application.
So, to change the font size on the screen, you will need:
- Go to the program with which you plan to work further. For example, an Internet browser.
- Press Ctrl. You need to keep this button pressed.
- Press the “+” or “-” key to increase or decrease the font, respectively. These elements are located above the letter panel of the keyboard.
- Release Control when the desired result is achieved.
At this stage, active actions can be completed. Everything, as it turned out, is extremely simple. The possible scenarios for the development of events do not end with the techniques discussed. What else can you use when thinking about how to make the fine on a laptop using the keyboard smaller/larger?
Enlarge font on laptop using Windows tools
To change the parameters of letters in text or other elements on the laptop monitor:
- on the desktop, press the right mouse button;
- select the “Screen Resolution” section;
- in the lower zone of the window that opens, click on “Change text sizes”;
- After completing the manipulations, click “Apply”.
@reedr.ru
Reference. In the tenth version of Windows, you can change the characteristics of letters and elements through “Display Settings” - a section in the window that appears after right-clicking.
All of the above methods to make font sizes smaller or larger are clear and easy to implement. Therefore, any user, even one who is just learning how to use a laptop, will be able to change the font settings at will.
Keyboard only: second option
The next technique is almost completely identical to the previous one. Only on laptops it is sometimes problematic to implement it.
The thing is that the NUM panel helps to adjust the text scale. It is not available on some laptops. Then you have to buy it in the store. This device is connected via a USB port.
Let's assume that there is a NUM panel. Then the person will have to do the following:
- hold down Ctrl and “+” to enlarge the text;
- press Ctrl and “-” to zoom out;
- hold down Ctrl and “0” to return to the original settings.
That's all. These combinations help in almost all applications. As already noted, they do not affect the screen resolution and system settings in general.
Screen panel
How to reduce the fine on an Asus laptop? There is another non-standard solution. It is almost never used in real life. Perhaps for experimental purposes or in case a regular keyboard fails to work.
We are talking about using the on-screen keyboard. It works exactly the same as a regular one, but runs directly in the operating system.
To use it, you need:
- Open Start.
- Switch to the “All Programs” tab.
- Click on the “Standard” folder.
- Expand the "Accessibility" section.
- Click on the line that says “On-Screen Keyboard”.
What's next? You will have to switch to the application the user needs, then activate the on-screen keyboard, after which you need to use the previously specified keyboard shortcuts. You will have to click them with the mouse cursor. It's not very convenient.
Browser and its settings
What else should a PC user pay attention to? You can change the scale of text and pages in application settings. Let's look at this option using a browser as an example. It’s clear how to make a font smaller on a laptop using the keyboard.
To change the font size in Google Chrome, it is recommended to follow these steps:
- Launch Chrome.
- Click on the button responsible for opening the main functional menu of the application. It's located to the right of the address bar.
- Click on the “Settings” inscription.
- In the “Font” section, set the desired value.
- Save the entered adjustments.
To change the page scale, you need to change the values in the “Scale” block in the main functional menu of the Internet browser. Usually the increase/decrease is carried out as a percentage.
How to change letter size in certain programs (partially)
In many computer programs in which you can open and read some text, you can increase or decrease its size. In fact, this is a change in scale, and not an edit of the file itself. Roughly speaking, you can simply zoom in or, conversely, move away the text without changing it.
How to do it. The most common way is to find this function in a separate program. But this is not very convenient and not always easy. Therefore, there is an alternative "fast" option that works in most computer programs.
Press one of the CTRL keys on the keyboard and, without releasing it, scroll the wheel on the mouse. Each such scroll increases or decreases the text by 10-15%. If you turn the wheel towards you, the font size will decrease, and if you turn it away from you, it will increase.
Once you are happy with the size, release the CTRL button. Thus, you will consolidate the result and return the wheel on the mouse to its previous functions.
By the way, instead of the wheel, you can use the + button to increase and - to decrease. That is, hold down CTRL, then press and then release the + or – key on the keyboard. One such click changes the size by 10-15%.
A few examples. Let's say I often use the Internet to search for information - I read news and articles. The text size differs on different resources - it depends only on the site itself.
For the most part, I'm happy with the size of the letters and I don't feel uncomfortable reading them. But sometimes I come across sites where the font is too small for me - I have to lean close to the screen and squint. It's inconvenient and unhelpful.
In such cases, you can quickly increase the font. I hold down the Ctrl button on the keyboard and scroll the mouse wheel several times, thereby changing the text size.
This works in 90% of cases: on websites, in mail, on social networks. You can check for yourself by increasing the font size in the article you are currently reading.
By the way, to return to the original size, you need to hold down the Ctrl button on the keyboard and then press the key with the number 0 once. However, this “return” does not work in all programs, but only in browsers.
Another example. Let's say I'm typing a document in Microsoft Word. The text in it should be a certain size, but for me it is too small. I can’t simply increase the font in the program itself - it would violate the design rules, and working with such small text is a pain.
By holding down the Ctrl button and turning the mouse wheel, I can zoom in on the document. By doing this, I will simply bring him closer to me, but NOT change him. The text will remain the same size, but I will see it enlarged.
The same applies to photographs and pictures that we open on the computer. In exactly the same way they can be “brought closer” or “farther away”.
Important! Some programs remember the size that was configured. That is, having opened something else in such a program, it will immediately be shown in a changed size.
So don't be alarmed if a document, book, or Internet page opens at a non-standard size—too large or too small. Just change it in the same way (CTRL and mouse wheel).