1. Be patient
The advice is banal, but useful: if the installation freezes, do not rush to worry. Recently, I have had to deal more than once with the fact that on completely new computers the installation program stops when it reaches the Windows desktop screensaver. In all cases, the installation resumed by itself - sometimes after 10 minutes, sometimes after 45.
I have not yet been able to find any official explanation from Microsoft about the reasons for this freeze. But according to my observations, this most often happens when installing Windows on computers with Gigabyte motherboards and AMD processors.
The desktop screensaver isn't the only stumbling block for Windows Setup. Sometimes it freezes before displaying a screen asking you to select a hard drive to install the operating system on. True, in this case the installation process resumes much faster.
2. Disable the floppy controller
Although floppy disks have long since fallen into disuse, some manufacturers still provide floppy disk controllers on their motherboards. Sometimes Windows cannot be installed until you disable the floppy disk controller in the BIOS settings.
Recently I had to deal with a long hang of the Windows installation program on one of my computers. After disabling the floppy controller, the installation went much faster and without delays. Unfortunately, this is not a one-size-fits-all recipe because sometimes the Windows installation freezes even if the floppy controller is missing on the motherboard.
3. Check the voltage of the memory modules
If Windows Setup freezes intermittently, it may be due to a memory problem. There are many ways to diagnose problems of this kind, and I will list some of them below, but I would like to mention one method in particular, since it is often overlooked.
Most motherboards provide for the use of memory modules with a voltage of 1.5 V. If the voltage is higher (even if only slightly), the system periodically freezes. However, this does not mean that such memory cannot be used: some motherboards allow you to adjust the RAM voltage through the BIOS.
4. Try removing or replacing memory modules
As mentioned above, most often Windows installation freezes due to RAM problems. In this case, try removing all memory modules except one and see if the freezing stops. If this does not help, replace the remaining module with another tested one to eliminate the possibility of defective memory. If this does not solve the problem, check the documentation for the motherboard: the memory may be operating at an unsupported frequency. Even if a module can be installed in a motherboard slot, it is not a fact that it will work.
Reason for the message “Preparing Windows. Don't turn off your computer"
As you know, the functionality of Windows 10 allows you to automatically install all the necessary updates. Typically, updates are downloaded to the system in the background, and then, when the PC is turned off and on, they are automatically installed on the system.
When installing these updates, the system may experience various types of problems - stops, freezes, crashes, glitches and other dysfunctions. One such problem is the system freezing for an indefinite period of time, accompanied by the message “Preparing Windows. Don't turn off your computer."
The causes of dysfunction may be the following:
- Software conflict when installing updates;
- There is an issue on the user's system that is preventing specific updates from being installed;
- Unstable update from Microsoft;
- Unstable operation of the Windows update service;
- The presence of virus malware on the user’s PC;
- Problems with the PC hard drive (bad sectors, disk shedding, etc.)
Let's figure out what to do if such a message hangs on your screen on Windows 10 for a very long time.
What to do if, during installation, Windows freezes at the “getting ready” sign - PC Consultant
Sometimes when installing Windows, including version 10, an error message is displayed on the screen. The text of the message is: “Windows cannot be installed on this disk.” In this case, the hard drive is displayed in the BIOS. It is also visible at the stage of installation of the operating system, where it could be divided into sections.
This problem occurs for two reasons:
- the controller is disabled in the BIOS (AHCI mode);
- The hard drive has a GPT volume.
Problem with AHCI mode
In addition to an error message informing you that it is impossible to install Windows 7 or 10 on this disk, if there are difficulties with the AHCI mode, the computer cannot boot from the selected disk. The reason is that the controller may be disabled in the BIOS.
The problem is solved as follows:
- go to BIOS;
- go to the AHCI Mode Control section of the Advanced tab;
- change the parameter to Manual (manual) from Auto (automatic);
- the Native AHCI Mode line will be displayed with the value Enabled;
- set the parameter to Disabled;
- save the changes in the BIOS;
- exit and reboot the computer. After rebooting, the computer will continue installation;
- After completing the installation of the operating system, you must return the changed BIOS parameter to the original option (Auto).
Problem with GPT format
Another reason for the impossibility of installing Windows 7 or 10 versions with the display of a similar message may be GPT - the hard drive partition format.
Until recently, all hard drives were the same type. The only partition style was MBR. Over the past few years, manufacturers have been gradually switching to producing hard drives with the GPT format. But the boot files from the OS are not modified for the new formats, and as a result, the error described above appears during installation.
The MBR (master boot record) is the program code and data required to pre-start the computer. They are located in the initial marked sector of the hard drive. The MBR starts after the initial BIOS analysis of the performance of all devices. Its main function is to determine the location of the files that are needed to boot the OS.
GPT is a new standard for the volume table layout format. A standard firmware interface for computers was also developed, replacing the BIOS. It is called UEFI (Unified Extensible Firmware Interface).
The problem occurs because the OS installer cannot install Windows on the specified partition due to the fact that the partition table does not suit it.
There are 2 methods to solve the problem:
- installing the system on a similar disk;
- Converting a partition to MBR.
The choice of method should be determined by the following rules:
- if your computer supports the UEFI interface and you need to install a 64-bit OS (for example, Windows 10), then it is recommended to use the first option. Checking the presence of a UEFI interface is very simple. Graphics mode with mouse control indicates the presence of UEFI;
- If the computer was manufactured several years ago, has a BIOS and requires installing a 32-bit operating system from MicroSoft, then you should convert GPT to MBR.
Using MBR limits some features, such as:
- their volume cannot exceed 4 TB;
- The maximum number of volumes on the HDD is limited to 4.
Installation of Windows 7, 8 and 10 on GPT
- Problems when installing an OS on a GPT volume usually arise for those who want to install Windows 7, 8 and 10.
- To install the OS on a GPT volume, you must meet 2 conditions:
- install a 64-bit system (for example, Windows 10);
- boot in EFI mode.
If the first condition is not met, you must prepare a bootable UEFI drive.
But in most cases, only the second condition is not met. Therefore, it is better to immediately go into the BIOS and check the settings.
There are two parameters to set in the BIOS:
- enable UEFI boot;
- switch the operating mode from SATA to AHCI.
After saving the settings, you can install the OS on your computer. The mistake will not happen again.
Converting GPT volumes to MBR
There are several options for converting volume style. Let's look at them in more detail.
Converting to MBR when installing Windows via the command line
This method is optimal for use in situations where installing an OS such as Windows 7, 8, 10 is not feasible due to the GPT volume type. It can also be useful not only when installing the OS, but also during the normal operation of the OS for converting non-system partitions.
It should be remembered that when converting partitions, all information from them will be lost. Therefore, it is recommended to save everything important on an external storage device in advance.
To change the style of volumes from GPT to MBR via the command line:
- run the command line in Windows as a user with administrator rights;
- to display a list of hard drives connected to the computer, enter the commands “diskpart” and “list disk” in sequence;
- select the disk to change the style with the command “select disk D”, where D is the disk number; Then two scenarios are possible.
- perform a complete disk cleanup using the “clean” command. In this case, all HDD volumes will be deleted;
- You can delete HDD volumes one at a time using the commands “detail disk”, “select volume” and “delete volume”;
- start converting the disk to MBR with the “convert mbr” command;
- exit Diskpart by selecting “Exit”. Close the command prompt. After this, it is recommended to continue installing the operating system. This error message will no longer appear.
- Configure disk in the volume selection window for installation .
- The volume style change is complete.
Changing partition style from GPT to MBR using Windows Disk Management
An alternative method for converting volumes requires a normally functioning Windows 7, 8 or 10 operating system on a personal computer. You can only convert a disk volume that is not a system one.
Make sure your computer is really frozen
Some Windows OS updates may take quite a long time to install. Therefore, if you get the message “Do not turn off the computer,” do not rush to sound the alarm and try to fix something. Otherwise, instead of solving the problem, you will create another problem yourself.
We can talk about the presence of a problem no earlier than 3 hours from the moment the message we are considering appears. And this is provided that you do not observe the activity of your PC, and the hard drive indicator either does not light up at all, or lights up regularly, but for very short periods.
Code 0X8007025D: essence and causes of failure
Error 0X8007025D often occurs at some stage of the operating system reinstallation process with a message appearing on the monitor screen stating that it is impossible to use the files necessary for the procedure. Most often, repeating a reinstallation attempt without taking certain measures to eliminate the failure does not produce results. There is no clear explanation for the reason for this, but it may be caused by a problem with the functioning of the hard drive, software problems and defects in the OS file system. The reasons for this are as follows:
- Windows installation is not available due to incorrect PC assembly or defects in installed OS drivers.
- There was a problem in the boot area of the system.
- There are problems with RAM.
- Conflict between computer components and the installed system.
- There is not enough free space on your hard drive.
- There is damage to the hard drive.
As a rule, when the installation process is interrupted by the system with error 0X8007025D, two main versions of the problem are usually considered: a malfunction of the hard drive or insufficient memory on it.
Damaged hard drive
The hard drive, HDD or SSD format on which system files are installed has a complex structure. If there are defective areas among the working sectors, when reinstalling the OS, the necessary files will not be able to be copied from the installation drive to the required partition, which will result in an error message on the display. The cause of the problem may be a disk malfunction, which can sometimes be resolved by formatting the disk or by checking the disk for errors and then eliminating them.
RAM deficiency
Insufficient RAM may be the cause of error 0X8007025D. If the memory is low or damaged, error 0X8007025D will appear. A similar error message will appear on the display if data is copied to a faulty sector.
Using Ctrl+Alt+Del if the computer hangs for a long time
The installation of some Windows 10 OS updates can be stopped by pressing the Ctrl-Alt-Del keys on your PC's keyboard. This is especially true when the computer boots, when after pressing the specified key combination you will be taken to the account selection screen. Log in as usual and try installing the required update again.
Press ctrl+alt+del to fix the freeze
Windows 10 installation stuck during installation - Various scenarios
Windows 10 installation gets stuck . This can cause anxiety for any Windows user. And so in this post, we will look at possible solutions for various scenarios where Windows 10 installation might get stuck. However, remember one thing and as we always advise, always back up your data before any new installation or update. You never know when it'll get STUCK!
Windows 10 installation stuck during installation
Why does Windows 10 installation get stuck? It's hard to say for sure, but most of the time it's because it's waiting for something to move on to the next stage of installation. Sometimes it's the internet connection, sometimes it's a file that disappears, and sometimes it takes too long because the hardware is slow.
It could also be a hardware or driver incompatibility.
We are looking for solutions for various scenarios including - stuck setting up Microsoft account, logo with dots, logo without spinning dots, Getting Ready, Momentarily, Getting Files Ready, Blue Screen, “Setup is starting”, “Uploading files”, etc.
Booting the system in safe mode
Using safe mode is useful for diagnosing dysfunction, allowing you to use the OS with a minimum of working drivers and services. In our case, this will relieve the system of conflicting programs and install all the necessary updates in the system.
- When you turn on the system and start loading Windows, quickly periodically press the F8 key.
- When the system menu appears, select the "Safe Mode" option and wait until the system boots.
- After the download is complete, restart your PC in standard mode. This will help fix the stuck “Do not turn off your computer” message in Windows 10.
Boot the system in safe mode
For other options for entering Safe Mode, read our material “How to Enter Safe Mode in Windows 10.”
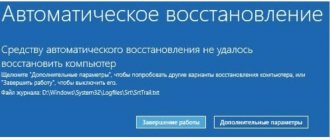
Restoring computer system files
System Restore is a good tool that allows you to fix the problem of the “Do not turn off your computer” message hanging in Windows 10. To do this, we need a flash drive with the installation version of the OS installed on it.
- Boot from this USB drive.
- Select your language and system from the basic screen.
- Then click on “System Restore” at the bottom left.
- Next, select the “Troubleshooting” option.
- Next is “Advanced options” and then “Command line”.
Select "Command Prompt"
- Next type there:
- Press enter. Wait for the process to complete and restart your PC. The problem can be solved.
Rolling back Windows 10 to a stable earlier version
Rolling back the system to a stable version can serve as a convenient tool for solving the problem “Preparing Windows. Don't turn off your computer."
To do this, do the following:
- Boot into Safe Mode as above;
- Click on Win+R, and type rstrui in the box that appears and press enter;
- A system recovery window will appear;
- Among the list of early dates available for restoration, select the one in which there were no problems with the system (any early date will do);
- Perform the recovery procedure, after which restart your PC. The problem can be solved.
Errors with the code
Most errors that stop the Windows 10 installation process are accompanied by a unique code, based on which you can find a way to fix the problem.
Codes 0x8007025d, 0x80004005
The error appears if the installation media was unable to transfer some files to the computer. This can happen because the hard drive is overloaded or the files on it are damaged. The error can also be caused by other devices connected to the computer. To get rid of the problem, do the following:
- Disconnect from the computer all devices not involved in the installation: headphones, flash drives, modems, etc.
- If you are not performing a clean installation, but upgrading to Windows 10:
- return to the existing system, press Win+R and in the window that appears, enter the command wuauclt.exe / updatenow - this will allow you to get the latest system updates;
Running the wuauclt.exe /updatenow command will download all available updates for the operating system
- press WIN+R and enter the cmd command in the window that appears;
The command line can be accessed using the cmd command
- In the command line that opens, run the command sfc /scannow - it will start automatically scanning system files and correcting errors found in them.
The sfc /scannow command starts scanning and fixing system files
- If an error appears when trying to update, then use the clean installation method:
- copy all important files from your computer to third-party media;
- start the installation and at the action selection stage, indicate that you want to install the system manually;
- in the window that opens, format all hard drive partitions, and then install Windows 10 on one of them.
Delete unnecessary partitions and format the hard drive
Codes 0x8007000d, 0xc1900101 0x2000c, 0x80000001
- If this error appears, first try replacing the image, the media, and the port to which the media is connected.
- If this does not help, you will need to update the BIOS. You can do this using the official program from the company that created your motherboard. On the company's website you will find instructions explaining the update process.
Codes 0x80070017, 0xc00000e9
- Rewrite the image to the installation media, but use a different burning program.
- If the first point does not help, then try either recording another image, or using another flash drive, if possible.
Code 0xc190020e
The error appears due to the small amount of free space on the disk partition on which the installation is being performed. Please note that for correct installation, at least 20 GB. Format the partition or use another method to free up space on it.
Codes 0x8004242d, 0x80300001, 0x80300024
These errors occur when you try to format one of the hard drive partitions or when selecting a partition for installation.
- To get around errors, you need to delete the desired disk partition before formatting.
We delete the hard drive partition on which we wanted to install Windows 10
- Now you need to re-create the deleted partition, allocating the memory freed up after deleting the partitions.
- Continue the Windows 10 installation process on this partition.
Codes 0x80070003, 0x80070002, 0xc0000005, 0x80070490
This error occurs while upgrading to Windows 10 via Update. To solve this, you can reset the Update Center settings to default values, and also clear the folders with the cache and downloaded updates. But it's better to use another update method:
- Create installation media using the official Microsoft update tool - Media Creation Tool.
- From this media, upgrade to Windows 10 or perform a clean install.
A clean installation of Windows 10 is launched by selecting the installation type “Full installation”
Code 0xc0000605
This error indicates that you are trying to install an outdated build of Windows 10 Technical Preview. The build number and when it expired can be viewed in the table below.
- To get rid of the error, go into the BIOS and set the date value to not equal to or greater than the expiration date of the assembly you are installing.
In the BIOS, change the date value to a date that is not equal to and does not exceed the expiration date of the Windows 10 Technical Preview build
- While using Windows 10 Technical Preview, do not change the date to the previous one, otherwise the installed system will no longer start.
Table: Windows 10 Technical Preview expiration date
| Build number | Build release date | Start showing expiration messages | License expiration date | Stop Windows from starting |
| 10049 | 30.03.2015 | 17.09.2015 | 01.10.2015 | 15.10.2015 |
| 10061 | 22.04.2015 | 17.09.2015 | 01.10.2015 | 15.10.2015 |
| 11082 | 16.12.2015 | 01.07.2016 | 15.07.2016 | 30.07.2016 |
| 11099 | 13.01.2016 | 01.07.2016 | 15.07.2016 | 30.07.2016 |
| 11102 | 21.01.2016 | 01.07.2016 | 15.07.2016 | 01.08.2016 |
| 14251 | 27.01.2016 | 01.07.2016 | 15.07.2016 | 01.08.2016 |
| 14352 | 26.05.2016 | 01.07.2016 | 15.07.2016 | 01.08.2016 |
| 14361 | 08.06.2016 | 01.07.2016 | 15.07.2016 | 01.08.2016 |
Machine check exception error
This error appears along with a blue screen and indicates that you have problems with the physical components of your computer. It's possible that your computer doesn't meet the minimum requirements for Windows 10. And there's also a chance that your hard drive, processor, graphics card, or any other component is damaged.
Machine check exception error appears along with a blue screen
- Try performing a clean installation by first deleting all the partitions into which the hard drive was partitioned and creating them again.
- If the first point does not help, then test individual components of the computer (instructions for conducting tests can be found on the Internet).
Codes 0xc1900101 0x40017, 0xc000000f
This code is caused by the presence of third-party programs and drivers interfering with the process. To get rid of it, there are two options:
- perform a clean installation, first formatting all existing partitions;
- manually remove all third-party programs, as well as drivers for those devices that are not used when Windows first starts. If you choose the second method, then download drivers for Windows 10 in advance for devices that are left without them, so that after the installation of the system is completed, you can immediately install new drivers.
Codes 0x8007005, 0xc1900101 0x30018
This error occurs when trying to update via Update Center, activating the system, and using restore points. It reports that the computer does not have the rights to receive the desired update. In fact, there should be rights, but due to damage to the hard drive or the Update Center, they were not found. To get rid of the error:
- Uninstall third-party antivirus.
- Scan the disk using the commands sfc /scannow and chkdsk C: /f:
- press Win+R, enter cmd - a command line window will appear;
- enter the command sfc /scannow;
Scanning the system with the sfc /scannow command did not reveal any integrity violations
- enter the command chkdsk C: /f. If you install the system not on the C: drive, but on another one, then substitute the letter of your hard drive in the command.
We diagnose drive C: using the command chkdsk C: /f
- You can also try resetting the Update Center settings to default values or using another method of obtaining updates, such as using installation media.
Codes 0x80070057, 0x800705701, 0x80070015
If you encounter this error, then try:
- Replace the disk or flash drive from which the installation is performed.
- Check the hard drive or SSD and RAM for physical and software damage. The disk can be scanned using the chkdsk c: /r command, executed in a command prompt with administrator rights or through third-party programs.
Code 0xc0000428
This error appears due to problems with Windows activation. To solve them:
- Enter safe mode - when turning on the computer, press the F8 key and select the appropriate mode.
Selecting Windows boot options is called up with the F8 button when turning on the computer
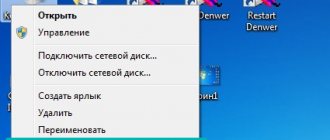
- Go to the path Cbcntvysq_lbcr:\windows\system32\drivers and delete the oem-drv64.sys file in the final folder.
- If step 3 does not help, use a clean installation (installation with preliminary formatting of the disk).
Codes 0x80300002
- Check your hard drive or SSD for physical damage.
- Reconnect it to the computer - perhaps the problem lies in the wires.
- If after reconnecting the drive to the computer the error does not disappear, try using a different drive.
Codes c1900101 4000d, 0xc1900204, c1900101 dt000
The error may appear when you try to install Windows from Update Center, the update tool, or the setup.exe file. To get rid of it, you need to try resetting the Update Center settings. Reset instructions are described in paragraph 4 of the “What to do if nothing helps or other errors appear” section of this article.
After resetting the settings, you will need to manually delete some files:
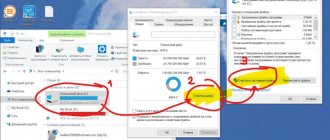
- Disconnect from the Internet. Run a cleanup of the disk partition on which the current system is installed. Open its properties and select the appropriate function on the “General” tab.
Run the built-in disk cleanup program
- Go to Clean Up System Files and check that you want to erase the temporary files you downloaded to upgrade to the new Windows. Perform cleaning.
Cleaning up Windows 10 installation files
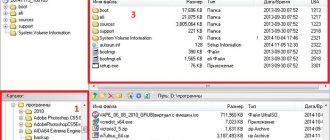
- After cleaning is complete, go to the system partition, turn on the display of hidden files and find the $WINDOWS.~BT and $Windows.~WS folders and delete them. Reconnect to the network and perform the update.
Delete the folders $WINDOWS.~BT or $Windows.~WS
If the error does not occur in the Update Center, then replace the system image or the setup.exe file used for installation.