What is USB debugging and why is it needed?
USB Debugging or USB debugging is a special mode in which the user is able to control the smartphone via a PC. Since the phone is almost always paired with a computer via USB, debugging allows you to gain access to additional functions.
USB Debugging mode was originally created for developers. But now it is actively used by ordinary owners of Android smartphones. Here are a few reasons that force regular users to enable debugging:
- creating backup copies;
- recovery of accidentally deleted files;
- data exchange without recoding;
- OS update via PC;
- obtaining root rights;
- access hidden files using a computer.
Depending on their needs, each user can continue this list. But the fact remains that USB debugging is really needed. True, not for every person. If you are not going to perform any of the actions indicated above, you can safely skip the Debugging operation.
To enable USB debugging, you must activate developer mode.
Why is debugging needed?
Initially, this mode was provided exclusively for developers of applications or services for Android. Using debugging, they gained access to the “insides” of the operating system.
But subsequently, more and more cases began to occur when “ordinary” users also needed the debugging mode. It’s just that the developers have created automated tools for obtaining root (read about root access here), restoring a smartphone, and modifying the OS that required debugging mode.
Despite the menacing name, activating this mode is quite simple.
How to enable developer mode
USB debugging is one of the hidden features available only to developers. Accordingly, to activate Debugging you must obtain extended rights. Fortunately, this can be done without any problems. The owner of an Android smartphone does not even have to obtain root access, which negatively affects the security of the system.
In addition, developer mode may be needed to enable the following features:
- change of real location;
- changing USB configurations;
- graphics acceleration in games.
A complete list of all additional options can be found in the “For Developer” section of the smartphone settings. However, this menu item is not available by default. Even if you scroll through the settings of the device, you won’t be able to find it. But the only problem is that you do not have developer mode activated.
To enable developer rights you need:
- Open phone settings.
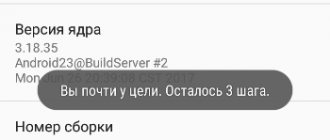
- Go to the “About phone” section.
- Click several times on the “Build number” label.
- If everything is done correctly, a notification will appear on the screen indicating that you have become a developer.
As a rule, 7 touches are enough to activate the mode. But everything may differ depending on the brand of smartphone, version of the operating system and the presence of third-party firmware.
After completing all these steps, a new section will appear in the smartphone settings - “For Developers”. It contains additional functions, including USB Debugging.
Login with hidden menu
In many smartphone models running the Android 4.2 operating system and higher, the mode is hidden from users. You can detect and enable it in the following way:
- Go to the system settings menu.
- Select the “About device” tab.
- Quickly tap on the “build number” item until the system issues an information notification that you have been assigned developer status.
After this, you will be able to use the special settings menu of your Android smartphone. To enable USB debugging mode, you must repeat the steps described in the previous section.
How to enable USB debugging on Android
Once developer mode is activated on your phone, you can start enabling debugging. Let us remind you that without it the corresponding menu item simply will not appear in the settings.
If all preliminary operations have been completed successfully, Debugging is started as follows:
- Open the device settings.
- Scroll down the page until you see the “For Developers” section.
- We click on it.
- In this menu item, move the slider next to “USB Debugging” to the right.
Now you can safely connect your phone to your PC to take advantage of additional features for creating a backup copy or editing the operating system.
Preparation
3.1. Installing custom recovery
Unfortunately, there is no universal way to install custom recovery and ROOT rights suitable for any Android device. You need to look for instructions specifically for your device, but there is good news: you can install custom recovery on your phone/tablet with virtually no involvement of its screen (No-Touch recovery version) using the fastboot device bootloader (the bootloader must be unlocked). Therefore, google installing custom recovery on your specific device with the keywords: <model of your phone/tablet>, No-Touch CVM/TWRP, ROOT, recovery, fastboot, bootloader, flash tool, etc.
As a guide, an article about installing custom recovery and ROOT on a Xiaomi phone may be useful. True, for example, to install TWRP and ROOT on Xiaomi phones, where you first need to unlock the bootloader and you have not previously registered for this and have not logged into the MI account on the device, it is unlikely that you will be able to unlock the bootloader without a screen. Therefore, we recommend not to waste time, but to immediately take such a phone to a service center to replace the screen.
3.2. Preparing your computer
In this guide, we will tell you how to enable USB debugging using a computer running Windows 10. The necessary software can also be found for other operating systems. The commands listed below are also valid for other operating systems (MacOS and Linux), but their syntax must be modified to match the syntax of the command interpreters on those operating systems.
3.2.1. Installing Android SDK Tools
ADB tools are included in Google's Android SDK Tools. But we will not use the entire development package, but only command line tools, the installation of which is described in detail in the article “Installing platform-tools (adb and fastboot)”.
3.2.2. Installing Notepad++
Typically, Android system configuration files are plain text files. Although they can be opened and edited with the built-in Notepad in Windows, we recommend using the free code editor for Windows - Notepad++, as it automatically recognizes line breaks in the file. You can also turn on the display of control characters (View > Symbol Display > Show All Symbols).
3.2.3. Installing SQLite3 (for Android 4.0, 4.2, 4.4)
If Android 4.0, 4.2 or 4.4 is installed on your phone/tablet, you will also need to edit the database with the device settings. To do this, we will use the console database editor for Windows - SQLite3, which can be downloaded from the official website.
3.2.4. Creating a working folder on your computer
Create a folder “android-config” in the root of drive C, unpack the archive with SQLite3 into this folder (for Android 4.0, 4.2 or 4.4). Also create a “backup” folder in the “android-config” folder to store all backup copies of the Android device system files that we will edit.
3.3. Booting into custom recovery
Reboot your Android device into custom recovery. This also depends on the device, but usually with the phone/tablet turned off, you need to press and hold the volume down or up and power keys together for a few seconds. A variation is also possible with holding down both buttons (volume up and down) and turning on the phone/tablet. Even less common, but there is a method where you only hold down the volume keys and connect the charger to a switched off device. In general, check the key combination for your device on Google.
How to enable debugging mode if there is no USB cable
To activate USB Debugging, the user does not need to worry about the cable being in good condition. This may only be required in a situation where a person is going to connect the phone to a PC.
If the owner of an Android device does not have a USB cable, then there is no need to pair the device with a computer. The setup involves connecting via USB, so you can’t do without the appropriate cord.
However, if the connector or cable is damaged, there is an alternative way to pair your phone with your PC. For example, using the ADB Wireless application. It provides additional connectivity options that can be compared to USB debugging.
There are a large number of similar programs. There are several dozen of them on Google Play, so if necessary, you can choose other software.
After downloading the application, you need to follow the instructions:
- Connect both devices to the same Wi-Fi network.
- Launch ADB Wireless.
- Click on the button in the middle of the screen.
- Copy the IP address for further pairing.
- On your PC, open the command line.
- Enter a command in the format “adb connect XXXX:8555” (enter the IP address instead of XXXX).
- Press the “Enter” button.
Using this simple algorithm, a smartphone running Android OS will be connected to a PC wirelessly using the full functionality of USB Debugging.
Root access may be required for correct pairing.
How to disable USB debugging on your phone
After completing all the necessary operations that require USB debugging, you can disable the specific mode. It's as easy to do as it is to set it up. To deactivate the function you must:
- Open device settings.
- Go to the “For Developers” section located at the bottom of the page.
- Move the slider next to “USB Debugging” to the left.
Thus, to disable USB Debugging, a similar algorithm is used as for activation. But this only applies to the method when pairing with a computer took place via a USB cable. If the devices connected to each other wirelessly, you will also have to deactivate the function through the interface of the downloaded application. For example, ADB Wireless.
How to disable developer mode on a smartphone
Today we noted that to enable USB debugging, the user must obtain developer rights. Without them, the desired menu item simply does not appear in the settings. When all actions with the smartphone and PC are completed, you need to deactivate not only USB Debugging, but also the “For Developers” mode.
To activate the mode, click on the build number in the “About phone” settings section. But if you try to repeat the operation, nothing will happen. The “For Developers” item will continue to show off in the smartphone menu.
Some devices have a slider that deactivates the special mode. But again, it is not provided on every smartphone. Therefore, to disable developer rights, it is recommended to use the universal method:
- Open your phone settings.
- Go to the "Applications" section.
- Select “Settings” from the options offered.
- Click on "Storage".
- Select the “Erase data” option.
After deleting these settings, you will have to adjust some parameters again. For example, the time until the screen turns off or the operation of the fingerprint scanner.
As soon as all the requirements of the instructions are met, you will exit the developer mode. The smartphone will return to its previous functionality.
When will this instruction be useful?
The instructions below will come in handy if your smartphone or tablet stops working normally. Most often this occurs due to the device being dropped, a system failure, or a damaged display. Please note that to successfully complete the tutorial, custom recovery must be installed on your phone .
Not many people know, but every Android device has a recovery menu that allows you to perform various actions with your smartphone. For example, resetting the phone to factory settings, removing viruses or updating firmware. By default, each device is equipped with Stock Recovery, installed by the manufacturer from the factory. Some users install Custom Recovery, that is, a recovery menu containing a number of additional functions. The most common types of custom recovery are TWRP and CWM.
If you have stock recovery installed on your smartphone, then don’t worry. The article will also discuss a method that allows you to enable USB on almost any device . There is just one caveat - it is advisable to have a wireless USB mouse, as well as an OTG cable.
Is it dangerous to enable USB debugging mode or developer mode?
In today's material, all methods for activating USB Debugging were discussed. But we also indicated options that allow you to disable debugging. Maybe we should leave it running forever, like developer mode? Or does the constant operation of additional options negatively affect the smartphone? Our experts answer.
Hermann
Expert in the field of digital technologies and the activities of mobile operators. I am engaged in constant monitoring of industry changes in Russia and abroad.
Ask a Question
Question to the expert
Is it dangerous to enable developer mode and debugging?
In fact, there is nothing dangerous about this. The operation of a special mode with additional functions will not cause any harm to your smartphone if only 1 owner uses it. And constant debugging work is dangerous only in a situation where an unauthorized person gains access to the device.
Why then is Android developer mode and USB Debugging hidden?
Google, which produces the Android operating system, offers device owners a huge number of settings without a special mode. Obtaining developer rights adds new options for editing parameters, changing which can negatively affect the functioning of the smartphone. Therefore, in Android, the developer mode is hidden, but if necessary, it is activated without any problems.
Do I need to turn off debugging and developer mode after completing the necessary manipulations?
Yes, this is recommended. This way you can protect yourself from an attacker gaining access to personal data. With developer mode and USB Debugging turned off, this probability is close to zero.
What is the difference between developer mode and root access?
Indeed, these concepts are often confused. But there is a huge difference between them. Obtaining root rights is an advanced feature of developer mode. In addition, opening root access means that the phone will not be accepted under warranty, and various payment methods, including NFC, will not work on it. With developer rights such problems will not arise.
4.8 / 5 ( 21 voice )
Author
Hermann
Expert in the field of digital technologies and the activities of mobile operators. I am engaged in constant monitoring of industry changes in Russia and abroad.
What is USB Debugging mode on Android
When people buy a mobile device on the Android platform, in most cases they follow the fashion, not realizing how much the capabilities of the new device are superior to their previous phone. Most often, owners of new smartphones or tablets use only 10% of all the capabilities of the electronic device. The so-called USB debugging mode, or USB Debugging, falls out of the attention of users.
This mode will be interesting for both professionals and ordinary owners, because... allows you to perform the following actions (the ADB utility (Android Debug Bridge) from the Android SDK is also required):
— copy the required folder or partition from the smartphone’s memory to a personal computer; — transfer a file from your computer to your smartphone; — install Android applications; — backup applications; — reflash the smartphone; — restore the operation of the electronic mobile device; — acquire root rights for the Android system.
For a clear example of activating the USB debugging mode, you can perform all the manipulations on the ZTE V880H smartphone with the Android 4.2.1 Jelly Bean mobile operating system installed by the manufacturer.
To do this you need to follow a few simple steps.
1. Go to “Menu”, find the “Settings” application icon.
2. After that, tap the “Settings” item and find the “For Developers” sub-item.
3. You need to go to this sub-item, select the name “Debugging for USB” from those suggested in it and activate it by checking the box next to it.
4. The next step will be taken by the system, which will ask the user the question “Allow USB debugging?” and write below an explanation of the essence of this mode. You will need to confirm “OK” or click on the word “Cancel”.
5. If “OK” is selected, the USB debugging mode will be enabled and the check mark next to its name will light up.
6. Now the owner will be able to perform the manipulations described above with his device. It should be remembered that they will definitely need the ADB utility (Android Debug Bridge).
So, USB debugging mode is activated, and the user can expand the capabilities of his Android device, which will now become a truly necessary assistant for its owner. What is USB Debugging mode on Android
See also - Articles