The release of Windows 10 generated mostly positive reviews from computer users. The new operating system from Microsoft has become much prettier and more convenient for ordinary computer owners. However, Microsoft has introduced a user tracking system into it, which, according to the company, should help improve the system.
At the same time, tracking in Windows 10 is enabled by default, and if you did not disable these functions during the installation of the operating system, then during operation your computer will constantly send information about you and your actions to Microsoft.
In today's article we will tell you how to disable Windows 10 tracking, which will not only allow you to hide yourself from the all-seeing eye of the American giant, but also speed up your computer a little and reduce the load on the network.
Why Windows 10 spies on users
Microsoft says that the tracking features of Windows 10 collect and send the following data to the company's servers: contact information (your first name, last name, email address, phone number, etc.), location data, your preferences (for example, which sports team you play). you are sick), credentials (logins, passwords, hints), payment system data, and so on.
Microsoft expects that this data will help improve the operating system and user interactions with it. For example, reports of system failures will help the company understand what needs to be fixed so that computer users no longer experience such errors. Or, if you, for example, are a bank employee and often read economic news and view exchange rates on the Internet, then you will be offered thematic advertising targeted at you personally.
It would seem that the goals are noble and perhaps this is so. But, Microsoft is an American company and all your data will be stored with it. Microsft itself can give out user data to intelligence agencies, not to mention hackers who can steal this data from Microsoft servers.
Therefore, it is better to turn off the surveillance functions of Windows 10. Even if you have nothing to hide, it is better to disable surveillance so as not to waste your computer resources and network.
Disabling tracking in an already installed Windows 10
In addition to disabling surveillance during the installation process, the user still has the opportunity to limit spying activities in the already installed Windows 10.
To do this you should:
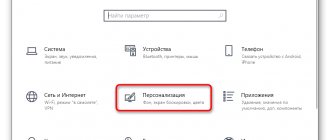
Step 1. Click on the notification icon in the lower right corner and select “All settings” , indicated by the gear icon.
Step 2. In the window that opens, select the item “Confidentiality” .
In the window that opens there are many items responsible for tracking. Let's take a closer look at them.
In the “General” you can safely disable all functions except “SmartScreen” . Disabled settings will limit surveillance and slightly speed up performance.
In the next item “Voice functions” you should disable this system to increase personal privacy. When disabled, the function looks like this:
“Feedback and Diagnostics” item is also subject to complete disabling , since these functions can potentially collect confidential information.
Disable surveillance during Windows 10 installation
You can and should turn off tracking options during the installation of Windows 10. This option appears at the step called “Increase operating speed.”
The vast majority of users click the big “Use standard settings” button and thus agree to the default privacy settings, in which, of course, user tracking is enabled.
To disable tracking during the installation of Windows 10, click on the “settings” item in the lower left corner of the screen.
In the window that appears, you should set all sliders to the “ disabled ” state. This way you will disable the collection of your data entered from the keyboard, voice, disable advertising recommendations and the collection of your location data.
But that is not all. Click Next.
On the second screen, you can turn off page prediction, reporting to Microsoft, connecting to other networks, and so on.
Of all these items, it makes sense to leave enabled only the item “Use SmartScreen Web Services to protect against malicious content.” After that, click “next” and continue installing the OS.
On the "Purchase for Yourself" screen, the system will ask you to specify or create a Microsoft account. Of course you shouldn't do this.
In the lower left corner, click "skip this step."
STEP 7. Configuring the Edge browser
- First of all, open the Internet Edge browser itself, after which you need to go to the menu “Additional actions” , then “Settings” and click on “View additional options” , where we turn on the slider above which it says “Send Do Not Track requests” . This option allows you to bypass the surveillance that is performed on users when they go to a particular site. Here you also need to move the sliders to the left, above which it says “Display search suggestions as you type” , “Use page prediction” , “SmartScreen” .
Disable surveillance in Windows 10
If you have already installed Windows 10 with default settings, where tracking is enabled, nothing prevents you from disabling it when working with Windows 10. Moreover, at the installation stage you cannot disable all tracking functions.
To enter Windows 10 privacy settings, click the Start menu and click the gear (Windows Settings).
Now go to “Confidentiality”.
A privacy settings window will open in the “ General ” tab.
Switch all sliders to off.
At the bottom of the same page, click “Manage your receipt of Microsoft advertising and other personalization information.”
In the browser that opens, make sure that the switches for “Personalized ads in this browser” and “Personalized ads everywhere I use my Microsoft account” are set to “off.” If they are not, turn them off. This function will not turn off advertising, but will make it non-personalized.
We return to the privacy settings menu and go to the “ Location ” section.
Here we also disable all options. Pay attention to the item “ Location information log ”. Be sure to click “ Clear ” there to delete entries that were made before you turned off tracking options.
Go to the “ Camera ” section. Here we also turn off all the sliders if the list of programs does not include those where you need a camera.
We do the same in the “ Microphone ” section.
Section " Speech, handwriting and text input ".
If you see a “Meet me” button in this window, then you have already turned off the option in which Windows 10 will remember your handwriting, voice and characters entered on the keyboard. If there is a “Stop Study” button, then click it to turn off tracking.
Account Information section .
We disable and thus prevent applications from accessing your name and other account data.
We go further through the items “Contacts”, “Calendar”, “Call Log”, “Email”, “Messaging”, “Radio” and “Other Devices”. At all these points we set the switches to the “Disable” state.
In the Feedback and Diagnostics section, select Never and Basics .
This will minimize the amount of data sent to Microsoft.
And the last section is “Background applications”. Here you can control which apps are allowed to receive information, send notifications, and update in the background.
As you may have guessed, we turn them all off.
Disable Windows 10 tracking in System Settings
When you have installed the system and configured all the settings, the desktop screen next opens. That's it, the system is ready for use. Naturally, now we need to disable a few more telemetry parameters.
- On the desktop, hold down the key combination Win+I .
- The System Settings window will open .
- Go to the "Privacy" .
Initially, this section will have a “General” tab. These are the tracking and data collection functions that we disabled during the installation of Windows 10. If something is enabled, disable it.
Disable the settings in the Privacy section
"Location"
Let's visit the "Location" or "Location" tab and check the features that can be disabled. This section stores our location data. We don't need this, so we'll first clear the location log.
Click the "Clear" button.
"Camera"
Disable access to the camera.
Since I have the latest version of Windows 10 LTSC, here I click the "Change" button and then turn off the slider.
Below we disable all the options that are possible.
"Microphone"
Similar to the previous method, you need to disable access to the microphone on your computer. You can also select applications for which access will be open, but it is best to close it for everyone. If you need a microphone, just visit this section and adjust the settings to suit your needs.
"Notifications"
The same. Click the “Change” button and disable access to notifications. Below we turn off all the sliders.
"Account Information"
It is necessary to disable it for all applications so that they do not receive information about your account. This is your name/login and other data.
"Personalize handwriting and keyboard input"
Turn it off completely. Why? Yes, because it monitors data entered from the keyboard. The function offers to read input from the keyboard in order to then offer more appropriate input options. Naturally, we don't need this.
In other system updates, the section may be called "Speech, Handwriting, and Text Input." There will be a “Meet me” button here. If this is the case, then the function is disabled and nothing needs to be done. Otherwise, you need to click “Stop studying”.
"Voice functions"
Sometimes this section can stand alone (in the LTSC version this is the case). This means we disable all the options that are available here.
Finally, in order not to talk about each section in detail, since everything is very clear, we disable all options in the following tabs:
- Contacts.
- Calendar.
- Call log.
- Email.
- Tasks.
- Message exchange.
- Radio.
- Other devices.
On the “Background Applications” tab, you can disable those built-in Windows applications that will work in the background (without your intervention) and collect all the information they need.
Diagnostic data and activity log
Also in Windows LTSC, LTSB there are two tabs “Diagnostics and reviews”, where I have everything disabled. In addition, you can delete diagnostic data collected by Microsoft.
Another tab, “Action Log,” collects information about all the actions that you did while the system was running. For example, visiting websites. The “Send my activity log to Microsoft” checkbox should be unchecked. It’s better to disable log saving altogether and clear it.
Everything we have discussed now is only part of it. Now all we have to do is disable telemetry in Windows 10. It's not difficult.
Disabling telemetry
Telemetry allows Microsoft to monitor the load on your computer's system and installed programs for sending and analysis to the company's servers.
To disable telemetry, open a command prompt. To do this, find the “systems” - “command line” folder in the start menu. Right-click on it - “advanced” - “run as Administrator”.
At the command prompt, type the following commands:
- sc delete DiagTrack and press Enter on your keyboard.
- sc delete dmwappushservice and press Enter.
- echo "" > C:\ProgramData\Microsoft\Diagnosis\ETLLogs\AutoLogger\AutoLogger-Diagtrack-Listener.etl
- reg add "HKLM\SOFTWARE\Policies\Microsoft\Windows\DataCollection" /v AllowTelemetry /t REG_DWORD /d 0 /f
These commands first erase all data accumulated by telemetry, then disable this function and enter a ban on further data collection into the registry. Telemetry will now be completely disabled on your computer.
How to disable telemetry in Windows 10
What is telemetry in Windows 10? This is collecting information about the state of the operating system under load and sending it to Microsoft servers.
We will disable telemetry using the command line and the registry editor. There are two ways to open it.
Go to Start, open all programs and go to the “Windows System” folder - right-click on the shortcut, select “Advanced” and open the application as administrator.
The second method is this: press the Win+X and select Command Prompt (Administrator) . It's easier, right?
All that remains is to enter the following commands:
Diagnostic Tracking Service:
sc delete DiagTrack
Routing Service:
sc delete dmwappushservice reg add "HKLM\SOFTWARE\Policies\Microsoft\Windows\DataCollection" /v AllowTelemetry /t REG_DWORD /d 0 /f
As you can see, from the command options, the collected data is deleted here, which could be sent directly to the company’s servers. The last command disables information collection in the Registry Editor.
By the way, all the information was collected in this place: %ProgramData%\Microsoft\Diagnosis\ETLLogs\AutoLogger
If the last command did not work for you, you can manually enter the registry editor and create the AllowTelemetry parameter there with a value of 0.
Disable Windows 10 telemetry in Group Policies
If your system is higher than the “Home” edition, then “Group Policies” are available to you, where you can fine-tune the operation of the system.
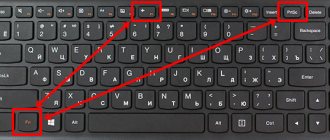
To launch the Group Policy Editor, press the Win+R key combination and enter the command gpedit.msc . Then we move on to the final section.
- Administrative Templates;
- Windows components;
- Double-click on the item – “Data collection and pre-build builds”.
Options will appear on the right. There will be a line “Allow telemetry” . Double-click on it with the left mouse button.
In the window that opens and in the “Options” block, select the option “0 – Security (for enterprises only).” And click OK.
For the changes to take effect, you need to restart the computer.
Disable tracking in the Edge browser
Internet Explorer has been replaced by the Edge browser in Windows 10. You may not use it, but it also has functions for spying on the computer user.
Open the Edge browser and go to Settings in the top right corner.
At the very bottom, open “Advanced options”.
In the “Privacy and Services” subsection, find the “Submit Do Not Track Requests” option and turn it on.
This switch prevents the browser and other applications from collecting data and tracking your location.
Disabling telemetry in Windows 10 - O&O ShutUp10 1.6.1399 Portable
O&O ShutUp10
allows you to gain full control over the Windows 10 features you want to use and ensure that your data is not sent to third parties. Using a simple and intuitive interface, the user can independently decide which unwanted features should be disabled to improve data privacy.
System requirements:
Windows 10 32|64 bit
Torrent Disabling telemetry in Windows 10 - O&O ShutUp10 1.6.1399 Portable in detail:
Main features of O&O ShutUp10:
· Configuring security settings; ·Data confidentiality protection; ·Management of location services; ·Windows update management; ·Prevent transmission of user and diagnostic data.
Green checkmarks indicate options recommended by the developer to be disabled if you need to reduce the degree of tracking by Windows.
The yellow triangle marks options that can be disabled, but this may cause problems with applications or the system.
Options that are not recommended to be disabled are marked with a red exclamation mark.
Additional Information:
·Microsoft tries to create the greatest convenience when installing its products, as a result, most users do not read the privacy statements and simply confirm that they have read this document. Unfortunately, this simplified approach from Microsoft results in more and more data being sent to the corporation's servers.
·Microsoft uses most of the data to display personalized information to make your digital world more convenient and simpler. For example, Windows 10 might remind you to leave for the airport 30 minutes early due to heavy traffic along the route. To provide you with this information, the service accesses your calendar entries, email messages, your location, and the Internet to obtain traffic information.
·Some protocol services record keyboard input, exchange WLAN access data with Facebook accounts, and connect to public, and therefore potentially dangerous, networks in the background without asking the user about it. All of this poses a serious security risk.
·O&O ShutUp10 allows you to decide for yourself which “convenience” features threaten your privacy and should be disabled. The program presents all available functions in one place - you do not need in-depth IT knowledge and there is no need to manually change system privacy settings.
·O&O ShutUp10 is a completely free solution and does not require installation - just open the file and the tool will instantly launch on your computer. The program does not contain unwanted adware, unlike other popular applications these days.
What's new in version:
·Enhancements and adaptations for Windows 10 1809 Redstone 5 (Build 17763) ·NEW: Command line parameter, to suppress error messages in read-only config files: /ignorereadonlycfg ·Miscellaneous bug fixes, incl. typing errors ·Available in English, German, French, Italian and Russian
About Portable:
The portable version of the program is provided by the developer and works without installation on a computer.
Screenshots Disabling telemetry in Windows 10 - O&O ShutUp10 1.6.1399 Portable torrent:
Download Disabling telemetry in Windows 10 - O&O ShutUp10 1.6.1399 Portable via torrent:
Disable Windows Defender
In order to disable tracking in Windows 10, you need to understand standard antivirus software. Windows Defender automatically turns off when you install any other antivirus software on your computer. But just in case, make sure you have it disabled.
To do this, click on the Start menu, go to Windows Settings and go to the “Updates and Security” section.
Turn the switches to the "Off" position.
Should I disable Windows Defender?
To turn off Windows 10 tracking, you can also restrict Windows Defender. Do this provided you have a backup antivirus.
To check the operation of Windows Defender, you need to open the system settings (key combination Win + I) and go to the “Update and Security” section.
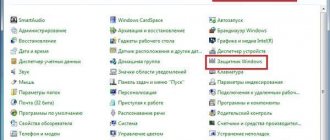
In the left column, select the “Windows Defender” tab and disable all the checkboxes on the right.
In the new version of the operating system, the left tab will be called “Windows Security”. On the right you need to click on the “Open Windows Security” button.
Then you need to open the “Protection against viruses and threats” section. On the right side of the window there will be a block “Protection settings against viruses and other threats”. Here, click on the “Manage Settings” link.
Disable all checkboxes:
- Real time protection.
- Cloud protection.
- Automatic sending of samples.
Disable Windows 10 Settings Sync
If you are not using a local computer account, but a Microsoft account, which we recommended at the beginning of this article not to register when installing the system, then you most likely have cloud synchronization enabled.
Go to Start - Windows Settings - Accounts - Sync your settings .
Disable synchronization by turning the switch to Off.
Disable Windows 10 synchronization options
If you have a local account that is not linked to Microsoft servers, then you don’t need to do anything. And if you have a Microsoft account and are logged into it, then you need to check your synchronization settings.
On the one hand, synchronization is a useful thing, since a lot of information can be restored on another computer or after reinstalling the system. On the other hand, it is unknown for what purposes this information can be used.
For all the paranoid people, here are instructions on how to disable synchronization. To some extent, this will help disable Windows 10 tracking.
- Press the key combination Win+I .
- In System Settings, go to the Accounts section.
- In the “Synchronizing your settings” subsection, disable the very first option.
Blocking Microsoft servers
As you know, all collected data is sent to Microsoft servers. We can block these addresses on our computer. Thus, even if the data is collected on a computer, it will still not be able to go anywhere.
Open the C:\Windows\System32\drivers\etc folder and open the hosts file using notepad.
Copy the following lines there to the very bottom of the file.
127.0.0.1 localhost 127.0.0.1 localhost.localdomain 255.255.255.255 broadcasthost ::1 localhost 127.0.0.1 local 127.0.0.1 vortex.data.microsoft.com 127.0.0.1 vortex-win.data.microsoft.com 127.0.0.1 telecommand .telemetry .microsoft.com 127.0.0.1 telecommand.telemetry.microsoft.com.nsatc.net 127.0.0.1 oca.telemetry.microsoft.com 127.0.0.1 oca.telemetry.microsoft.com.nsatc.net 127.0.0.1 sqm.telemetry.microsoft .com 127.0.0.1 sqm.telemetry.microsoft.com.nsatc.net 127.0.0.1 watson.telemetry.microsoft.com 127.0.0.1 watson.telemetry.microsoft.com.nsatc.net 127.0.0.1 redir.metaservices.microsoft.com 127.0.0.1 choice.microsoft.com 127.0.0.1 choice.microsoft.com.nsatc.net 127.0.0.1 df.telemetry.microsoft.com 127.0.0.1 reports.wes.df.telemetry.microsoft.com 127.0.0.1 wes.df .telemetry.microsoft.com 127.0.0.1 services.wes.df.telemetry.microsoft.com 127.0.0.1 sqm.df.telemetry.microsoft.com 127.0.0.1 telemetry.microsoft.com 127.0.0.1 watson.ppe.telemetry.microsoft .com 127.0.0.1 telemetry.appex.bing.net 127.0.0.1 telemetry.urs.microsoft.com 127.0.0.1 telemetry.appex.bing.net:443 127.0.0.1 settings-sandbox.data.microsoft.com 127.0.0.1 vortex -sandbox.data.microsoft.com 127.0.0.1 survey.watson.microsoft.com 127.0.0.1 watson.live.com 127.0.0.1 watson.microsoft.com 127.0.0.1 statsfe2.ws.microsoft.com 127.0.0.1 corpext.msitadfs .glbdns2.microsoft.com 127.0.0.1 compatexchange.cloudapp.net 127.0.0.1 cs1.wpc.v0cdn.net 127.0.0.1 a-0001.a-msedge.net 127.0.0.1 statsfe2.update.microsoft.com.akadns.net 127.0.0.1 sls.update.microsoft.com.akadns.net 127.0.0.1 fe2.update.microsoft.com.akadns.net 127.0.0.1 65.55.108.23 127.0.0.1 65.39.117.230 127.0.0.1 23.218.212.6 9 127.0.0.1 134.170 .30.202 127.0.0.1 137.116.81.24 127.0.0.1 diagnostics.support.microsoft.com 127.0.0.1 corp.sts.microsoft.com 127.0.0.1 statsfe1.ws.microsoft.com 127.0.0.1 pre.footprintpredict.com 127.0.0. 1,204.79 .197.200 127.0.0.1 23.218.212.69 127.0.0.1 i1.services.social.microsoft.com 127.0.0.1 i1.services.social.microsoft.com.nsatc.net 127.0.0.1 feedback.windows.com 127.0.0.1 feedback.microsoft -hohm.com 127.0.0.1 feedback.search.microsoft.com
You should get the same result as in the screenshot below.
After that, close the hosts file, saving the changes.
Now the data collected by the tracking functions of Windows 10 will not reach the recipient, even if you forgot to disable any of the tracking options.
Disable Windows 10 surveillance using programs
And the last chapter of our article, which everyone has been waiting for. Of course, all the steps described above can be accomplished using several utilities.
Destroy Windows 10 Spying (DWS)
Perhaps the best utility for removing spyware from Windows 10. The program is absolutely free and open source, so you don’t have to worry about viruses if you download it from the program’s official website. The program can remove and disable telemetry elements, disable Windows Defender, Cortana voice assistant, and much more.
At the time of writing this article, the latest version was DWS 1.6 Build 722. Go to the official website and download the latest release of this utility.
Launch the program and go to the “Settings” tab and select the tracking functions that you want to disable. In my case, this is everything from the proposed list.
After that, go to the “Home” tab and click the Destroy Windows 10 Spying button. After this, the process of removing Windows 10 tracking services, telemetry elements, adding Microsoft servers to the blocked list, and so on will begin.
After the utility completes, it will prompt you to restart your computer.
Disable Win Tracking
Another excellent program for removing spyware from Windows 10. Like DWS, this program is free and available on the github website.
The main difference of this program is that it allows you to selectively disable tracking services on your computer, as well as return them back if you accidentally delete them.
Although the program is in English, it is extremely easy to work with. On the right you need to choose what you want to do with the selected elements - disable (disable) or delete (delete). After that, select the checkboxes of the tracking elements you do not need and click Go to start the process.