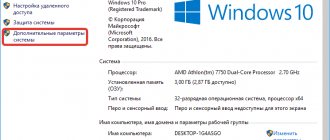
Quite often, Windows users complain that when they have a large amount of RAM, the amount available for use is not at all the value determined by the operating system itself. For some it may be 35-50 MB, but you can find values much higher (memory reserved by hardware). How to remove this reserve will be discussed further. But for now let’s dwell on the root causes of this situation. Why is memory reserved, for what resources?
Memory (reserved by hardware): how to remove it and what is causing this problem?
First of all, any user of the Windows operating system family should clearly understand that this problem is typical exclusively for systems with 32-bit architecture or, as it is usually referred to, x86. In 64-bit OSes this question does not arise at all.
As for the reasons that when viewing the available volume it turns out that the memory is reserved by hardware (we’ll look at how to remove the existing reserve in Windows 7 a little later), they are mainly associated not even with the operating system processes themselves, but with the release of memory for integrated graphics accelerators , built directly into the motherboard, which cannot provide sufficient memory to perform any system and non-system operations related to displaying current events on the screen in terms of the correct operation of the system interface itself.
In addition, it is not uncommon for RAM to be allocated according to user settings, where the system partition specifies the use of all processor cores with maximum RAM allocated to each core. But the main problem with installing such options is that not everyone is aware of exactly how many cores the processor has and how much memory to allocate for each of them. For example, many people believe that the second generation Intel Core i7 processors installed on laptops are 4-core. This is wrong. They can be called such quite conditionally, since each core accounts for two streams of computing power. By installing memory for four processors/cores instead of two, you get the problem that the memory is “eaten up” in the system properties.
How to disable Reserved Storage in Windows 10 in the Registry
You can disable a reserved area on a computer disk by applying changes to the system registry. To do this, we need to launch the Windows Registry Editor.
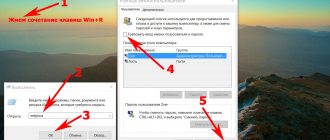
- Press the "Win" + "R" keys.
- In the Run dialog box, enter the command: “regedit” (without quotes), click on the “OK” button.
- In the Registry Editor window, follow the path:
HKEY_LOCAL_MACHINE\SOFTWARE\Microsoft\Windows\CurrentVersion\ReserveManager
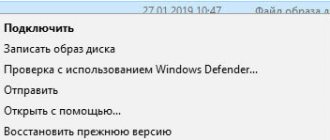
- Find the "ShippedWithReserves" option and then right-click on it.
- In the context menu, select "Edit...".
- In the “Change DWORD Value (32-bit)” window, in the “Value:” field, insert the parameter “0” instead of “1”, and then click on the “OK” button.
- Close the Registry Editor window and restart your computer.
The reserved storage does not disappear immediately, but after installing the next Windows update. Wait until you receive the cumulative system update, or go to the Update & Security option yourself. Use Windows Update to check for updates, and then install them on your computer. After installing the updates and rebooting the PC, the reserved storage will disappear from the system disk.
RAM is reserved by hardware: how to remove it? The simplest method to fix the problem
But let's return to the original problem. To begin with, even after the initial installation of the operating system, go into its properties and look at the available amount of RAM in the performance section, compared to the one that is fully determined. If the discrepancy is too large, it is possible that the installed system has its limitations.
At least initially, it is worth looking at the special compatibility tables of system versions with the computer configurations used. It may very well be that the installed OS will have to be changed (no additional actions will have any effect in this case). On 32-bit systems, the ceiling is usually 4 GB. Everything that will be installed above will be defined as memory reserved by hardware. How to remove (in Windows 10, for example) such nonsense, I think, is already clear. If the system does not support installing more RAM, then there is no point in trying. Change the system or remove memory sticks.
Checking for possible problems with installed memory modules
Sometimes the problem occurs due to problems with the installed physical memory modules.
Checking for damaged memory modules
To check your PC for such a problem, you need to turn off the computer, disconnect it from the network, and then swap the memory modules (sticks).
Checking the location of memory modules (strips)
To find out how to install memory modules (sticks) into slots, you need to see the user manual that came with your computer.
If your computer does not use all memory slots, you may need to use specific ones. For example, if your computer has four memory module slots, it is possible that you should use slot 1 and slot 3 when installing only two modules.
Are hub boards used for memory modules?
If your computer uses a memory hub card (a card that holds multiple memory modules and fits into a single memory module slot), you may need to do some additional system configuration. And the amount of available memory may be less than expected.
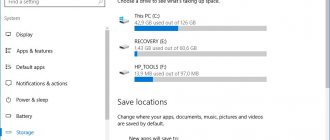
After turning on the computer for the first time, users notice that not all of the installed RAM in Windows 10 is available. In the characteristics, you can see the value of available significantly less than the installed RAM. If you run resource monitoring, you can see that more memory is reserved by hardware.
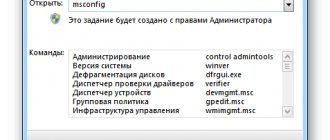
Using System Configurator Settings
With the Windows configurator, which is called by the msconfig command, the situation is somewhat more complicated. This is where the memory allocation settings for each processor core are located.
If you set such parameters yourself and using system tools, specify only the main cores without taking into account threads and memory allocation for each core. If you are asked to specify the maximum memory, do not flatter yourself too much - after a reboot (and this is mandatory after setting the appropriate options) the system may simply “fly off”, and after that no means of resuscitating it will help (of course, except for a complete reinstallation).
How to enable Reserved Storage on Windows 10
If plans have changed, and we again need to enable Reserved Storage on the PC, we will again have to resort to the help of the Registry Editor.
Follow these steps:
- Launch Registry Editor.
- Follow the following path:
HKEY_LOCAL_MACHINE\SOFTWARE\Microsoft\Windows\CurrentVersion\ReserveManager
- Double-click the left mouse button on the “ShippedWithReserves” parameter.
- In the "Change DWORD (32-bit) Value" window, change the value of the parameter from "0" to "1".
- Click on the "OK" button.
Exit Registry Editor, restart your PC.
The best method to solve the problem
In general, it is believed that the problem of how to remove memory reserved by hardware can be solved quite simply by installing an operating system similar to the previous one, but with a 64-bit architecture.
Here you don’t have to deal with additional settings of options. No, you can, of course, try again to set the use of all CPU cores, but believe me, this will not lead to anything good (tested in practice). Therefore, to avoid such incidents, it is better to give independent choice to the system itself.
Graphics adapters
In addition, if you see that the memory is reserved by hardware (how to remove the reserve is already a little clear), pay attention at that moment that two video cards can be installed on the computer.
Try switching from an integrated adapter to a discrete one, using at least the “Device Manager” in the simplest case, where the built-in chip, as is already clear, just needs to be disabled.
If this solution does not work, the question of how to remove the reserved memory can be resolved by changing the parameters in the primary BIOS input/output system (UEFI), where you should find both accelerators in the hardware section and for the integrated one, apply the system inaccessibility parameter (Disabled ), then restart and look at the result in the same computer properties.
LiveInternetLiveInternet
When working on a computer, you may notice a message on the taskbar in the right corner stating that there is not enough virtual memory and that the free virtual memory of the system will soon run out.
And you sat down to do difficult work.
We redid and rearranged a bunch of notes and made a presentation or made our own video clip.
And what a shame it is that all this can be lost.
In such a situation, there is only one way out - to monitor it, and not rely on the machine.
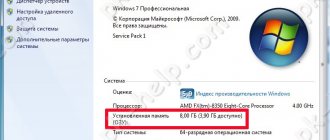
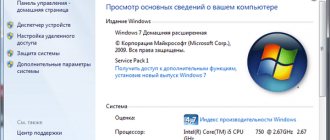
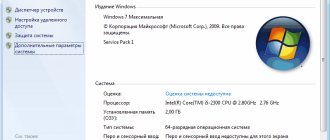
see how much RAM is allocated on your computer like this: “Start - Control Panel - System” . In the column “System – Installed memory (RAM)”
it will display exactly how much RAM is installed in your computer.
So you have seen how much RAM is installed on your computer.
Now, if we want to increase the RAM , we need to:
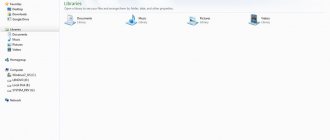
open “Control Panel” - then go to the “System” - open the “Advanced” .
Next, select “Performance” , where you will need to click the “Options” button.
In the same last “ Performance , you must select the “Advanced” .
The next section, Virtual Memory, will display the amount of memory currently available on your computer.
Then you need to click the "Change" if you decide to change the virtual memory settings.
Note: Experts advise setting the value to 1.5 or 2 times the specified volume. For example, if you have 2 GB of virtual memory, the file size can be increased to a maximum size of 4096 MB. Well, you have decided where and how to see and pump up the computer’s virtual memory. But the most important question remains.
How to clear virtual memory? Virtual memory needs to be cleaned in order to maintain the confidentiality of your data that is in the paging file. Generally speaking, the function for clearing paging files itself is disabled . In order for it to work again, you need to do the following: go to the Start , then go to Settings to Control Panel ; in the “Control Panel” you need to open “Administration” ;
in the window that opens, select the folder called “Local Security Policy” ;
Then you see the Local Security Settings .
In the list provided you will need to select the item
Shutdown : Clears the virtual memory file.
By right-clicking, select “Properties” ; in this last window select “Turn off” , then “Apply” and click “OK”;
After all the activities have been completed, the “Status” will be changed to “Enabled”. After all the steps have been completed, you will need to restart your computer two (2) times.
After the last, second reboot, clearing our paging file will be successfully completed.
So, if suddenly a window appears on your computer saying that there is insufficient virtual memory, then the answer is simple: you need to clean up the virtual memory.
To enable memory cleaning permanently and automatically, you need to click the "Start" and select "Run" .
In the line that appears, you need to type regedit.
Open the sequential drop-down folder menus and click on “+”
and follow the path HKEY LOCAL MACHINESYSTEMCurrentControlSetControlSession ManagerMemory Management.
Select it, call up the menu with the right mouse button, select “Change”
and in the Value field enter “1”
As a result of such actions, every time you reboot your computer, the virtual memory, or rather the page file, will be cleaned.
You have become familiar with the concept of virtual memory, why it is not enough and how to clear virtual memory.
Now, by following the above steps in this article, you can easily
You will be able to clean up the virtual memory of your computer. Well, I found the source of these unique tips for you, which are located here: Virtual memory and why is it not enough? I hope you liked it!
Instead of an afterword
For the rest, you should initially rely on the limit tables for the used RAM, since failure to comply with such conditions if the system is incompatible with the hardware of the installed equipment may cause such problems in the future, not to mention more serious consequences.
As for the main solution, immediately pay attention to the graphics card, for which the 32-bit OS allocates memory, even for the execution of its own processes, which cannot be executed without using the minimum required volume (the graphical interface simply will not work). And this, in turn, can provoke the emergence of problems of a more serious nature that cannot be eliminated using standard methods.