Windows is a fairly multifaceted system, with many different nuances and subtleties located in places that are not the most obvious to users. Moreover, many ordinary users do not even realize that most of them exist. In order to expand the boundaries of your knowledge when working with a personal computer, find out more information about your system and PC configuration, increase the performance of Windows, and also take advantage of some additional features and functions of the operating system, you need to study in detail one of the sections of Windows 10 “Advanced system settings” ", and some related ones.
Additional Windows 10 system settings
How to open system properties
The "System Properties" section provides some information about the configuration of your PC (information about the CPU and RAM), indicates the version of the operating system, the system bit depth and some other information. What does he look like:
Section "System Properties"
There are several ways to open System Properties:
- By simultaneously pressing the “Win” + “Pause” keys.
- You need to go through a certain path in the system settings.
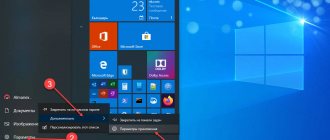
Step 1: Use Start by clicking on the icon at the bottom left edge of the screen.
Step 2. Click on “Options” located immediately above the “Shutdown” column.
Click on “Options”
Step 3: In the Settings app, go to the tile called System.
Go to the tile called “System”
Step 4. We are interested in the “About the system” tab at the end of the list, click on it.
Click on the “About System” tab
Step 5. Finally, the last step is to click on the “System Information” text.
Click on the text “System Information”
The standard “System Information” subroutine provides more detailed information
System Information app
(System Information) was added in Windows XP. With its help, you can see a much more detailed overview of both system information and information about the equipment used, much more informative than the previous method.
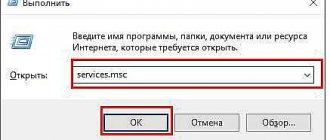
To open the System Information
, press the combination
“Windows + R”
, and in the
“Run”
enter
“msinfo32”
and click
“Enter”
.
The Home page will immediately provide much more information than we saw in the Settings
. Here it is indicated in more detail, the manufacturer of your PC, detailed configuration information, BIOS version, motherboard model, installed RAM, etc.
But this is just the beginning. Expand the tab tree in the menu on the left, and the real functionality of this application will open before you. Most of this information will probably be useful only to software developers and system administrators, but at the same time, almost all the necessary data about the system is available here.
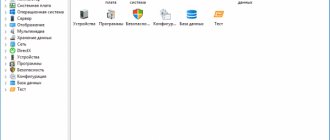
For example, in the "Components"
Click on the
“Network”
and then
“Adapter”
and the program will display complete information about the device: name, model of your network card, manufacturer, driver versions, current status, as well as all related settings that are currently in use.
Another excellent feature of this software is the ability to export the information you are interested in to a text file. This option is extremely useful when you need to send data about your system or hardware errors to someone else, such as support, or if you simply want to keep a copy of your system configuration and settings just in case.
First you need to select the desired section or subsection from which you want to export information. If you select the "System Information"
, then the exported file will contain data from all sections that are available in the application. But you can also select any individual section or subsection to save only specific information.
Then open the File
and click on the command
"Export"
.
A standard dialog for saving a file in Windows will open, just go to the desired directory and enter the names of the new report and click the “Save”
.
Now, at any time, you can easily open this file and view all the information and settings that interest you.
Open "System Properties" through the "Control Panel" of Windows 10
In older versions of Windows, the Settings application was completely absent, and all the options found there were located in the Control Panel. In the 10th version of the Microsoft system, they decided to replace it with the Settings application, but for the convenience of users they still left the Control Panel. Follow the steps below:
Step 1. First, let’s open the “Control Panel” itself. It is called by the “control” command in the “Run” window (“Win” + “R”). Second method: use “Start”, in which you should select the “All applications” column. Find the “System Tools - Windows” subsection and click on “Control Panel”.
In the “System Tools - Windows” subsection, click on “Control Panel”
Step 2. All you need to do is click on the text “System and Security”, we need the “System” section
In "System and Security", we need the "System" section
System information in the Command Line
If Windows does not boot in normal operating mode, you can use a special command for the “Command Prompt”
.
Using this option, you will not be able to get as detailed information as in the System Information
, and perhaps this option is more complex than the regular application, but still this command will be extremely useful in the case when the operating system the system begins to
“stand out”
and stops loading normally.
After the standard command line prompt, you need to go to the directory where this program is located, enter the following command “cd C: WindowsSystem32”
.
Next, enter the command “systeminfo”
and press
“Enter”
. After a little analysis, the program will display a few lines of information you need about the OS build and version, processor, BIOS version, boot disk, memory and network information.
Open additional OS settings
In the section called “Advanced system settings”, users have access to some data about the computer itself, the system and connected equipment; there is also a section dedicated to remote access. It opens like this:
Step 1: Find and open System Properties using one of the methods described in the previous section.
Step 2. The item we need is located on the left, just click on it.
Open “Advanced system settings”
Program for viewing computer settings
To access more detailed information and view computer settings, you can use the special AIDA64 program.
To get more complete answers to questions about computer settings, this is a great program. With its help, viewing the parameters is quite simple.
However, it is worth noting that the program is paid. But nothing prevents you from taking advantage of the 30-day free period, which the developers kindly provide for evaluation purposes.
The application is available for download on the developers' website - www.aida64.com. To download it, you need to go to the Downloads section and download the latest version here.
After downloading AIDA64, install it on your computer, everything is as always, nothing complicated.
Key features of AIDA64:
• All information about computer components: motherboard, processor, operating system. memory, video adapter, hard drives, etc.
• Information about hardware characteristics: device temperature, supply voltage, clock speed, cache size, etc.
• Diagnostics and testing of processor, hard drives, memory.
• System configuration
• Installed software
• Installed drivers
• License information
Open the printer properties
In order to configure a printer in Windows, you need to open its properties. How to do this:
Step 1. As usual, open “Start” using the icon in the lower left corner.
Step 2. Click on “Options”.
Click on “Options”
Step 3: Select the Devices tile.
Select “Devices”
Step 4. Select the top tab “Printers and Scanners”, then click on the text “Devices and Printers” highlighted in color.
Select the “Printers and Scanners” tab and click on the text “Devices and Printers”
Step 5. Find your device, left-click on it, and select the “Printer Properties” column.
Select the device, left-click on it, and select “Printer Properties”
How to find out the version of "DirectX"
"DirectX"
is a special set of ready-made graphic elements, procedures and functions that the Windows operating system provides for use by external programs.
"DirectX"
is specially designed
to facilitate the development of graphical applications for Windows; most programs, one way or another, use it to visualize all kinds of data. Most often it is used to write computer games. And if you installed a game that requires a newer version of “DirectX”
than the one installed on your PC to work properly. Once you find out what version is installed, you will be able to understand whether it needs to be updated or not.
The easiest way to do this is by running the standard OS utility. To do this, press the keyboard shortcut “Windows + R”
, and in the
Run
type
“dxdiag”
and press
Enter
.
This will launch the DirectX Diagnostic Tool.
.
The first tab of the program window will display some information about the PC and information about the version of “DirectX”
.
In fact, this inscription only indicates which version of the program is active and in use at the moment, and not which is the latest installed on your PC. After updating the “Windows 10 Fall Creators Update” in this window, the utility always shows version 12. But here the question arises that not every video card can support this “DirectX”
.
The version of the program that your device supports can be found in the “Display”
“Settings”
application .
Setting up devices on Windows 10
You can configure each connected equipment in the “Device Manager”.
Step 1. As always, open “Start”. In the “All Programs” column we find “Windows System Tools”, we need the “Control Panel” sub-item.
In the “System Tools - Windows” subsection, click on “Control Panel”
Step 2. Click on “Hardware and Sound”.
Click on “Hardware and Sound”
Step 3. The last step is to click on the text “Device Manager”. A list of all devices connected to the PC will open.
Click on the text “Device Manager”
List of devices connected to PC
How can I place my computer on my desktop?
Unfortunately, in the latest versions of Windows, namely 8, 8.1 and 10, the “My Computer” shortcut familiar to all users has disappeared from the screen. It is now not possible to return it in exactly the same form, but “My Computer” is being very successfully replaced by a slightly different shortcut called “This Computer”. How to place it on your PC desktop:
Step 1. Click on any empty area on the desktop of your computer. In the context menu that opens, select “Personalization”.
Click on any empty area on the computer desktop
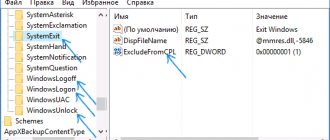
Step 2. Go to the “Themes” column and select “Desktop Icon Settings”.
In the “Themes” column, select “Desktop icon settings”
Step 4. In the window that opens, use the checkbox to select the “Computer” item.
In the window that opens, use the checkbox to select “Computer”
Now “This PC” will always be on your desktop.
[For Beginners] 7 Ways to Open the Settings Menu in Windows 10
Seeing how Microsoft is phasing out the Control Panel in an attempt to make the Settings app the primary place for system settings, I came up with the idea to share with you all the ways I know how to open this menu. I know most of you already know this, but I hope some readers find the information below helpful.
Use the Settings shortcut in the Start menu
The Start menu was not included in Windows 8 and 8.1, but after massive user dissatisfaction, Microsoft returned it to Windows 10, although not quite in the form in which we are used to seeing it. It makes sense that the Start menu provides one of the fastest ways to open the Settings menu in Windows 10.
So, open Start and look at the bottom left of the menu - there you will see a gear icon that allows you to go to Settings.
Use Search/Cortana
This method is not as fast as the first, but still deserves to be mentioned. Type the word “options” in the “Search the Internet and Windows” field, and once the system displays the search results, press Enter or click on the corresponding result.
Use Quick Actions
Windows 10 includes a new panel called Action Center, the purpose of which is to notify the user about events happening on their computer. Additionally, this feature has a series of buttons for quick actions.
Open the notification panel by clicking on the icon on the far right in the system tray. At the bottom of the panel, click the All Options button. This will open the Settings app.
Pin Settings to the taskbar
If you use the Settings menu frequently, simply place its shortcut on your taskbar. To do this, open the Start menu, find the Settings shortcut and right-click on it (or hold until the context menu appears if you have a touch device). From the menu, select Advanced → Pin to Taskbar.
How to open the options menu while in This PC
In the “This PC” window, in the place where the button to open the classic Control Panel was previously located, in current versions of Windows 10 there is an “Open Settings” button, clicking which will take you to the main page of the system settings management menu.
1
Opening the Settings menu from the Start button context menu
A link to open the settings in the Start button context menu is available starting in Windows 10 version 1703. To open this menu, right-click on the Start button or press hotkeys + X.
Use keyboard shortcuts
This is the last and perhaps the fastest way. All you have to do is press the keyboard shortcut + i. This action will instantly open the Options window.
If you know of other methods, please share them in the comments and I will add them to the article.