Play a sound when shutting down in Windows 10
Starting with Windows 8, the option to enable/disable sound playback when shutting down has disappeared from the Microsoft operating system settings. Turning on sound when Windows starts is now disabled by default. In addition, many users are faced with a problem where, even with the “Play Windows startup ringtone” option enabled, the sound is not played.
Next, we will look at how to return the ability to turn on/off the shutdown sound in Windows 10, and also solve the problem of no login and shutdown sound in Windows.
How to return the Shut down option to the Windows 10 sound scheme
To do this, you will need to make one small edit to the Windows system registry.
- WIN + R (or right-click on the “Start” button → Run) → regedit → OK;
- Let's move on to the section: HKEY_CURRENT_USERAppEventsEventLabelsSystemExit;
- Change the value of the ExcludeFromCPL parameter from 1 to 0 (to change, double-click with the left mouse button → specify a new value → OK);
- Close the registry editor → restart the computer.
After that, open the Windows sound settings.
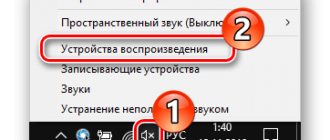
- Right-click on the speaker icon in the tray → select Sounds;
- Find the “Shut down Windows” item (appeared thanks to the edit we made) → select the appropriate sound (or specify the path to your own audio file in .wav format using the “Browse” button) → Apply → OK.
After this, the shutdown of Windows 10 will be accompanied by the melody of your choice.
Enable the display of missing system sounds in the sound scheme settings
In order to be able to change the login, logout, and shutdown sounds of Windows 10, you will need to use the Registry Editor. To launch it, either start typing regedit in the taskbar search, or press Win+R, type regedit and press Enter. After that, follow these simple steps.
- In the Registry Editor, navigate to (folders on the left) HKEY_CURRENT_USER AppEvents EventLabels.
- Within this section, pay attention to the subsections SystemExit, WindowsLogoff, WindowsLogon, and WindowsUnlock. They correspond to shutting down (although it's called SystemExit here), exiting Windows, logging into Windows, and unlocking the system.
- To enable the display of any of these items in the Windows 10 sound settings, select the appropriate section and pay attention to the ExcleudeFromCPL value on the right side of the Registry Editor.
- Double-click on the value and change its value from 1 to 0.
After you complete the action for each of the system sounds you need and go to the Windows 10 sound scheme settings (this can be done not only through the control panel, but also by right-clicking on the speaker icon in the notification area - “Sounds”, and in Windows 10 1803 - right click on the speaker - sound options - open the sound control panel).
- Where did the sound settings panel disappear in Windows 10 version 1903?
There you will see the necessary items with the ability to change the sound to turn on (don't forget to check the Play Windows startup ringtone), turn off, exit and unlock Windows 10.
That's it, ready. The instructions turned out to be really compact, but if something doesn’t work or doesn’t work as expected, ask questions in the comments, we’ll look for a solution.
Information for the news
- 491
- Author: admin
- Date: 25-12-2017
25-12-2017
Category: -
In the old Windows XP, it was quite easy to change the operating system startup sound. All system sounds, including the startup melody, in WAV sound format were stored in the directory under the path C:WindowsMedia. It was necessary to open this path in Explorer and replace the source file “Windows XP - startup” with a WAV file with its own sound, but renamed as the source. Starting with Windows 7, the standard system startup ringtone is no longer a separate WAV file, but is included in the imageres.dll DLL file located in the System32 folder. And, according to the official position of Microsoft, you cannot change the system startup sound to your liking. We must either listen to what is there, or not listen to anything at all, which is what is offered by default in the latest versions of Windows 8.1 and 10. In this article, we will look at how to bypass Microsoft’s strict limits. And listen to your favorite ringtones when loading system versions 7, 8.1 and 10.
There is no Windows greeting or shutdown sound - solution
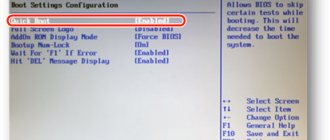
If you are faced with the fact that, even oh, the Windows greeting or shutdown sound still does not play, then simply disable “Windows Fast Startup” in the power settings:
- Control Panel (Start → Windows System Tools → Control Panel) → Hardware and Sound → Power Options → What the power buttons do;
- Click: “Change settings that are currently unavailable”;
- Uncheck “Enable fast startup (recommended)” → Save changes.
No sound when shutting down in Windows 10 - problem solution
Unfortunately, in Windows 10 there are simply no settings that allow you to set one or another sound to shut down the operating system, as can be done in Windows 7. Therefore, for most users, the computer shuts down silently.
Next, we will consider a method that will solve this problem once and for all.
Despite the fact that already in Windows 8 the ability to select and set the shutdown sound has disappeared from the operating system settings (and the Windows startup melody is disabled by default), there is still a way to return this option.
It is worth noting that the solution to editing the ExcludeFromCPL registry parameter from 1 to 0 only helps to return the “Shut down Windows” item itself to the sound scheme, but in fact, when you turn off the computer and shut down Windows, nothing happens - the melody still does not play.
However, the advice to uncheck the “Enable fast startup (recommended)” item in the power options does not give any results.
In fact, everything can be solved without resorting to editing the registry, but using the Group Policy Editor and a Windows PowerShell script.
Download Windows 10 Sound Themes and Schemes
If you want to create a completely custom sound scheme in Windows 10, you need to manually change each sound to the one you want.
Perhaps the best way to customize sounds in Windows 10 is to use a theme. Many of the themes in the Windows 10 store also have their own sounds. You don't even need to use the rest of the theme (like wallpapers, colors, and mouse cursors).
The easiest place to find themes with custom sounds is the official Microsoft repository. Go to the store in your browser and select With custom sounds from the menu on the left side of the screen.
There are a large number to choose from; they cover everything from popular games to tranquil settings.
Download the theme and double-click the file to extract it.
Once a theme is installed on your computer, the corresponding sound scheme will become available in the Sound Schemes drop-down menu that we discussed earlier. You can remove the visual parts of a theme in Settings > Personalization > Themes .
Some other sites offer sound patterns
, but due to changes in Windows 10 architecture, you will need to download the WAV files and then change each sound individually.
Save the new WAV files to C:\Windows\Media , then click on Browse in the Sounds menu to select the appropriate output. Save the diagram once you are finished.
Enable sound playback when shutting down in Windows 10
- Let's create a Windows PowerShell script file with the following content:
-c (New-Object Media.SoundPlayer ' C:WindowsmediaWindows Shutdown.wav ').PlaySync() ;
Please note: ' C:WindowsmediaWindows Shutdown.wav ' is the standard (default) path to the Windows 10 shutdown file. If you want to use a different ringtone, then specify your path to the .wav file, and its name must be on English language.
You can use the PowerShell ISE to create the script, or you can simply do this: create a new text document by copying the above script into it, and then save it with a .ps.1 extension. For example, like this:
- Desktop → New → Text document;
- Copy and paste the script into the document → File → Save As → Set the file name, for example “sound.ps1” (the name can be anything, but the extension must be ps.1) → Save.
- Next, copy (or move) the script file (in our example “sound.ps1”) to the folder: C:WindowsSystem32GroupPolicyMachineScriptsShutdown
- After that, open the “Local Group Policy Editor” (just start typing “groups...” in the Windows 10 search → click “Edit Group Policy”);
- Already in the editor, go to “Computer Configuration” → “Windows Configuration” → Scripts (startup/shutdown) → double-click on “Shutdown” (see screenshot);
- Click on the “PowerShell Scripts” tab → “Add”;
- Click “Browse”;
- Double click on the file that was created in the first step (sound.ps1) → OK;
- Select “Run Windows PowerShell scripts first” → Apply → OK.
That's all. The settings you make take effect without rebooting. Now, when you turn off the computer, the “Shut down Windows” melody you specified will sound.
In order to change the sound, you will need to make changes (specify a new path) to the script file, and to disable it, just delete it.
How to change Windows 10 login, logout and shutdown sounds
In previous versions of Windows, the user could change system sounds in Control Panel - Sound on the Sounds tab. This can be done in the same way in Windows 10, but the list of sounds available for changing does not include “Login to Windows”, “Exit Windows”, “Shut down Windows”.
This brief instruction tells you how to return the ability to change the login sounds (startup ringtone) of Windows 10, logout and shutdown of the computer (as well as unlocking the computer), if for some reason the standard sounds for these events do not suit you. You may also find this instruction useful: What to do if sound does not work in Windows 10 (or does not work correctly).
What to do if there is no sound on Windows 10
There are many reasons for sudden loss of sound. Before performing the steps described below, you must first make sure that your speakers or headphones are working properly: if possible, connect them to another gadget, for example, a smartphone. If everything works, proceed to follow the instructions.
Adjusting the sound volume
The user may not hear the sounds of the system due to the fact that the operating system is currently set to the minimum volume level. The sound can also be turned off. This problem has a very simple solution:
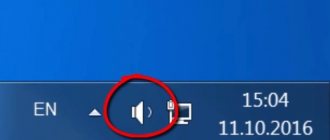
- Pay attention to the lower right corner of the display. Among the icons in this area, find the icon in the form of a loudspeaker. Its name is “Speakers”. Click on it with the left mouse button.
Click on the loudspeaker icon located next to the clock and date in the lower right corner of the screen - If there is a cross next to the icon, it means that the sound was accidentally turned off. Enable it in the panel that appears.
- To do this, press the slider with the left key and hold your finger on it. Move the slider to the right to the desired volume level, but we recommend doing the maximum and checking the sound right away. If there is no cross, try first lowering the volume by moving the slider to the left, and then increasing it again.
Move the slider to the right to increase the volume - If the sound is barely audible, right-click on the same “Speakers” icon. In the list, click on the first item “Open volume mixer”.
In the context menu, click on “Open volume mixer” - Check the volume level for individual utilities that are currently open on your PC. The browser volume can, for example, be much lower than the system sounds. Set it to maximum and make sure that the sound now works as before.
Increase the volume for each type of sound
Running the troubleshooter
Perhaps there was some kind of isolated failure in the system - which is why the sound disappeared. In this case, simply restarting the device through the Start menu can help. If it doesn't give any results, run the special Windows tool to fix audio problems:
- Right-click on your speakers icon again. This time, opt for the last option, “Troubleshoot audio problems.”
- The system will immediately begin to look for existing problems. Wait a bit.
Wait until the system detects sound problems on your PC - The tool may find some problems. The message will include specific recommendations to resolve the problem. They can be different (depending on the cause of the problem). Follow the recommendations. For example, the tool might tell you to simply turn up the volume. Use the instructions described in the previous section of this article.
Troubleshooter asks to increase audio volume in mixer - Click on "Next". The tool will continue to look for problems.
The tool can detect other problems that are related to the lack of sound - The tool can also detect a problem with the audio driver. In this case, you will be prompted to reinstall it. Click on “Play test sounds”.
Click "Play test sounds" - The system will try to play sounds. Depending on their quality, select a rating in the next window. If it was difficult to hear or there was no sound at all, the system will reinstall the driver. After that, restart your PC and check the sound. If the sound was good, the OS will continue to use the current driver.
Rate the sound the system just played - After checking and performing troubleshooting steps, the tool will provide you with a short progress report.
Check out the tool's progress report: it will contain information about detected problems and their solutions
Absence or irrelevance of the driver
A common reason for no sound is an out-of-date audio driver. In this situation, it is necessary to update it to return the sound. This can be done in a standard Windows window called “Device Manager”, through special update utilities, for example, DriverPack Solution, DriverBooster, SlimDrivers and others (download them only from official sources). It is also possible to download audio drivers from the official resource of your PC manufacturer. Let's look at installing new drivers using the example of a laptop from Asus:
- In any browser we will open the official Asus company page. In the upper right corner, click on the magnifying glass icon and begin entering the model name in the line. Our device is called X555UB. Click on the desired model in the search results.
Enter the name of your PC model in the search bar - Switch to the third tab “Support”.
Switch to the "Support" tab in the upper right corner - Now we need the first section “Drivers and Utilities”. We left-click on it.
Go to the “Drivers and Utilities” section to open the list of available “firewood” - In the drop-down menu, select your OS version. In most cases this is a “ten”. Don't forget about the bit depth - it also needs to be taken into account.
Select your operating system from the drop-down menu - We are looking for Audio in the list. The driver will be located almost at the very beginning of the list. Click on the corresponding blue “Download” button and wait for the download to complete - it will take some time depending on the speed of your Internet.
In the list of available drivers, find Audio - Launch the downloaded archive with the audio driver suitable for your model. We find in it a file called Setup.exe - an installation document.
In the downloaded archive, find and run the Setup.exe file - Click “Yes” to launch the installer and allow it to make changes to the device.
Click on "Yes" to allow the driver installer to make changes to your PC - Click “Next” on the initial screen of the audio driver installer.
In the initial installer window, click “Next” to proceed to the next instructions - Click on “Next” again to begin removing the previous driver.
First, the installer will remove the old driver, and after restarting the system, install the new one - We are waiting for the uninstallation procedure of the old driver to complete.
The installer will take some time to remove the old audio driver - After this, we immediately reboot the system through the appropriate item in the installer window.
Install o and click on “Done” - After restarting the PC, the new driver will be installed automatically.
Video: how to update the audio driver for a Realtek sound card
Rolling back or uninstalling sound drivers
If you have problems with sound after any updates to the system, in particular, an audio driver update, the driver may have been installed incorrectly or it turned out that it does not suit your equipment for sound playback. In this case, it is recommended to roll back the sound “firewood”:
- First, call up the necessary window - “Device Manager”. In the tenth version of Windows, this is easiest to do: right-click on the “Start” icon and select the appropriate item from the list.
From the Start button context menu, select Device Manager - If the Start context menu does not appear, use the Search panel (the magnifying glass icon on the Taskbar). Start typing a query corresponding to the name of the window - the system will immediately begin to select options for you. Click on the desired result.
You can open Device Manager through the Windows Search panel. - In the list of hardware parts we find the item “Sound, gaming and video devices”. Open it by double-clicking with the left mouse button.
In Device Manager, expand Sound, Game, and Video Devices. - Right-click on Realtek High Definition Audio or another that matches your audio equipment, for example, Conexant SmartAudio HD. In the gray menu, click on “Properties”.
Open driver properties using the context menu - In the second section “Driver”, click on the “Roll Back” button if it is clickable. If not, then this option is not currently available to you.
If the “Roll Back” button is not clickable, it means that you will not be able to return the previous version of the driver - The system will roll back the driver to the previous version. After that we check the sound. If it does not appear, remove the device through the same context menu, which is called by right-clicking.
- Now, on the top panel, click on “Action”, and then select “Update hardware configuration” - the driver will appear in the list again. We check the presence and quality of sound again.
Click on “Update hardware configuration”
Viral activity
Problems with system components can be caused by malware that has previously settled on the device despite the presence of antivirus utilities. There may be problems not only with sound - there will be a general “slowdown” of the OS.
To rule out this explanation or, conversely, to make sure that the problem is a virus, conduct a full scan. You can use either a third-party antivirus or the built-in standard one - Windows Defender. Let's look at checking and treatment using his example:
- Launching Defender is very simple: it always runs in the background, so its icon is in the Windows tray. Open it and find an icon in the form of a white shield.
Find the white shield icon in the Windows tray and left-click on it once - In Protection Center, open the “Virus and Threat Protection” section.
Click the Virus & Threat Protection tile - On the next page you can start a quick check, but unfortunately it may not give any results. It is still recommended to use a full scan, so click on the “Run a new extended scan” link.
Give preference to advanced scanning, which will definitely help neutralize the virus - Now choose one of three types. The custom scan will search for viruses in specific directories that you specify yourself. Windows Defender Offline will scan for approximately 15 minutes, but the system will have to restart. This option is suitable for removing threats that are best at camouflage. The first item - “Full scan” - will take a lot of time, but at the same time you can continue to work on your PC without worry. After selecting, click on the “Scan now” button.
Select "Full Scan" if you are not concerned about the time the scan will take and if you want to work on your PC during this time - We are waiting for the virus scanning process to complete. The system will present you with a report: if malicious files are found, you will be given the right to choose the action that will be performed with this file. Select deletion. After that, restart the device and check if the sound works. If necessary, update the PC configuration (removing and restoring the driver) using the instructions in the previous section of this article.
Wait for the system virus scan to complete
Enabling or restarting a service
The system service that is responsible for sound operation may be deactivated for some reason. If it is disabled, the sound, of course, will not work. You can activate it in a special window:
- We call it on the display through the “Run” window: immediately click on the two buttons Win and R, and in the field we paste or type the code services.msc ourselves.
Write the command services.msc in the “Open” line - Another way is the Search panel. Click on the magnifying glass on the “Taskbar” (usually it is located next to the “Start” button). We write the request in Russian - “Services”. Click on a section in the search results.
Enter “Services” into the search bar - On the right side of the window, look for the Windows Audio item. If this service is disabled, there will be a “Run” link in the middle part of the window. Click on it - it will start working in a few seconds.
Using the "Run" link you can activate the Windows Audio service - After that, double-click on Windows Audio to open another window. If this click does not work, right-click and click on “Properties”.
Click on "Properties" in the Windows Audio context menu - In the new window, we need a “Launch Type” drop-down menu. In it we select “Automatic” so that the service starts working immediately when Windows boots. Checking the sound.
For the “Startup type” parameter, set the value to “Automatic” - After that, also make sure that three more audio-related services are running on your PC: Media Class Scheduler, Windows Audio Endpoint Builder, and Remote Procedure Call. For all of them you need to set the value “Automatic” for the “Startup type” parameter.
Video: How to start the Windows Audio service
Wrong speaker format
The sound may disappear if you install the wrong speaker format. Switching it will help correct the situation:
- There are also two ways to open the desired window. Call the “Run” panel again (via the Win + R combination): write or paste the request mmsys.cpl into it, and then execute it using the OK button.
In the “Open” line, write the code mmsys.cpl and click on OK - The second method is as follows: right-click and in the list on a dark background, click on “Sounds”.
- In the Sound window, we need the first tab. Right-click on “Speakers” and immediately select “Properties” from the menu. Another way is to double-click on the “Speakers” item or use the special button under the panel on the right.
In the context menu of the “Speakers” item, select “Properties” - In the next window with speaker properties, go to the penultimate section “Advanced”. In it, in the drop-down menu, select the format suitable for your speakers (if it was 24 bits, check one of the items with 16 bits). The “Check” button will help you decide on the formats.
Choose the sound format that suits your speakers or headphones - Also remove everything about.
Disable all options under Exclusive Mode - Once configured, apply the changes using the button in the lower right corner and click on OK.
Deactivating sound effects
Your audio output device may not work when sound effects are enabled in your speaker settings. To disable them, do the following:
- Open the Properties: Speakers window using one of the methods described in the previous section. Go to the third tab “Improvements” or “Additional features”.
In the “Improvements” tab, disable all items and click on “Apply” - In the list of available effects, uncheck all items at once.
- Now click on “Apply” for all changes to take effect. Check if there is sound. If the problem has been resolved, you can close the window.
System recovery or reinstallation
If none of the above methods solved your problem, try restoring your system. First, let's look at how to use a restore point, if you have one on your PC:
- To start recovery using a point, we need the System Properties window. There are several ways to open it. The fastest way is through the Run panel. Hold Win and R, paste the systempropertiesprotection code and press Enter.
Paste the systempropertiesprotection command into the field and click OK - If it doesn’t work, open the “Control Panel” through the “Start” menu and find the “Recovery” section there.
- You can also use Windows Search. Use one word “Recovery” as a query.
In the search bar, type the query “Recovery” - Now click on the “Restore” button.
In the “System Properties” window, click on the “Restore” button - On the tool's initial screen, select either the most recent point (recommended value) or check the box next to the second point to choose a state from the list yourself.
Select the last restore point or check the box next to the second item - In the latter case, select a state in the list that appears and click “Next”.
Select the required restore point from the list - Before doing this, you can also familiarize yourself with the list of components that will be restored.
The tool can show which programs and drivers will be affected by the rollback - Now click on “Finish” so that the tool starts restoring the operating system to the previous version - the state when sound was present on the PC.
Confirm the restore point by clicking “Finish” - Confirm your intention to restore by clicking on the “Yes” button. The preparation process for the procedure will begin immediately. After this, the PC will immediately reboot - you will not be able to work on it. All that remains is to wait for the procedure to complete. After that, check the sound.
If you previously made a backup copy of your operating system, you can restore it using it:
- Restart your device. When it starts to turn on again, hold down the key called F8. On the blue screen, click on the “Recovery” button.
- Select your keyboard layout.
Select your keyboard layout option - In the next window, click on “Diagnostics”, and then on the “Advanced options” section.
In the “Diagnostics” section, open the “Advanced parameters” block - Now select the System Image Restore tile.
In "Advanced Options" select "System Image Restore" - The OS will perform the preparatory stage. Wait for it to complete.
Wait for preparations to restore the system from the image to complete - Select your account from the list if there are several. If necessary, enter the password for it.
Select your “account” and enter its password, if you have one - You will see a step-by-step wizard for restoring Windows from a system image on the screen. The tool will default to the last image created. If you want to install another file, manually specify the path to it. Click “Next”.
Select the latest image or specify the path to the image stored on your disk yourself - Click “Next” again in the next window.
Click “Next” to proceed to starting the recovery - The tool will tell you the date and time the image was created from which the system will be restored. Click on “Done”.
Click on “Finish” to begin restoring the system from the image - Click on "Yes" to confirm that you really want to complete the procedure. Wait for it to complete.
Click on the “Yes” button and wait for the tool to finish restoring - Click on “Restart now” so that your PC will restart and all changes will take effect.
Click on "Restart Now" to restart your device
If you don't have a restore point or backup, your only option may be to reinstall the operating system. If you are a beginner, it is not recommended to do it yourself - contact specialists at a computer service center.