Causes of bootloader problems
Problems loading Windows are a clear sign of corruption in the files responsible for loading the OS. Incorrect system startup can be caused by many reasons.
The most common of them:
- Installation of additional operating systems , damaging the boot files of the main OS.
- Damage or deletion of boot files by malware and viruses.
- Loss of files due to physical and software malfunctions of the drive.
How to restore Windows 7.
Yes, comrades. I’m omitting Vista, because a) according to the statistics of blog visits, almost no one uses it and b) Windows 7 is a reliable successor to Vista. So what is described for the second one is also suitable for Vista. This paragraph is the longest - here I’m chewing on everything so as not to repeat it in the following ones.
- The Windows bootloader is connected and loaded successfully
- In the installation window, select System Restore
- select the system type (if offered), click Next
- in the Recovery Console window, select Command Promt
- in the console from drive X (this is what the Windows installer assigns to itself by default, so as not to mix with other existing volumes), type the commands (depending on what suits you best):
bootrec /rebuildbcd
This command will go through ALL working boot entries compatible with Windows 7 and reformat the list, bringing it back to normal (suitable for a multi-boot system if more than one is installed on the computer);
this is the most “armored” of the system recovery command options, with which you can try to solve all problems in one fell swoop bootrec /fixmbr
This command will write a duplicate of the MBR master boot record - the one that appeared immediately after installing Windows 7. Used if there is a suspicion of file corruption disk system in the partition table.
This is exactly the case when the chkdsk command did not detect damage to the disk surface (bad sectors), but Windows still does not boot: bootrec /fixboot
The command will write a new boot sector to your disk. It is used when the chkdsk utility has detected and “fixed” (or tried to do so) bad sectors of the disk. Often these sectors are simply erased to zero without recovery, and therefore you have to follow this command with the following bootrec /fixmbr.
bootrec /fixboot: Access denied
Thus, you already have a significant arsenal of utilities and attributes for their commands in order to approach the Windows recovery process almost professionally. That is:
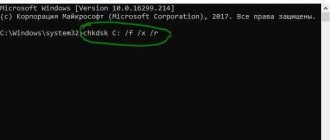
- chkdsk your_disk: /f/r/x/b, launched from the console , in its most “repair” version, will check the status of the disk and, if possible, correct disk errors (BUT NOT SYSTEM!)
- The commands of the bootrec.exe utility launched above will allow you to conduct step-by-step reconnaissance in force in order to restore Windows to boot. You may have to try all the command flags, and not in the order I specified.
Startup Recovery
“Broken” or missing OS bootloader files make it impossible to start and operate the computer correctly. In this case, you need to resort to restoring the Windows bootloader in the following way:
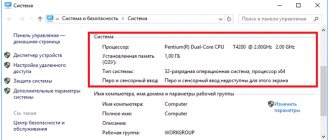
Step 1: To begin boot repair, you will need a Windows recovery disc or bootable USB flash . Important: for the recovery system to work correctly, you must boot in the same bit depth (32 or 64-bit) as the current OS. If you boot from an installation disk, you must select “System Restore” .
Step 2. On the recovery screen, you must select “Diagnostics” .
Step 3. In the window that opens, select “Startup Repair” .
After this, automatic recovery and correction of problems that prevent normal loading of the OS will be activated.
Unfortunately, automatic recovery methods do not always help restore the operating system of the OS, so sometimes you should resort to manual recovery using the command line.
Method 1: Integrated bootloader recovery tool
Each installation drive with the Windows 10 operating system contains a utility that can automatically identify and fix bootloader errors, as well as the “fixboot” command associated with it. To use it you need to do the following:
- Insert the boot drive into your computer/laptop and boot from it through the “Boot menu”.
These steps are no different from those performed when installing Windows 10. If you don’t know which button calls up the “Boot menu”, then check out our thematic guide. Read more: Guide to installing Windows 10 from a USB flash drive or disk - After booting from the installation drive, click Next. In the first dialog box, you can leave the default language settings.
- Next, click on the “System Restore” button.
- In the action selection window, you must click the “Troubleshooting” button.
- Next, select the very first item – “Startup Recovery”.
- The next step is to select the operating system on which to run the recovery utility. If you have several operating systems installed, select the one you need from the list using the arrows on your keyboard and press “Enter”. Otherwise, you will only see one item.
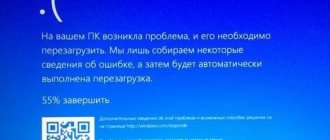
- After this, the system will automatically reboot. The computer diagnostic process will begin.
- If errors are found during boot sector scanning, the snap-in will try to automatically correct them. You will see a corresponding message on the screen and a prompt to restart the system. Do it.
The disadvantage of this method is that the utility does not always find problems. If it fails to detect errors, the message below appears. In this case, we recommend clicking the “Advanced options” button and moving directly to the next item.
Restoring the Windows boot loader from the command line
To start restoring the bootloader using the command line , you first need to open it. This can be done using a bootable USB flash drive or the recovery and diagnostic menu.
If you are using a boot drive, you must press Sfit+F10 on the language selection screen.
You can enter the command line through the diagnostics menu by clicking on the corresponding icon.
After opening the command line, you must enter the following commands:
- Diskpart (built-in utility for working with hard drives)
- List volume (list of connected media)
- Exit (terminating work with the utility)
The entry of each command must be confirmed with the Enter .
This order will allow you to find out which drive is the system drive (by default it is drive C), and based on this knowledge, try to perform software recovery of bootloader files .
After this, you need to enter the command bcdboot c:\windows , which corrects most problems with the bootloader.
It is worth noting that if there are several operating systems installed on the computer, these steps should be performed one by one for each system .
If this method does not work, you can completely clear the bootloader and create its files anew.
To do this: open the command line in any convenient way. Enter diskpart . Then volume list . Then we find the hidden disk with the bootloader (usually a disk of 100-500 MB , created by the system in FAT32 format by default) and remember the letter of this partition.
Now you need to enter a series of commands that delete and recreate the bootloader.
- Select the volume with the command select volume 3 (there may be another number instead of 3).
- We format the volume with the command format fs=ntfs , or format fs=fat32 , depending on the disk file system.
- We assign the name “Y” to that with the command assign letter=Y
- Exit the utility using the exit .
- Enter the command bcdboot C:\Windows /s Y: /f ALL (the letters C and Y may differ, depending on the system and the number of disks). If several operating systems are installed, you must perform this step for all volumes with bootloaders.
How to restore Windows 10, 8, 7 bootloader from the command line
You can do it as you want. Your main mistake is that when working with the bootloader of some OS, you do not set its physical disk as the first boot disk in the BIOS. (Or rather, you set it, but by juggling cables and cables, you physically reconnect the drives in the system unit and thus fool the brain and the non-volatile BIOS memory) I have seven Windows operating systems installed on three physical disks. (The whole history of Microsoft since 2002 XP, VISTA, W7x86, W7x64 on the first old one; W8.1Prox64 Up14 and W10Prox64 on the second physical disk...More your own Operating System loader and after installation you could load only those OSs that were installed on it, and before loading into the BIOS you had to set the priority for one of the disks... Ideally, I have this: In the boot menu of each physical disk, all systems are listed and you can select any of the seven, no matter which of the physical disks is the first boot, but you can also select the disk to boot from in the BIOS when booting the PC by pressing F12, including from a USB HDD or USB Flash. Why is that? And if the first disk breaks, the computer starts on the second, will both crash? Booting from USB HDD. If all the disks break, I’ll take two new ones from the shelf with exact copies, insert them and still boot... The main thing is “No need to disconnect the disks from the system board, no need to yank cables and cables, and then, and if the PC is new and under warranty, and someone else’s Besides, isn't it cheap? There are seals on it." We decided to install about fifty operating systems on the computer, but bet on your health... You need to install systems on each disk in order from old to new. It is advisable to group by era loaders (X-like/VISTA,Win7/Win8,Win10) And most importantly, before installing the Operating system, set the boot priority for the Hard drive on which you will install... If you need to restore what is installed: You have three physical disks in the system unit and on each sections. The partition on which the system is somehow recognizable and remember the name, remember the name of the physical disk itself (as it is visible in the BIOS), or better yet, on a piece of paper, and so on for each Hard of the three. In the Disk Management utility, look at the HDD numbers and write down the names of the disks and partitions with the systems on a piece of paper. Look into the system unit and check which drive is connected in which slot and whether it matches your records. Prepare distribution kits, or recovery disks, or DaRT disks for each Operating system (if the systems are different). Restart the computer and go to the BIOS settings (“Delete”) In the settings, go to Advanced and there in the list of HDDs, put the disk you need in the top position, F10 save the settings, insert the recovery disk into the drive and Enter. When loading, press F12 and select boot from ODD in the menu. Boot from the optical one and it will restore the boot of the system you specify, or automatically find all the ones on all disks. Do the same with the second HDD and the third one in turn. The bootloaders on all disks will be restored. Actually, you need to read a lot about all this and try to understand how it works. The boot menu can also be done via the command line, edited, added and cleaned... I gave the names of the keys as an example from the AWARD BIOS
Recovering Deleted Data
Incorrect operation of the operating system and problems with the bootloader may indicate the presence of viruses that literally destroy all files. If you find that your important data has disappeared, we recommend using the RS Partition Recovery , which can quickly recover all deleted data damaged by viruses or lost due to accidental formatting.
Also, the RS Partition Recovery allows you to recover photos , video files , text documents , etc. after removal until several months ago. On the website recovery-software.ru you can get acquainted with all the advantages and features of RS Partition Recovery , as well as other products from Recovery Software .