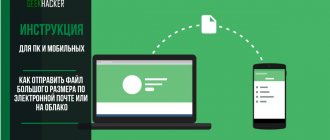
Web version
You can clear Yandex Disk of unnecessary files through a browser - just log in to the system and perform simple steps.
- Click on the file with the left mouse button;
- Hold down the Ctrl key and mark all unnecessary documents;
- You can also left-click and drag the selection area across the screen;
- Release the cursor and a trash can icon will appear on the top panel;
- Click “Delete files”;
- The process will start automatically.
You can select all documents, you can select one or several - act at your discretion, the instructions do not change.
To completely get rid of files, you need to:
- Go to the trash icon - it is in every storage;
- Double click on the icon;
- A “Clear” button will appear on the top panel
- Click on it and confirm the action.
Attention! The repository is configured to automatically empty the recycle bin - all documents from this folder are permanently deleted after thirty days.
Emptying the Trash
The point is that the actions described above are not enough to completely erase the information uploaded to the cloud service. We'll have to do something else.
We are talking about emptying the trash can in “POISON”. To implement the task, the user will need to perform the following manipulations:
- Log in to your virtual data storage on Yandex.
- Select the “Trash” folder in the left menu.
- Click on the control that says “Clear...”. It is located at the top of the window.
Once the transaction is confirmed, all data placed in the cart will be permanently erased. They will no longer take up space on the virtual disk.
Important: when moving files to the Recycle Bin, space on Yandex.Disk is not freed. The user will simply move the documents that bother him to the Trash. This is a temporary storage place for old or unnecessary files.
PC program
You can clear space on Yandex Disk on your computer through a client for the Windows operating system. If you are using the desktop version, then the following instructions are for you:
- Click on the program icon to open it;
- Select documents using the Ctrl key or the left mouse button;
- Right-click and select “Uninstall”;
- Or click on the Delete key;
- In addition, you can hold down the left mouse button and drag documents to the trash on your PC.
After you have managed to clear Yandex Disk, you need to empty the recycle bin on your desktop:
- Right click;
- Select “Clear”;
- Confirm the action.
Now you know how to completely clear Yandex Disk on your computer - it’s time to deal with smartphones. Also take a look at our other article, where we have prepared information on how to remove Yandex Disk from your computer.
Yandex.Disk 2.0 for Windows and Mac - beta version
Find the Y.Disk icon in the tray and launch it. The application explorer will open (do not confuse it with Windows Explorer): this is the root folder of Yandex Disk. For now, let's close the window.
What is remarkable about the Yandex Disk beta? in version 2.0 3.0 there is a widget that the developers called “dropzone”.
Using this widget, you can quickly transfer - by dragging and dropping - any file “from the desktop” or some folder to the Yandex disk core, and then move it to the desired location.
If a widget is required, then check the box as in the screenshot... (this disk settings window will appear if you right-click on the disk icon and select the “Settings” option in the menu)
...and it would probably be better to disable the installation of updates automatically...
So: as soon as we enable the display of the dropzone in the settings, the widget immediately appears on the desktop - on top of all windows. We change its location at our discretion.
back to contents
Phone app
If you prefer to use the smartphone app, you can leave your computer on to remove unnecessary content.
Let's talk about how to clean Yandex Disk on an Android phone:
- Open the application;
- Click on the document and hold your finger until the selection option opens;
- Check all the files you want to erase;
- Click on the three dots icon in the upper right corner;
- Select “Delete”;
- Click on the button in the form of three stripes in the upper left corner;
- A menu will open with the “Cart” item;
- Select the "Cleansing" line.
Now let’s look at the algorithm of actions on iPhone:
- Login to the application;
- Open the desired folder;
- Press and hold the file with your finger until an additional menu opens;
- Mark all unnecessary documents - a checkbox will appear next to each one;
- Click on the trash can icon on the bottom panel;
- Then click on the gear icon - it is located in the upper left corner;
- Select “Empty Trash”;
- Confirm the action again.
It couldn’t be simpler, could it? Let's finally talk about another interesting storage feature.
How to clear history in Yandex Disk
Many users are interested in how to delete history in Yandex Disk. Unfortunately this is not possible.
The history of actions is highlighted in a separate section - it can be found in the side menu on the left. You can view all events on devices recorded since the storage was used (or since mid-December 2020).
This section cannot be edited or changed - it is only available in view mode.
The question of how to delete everything from Yandex Disk at once has been removed - now you are familiar with all the intricacies of the operation and can quickly get rid of unnecessary content so as not to clutter up your storage.
How to increase the volume of Yandex disk
The standard volume provided to each registered user is 10 gigabytes. There are two ways to increase the volume of cloud storage: either delete unnecessary files, or purchase additional disk space.
Step 1. To purchase additional gigabytes, go to the Yandex Disk website.
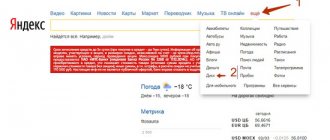
Open the Yandex website in any browser
Open Yandex.Disk
Step 2. In the menu on the left, under the number of free gigabytes, there is a “Buy space” button. There are three options available: add 10 GB, 100 and 1000 (1 terabyte).
Click on the “Buy a place” button
Note! Subscription fee prices are indicated. By choosing, for example, an increase of 10 gigabytes, you will pay 30 rubles every month.
Step 3. Select the appropriate volume. You can pay for a month, or the entire amount for a year at once.
Select the appropriate option and click “Buy a seat”
On a note! Annual payment is more profitable - it saves 17%. Payment is made either from a bank card or from a Yandex wallet.
How to completely clear Yandex Disk storage - free up space
Cloud storage is becoming increasingly popular as a tool for storing data and is an alternative to physical hard drives when broadband Internet access is available. However, like any data storage, cloud storage tends to accumulate unnecessary files that are no longer relevant. Therefore, the question arises of how to clean Yandex Disk.
One of the dynamically developing services in this direction is Yandex Disk. There are two main ways to clear this storage.
how to download and install Yandex Disk of the required version
You can download Yandex Disk using the official link: it is located in the depths of your personal email. However, below I provide a direct link, following which you can also easily download the required version of Yandex Disk.
download Yandex Disk versions
//disk.yandex.ru/download/#pc
Then everything is simple: follow the link...
...or click on the yellow button (the system will automatically provide the version of Ya.D for your operating system), or select “Download old version...”.
As soon as the required version is downloaded, in Explorer (for example, in the downloads folder) you will have the following: As you can see, I downloaded two different versions... the old and new version of Yandex disk. This is in order to understand more clearly and demonstrate the differences in the text below:
For the sake of example, I’ll install version 3.0... let's go...
Double-click on the YandexDisk30Setup installation file and... the process of starting the installation of the Yandex Disk application will begin automatically.
Advice:
find out here
Space on drive C is disappearing - change the storage location of the Yandex Disk folder - because Disk files often take up more space than the Windows OS itself. Read it, it’s very useful - learn about the nuances! about how to change the storage location of the folder with Yandex Disk files?
...and the only nuance at the end of the installation is to uncheck the boxes in the window if this software is of no use to you.
Installation of the Yandex Disk application is complete.
back to contents
Cleaning using the web interface
Yandex Disk has a convenient web interface designed to manage your files and folders. A browser is required to access it. In the browser, you need to log in to your Yandex account, and there, in turn, select the Disk service.
You will be presented with a list of files and folders in your storage. You should use the left mouse button to select files and folders (selection is made by checking the checkbox next to the file or folder icon that appears when you hover the mouse over it) intended for deletion, and select “Delete” from the menu on the right side .
Yandex Disk: how to use this service for your own purposes
Yandex.Disk is a development, well known to some Internet users, from the Yandex company and is a cloud storage to which you can upload your files and other data, open them on the service itself, create new files directly in the service interface and, of course, if desired, delete unnecessary or annoying files.
The main goal of creating this software product is to provide people with the opportunity to freely and without unnecessary obstacles exchange interesting data with each other. And in order to attract and promote the service, the corporation’s management decided to permanently assign ten gigabytes of Disk space .
Install Disk software on your computer
Before proceeding directly to downloading the utility, you will need to obtain an e-mail address from Yandex. If for some reason you still don’t have it, then you can create an address by following this link: https://mail.yandex.ru.
Having completed the procedure for obtaining an e-mail address, go through the following sequence of actions:
- Log in to the product website using this link: https://disk.yandex.ru .
- In the lower right corner of the service window you will see the inscription “Download Disk for Windows”. Just below is a button, clicking on which will take you to another page where you can download software installation files for smartphones or tablets. Select which electronic device you want to download the program to, or you can download the software to your Windows operating system by following the following link directly from here: https://disk.yandex.ru/download/YandexDiskSetup.exe?referer=webinterface&src=Yandex .DownloadLinks
- After this, the utility installer will begin its work, downloading the product to your device and loading it into the system. Please note that Yandex Corporation additionally offers you to connect some of its services. Ignore this and uncheck the appropriate boxes. It is highly advisable to do such an action for the following reason: the items that the company insists on supplying you will most likely dramatically reduce the performance and speed of your electronic device. After installing the utility, find the button called “Finish” and click on it with the left button of your mouse .
- You will be offered a short presentation that will clearly and legibly provide you with primary information about the functioning of the service. If you wish, you can familiarize yourself with it; there will definitely be no harm from it.
- To gain access to the program, you will need to write the address of your email address, as well as the password for it. Then click the button that says “Login”. If the data you entered into the form was correct, then you will have access to the utility.
- After successfully logging into the program, synchronization should take place between your electronic device and Yandex.Disk. You can make sure that the operation was successful by turning your attention to the area displaying notifications, where the software will create a special sign that takes the form of a green flag. You can see how it all looks at this link: https://youpk.ru/wp-content/uploads/2013/01/Znachok-v-oblasti-uvedomleniy.gif
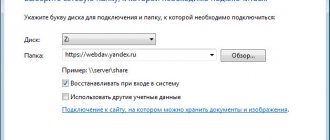
- This is a very important point, so don't neglect it! Now you will need not to leave the folder through which you will transfer files to cloud storage on the system drive, but move it to some other drive on your electronic device. To do this, right-click on the sign described above in paragraph 6 of this algorithm of actions, find the item called “Settings” in the drop-down menu and click on it. For greater clarity, look at the graphical representation of this process by clicking on the following link: https://youpk.ru/wp-content/uploads/2013/01/Kontekstnoe-menyu-YAndeks-diska.gif.
- Next, a window will open where you must go to the tab called “Basic” and there indicate where the folder from the Yandex.Disk program will be located. Select a location or create a folder with any name using the Edit button.
Removing Yandex.Disk from PC
The program installed on the computer runs together with the operating system. Before uninstalling it from your PC, you should disable synchronization, then turn it off.
Step 1: Disable Sync
Do this:
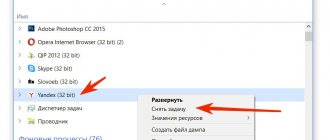
- In the lower right corner of Windows 10, click on the arrow that opens hidden programs in the system tray.
- Right-click on the cloud icon.
- Click "Turn off synchronization" and select any period.
Step 2. Terminate the program
Without hiding the previous menu, click on the line “Exit” .
Step 3. Remove the application from your computer
There are many ways to remove a cloud storage client from a PC. Choose the one you like.
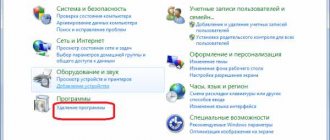
Via control panel
To remove the Yandex.Disk application from your computer:
- Win+R key combination and run the command appwiz.cpl .
- Find the application in the list. For convenience, you can sort by publisher, starting from the end.
- Click “Delete” and confirm your intentions by clicking “Yes” .
Wait a few seconds until the program is completely removed.
Via "Options"
In Windows 10, you can uninstall the software in a special Windows 10 partition:
- the Win+I key combination , call up “Options” .
- Go to the applications section.
- Without leaving the first section, scroll down in the active window and use the search to find Yandex.Disk.
- Select the application and click "Delete" . In the second window, repeat the operation.
Using Revo Uninstaller
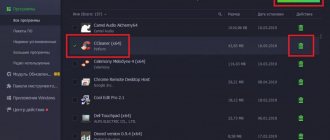
There is quite good software for removing programs with all the information associated with it. For example Revo Uninstaller:
- Run the program in the active “Uninstaller” , enter Yandex in the search.
- Select the cloud and click “Delete” . Wait for the system restore point to be created programmatically.
- Click "Yes" and wait until the standard uninstallation completes.
- Then select the scan mode and wait for the analysis to complete.
- Select all remaining entries in the registry about the program and erase them by clicking "Delete" . Then move on to the next window.
- Delete all cloud-related folders. Some files will be deleted when the system starts again.
- Restart Windows.
Step 4: Clean up residual files and folders
If the program was uninstalled using standard Windows methods, files and folders could remain on the system that can be deleted:
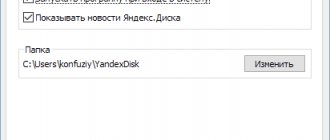
- Synchronization folder. Located in the directory C:\Users\User_Name\YandexDisk . Here you can delete the Yandex.Disk folder from your computer with all saved data.
- Program files and folders. Main location C:\Users\Username\AppData\Roaming\Yandex
- Also check for empty folders in the installation partitions. By default these are C:\Program Files and C:\Program Files (x86) .
A MINUTE OF HUMOR
A good system administrator after a nuclear war can eat crumbs from the keyboard for a month and pull the Internet from the proxy cache.
Step 5. Delete all files from the web version of the cloud storage
To prevent your personal data from being in the cloud, you can go to your personal Yandex.Disk account and delete it from there:
- disk.yandex.ru in the browser address bar .
- Enter your username and password for authorization. Open the file section.
- Select all files (except Recycle Bin) and click Delete .
- Open the Trash and click Empty Trash .
- Confirm the deletion (data cannot be restored).
An empty files section indicates complete deletion of data from the cloud.
How to upload files to Yandex.Disk
Files can be moved to Yandex.Disk in several ways . Keep in mind that these methods work both on the service’s website on the Internet and in the program installed on your electronic device. So:
- On the website or in the software window, find a button called “Download”. Click on it and a window will appear in front of your eyes with which you can move your data to Disk. Having selected the required files, left-click on the “Open” button.
- You need to left-click on the icon of the file that you are going to send to Disk, and, without releasing the button, point the file icon at the site of the utility or program displayed on your Taskbar (it is located at the bottom, next to the “Start” button ). As soon as the Drive or program website window expands, drag your file with the mouse to the place where the other files are located. You will see that a rectangle will appear, the sides of which consist of broken lines. This is the so-called drop zone, and by releasing the left mouse button holding the file in it, you will begin the process of loading data to Disk. You can upload videos, pictures, music, documents and any other files on your computer to Yandex.Disk.
What is deleted along with the cloud
The process of uninstalling cloud storage from Yandex does not cause any difficulties, so even those who have never dealt with deleting content on a PC can cope with this procedure.
However, it is worth considering that in addition to the service, the following components will also be destroyed:
- a folder that is the main content of the repository, as well as a shortcut to the taken screenshots;
- an application that was installed on system media and is now displayed in the desktop tray;
- documents and files that remain in the online service.
However, if you first turn off synchronization and delete the program only on your computer, all data will remain stored in the cloud. You can now view them only through a browser.
How to download from Yandex.Disk
This operation can be performed in several ways . Let's look at them in more detail:
- Place a check next to the item you want to download to your electronic device. On the right side of the software window, look for an icon that shows an arrow pointing down a straight line. Left-click on it with your mouse. After this, a window should open in which you can specify the location where you want to download the data. Then click on "Save".
- If you need to download information from someone else's Disk and the person sent you a link to their files, follow this link to their Yandex.Disk. You will see files that are inside the folder or a separate file. Next, move your gaze to the right side of the window, there you will see two buttons: the first one invites you to move the information to your own Drive, and the second, called “Download,” will help you save the objects to your electronic device.
How to remove Yandex Disk (video)
For greater clarity, you can watch a video on YouTube, which shows in detail some of the operations above.
If you follow the instructions step by step, the operation will not be difficult. Once the service has been completely removed from your computer, it will be useful to know that you can restore it whenever you wish. Yandex.Disk is a convenient cloud service from Yandex. With its help, people can store their information online under reliable protection. Unfortunately, from time to time space on “POISON” runs out. In this case, you will either have to purchase it in addition (which is not in great demand) or format the storage. How to clear Yandex.Disk? Below you will find detailed instructions on how to bring your idea to life. In fact, even a teenager can cope with this task.
How to delete data from a Drive website or program
To delete your files from Yandex Disk, you will need to perform a series of steps sequentially . First, check the boxes of the documents or data that you want to destroy. If you plan to delete only one object, you will see a trash can sign on the right, but if you are preparing several objects for liquidation, then a large button called “Delete” will appear on the right. Click on it. Now these objects are sent to the Trash.
If you want to clean out the debris in the Trash, then find the “Trash” item, which is located on the left side of the window in the menu, and click on it. Find the button called “Clear” and click on it. When the process is complete, the Trash will be empty.
How to delete files in Yandex.Disk via the web interface?
Deleting files from Yandex.Disc forever
Over the past 4 days, all articles on this site have been devoted to the “cloud” topic. Well, it just so happened - I had just finished describing SugarSync when in the comments to the article about deleting Yandex.Disk they asked me to tell you about deleting files from this cloud storage using the web interface.
So instead of replying to the comment there will be this little note. And this is even better: let one more page on the site give PR to others
In general, you can delete files through their application by downloading the special Yandex.Disk program. But in any case, you will then have to go to the web interface for the deletion to be final.
Disable synchronization with storage
If you have problems deciding how to remove Yandex.Disk from your computer, you should follow all the steps in order. It is important to adhere to the algorithm discussed below. As a rule, the connection between the client and the Internet is first deactivated. To do this we do the following.
- Launch the system tray menu (lower right corner of the screen), find the corresponding icon and right-click on it.
- A context menu appears in which you need to select the “Settings” .
- Open the “Basic” . Then in the “Account” , click the “Log out of account” .
Now access to the service will be closed and you will not be able to view the data from your PC. This way you have disabled synchronization.
Helpful information! When logging out of the storage account, in order to restore access to it, the user must enter his Yandex email username and password.
Uninstalling the application itself
After the user logs out of the system, all data remains in place, both on the computer and in the electronic service. They just stopped synchronizing. Now the entire application opens on the computer, and to uninstall it, you need to use the internal PC settings.
- Go to the Start menu, select the Settings . In the list of tools, click on the item “Applications” .
- Scroll down the entire list and find the Yandex.Disk program of interest. Let's click on it, after which the "Delete" . Click on it.
- The removal process will then begin. A dialog box will appear in which you will need to enter confirmation to uninstall the program and all its components. Click on the “Yes” if you have not changed your mind about deleting.
After a few seconds, the program will be removed from the computer, however, in order to eliminate all the “tails”, it is necessary to process the system with the “Cleaner”, and also to completely reboot the computer.
Helpful information! Before you delete all application data, you should save all the necessary information, since after deleting your account it will not be possible to download it.
How to delete an entire account
All that remains is to delete the account. To do this, you need to go to Yandex mail and follow the step-by-step algorithm:
- We click on the account name, and in the window that appears, click on the “Passport” .
- We go to the very bottom of the data and see the “Delete account” .
- We provide the answer to the security question or indicate the phone number that was used during registration. Next, click on the “Delete account” . Don't forget to enter the captcha.
- The deletion confirmation window appears, click the “Delete account” .
- In the next window, enter the password, then click the “Confirm” .
The system will notify the user that he has logged out of his account. To close it and not use Ya.Disk in the future, just delete the account from the list of existing ones in the browser.