How to take screenshots on Steam
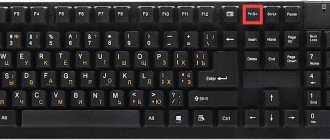
By default, to take a screenshot in the game, you just need to press the F12 key, after which you will hear a flash sound, and a new window with a screenshot will appear in the Steam overlay.
By the way, it can be uploaded to Valve’s servers, from where you can access it from any device, anywhere. To do this, you need to mark the screenshots that you want to upload to your page, and then click on the “Upload” button. The Internet must be turned on.
Ways to search for images taken on Steam
To create a game photo, you need to press F12, after which a characteristic sound will follow and a notification will pop up indicating that the image is ready. The most difficult thing remains - to find where the screenshots are saved after pressing F12. This can be done in two ways: using Windows Explorer or through the Steam service.
Method 1. Search for screenshots on disk
Steam itself chooses where to store images on your computer. Usually it places them in its own system folder, and the path to the screenshots will be something like this: C:\Program Files (x86)\Steam\userdata\99260339\760\remote\337000\screenshots .
It is difficult to indicate the exact location, since other users will have a different path after the “userdata” , and the names of the folders assigned to games will contain different characters. All this complicates the search, and given that there can be many games, it will take time to find specific images.
On a note. Along with the screenshots is the “thumbnails” , which stores thumbnails of the images. Thanks to them, you can quickly view screenshots without wasting time opening full-size versions.
Method 2. Search for screenshots through the service
It's much easier to determine where Steam screenshots are via the client library.
- Launch Steam, go to the “Library” , from the list on the right select the game for which you are interested in screenshots, right-click on it and click “View screenshots” .
- In the "Screenshot Uploader" you can either upload them to the Steam community so that they are available to others, or delete them from there. You can leave a comment or view a photo by double-clicking on it with the left mouse button.
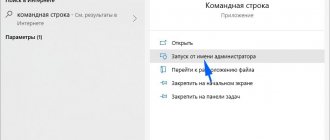
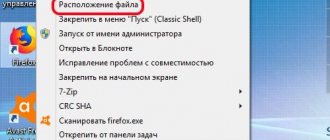
- To determine their location on the computer, click “Show in folder” . This way you can immediately get to the directory associated with a specific game.
How to change the screenshot button on Steam
If the F12 key is somehow used in the game, every time you press it you will have a screenshot taken, which is very inconvenient. We advise you to reassign the keys either in the game itself or in Steam. To do this you need:
- Launch the Steam client;
- Click on the "Steam" button at the top left of the screen;
- Select “Settings” from the drop-down menu;
- Go to the “In Game” section;
- Now click on the cross in the “Keyboard shortcut for screenshot” field;
- When the field is empty (it should say “None”), left-click on it, and then click on the key on the keyboard that you want to set for creating screenshots in Steam;
- Click OK.
Please note that in the screen settings menu, you can also change the keyboard shortcut for calling the overlay, configure the sound when taking a screenshot, display notifications, and also the process of saving an uncompressed copy.
In the Steam interface
Built-in storage in the Steam client is the fastest and most convenient way to share details of your gaming session. Here's what to do:
Log into your Steam profile and go to View, then Screenshots
The screenshot downloader menu will open. By default, screenshots from the last gaming session are shown. Click on the image you want and then click on the Upload button
The system will show the file size, the amount of remaining space in the Cloud cloud service and ask whether you need to share the screenshot in a linked Facebook social network account. If everything suits you, then click Download again.
Wait for the download to finish
Now the cloud icon will be displayed on the screenshot. This means that the screenshot has now been uploaded from your disk to the community. It will be available on the specific game's forum
For other players to be able to see the picture, you need to click Open in the community. This will allow users to not only view and rate your content, but also download it. With one click you can upload several pictures for viewing at once.
Now you can send your friends a link to the entire wall of screenshots. Just right-click and select Copy page address from the drop-down menu
If you need to share a specific picture, click on it. You will be redirected to the menu of this image, where you will only have to copy the link by left-clicking on it. Second option: right-click on the image, then Copy link address
Location of screenshots on the computer
Once you have taken a screenshot, it is automatically saved on your computer. The folder where the screenshots will be saved can be changed to any other one in the same place (Steam settings/In game/), where the keys are assigned. However, by default, screenshots are stored in the Steam root folder.
To find this folder as quickly as possible, take a screenshot, then click “Show on disk” in the additional overlay window. After this, a folder with screenshots of a specific game will open. Related folders contain screenshots from other games, if available. It is noteworthy that the folder with screenshots may have a name in numbers rather than words indicating the game. Don't be alarmed - this is how it should be!
If you want to manually find the folder with screenshots, the path to it usually looks like this: C:\Program Files (x86)\Steam\userdata\120058444\760\remote\ (the numbers may vary for each user). However, the path may vary depending on where Steam is installed and the choice for storing screenshots.
How to access the Steam screenshots folder
There are two ways to find the Steam screenshots folder. Or you can use the screenshot manager to find the location of the screenshot. Or you can access them via hard drive storage, which includes access to the Steam folder.
Method 1 – Screenshot Manager
Follow these steps:
- Open Steam .
- Click on " View " in the menu that runs horizontally across the top of the Steam window
Scroll down and click " Screenshots " from the drop-down menu. This opens the Steam Screenshot Uploader tool.
Select any image from the preview thumbnails on the right side, then click the
Show on Disk . Steam will automatically open the Windows folder where Steam screenshots are saved and stored.
The Steam Screenshot Downloader tool categorizes all games along with the number of screenshots saved. You can also remove Steam screenshots if you don't want them.
Moreover, you can also upload your Steam snapshot folder or any picture to the cloud for safer storage. To do this, simply select a screenshot of the game and click the “Download” button. Soon you will click on the Steam button, which will load and your picture will be saved to the cloud.
Method 2 – Find Steam Screenshots Folder Manually on PC
You can bypass Steam and physically locate the screenshots folder. To find this folder, you must find where you installed Steam. The location varies depending on users, it could be on hard drive C, D or E.
But you can find it in Program Files\Steam\userdata\*Steam ID*\760\remote\.
In my case I found the Steam Screenshots folder on
You will need your steam ID to find your steam screenshots folder. This ID is exclusive to your Steam login. If you have multiple games installed, each game will have its own Steam ID.
But if you can't find your Steam ID, you can open each folder until you can access the exact screenshots folder. Or you can follow these steps to track your ID:
- On Steam, click View in the top menu and select Settings.
- Select "Interface" from the left menu.
- Make sure you check the "Display Steam URL when available" checkbox and click "OK" at the bottom of the window.
Click on your Steam profile name and select " Profile " from the drop-down menu.
In the URL that appears at the top of the window just below the menu that says " Store ", " Library ", " Community ", etc., provide the long form number. The number is your Steam ID.
How to download a screenshot from Steam
To be able to access screenshots from any device (even a mobile phone or tablet), the screenshots must be uploaded to the server. Then you need to open your Steam profile, and on the right side of the display go to the “Screenshots” menu.
Editing a folder with screenshots through settings
All the screenshots taken are there. For convenience, you can filter their display by creation date or game. If you logged into your profile through the official Steam website, to download a screenshot, simply open it in a new window, right-click, then click “Save picture as...”, and select the location where the screen will be located.
If you use the Steam client, you won’t be able to save it directly from there. To do this, click “Copy link address” on the screenshot, then paste it into the address bar of your browser. There you can download the screenshot.
If you don’t have restrictions on displaying screenshots in your visibility settings, you can even download them from another account. To open or close access to displaying screenshots, click “Manage screenshots” in the menu. A submenu will appear at the top - in it you can configure the screenshots to be shown to everyone, only to friends, or only to yourself. You can also delete screenshots here.
Searching for screenshots in the program
An easy way to find out where to find Steam screenshots is to use the program itself. Thanks to this method, you do not need to determine in which system folder the files are located. So, where to find screenshots in Steam and what you need to do for this:
- Open the "Client" panel.
- Find the Steam gaming platform icon.
- Right-click to open a special menu called “View”.
- Select the “Screenshots” item.
- After the manipulations have been performed, a window will open on the screen where the screenshots you took in Steam are located. All photos are sorted into special categories that correspond to a specific game. On the page you will also find a menu with which you can go to any folder to select the desired screenshot.
- There is an “Upload” button on the right side of the screen; it will help you move the selected image to the Steam Cloud. This is a special cloud space through which your files will be available to other users.
The above screenshot search method helps you send the image directly to your Facebook page. In addition, the program searches for files on the system drive where Steam screenshots are stored. To do this, click on the image and select the “Open/show on disk” button.