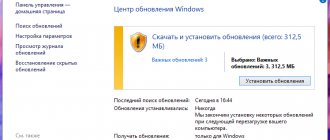
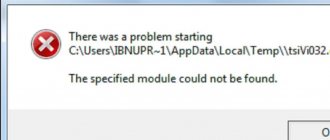
When running Windows Update, an error that often occurs is 0x80070643 An unrecoverable error occurred during the installation process.
In this article, we will explain the reasons for this error and the steps to resolve it.
Error 0x80070643 is very common and can occur in the following cases:
- Error installing NET.Framework component
- Error installing any Windows update
So what are the main reasons for error 0x80070643 when updating windows 10.8.1 or 7?
The main causes of error 0x80070643:
- Corrupt MSI installer update registration or corrupt .NET Framework installation on your device
- The Windows Update database is corrupted
- Background Intelligent Transfer Service (BITS) does not work correctly
- A system file required for operation is incorrectly registered
- When running Windows Installer, an error appears indicating that it is damaged
- CBS Model Manifest Broken
- Windows Update service stops working
- Windows Update Agent conflicts with the versions of updates being installed
After considering the main reasons for the error, we move on to the main thing - when error 0x80070643 occurred on windows 10.8.1 or 7, how to fix it?
.NET Framework update installation error: "0x80070643"
Happens only on Windows 7 and earlier versions, solutions to the issue:
Restoring .NET Framework components:
- Follow the link, click Download and download the .NET Framework recovery program file
- Then everything is simple - after downloading the tool, run it.
- Check the box next to “I have read and accept the license items” and click “Next”
- After that, click “Next” again.
- The program will do everything itself, you just have to wait for it to complete, click “Finish” and try installing .NET Framework updates again
If the problem persists, we can help by completely removing NET.Framework from the system and installing these components again. Everything is simple here too.
- Download the cleanup_tool removal tool from the link
- download the archive
- right click and open with archiver
- in the list of files that you will see in the window that opens, find and run cleanup_tool.exe.
- When the message to start the cleaning program appears, click Yes.
- accept the terms of the license agreement.
- In the Uninstall a product window, click the “Cleanup now” button
- After finishing the program, be sure to restart your computer
Try installing the updates again. Here the problem should be solved.
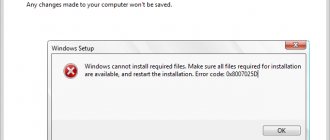
If the problem remains after these steps, you need to install the system while saving your files and programs.
To do this you will need a Windows 7 installation disk or image.
Unpack the image using any archiver or launch a disk, find the Setup file in the root of the image or disk and run it. Follow the installer's instructions and your system will be updated. After this, the necessary updates will be installed correctly.
This way you can solve error 0x80070643 windows 7 .NET Framework update error.
Let's move on to the second option, when an error may occur when installing updates.
Getting rid of code 0x80070643 by installing the NET Framework
- If the system is new, or for some reason the NET Framework component was not installed, we will try to fix this problem. Go to the official Microsoft website – https://www.microsoft.com/en-us/download/details.aspx?id=30135. You need to download the Microsoft .NET Framework recovery tool. To do this, click the “Download” button.
- Select the utility that weighs 1.2 MB by tick and click Next.
- After downloading, open the tool. Check the license agreement box and click Next. A short update and troubleshooting process will begin.
- In the next window, click Next again.
- Another update process is taking place.
- Click Finish.
This tool does not update the component, but rather fixes issues that are preventing it from installing. After this procedure, you should reinstall the NET Framework.
How to remove NET Framework
If the above method does not help, let's try to get rid of the component. You need to download a special utility from this site: https://www.microsoft.com/en-us/surface/surface-laptop/p/90fc23dv6snz?ocid=store&activetab=pivot:overviewtab.
- In the archive we find the file cleanup_tool.exe, which we run or unpack from the archive and then run.
- A window appears asking you to immediately remove the NET Framework. Click YES.
- We accept the terms of the license agreement by clicking on the “Yes” button.
- In the next step, click on the “Cleanup Now” button and wait.
- Restart your PC.
If error 0x80070643 does not go away, there is only one option left - reinstalling the system. Of course, you can simply update system files without losing data, but this is a topic for another article.
When installing any Windows update, error 0x80070643
This error may also appear as a message - installation failed with error code 0x80070643 windows update.
Next, you need to take steps that will correct error 0x80070643 in most cases. The steps are simple and now I will tell you about them in order.
Run an automatic tool - the easiest option for the user.
Download the tool from the link, run it
Click “Next”, if problems are found, the tool will fix them and write about this in its window, and it will also immediately offer to download and install updates if they are currently found. Agree with this proposal and install them.
What does it mean?
A code designation in the form of a specific set of numbers indicates a specific reason for difficulties in the operation of the OC. In what situations does error 0x80073712 appear in Windows 10? A system message with this code is displayed when the operating system service was unable to fully complete the automatic update. It is not uncommon for this problem to be caused by major changes such as the Creators Update or Anniversary Update. The reason for the inability to successfully complete the operation is the absence or corruption of system files intended to accommodate the transferred data.
Clearing the update cache
A very effective method if any problems arise with updates; often already downloaded update files can interfere with the installation of new ones; the cache itself can be damaged. Therefore, you need to open a command prompt with administrator rights, to do this, click Start and start typing Command Prompt, you will see the “Command Prompt” program, right-click on the found program - “Run as administrator”.
In the command line that opens, enter
Net stop wuauserv
And press enter.
You should see a message at the command prompt that the Update Center service has stopped. After that, proceed to deleting the SoftwareDistribution folder with the cache.
If error 0x80070643 occurs or the service does not stop, reboot the system and go directly to the next step:
Open Local Disk C, go to the Windows folder and find the SoftwareDistribution folder in it, delete this folder.
You can safely delete it, it will be recreated again, without damage and ready to work without errors.
Try searching for and installing updates again.
Fixes
There are different methods for troubleshooting. They depend on the factors that caused the problem. Since there can be many reasons, we will describe several universal methods. They are also suitable for different OS versions (including 10 and 7)
Net Framework
In Windows 7, “0x80070643” may appear due to problems with the Net Framework. To get rid of them, you don’t even have to redownload the updates.
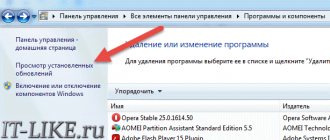
- Go to Start - Control Panel.
- Open Programs and Features. Or "Remove programs".
- All utilities will be displayed. Click on "Net Framework". The list is compiled alphabetically, so it will be easy to find the item you need.
- Click the "Delete/Change" button. It is located above the main work area. The same option is available in the context menu.
- Place a dot in the “Restore” box and click “Next”.
- Wait for the process to complete.
After this, all damaged program elements will be reinstalled. If this was the cause of the failure, the error will disappear. You can also uninstall the application completely to fix it. To do this, you need to use special utilities (for example, Revo Uninstaller). Otherwise, some files from the Net Framework will remain on the computer.
In OS version 10, this problem may also occur.
Clearing cache
Updates received through Windows Update are cached in the operating system before installation. If “broken” files were downloaded, a dialog box with “0x80070643” will appear. If you download the update again, it can be installed without problems. To do this, you need to clear the cache (more precisely, rename the folder in which it is located).
In Windows 8 and 10 this function is automated. There is a special utility for it. But in version 7 of the OS, this must be done manually.
- Start - Programs - Accessories.
- Right-click on “Command Prompt”.
- Select "Run as administrator".
- Enter the following words in sequence without quotes: “net stop wuauserv”, “ren %windir%\SoftwareDistribution SoftwareDistribution.OLD”, “net start wuauserv”. After each command you must press Enter. Enter them exactly in the order in which they are written here. You can't copy and paste them - you have to print them yourself.
- After that, try installing the update again through the Update Center.
Windows 10 also has a command line. But in this OS it is better to use a utility to clear the cache.
Restarting services
To fix 0x80070643, you can restart the services responsible for downloading new versions of programs. This method is suitable for different OS versions (7, 8, and 10).
First you need to stop the system programs: MSI Installer, Cryptographic, BITS and Windows Update Services. The installation progress through the Update Center depends on them. Launch Command Prompt and enter the commands (press Enter after each one).
- net stop bits net stop.
- net stop cryptSvc.
- net stop wuauserv.
- net stop msiserver.
Then rename the folders in which the updates are located. So they will be loaded again. But at the same time, just in case, you will still have old files of downloaded updates. The necessary directories are located in the C:\Windows\ directory (relevant for both 10 and 7). One of them is called "SoftwareDistribution", the other is called "catroot2" (in the System32 subdirectory). You can change their names in the same command line. To do this, enter “ren [Directory path] [New directory name]” (without quotes).
After this, start the services again. Write the commands:
- net start msiserver.
- net start cryptSvc.
- net start wuauserv.
- net start bits.
Now close the command line (type “Exit” in it or click on the cross at the top right) and try downloading the update again through the Update Center.
Restarting services
Click search and type "Computer Management" and a console window will open. On the left, find “Services” and select it.
In the list of services that opens, we need to find the following services
Application Identity, Cryptographic Services, Background Intelligence Service, and Windows Update. Select each one in turn and restart.
We try to install updates and check if error 0x80070643 occurs.
Rebooting the Update Service
Another possible cause of the problem is a problem with Windows Update. You need to manually disable and restart the service using the following guide:
- Using the search bar in Start, find the “Services” utility.
- In the list of all services, find “Windows Update”. Double-click to open properties.
- Click the "Stop" button and then "Run". After this, restart your computer.
Download and install the System Upgrade Preparation Tool.
For Windows 8.1 and 10 – in the command line as administrator and run the following command:
DISM /online /cleanup-image /restorehealth
For Windows 7, download and run the appropriate version of the CHEKSUR program; you can download this program update from the link. After downloading, complete the installation.
After completing these steps, restart your device and start installing updates
Elimination methods
There are several effective ways to fix Windows Update crashes and error 0x80073712.
The update service is not working
First, you should check whether the update service is running or not and restart it. There are several ways to do this.
Service Manager window
A list of services is called up through the control panel. For this:
- Open Control Panel via the Start .
- In the menu that appears, select “system and safety».
- Next click on “Administration».
- Services in the list .
- Will open service manager. It consists of several columns. The first indicates the name of the service. Choose " Windows Update" In the column " State» shows whether the option is running or not. Absence of the inscription " Works" means that the service is not functioning. Next you need to pay attention to the column “ Startup type" If it states " Disabled", then updates can only be launched through the service properties.
The “ Services ” option can be accessed in a shorter way by pressing Win + R and entering the command “ services.msc ” in the window that appears. After that, click on “ OK ”.
- Next, right-click (RMB) on the line “ Windows Update ” and select “ Properties ”.
- A submenu will open. In the “ Startup type ” line, you can select 2 values: “ Automatic ” and “ Manual ”. Mark the one you want and confirm. If you select the first option, the service will start after the computer restarts.
- If you select “ Manually ”, the launch is performed without rebooting in the services window. You need to click on the “ Run ” item, located in the upper left corner under the inscription “ Windows Update ”.
- After this, the launch will begin .
- Once the process is complete, Running ” message will appear Status ” column.
- If the services window shows that the process is running, but the error still appears, then you need to restart it. To do this, click on the “ Restart ” item, which is located below the “ Stop ” inscription.
What to do if Origin is not logged in because network authentication is temporarily unavailable
Restart via console
To fix error 0x80073712 in Windows 7 and 10, you can try restarting the update service. You can restart the service through the command line running with administrator rights. The procedure is as follows:
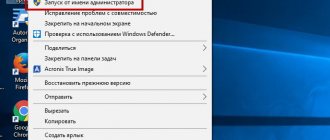
- Through the “ Start ” menu, go to the “ Standard ” folder.
- Command Prompt item in it , shown as a black square. Right-click on it and in the tab that appears, click on the inscription “ Run as administrator ”.
- The console will appear . Enter 2 commands, pressing “ Enter ” after each:
net stop wuauserv net start wuauserv
The first one stops the service starts it again .
- This method will not work if Windows Update is in the “ Disabled ” state in the services window discussed in the previous paragraph. Then the following warning will appear.
Task Manager
Restarting the service is possible through the task manager:
- To call it, you need to press Ctrl + Shift + Esc . Or, right-click on the taskbar and select “ Launch Task Manager ”.
- In the task manager, go to the “ Processes ” tab and o located at the bottom.
- Then go to the “ Services ” tab. After opening it, find the inscription “ Wuauserv ”.
- Using the right mouse button, open the menu. In it, first click on “ Stop ”, then on “ Run ”.
- Running will appear .
Not enough free space on the system disk
If the hard drive of the computer on which Windows is installed has less than 10% free space, then there will not be enough space to store temporary folders with downloaded update files and error 0x80073712 may occur.
You can manually free your disk from unnecessary files. To do this, you should analyze the installed programs and remove unnecessary ones. You can also use disk cleaning programs such as CCleaner or UninstallTool.
Blocking updates by antivirus
If error 0x80073712 occurs, you should pause your antivirus software. Sometimes it may mistake ongoing processes or downloaded files for a virus attack . Therefore, you should temporarily disable the antivirus and then start upgrading the system.
What is the Runtime Broker process and why does it load the system?
You can pause the activity of many antiviruses in their settings or on the main screen . Here's what disabling protection looks like for various antivirus applications:
- Kaspersky;
- McAfee;
- Avira.
Antiviruses are also disabled through the “ System Configuration ” panel. To call it:
- Open the “ Run msconfig in it and confirm.
- A panel will appear. Go to the “ Services ” item. In the list of system processes, remove the checkmarks from those related to antiviruses. Click " Apply " and "OK".
- Do the same steps for the “ Startup ” tab.
After a successful update, you must enable the antivirus.
Software inaccuracies
When developing new applications and programs, various errors may slip through, which then interfere with the operation of the software. In the future, updates will be released to eliminate such shortcomings.
Microsoft has released a special package of applications for Windows 7 that analyzes the system for errors and fixes them. It is called KB947821. It is applied as follows:
- Go to the Microsoft website. Find package KB947821 and download.
- Install the program and restart the computer.
- After turning on, run the utility .
- The application will start working. After completion, check the system for errors.
Damage to update folders
When you update, Windows saves files in the SoftwareDistribution , located at C:\Windows\SoftwareDistribution . If the directory is damaged, the system will not be able to “stack” files in it. Error 0x80073712 will pop up.
You need to “force” Windows to re-create this folder. If you rename or move , the system will not detect the desired directory and will create a new one in which the files will be saved. Follow these steps:
- Open a window with services and stop 2 of them: “ Windows Update ” and “ Background Intelligent Transfer Service (BITS) ”.
- Find the C:\Windows\SoftwareDistribution and rename it.
stop services and change the directory name from the command line.
- Enable services.
- Restart your computer and start updating the system.
Restoring system files and damaged components
There are 2 utilities for checking Windows 7 and fixing files, their backups and the storage where they are located. If these elements are damaged, then the entire system will not function correctly , and various errors will occur in its operation.
Whea Uncorrectable Error in Windows - causes and solutions
First you need to use the SFC utility . To initialize it you need:
- Launch the console with administrator rights and enter the command “ sfc /scannow ”.
- Windows 7 will begin checking and automatically fixing damaged files.
- After finishing the utility, restart the computer . Check for an error.
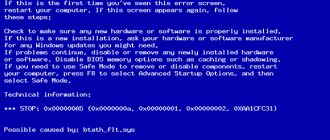
If, as a result of the check, the alert shown in the figure appears, you should run the DISM utility .
First, enter the command “ DISM.exe /Online /Cleanup-image /Scanhealth ”.
After checking the components, enter “ DISM.exe /Online /Cleanup-image /Restorehealth ” to fix them.
When finished, restart your computer .
Another system recovery option is to roll back to a previously saved state, that is, to a restore point. For this:
- Go to the “ Accessories ” folder from the “ Start ” menu and select the “ System ” folder.
- In it, select the “ System Restore ” item.
- A recovery window will open. Click " Next ".
- A window will then appear with the date when the last rollback point was created. If o, then the entire list of dates will open. Select the one you need and click “ Next ”.
- At the next stage, you need to check all the conditions and confirm the start of the recovery.
- At the end, a warning will appear indicating that changes cannot be undone. Confirm it.
- A reboot will begin , after which the process of rolling back to a previously saved system state will be initiated. Check for errors after recovery is complete.
Uncorrectable Windows errors
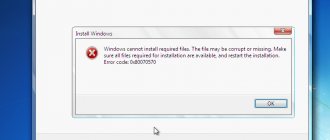
If after all the steps error 0x80073712 remains, then the only option is to reinstall the OS. To save programs and settings of an existing system, you need to use a boot disk.
It is necessary to accurately determine the version of Windows and its bit depth. Also, this method cannot be applied to pirated versions, since the result will be the final failure of the operating system. Be sure to save important files on other media and make copies of them. After that:
- Insert the bootable USB flash drive into the computer and run Setup.exe .
- A standard installation window will open. Click on “ Install ”.
- Connect to the Internet and download updates.
- After the download and installation is complete, the program will restart . Accept the terms and click “ Next ”.
- Click on “ Update ”.
- Windows installation process will then begin .
- After completion, reboot.
If none of the methods described above resolves error 0x80073712, you will have to install a new OS. However, in most cases, these operations help resolve the problem.
Try downloading the update and installing it manually. How do you like this option?
To do this, go to the website
In the search window, enter the number of the update that is not installed in the form KBXXXXXX, where XXXXX is the update number and click “Find.”
You will need to download the version of the required bit size - x64 or x86 (for 32-bit Windows).
After downloading, run the installation of this update; to do this, simply double-click on it with the left mouse button and confirm its launch.
And we almost forgot about the antivirus!
Yes, unfortunately, it can cause problems with the operation of the update center and errors, and it can block access to update servers and their installation. So what should you do in this case?
If you understand the settings of your antivirus, then of course it is best to check them to make sure that Microsoft servers are not listed as blocked in the antivirus.
But, if you installed an antivirus once and never used it again, this may cause difficulties.
Therefore, to eliminate its influence, remove it.
You can always install it back in the future, it will take a little time, but by removing it completely we will eliminate its impact on the update center and everyone will have peace of mind.
Therefore, open the website of the manufacturer of your antivirus, find a program there to remove it and completely remove the antivirus from your device. If you cannot find such a program, simply uninstall it through Windows Programs and Features.
How to fix
The situation 0x80073712 requires a mandatory solution, since the lack of new files and changes will affect the performance and efficiency of Windows 10. Options for solving the problem of error code 0x80073712: using the Update Troubleshooter service; through disk cleanup.
Troubleshooting with Update Troubleshooter.
The procedure involves the following steps:
- Enter a query into the search engine – update troubleshooter.
- Go to the official Microsoft website.
- Download the Update Troubleshooter program, a tool designed to troubleshoot and fix errors in Windows Update.
- Go to Start – Explorer – Downloads.
- Open the file with the downloaded program.
- In the window that opens, click on the “Windows Update” line and click “Next”.
- The system will begin scanning and looking for problems.
- When a new request appears, click on the line “try troubleshooting as administrator.”
- Here again we press “.
- The service will scan, identify problems and solve them.
- After completing the procedure, click the “Close” button.
- Open the program again and in the window click on the line “Windows network diagnostics” and further.
- The check should not show any problems.
- We close the window.
- Update center error 0x80073712 has been successfully fixed.
- The computer is restarting.
- After Windows 10 restarts, open Explorer through the Start menu.
- Go to “Settings” and then open the “Updates and Security” section.
- Next, select “Update Center” and try to download the changes.
You may be interested in: How to get rid of annoying calls from unknown numbers: saying goodbye forever without regrets
Solving the problem by cleaning the disk.
If, after using the service to eliminate update error 0x80073712 (described above), the system still displays the same code message, you should use the Disk Cleanup service to delete temporary Windows configuration files.
Actions:
- Open “Start” - “Explorer”.
- In the window that opens, click on drive “C”
- Right-click on the C drive panel.
- From the drop-down list, click the “Properties” line.
- In the window that opens, click on the “Disk Cleanup” button.
- In the window that opens, click “Clean up system files.”
- In the list to delete the following files, check the box: Temporary files.
- Click "OK".
- Restart your computer to complete the process.
- After the OS has rebooted, open Explorer through the start menu.
- Go to “Settings” and then open the “Updates and Security” section.
- Then select “Update Center” and try to update the system.
I hope these options help you!
Is the problem still there?
We have ruled out many problems, but we have not ruled out third-party applications and services installed on your system. What if they cause a problem?
Optimizer programs, registry cleaning programs, any programs that can run automatically on your device can damage the system or block the installation of updates, so we perform a so-called “Clean boot of the system.”
In the search for your system, write msconfig and run the found “System Configuration” program. Sounds and looks scary? No problem, we’ll set everything up now.
On the "General" tab, select "Selective startup" and uncheck "Load startup items"
Go to the Services tab, click "Hide Microsoft services" and uncheck all the services in the window.
Click “Apply” - “Ok” and the system will ask to reboot.
Feel free to reboot and start installing updates. If some third party service or programs were causing the problem, everything will be fine now.
Error in older versions of Windows
In MS software products: Windows XP, Vista, 7 and Windows Server 2003, 2008, 2008 R2, the message “0x80070463: an unrecoverable error occurred during the installation process” or “installation failed with error code 0x80070643 (in English)” may occur due to incorrect registration of the latest Microsoft Installer (MSI) update or failure to install the .NET Framework.
Let's look at how you can fix a damaged package or remove all installed versions of .NET.
Option 1: fix
Download the “Microsoft .NET Framework Recovery Tool” from the Microsoft support site. At the moment, the latest version is English v1.3 dated April 13, 2020. The program will only work when there is an Internet connection or the installation files are stored on disk. In the latter case, offline mode is possible, but the software will ask you to indicate the path to them.
- Launch the Microsoft .NET Framework Repair Tool.
- Check the box that agrees with the license next to “I have read and accept the license terms” and select the continuation – “Next”.
- Click “Next” again to start diagnostics.
- Once the problem has been investigated, the Recovery Tool provides a list of recommended changes.
- If you agree to make these corrections, click “Next”.
- Next, when the dialog box is open, it is suggested to try to reinstall .NET or run the uninstalled update again. If all tasks are successfully completed, you need to click “Finish”, otherwise click “Next”.
- The application will begin to collect additional information and report that it cannot cope with the problem. It sends an archive of logs to Microsoft for analysis. The “Finish” button means the completion of the utility.
It is possible to run ".NET Framework Repair Tool" in the background. This is done via the command line using the appropriate switches.
Option 2: Delete
A radical method when all means have already been tried. We completely remove .NET Framework 4 :
- Download the “.NET Framework Removal Tool”.
- Open the archive and run the cleanup_tool.exe file.
- When prompted, enter the administrator password and continue executing the program.
- We agree that we want to run the cleaning utility.
- We accept the license agreement.
- In the new window about and select “all versions”.
- Click “Clear Now”.
- When finished, exit the program and restart the computer.
The next task will be to reinstall all available versions of .NET. Download them from microsoft.com/downloads or go to Windows Update to find new versions.
After rebooting, we again encountered error 0x80070643?
Let's remember what we haven't checked yet?
So, hard drive, how long have you had it installed? Have you noticed any problems with it before? Let's check it out!
Open our already favorite command line and enter the command
chkdsk C: /f /r
A message appears that the current drive cannot be verified. That's right - we're in the system now
No problem! We press the letter “Y” and Enter on the keyboard and now the next time you reboot, the disk check will start automatically. This will be a complete check of the disk and correction of problems that can be fixed. After that, we try to install the updates again.
Update error 0x80073712 on Windows 10
If you have been using a computer for a long time, then you have most likely already encountered various kinds of errors in the system, but you have certainly never had such a problem as update error 0x80073712 in Windows 10 , which means it’s time to deal with it and try to eliminate this problem.
The essence of error 0x80073712 is that you are working in the OS, everything is as usual, and at the moment when the system, on its own or at your request, tries to update, the above error occurs. It seems that this is a temporary glitch and you need to restart the PC or wait a few days, but time passes and nothing changes. Day after day, the user tries to remove the error, but it appears again and again, which ultimately limits the operating system from receiving high-quality and timely updates.
Many of those who encountered this error for a long time could not understand: “What exactly is happening to their OS?” And at some point this very question was answered by Microsoft, as they conducted a small study of the problem, which showed that a damaged component of the CBS manifest was to blame. In fact, there is nothing to add to what was said from the lips of the operating system developers, because all we can do is try to somehow revive the system so that it can work fully, as before. In order to restore 100% system functionality, we can offer you 4 truly working schemes.
DISM utility against error 0x80073712 in Windows 10
In this case, we will use the standard DISM utility, which is built into the operating system. To begin with, you must press the Windows + S buttons to open a search bar in which you will need to enter: “Command Prompt”. As soon as the system offers you the most suitable application options, select “Command Prompt” directly, but first, you must open this application with Administrator rights, and to do this, you need to right-click on the result in the “Command Prompt” search and from the contextual menu, select the item: “Run as administrator.” Once in the “Command Line”, you type two commands in it alternately:
- DISM.exe /Online /Cleanup-image /Scanhealth
- DISM.exe /Online /Cleanup-image /Restorehealth
Once you are done entering commands, there is nothing more you will need to do except close the Command Prompt window and restart the OS.
"Windows Update Troubleshooter" for error 0x80073712 in Windows 10
Let's assume that the first method of countering your problem was not effective, and therefore the update error 0x80073712 in Windows 10 remains... This means that you need to use the “standard” Microsoft capabilities, which were developed specifically for such cases and are called nothing more than “Troubleshooter Center Windows updates." To get started, go to the Microsoft website and launch the utility here. As soon as the utility is downloaded to your computer, double-click on it with the mouse to launch it. Now, all you have to do is carry out the actions that the utility will direct you to, but it is worth remembering that at a certain moment, you will need to select the “Update Center” item and only after that, click on the “Next” button. The utility works relatively quickly, so wait until it finishes scanning and restoring system files and reboot your computer.
System Restore against error 0x80073712 in Windows 10
If, after two attempts to fix the problem, your system still has update error 0x80073712 in Windows 10 , then you need to move on to more radical measures, which look like “OS Restore”. Here the action log looks like this: click on “Start” and go to it, find a small “gear” icon from where we go to the PC settings, now, go to the “Update and Security” section, go further to the “Recovery” tab, find the button “ Start" (it is located under the item "Return the computer to its original state") and click on it. All you have to do is wait for instructions from the operating system and be careful, since you should select the item that is responsible for saving all personal data so that your important information is not accidentally deleted from your OS.
Reinstalling the operating system against error 0x80073712 in Windows 10
This is the most radical way to counter the problem, which means it should be used only as a last resort, and as you understand, after using this method of countering the error, it will probably disappear, but there will be nothing left in the OS!