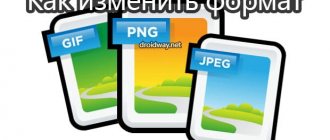
Many users are faced with the need to change the photo format: convert a photo from one format to another graphic format, for example, from “PNG” to “JPG” (“JPEG”), or vice versa. In some cases, you need to use a specific graphic format, but the user has a different photo format available.
Graphic files are saved in various formats that differ in information storage methods and properties. Depending on the format, an extension is added to the file name, which determines the type of information stored: image, video, audio, text, etc. The file extension is separated from the main file name by a dot. One format can have multiple file name extensions.
Different types of graphic files differ in their characteristics, so it may be necessary to change the image format for further use in a specific program, on a remote service, or to reduce the file size. After changing the file format, its extension will change.
Images can be raster or vector. In this article we look at raster formats in which images are saved: photograph, picture, screenshot (screenshot).
The following image formats are currently the most popular:
- JPEG (JPG) is the most popular photo format with support for a large number of colors, the format uses a high degree of compression.
- PNG is a popular image format with lossless compression and transparency support.
- BMP is a graphic format created for Windows; photographs are stored uncompressed and take up a lot of space.
- TIFF (TIF) is a format that uses lossless compression and supports a huge number of colors.
- GIF is a format used to create animated images, often used on the Internet, and has a limited number of colors.
Due to the abundance of graphic formats and the difference in their use, the user is faced with the question of how to change the photo format to reduce the size, change the quality, etc. Files of some graphic formats take up quite a lot of disk space; other graphic formats are impractical to use, for example, for storing diagrams or drawings, due to unclear details.
You need a program to change the format of a photograph or other image on your computer. This guide will show you how to change the photo format on your computer using various programs included with Windows or third-party applications. We will look at using online services to change the format of photos in another article.
How to change the image format in Paint - 1 way
The user can change the photo format for free on his PC using the Paint program, which is included in different versions of the Windows operating system.
Now we will see how to change the photo format from “PNG” to “JPG” using the built-in, standard Paint program.
Follow these steps:
- Go to the Start menu, search for Accessories, and then launch the Paint program from there.
- Go to the "File" menu, click "Open", select the desired image on your computer.
Another way to open a file in Paint is to right-click the file, click on the "Open with" context menu item, and then select Paint.
- Go to the “File” menu again, click on “Save As”.
The “Save As” window offers a choice of image formats: “PNG”, “JPEG”, “BMP”, “GIF”, “Other formats” (“TIFF” and “HEIC”).
- Click on the “Image in JPEG format” item, since in this example, we need this format for the photograph.
- In the Explorer window, give the file a name and select a location to save the image.
Using Windows itself
In order to change the file format, it is not necessary to use third-party tools. You can do this on Windows
- as with single files directly in Explorer ( renaming ),
- and group processing of all files in a folder at once using the command line .
True, the size of the file(s) will remain the same as it was before the format change.
Changing format in Windows Explorer
Open the folder with the files. By default, as a rule, the file extension is not displayed in the file name. To make it visible, click “View” at the top of the window and in the menu that opens, check the “File name extensions” checkbox. Now the file name shows its format (extension type). If the changes do not take effect immediately, simply close the file folder and open it again.
Show file name extensions
Now, as with normal renaming, right-click on the desired file, and in the list of actions that opens, click “Rename”. In our example, instead of PNG we type JPG and press Enter. The foolproof system warns that the action is irreversible, think again just in case, and press Enter again.
Changed photo format
That's it, the photo format has been changed. But! The file size did not change.
Batch changing file format using the command line
Go to the command line. You can do this by pressing the Windows + R key combination on your keyboard, then enter cmd and click OK.
Login to the command line
In Windows 10, click on “Search” in the control panel, also enter cmd and click on the “Command Prompt” line that appears in the list.
Windows10 Command Prompt Login
As a result, a window with a black background will open.
Windows Command Line
First you need to go to the desired folder. To do this, enter the command cd (change directory) in the line and insert the path to the folder in which the files are located. If someone has forgotten how to copy the path to a folder, let me remind you that you just need to click on the path line in Explorer. The path will be displayed in a form understandable for the command line. Look at the gif.
Path to the folder with files
We insert into the line the path to the folder in which the files are located, immediately after the cd command, it looks like this: cd C:\Users\Albert\Downloads\100D5000 , (you will have your own path, so I crossed out mine so that they don’t accidentally copy it) .
Command line folder path
Press Enter. With this action we go to the folder we need on the command line.
Then we use a special command that will change the file extensions, copy it directly from here: rename *.PNG *.JPG and press Enter again.
Command to change file format
We look into our folder and see that all the files have changed their extension type, or as we more often say, format. Everyone got JPG.
Result of batch change of file format from PNG to JPG
You can enter a more universal command to change formats: rename *.* *.JPG This instruction will change the format of absolutely everything that comes its way in the specified folder. So you should use it carefully, having first checked whether video or text files that may accidentally end up there will not be affected.
Change photo format in paint
It's as simple as in the previous editor. And their names are similar. Here, look at the image below, one picture is enough to display the whole simple way to change the format of a photo.
- Open the file in the paint editor
- Save it using “Save As” in the desired format.
How to change the photo format in the paint editor
Now let's see,
How to change the image format on your computer in the Photo Album program - method 2
The free Photo Gallery program is part of Windows Live Essentials. Currently, Microsoft has stopped developing the program and distributing the main components, but the Photo Album program can be downloaded and installed on your computer.
To change the image format, follow these steps:
- Open the photo in Photo Album.
- In the "File" menu, click on the "Create a copy..." item.
- In the Explorer window, give the file a name, and in the “File type:” field, select the appropriate format: “JPG”, “PNG”, “TIFF”, “WMPHOTO”.
- Save the file to your computer.
Learn more about working in Windows Live Photo Gallery here.
How to change photo format in FastStone Image Viewer - 3rd method
The FastStone Image Viewer program for viewing and processing images allows you to save files in other graphic formats.
Do the following:
- In the FastStone Image Viewer window, select a photo on your PC.
- On the toolbar, click on the “Save As...” button, or from the “File” menu, select “Save As...”.
- In the Save As window, select the location and format you want.
FastStone Image Viewer supports saving images in the following formats: “BMP”, “GIF”, “JPEG”, “JPEG2000”, “PCX”, “PNG”, “PPM”, “TGA”, “TIFF”, “PDF” .
By following the link to the site page, you will find a review of the FastStone Image Viewer program.
Changing the photo file format type in XnView - method 4
The free XnView viewer supports a huge number of graphics file formats. Using this application, the original format can be converted to another suitable graphic format.
Go through the steps:
- Open the photo in XnView.
- In the "File" menu, click on the "Save As" item, or click on the "Save As" button located on the toolbar.
- In the Save File window, select the format you want, and then save the image to your computer.
More information about the XnView program is written here.
Changing the photo format in IrfanView - method 5
The free image viewer IrfanView, among other features, can save source files in other graphic formats.
Follow these steps:
- Open the photo in IrfanView
- Click on the “Save As” button on the toolbar, or go to the “File” menu and click on “Save As” there.
- Select one of the supported formats, for example, to change the photo format from JPG to PNG.
- Save the picture on your computer.
An article about the IrfanView program is here.
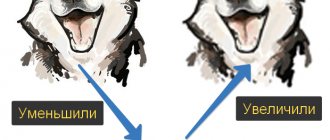
How to resize photos with Pichold
Resizing photos (pictures, images) online is easy if you know which site is best to use. To resize a photo, picture or image online, go to the pichold website, then:
- Click the “Select File” button to select a file
- Check the box that indicates how you want to change the size or indicate the size you need in the box below
- Click the “Zoom Out” button
This way we resize an image, photo or picture online without much effort.
Changing photo format in Paint.NET - 6th method
Now we will change the format of the graphic file in the free graphics editor Paint.NET. In this graphic editor you can perform various operations with images; there is support for working with layers.
Do the following:
- Launch Paint.NET on your computer, and then open a photo.
- In the program window, go to the “File” menu, click on “Save as...”.
- Select the appropriate format and then save the photo to your PC.
PhotoZoom Pro
This program is released by BenVista and allows you to increase the size of an image. This is a kind of professional workshop where you can create and process digital photographs. With its help, you can easily emphasize important points and make the necessary changes. You can change parameters even in JPEG format.
The main differences of the program are:
- ability to support high expansion up to 1000000×1000000 pixels;
- the maximum size is up to 16 exabytes (EB), and there is also a tool for cropping photos;
- an option called “grain”, which helps give the photo a natural and natural look;
- Of course, there is also the ability to make various settings;
- You can process photos at your own discretion;
- the application has patented algorithms S-Spline, S-Spline XL, S-Spline MAX, with which you can perform image interpolation;
- of course, there is integration with Adobe Photoshop, Corel Photo-Paint, which can also be called an advantage;
- but at the same time, the application should be used on new consoles and powerful PCs so that it works well and does not overload the system.
How to change photo format in Adobe Photoshop - 7th method
This article cannot ignore the most powerful photo editing tool - Adobe Photoshop. In Photoshop, you can change the image format by choosing a different type of graphic format.
In Adobe Photoshop, do the following:
- Open the desired photo in Photoshop.
- Enter the “File” menu, select “Save As...”.
- In the Save window, select one of the supported image formats, and then save the file to your computer.
Saving an image in a different format using Word - 8th method
Microsoft Word has a way to save an image in a different format. The word processor supports inserting pictures, which can then be saved in other supported formats.
Steps to follow:
- Paste the image into the Word text editor.
- Right-click on the image, and in the context menu click on “Save as picture...”.
- In the Explorer window, select the appropriate format, and then save the file in the desired location.
Word supports graphic formats: “PNG”, “JPEG”, “GIF”, “TIFF”, “BMP”.
Programs for resizing images
Sometimes you may need a picture with a certain resolution, but it’s not always possible to find the one you need on the Internet. Then special software comes to the rescue, which is designed for all processes related to working with images. In this article we have compiled a list of the most popular such programs. Let's take a closer look at them.
Image Resizer
Image Resizer is a simple utility for the Windows operating system that does not take up much space and is launched not from a shortcut, but by right-clicking on the image. Its functionality is quite limited and is only suitable for changing the size of a picture, either using prepared templates or setting your own resolution.
PIXresizer
This program includes the ability not only to resize a photo, but also to convert its format and work with several files at the same time. You can set certain parameters, and they will be applied to all photos from the folder during processing. PIXresizer is very easy to use, and preparation for processing will not be a problem even for inexperienced users.
Easy Image Modifier
The functionality of this representative includes a little more than the previous two. Here you can add watermarks and text to the image. And creating templates will help you save the selected settings for later application with other files. Easy Image Modifier is available for download for free on the developer's official website.
Movavi Photo Batch
Movavi is already known for its software for working with video files, for example, Video Editor. This time we will look at their program, which is designed for image editing. Its functionality allows you to change the format, resolution and add text to photos.
Batch Picture Resizer
Batch Picture Resizer can be called an analogue of the previous representative, since they have an almost identical set of functions. You can add text, change the image size, convert the format and apply effects. In addition, it is possible to change an entire folder with files at once, and the processing process occurs quite quickly.
RIOT
Use this program if you need to quickly compress or increase the resolution of a photo. The processing process occurs immediately after the source file is loaded. There is also batch processing, which means simultaneous editing of an entire folder with pictures. The lack of Russian language can be considered a disadvantage, since not all functions are understood without knowledge of English.
Paint.NET
This program is a modified version of the standard Paint, which is installed by default on all Windows operating systems. There is already an impressive set of tools and functions, thanks to which various manipulations with images are performed. Paint.NET is also suitable for reducing images.
SmillaEnlarger
SmillaEnlarger is free and easy to use. It allows you to change the size of pictures using prepared templates or by setting values manually. In addition, you can add various effects and set your own by adjusting the sliders provided for this.
FastStone Photo Resizer
The interface of this representative is not very convenient due to the huge size of the file search section, the remaining elements are shifted to the right, as a result of which everything is in one heap. But in general, the program has standard functionality for such software and does an excellent job of processing images.
In this article we have provided a list of software that will help you work with images. Of course, you can add dozens more different programs here, but you should understand that they all simply copy each other and do not offer users something new and truly interesting for working with photographs. Even if the software is paid, you can download a trial version to test it.
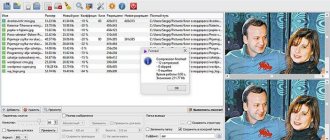
Converting photos to another format in Format Factory - method 9
The free program Format Factory is a converter between different multimedia file formats, including graphic file formats.
You will need to go through the following steps:
- In the "Format Factory" window, click on the "Photo" section, and then select the appropriate format for conversion.
- In the window that opens, click on the “Open file” button to add the source file to the program.
- In the main window of the Format Factory program, click on the “Start” button.
The Format Factory program supports conversion between the following graphic formats: “WebP”, “JPG”, “PNG”, “ICO”, “BMP”, “GIF”, “TIF”, “TGA”.
There is a detailed article about Format Factory on my website.
Working with Photoshop
You can definitely reduce the size of an image without losing quality using Photoshop. This software is much more complex, and you need to work with it step by step. To reduce the size of a photo, you must first upload the file to the editor. To do this, select File – Open.
Now you can perform any actions with the new file, but to change its size without losing quality, you need to click on the Image tab and select the Image Size line there.
In the window that opens, in the Width field you need to put a value that is half smaller than the original size. If you check the Maintain proportions box, the value in the Height field will change automatically. And so that the photo does not lose quality, you need to select the “Bicubic” option. To save the new size, click OK.
Changing the width and height is enough to ensure that the quality is not lost and the pictures look good, so after saving the new parameters, you can save the photo. To do this, in the File section, select the Save line.
Converting photos to another format in Movavi Video Converter - 10th method
Movavi Video Converter, in addition to converting videos, supports converting images of certain formats between different file types.
Do the following:
- In the Movavi Video Converter program window, click on the “Add Files” button, and then on the “Add Images” button.
Movavi Video Converter supports graphic formats: “JPG”, “GIF”, “PNG”, “BMP”, “TIFF”, as well as formats for publishing on social networks LiveJournal and Tumblr.
- Add the desired file to the program from your PC.
- In the "Images" section, select the appropriate format.
- Click on the "Start" button.
Movavi Video Converter supports batch conversion of images.