People often ask how to make a vector image in Photoshop. As you know, Photoshop is a program for processing raster graphics and is not intended for working with vectors. Special graphic editors work with vector graphics. But if you really need it, but don’t have time to learn a new program, then with the help of some manipulations you can convert the image into a vector.
What are raster and vector images and how do they differ?
A raster image is also a grid of pixels (dots). The familiar digital photo to all of us is precisely a raster image. A vector image does not consist of pixels, but of geometric primitives: straight lines, rectangles and other shapes.
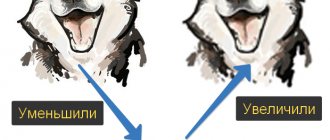
If you reduce and then significantly enlarge a raster image, its quality will be irrevocably damaged. Because each pixel is a point of a certain color, and all these points together make up the picture. When you reduce an image, extra pixels are thrown out, so you can't return it to its original appearance.
Scaling a vector image allows you to change the size without losing quality. This is possible thanks to mathematical recalculations of the sizes of the geometric shapes that make up the image.
A raster image allows you to reliably convey visual information; a vector image does not have this advantage. Vector graphics images can be useful for visualizing logos and line drawings. You won't get photographic beauty from them. Or they will be very complex images, consisting of a huge number of primitives that actually replace pixels.
A simple example of how to convert a raster to a vector
So, the vector consists of geometric shapes. Photoshop has tools for creating paths. The contour is a geometric figure. To make a vector image in Photoshop, you need to create an outline of the image. “Selection” group will help us with this.
:
Rectangular Marquee Tool
,
Elliptical Select Tool
, Magic Wand Tool
, Quick Selection Tool
and
Pen tool
.
To make the vector neat, you should choose a raster image of the highest possible quality, otherwise you will need to draw the contours manually.
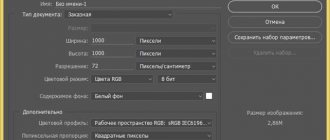
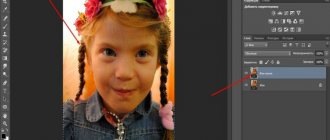
Open the raster image in Photoshop (the most common raster image format is JPG). Logos, outline drawings, and sketches are very easy to process. To get a vector sketch of a portrait, you can first convert the portrait to a sketch using the Filter Gallery
, or use ready-made pop art.
about how to work with the “Filter Gallery”
and quickly create pop art from photos in previous articles. For this example, we will take a ready-made pop art portrait. We deliberately prepared it from a photo of not the best resolution. Therefore, the vector version will show us a noticeable difference.
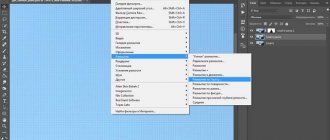
To work with paths, you need to call the “Contours”/Path
to the layers palette.
To do this, go to the menu “Window” / Window
and o / Path
.
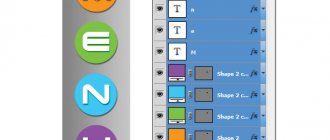
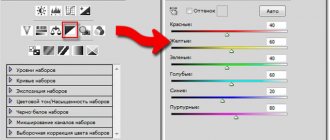
The bookmark will appear in the Layers palette. The image has 4 colors (we do not count the background). Take the Magic Wand Tool
and select the first color.
To select all areas scattered by islands across the image, hold Shift
.
With the first color selected, select the Lasso
or
“Rectangular area” / Rectangular Marquee Tool
and, without removing the selection, click the right mouse button.
In the context menu, select “Make Work Path”
.
In the dialog box, specify the maximum smoothing “Tolerance”
(from 1 to 10; the lower the number, the better the contours will be repeated).
Click Ok
.
On the “Outline”
the first outline will appear.
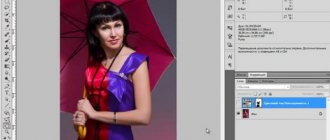
In the image it will be noticeable in the form of curves with dots. They can be aligned and adjusted using the Node Selection Tool
. Using this tool, select a point and either adjust the curve by moving the point's tendril, or move the arc itself.
On the “Outline”
change the name of the contour. To do this, double-click on it and change the name in the dialog box.
We carry out all the steps described with the remaining colors. As a result, we get four contours for each color.
Having received the contours, all that remains is to create a vector. Go to the “Layers”
on the layers palette, create a new layer
Shift+Ctrl+N
. We set the main color to the one in which we paint the first contour.
Return to the “Outline”
, we stand on the first circuit.
In the main menu, in the “Layers”
, select
“New Fill Layer
–
“Color” / Solid Color
.
In the window that opens, click Ok
.
Now, going to the “Layers”
, you will see the first vector layer on the new layer.
In the next dialog box, as usual, specify the file name and path.
That's all. The method is quite simple.
If you often work with vector images, perhaps this article will inspire you to explore new graphics editors. In any case, you have learned another useful method. We wish you great work.
Even more about Photoshop in the courses.
In my third part of the article on working with layers in Photoshop, I want to tell you some tricks and nuances that will help you when working with layers. This article will give you general quick tips and tricks. Sometimes our knowledge is not enough to understand what is happening in the layers panel. If you are a novice user, you have probably encountered a situation in which you do not understand what kind of layers are in the Layers panel, how to work with them, how to generally bring everything into a more familiar form for you? How to make quick selections? How to get rid of styles? How to merge blending modes?
If you have just joined Chronophage, you should start with the first articles in this series:
How to merge layers in Photoshop?
The point of working in Photoshop is layers and their presence. However, in some situations you simply need to merge all layers into one raster layer. Layer > Flatten Image command will help you with this.
.
Flatten Image
— merges all existing layers into one
Background Layer
.
It removes invisible layers. There is no need to select specific layers. The same command can be applied directly in the layers panel. Just right-click on any of the layers and select Flatten Layers
.
In other situations, you might want to merge all layers but leave the ones that are invisible. Team Flatten
, as you understand, kills everything in the world.
To merge only visible layers use Layer >Merge Visible Layers
. It is not necessary to select specific layers in the Layers panel. The command merges all visible layers and leaves all hidden ones intact.
Working with a finished line
All the lines you create are in the Path box. It is advisable to create a separate “line layer” for each line in the Path panel.
Crtl + H - Hide/Show lines.
Stroke Path… - line stroke function. You can select the tool that will be used for tracing. Usually this is a brush, and before using this function, it is advisable to set the brush to the desired thickness, and only then resort to stroke.
By checking the Simulate Pressure checkbox, the line stroke will be thinner at the edges.
When the desired line shape is ready, all that remains is to outline it.
Tools for working with vectors in Photoshop appeared quite a long time ago, but they began to be used in work relatively recently. This is due to the fact that they were “raw” for a very long time, etc. a vector in Photoshop is not a specialized tool for work, and it has not been modified. But everything changed with the release of Photoshop CC.
Why do you need a vector in Photoshop?
First I want to tell you why I use a vector in Photoshop. There are many proven vector editors. The most common are Illustrator, CorelDraw, Xara. Most often I do web design, which means my work is not the end result. Those. Before becoming a website, interface, or application, the layout will be sent to the layout designer. Most layout designers are fluent in Photoshop, but are very superficially familiar with Illustrator. Therefore, the desire to “stuff” everything into one file is quite logical. It’s great when the layout designer receives one PSD that contains a complete layout and even with the ability to edit elements. Change the color of a button, change the radius of a menu shape, increase or decrease a block without losing quality - in 2 clicks and 1 minute! Vector in Photoshop allows you to do this without any special skills.
Features of working with vectors in Photoshop
If you have worked in any vector editor before, much will seem familiar. But you'll have to get used to a lot. All work in Photoshop is built with layers, this also applies to all vector tools. 1. To easily edit a vector in Photoshop, you need to place each shape on a separate layer. 2. Operations of “merging”, “subtracting”, “overlaying” are best applied to no more than two objects. 3. After the operation of “merging”, “subtracting”, “overlaying”, the contours of the original objects remain available for editing. 4. Raster styles can be easily applied to all vector objects. It is very comfortable. 5. You can apply transparency to vector objects and apply filters to them. 6. Individual layers and groups of layers with vector objects can be easily cloned within a document or copied to another PSD document. 7. Label each layer and group layers - this will save a lot of time.
Basic primitives
As in any vector editor, a vector in Photoshop has ready-made primitives. Basic primitives: “Rectangle”, “Rectangle with rounded corners”, “Ellipse”, “Polygon”, “Line”, “Free-form”. For each shape (at any time), you can set the thickness/type/color of the stroke and fill. Additional properties are available for specific primitives. For example, for a polygon you can set the number of corners, and for a rectangle with rounded corners you can set the radius of the rounding.
Basic Tools
To draw an arbitrary vector or edit an existing one (including the outline of primitives), you need to use the “Pen” tools (draw an arbitrary outline), “Pen+” (add new anchor points to the finished outline), “Pen-“ (delete anchor points from the finished outline), “Free Pen” (draw an arbitrary outline by hand), “Angle” (change the bends of the contour curves, set the types of connections between anchor points).
To illustrate the process, a short video from which you will learn: 1. How to create a primitive 2. How to draw an arbitrary vector shape 3. How to edit the outline of a primitive 4. How to edit the outline of an arbitrary vector shape
Basic operations with vectors in Photoshop
There are 4 operations available in total: “Merge Shapes”, “Subtract Front Shape”, “Merge Shapes in Overlay”, “Subtract Shapes in Overlay”. All these operations are available through the main top menu Layers > Merge Shapes, or through the “Properties” toolbar (top menu Window > Properties). Attention! Before you begin any operations to combine vector shapes, make sure that the layers of these shapes are selected in the “Layers” toolbar (turn it on F7 or Window > Layers). A short video illustrating the basic operations of “merging shapes” in Photoshop.
Change color, size and apply styles
Now we come to the most interesting part. A vector in Photoshop allows you to change the size both up and down without losing quality. To do this, select the desired layers in the “layers” toolbar, press Ctrl+T (or Command+T if you have a MAC) and drag the markers of the selected path with the mouse to adjust the size. To change the size proportionally, you need to hold down the Shift key.
Short video: 1. Change the size of a vector shape 2. Change the fill color of a vector shape 3. Add a style to a vector shape
PSD (free)
To make it easier for you to figure out how to use a vector in Photoshop and see how these tools can be used in practice, I am posting an Infographic file made by me entirely using vector tools.
Ask a Question
How and why to rasterize an image
So, we’ve sorted out the types of images, let’s return to rasterization. Simply put, the term "rasterize an image" means converting a picture that is made up of many shapes into one that is made entirely of dots. You can rasterize an image using Adobe Photoshop or other similar ones, which use vector images for work, because they are easy and simple to scale or edit (for example, change the font, deform a line, etc.).
At the same time, it is impossible to apply many tools, as well as almost all of them, to a vector image; therefore, it must be rasterized. After rasterization, you can apply any filters and use any drawing tools.
Rasterizing a layer is very simple. In the lower right window of Photoshop, which is called “Layers”, select the layer you need, if necessary, unlock it, then right-click on it and select “Rasterize”. Then you need to select the appropriate item in the drop-down menu, namely, text, shape, fill, smart object, etc.
Well, now you know what types of images there are, why you need to rasterize a layer, and also how exactly the rasterization process occurs. Good luck in your endeavors!
Instructions
Draw a picture or select a photo. Scan the image
, photograph it, that is, convert it into digital format in one way or another.
Import the image into the graphics editor of your choice. Gradually increasing the viewing scale, notice that the image
gradually breaks up into separate ones, each of which is painted in its own color. These squares are called rasters, and they are the basis of your image.
Analyze the file size. Choose a color model that suits you (RGB, CMYK) that will help you display it correctly. Using the editor, remove or add details, adjust the frame, sharpness, and color scheme. Select (the optimal display value on the screen). Resolution (raster), that is, the calculation is based on the number of pixels that your picture contains horizontally and vertically. Small resolution is considered to be up to 500 pixels along one edge, medium resolution is up to 1024 pixels along the edge, everything else is considered high resolution. Large ones “eat up” a lot of memory and can take a long time to load onto the network.
Select the compression algorithm you need and save the image. For small images and animations of two or three frames published on the Internet, *.gif is suitable; the optimal ratio of quality and file compression is provided by the *.jpeg format; for working with transparent and backgrounds, especially in small pixel images, *.png is used. These formats are mainly used in web design. The *.bmp format provides very high quality color rendering, but the files are large in size, while the *.tiff and *.raw formats, despite the size of the resulting file, allow you to save images obtained directly from digital devices, convey the smallest shades of color and are widely used in professional photography and printing.
note
The disadvantage of raster images is the impossibility of scaling them without losing the quality of the original file.
Helpful advice
To work optimally with a raster image, be sure to know the final format you need (resolution, dots per inch, image size).
Sources:
- Raster and vector images. General provisions and comparison.
Vector graphics is a way of representing objects using geometric primitives - points, lines, polygons. In contrast, raster graphics use fixed-size matrices consisting of dots (pixels). Software converters are used to convert an image into a vector format.
You will need
- Adobe Illustrator
Instructions
note
Many vector graphics editors have a function for converting a raster to a vector. just run some coreldraw or inkscape, import a raster image there and start the conversion.
Helpful advice
How to make a vector image from a raster image, Adobe Illustrator, tracing. Typically, tracing is used for images only with solid colors and with extremely clear contours, since the presence of gradient or simply complex colors leads to the formation of a very large number of vector contours.
Sources:
- how to convert a rastovo image into a vector one
Raster graphics
is a way of expressing images in the form of rectangular matrices. Each cell of such a matrix represents a colored dot. An element of such a grid is called a pixel.
Almost all beginners cannot master Photoshop because they are intimidated by working with layers in Photoshop. They don't understand her.
But everything here is quite easy - you just need to know the basic rules and actions.
I promise you that you will understand them and begin to put them into practice! And so - let's get to work!
Let's look at all the steps using the example of creating a video screensaver. In addition to creating a video intro, we will learn:
- how to move layers in photoshop
- how to rasterize a layer in photoshop
- how to create a new layer in photoshop
- how to copy a layer in photoshop
For a more visual understanding of this, at first glance, complex topic, I created a video where I discuss in detail all the above-mentioned features of working with layers in the process of creating a video screensaver. If it’s easier for you to perceive video material, go to the end of the article. But I recommend both reading and watching, because then there is a chance that you will easily learn everything that will be posted here.
How to select a layer in Photoshop. Layers panel
When you open the Photoshop program (I use Photoshop CS6), on the right toolbar we find the inscription “Layers”:
We click on it with the left mouse button and we get into the layers panel, in which we will constantly be located when creating any drawing:
For normal operation, you always need to know which layer you are on. Whichever layer is selected is where you are. The selected layer in the panel is always a different color - mine is blue. If you need to carry out some actions on a certain layer, you first find it in the layers panel, stand on it and click on it with the left mouse button - it is highlighted in color and you can already work with it (see the picture above).
There are different buttons on the layers panel. We will now learn the most popular ones (I numbered them in red numbers). Thanks to them, we can do different actions with the selected layer.
How to create a new layer in Photoshop
Click on the layer inscription on the panel (Fig. 1), go to the selected layer (Fig. 2). If we need to add styles to our layer, click the icon number 1 (the label on the button is fx). A window with styles will appear and we select the one that will improve our fragment of the picture.
If we need to create a new layer, click on the shape number 2 (in the film I looked at adding a layer with a gradient in great detail). The new layer always appears on top of the selected one. I recommend naming the layers.
If you need the layer to appear below the selected one, press simultaneously the “Ctrl” button on the keyboard and button 2, which is called “Add Layer”.
How to remove layers
If you experimented and realized that the layer is unnecessary, you can remove it from the drawing in two ways - click the drawn eye in the panel next to the layer - it will then simply become invisible, or hold down the left mouse button and drag it to the trash can (number 3). The layer will be deleted.
There are some other nuances of working with text layers, but we will look at them in a separate article.
Before you start watching the video, I’ll make a small clarification for dummies: if you need to transfer a picture from your computer to a Photoshop field, press it with the left mouse button and drag it to the Photoshop work area (I couldn’t think of this at the time!!! ).
Let's watch the video and see how I work with layers, creating a video screensaver for the same video that you are watching:
I don’t allow you to download the lesson materials - find the pictures yourself on Google with which you want to create a similar composition. The only thing is when searching, add the word - without a background.
Printing processes require illustrations in the layout that are processed in a special way. Halftone one-color illustrations must be rasterized
, and colored ones are also
color-separated
.
For printing, the layout is supplied on a transparent film in full size. The document is output to film using phototypesetting machines
. In the roughest approximation, they are similar to laser printers, only the laser illuminates not the light-sensitive drum, but the photographic film. All phototypesetting machines use the PostScript language and have a print resolution several times higher than the best printers (an average of 3600 dpi). Phototypesetting machines are very expensive and complex devices that not every product can afford to purchase. To output original layouts, as a rule, they resort to the services of servers specializing in pre-press preparation.
Linear rasters
Rasterization is used by almost all digital display devices: from monitors to printers. Its essence lies in dividing the image into small cells using a so-called raster grid. In this case, each cell has a solid fill.
Methods for transmitting halftones in analog (photography) and digital (prints, printing presses) processes are fundamentally different. If you look at an image printed in a printing house or on a laser printer, it is hard to notice that it consists of many small dots, which are called raster
.
Most often, the points are located regularly, at the same distance from each other, forming a linear raster
, or
raster grid
.
frequency modulated
), which uses an irregular arrangement of raster dots,
has become increasingly popular The raster they form is called irregular
, or
stochaic
. In Fig. 17.9 shows a rasterized image.
Rice. 17.9.
Rasterized image
Unlike a photograph, a halftone dot cannot have any shadow - it is always black. To convey shades, raster dots of different sizes are formed during the screening process. Between the thicker points, on-
printed in adjacent cells of the raster grid, little white space remains. This creates the illusion of a darker shade of color in the area. Conversely, smaller dots printed at the same spacing leave most of the bugs in the space between them white. This gives the impression of a light shade (Fig. 17.10).
Rice. 17.10.
Simulating dark and light shades of gray using a raster
Digital rasters
Rasterization by digital methods is organized in a different way. The invention in laser printers and phototypesetting machines is created by laser scrap. The beam cannot have a variable size, which is necessary to obtain rar points of varying size. Therefore, the rasterization process involves combining “real” dots created by a laser beam into groups that form raster dots.
Such a raster is a collection of square cells into which the image is divided. Each cell is allocated for one raster point. The rarov point, in turn, consists of a group of "real" points of the same size, created by the output device. The larger part of such a cell is covered with printer dots, the larger the size of the raster dot they form and the darker shade of gray it conveys. For example, in order to fill an area of an image with 50% gray, the rasterization program (rasterizer) will fill this area with raster dots, each of which will represent a half-filled raster cell. If it is necessary to transmit 25% gray, the raster cells are filled with black only to the extent of black (Fig. 17.11).
Rice. 17.11.
2 50% rasters under magnification
Printer dots in a raster cell can occupy different positions. The shape of the raster dot depends on this. In printing, various raster dot foils are used, but the most traditional and widespread is round. Several examples of supported raster dot shapes are shown in Fig. 17.12.
a B C D
Rice. 17.12.
Various dot shapes:
A
- round;
b
- elliptical;
c -
square;
g
- linear
Please note that the number indicated in the printer's passport as resolution (for example, 600 dpi) represents the number of “real” dots that the printer can produce on a single segment 1 cm or 1 inch long. The number of rare points per unit length (raster grid pitch) is called lineature
and is measured in so-called
lines
per inch (lpi) or
lines
per centimeter (lpc). Since several real dots are required to form a raster dot, the lineature of the raster image is always lower than the printer resolution.
Lineature and number of grayscales
The ratio of the resolution of the output device to the raster lineature gives the size of the side of the raster cell, measured at printer points. The maximum number of printer dots that form a halftone dot is equal to the square of the cell side. So, for example, if the raster lineature is set to 100 lpi, and the printer resolution is 600 dpi, the side of the raster cell will be equal to 600/100 = 6 pixels. Under these conditions, the raster dot is formed from 6 6 = 36 printer dots.
The visible quality of illustrations also depends on the screen lineature. The higher the lineature, the less noticeable the dots that form the raster are, and the print is closer to the photographic original. As you can see, the 50 lpi we obtained is a very small value. If you print an illustration the size of a postage stamp with such a lineature, it is unlikely that you will be able to determine what is depicted on it. After all, each raster grid page will contain only 50 points.
When printing on an office printer, in order to increase the raster lineature, you have to sacrifice the number of transmitted shades of gray. In most 60-point printers, the default screen lineature value is 85 lpi. With this lineature, the number of shades of gray in the images does not exceed (600/85)2 + 1 = 50. This is three times less than the minimum defined at 150 shades. Hence the low quality of image printing on office laser printers (Fig. 17.13).
a B C
Rice. 17.13.
Image,
printed with lineatures: a
— 50 lpi;
b
- 85 lpi;
in
— 100 lpi
Creating a custom shape Custom Shapes
You can always save the resulting object into custom shapes Custom Shapes
.
Some time ago I mentioned how this can be done in the article Custom Shape Tool in Photoshop. Select the butterfly layer and click Edit > Define Custom Shape
Our butterfly appears in the shapes of the
Custom Shapes Tool
.
And here's what we ended up with:
Converting a raster photo into a vector in Photoshop is a completely pointless exercise. But sometimes such techniques can be useful for side work with graphics and more.
Creating a vector path
This is almost the final part of how to make a vector image. It is worth remembering the main thing: there are many programs for creating such images, a specialist needs to choose one (maximum two), otherwise your efforts in studying them all at once will be in vain.
Once you have selected an area, convert it to a vector path. To do this, you can use selection tools, such as Lasso Tool, Rectangular Marquee Tool, Magic Wand Tool, etc. Next, right-click on the selection area, after which a menu will appear in which you should select Make Work Path. Next will be a menu in which the degree of anti-aliasing Tolerance is set. The greater the anti-aliasing, the smaller the number of vector nodes and the less accurate repetition of the raster contour.
After all of the above, a work path should be formed in Path. If there is no such palette, you can find it using the Windows window and select Path in it. Then you need to double-click on Work Path and save it in another location. Paths in this area act similarly to layers in the Layers palette. A highlighted outline means it is activated and can be used.
Then select the path using the Path Selection Tool or the Path palette. You need to click the Layer button, then select New Fill Layer in the tab that opens, and then Solid Color in it. This way you will create a fill layer, which is immediately assigned a vector mask in the form of your outline.
How to Save a Vector Object to a Vector Shapes Library in Photoshop
You will then be prompted to name the new vector object. Click "ok" and then test the new object in the library using the Custom Shapes Tool.
If the lesson on converting raster to vector was useful to you, then share it on your social network (icons below).
People often ask how to make a vector image in Photoshop. As you know, Photoshop is a program for processing raster graphics and is not intended for working with vectors. Special graphic editors work with vector graphics. But if you really need it, but don’t have time to learn a new program, then with the help of some manipulations you can convert the image into a vector.
What are raster and vector images and how do they differ?
A raster image is also a grid of pixels (dots). The familiar digital photo to all of us is precisely a raster image. A vector image does not consist of pixels, but of geometric primitives: straight lines, rectangles and other shapes.
If you reduce and then significantly enlarge a raster image, its quality will be irrevocably damaged. Because each pixel is a point of a certain color, and all these points together make up the picture. When you reduce an image, extra pixels are thrown out, so you can't return it to its original appearance.
Scaling a vector image allows you to change the size without losing quality. This is possible thanks to mathematical recalculations of the sizes of the geometric shapes that make up the image.
A raster image allows you to reliably convey visual information; a vector image does not have this advantage. Vector graphics images can be useful for visualizing logos and line drawings. You won't get photographic beauty from them. Or they will be very complex images, consisting of a huge number of primitives that actually replace pixels.