Many Word users know how to use the edit mode. This mode is quite popular in editorial circles, when the resulting work needs to be sent for revision, indicating all the shortcomings. And if you are still an inexperienced user, then perhaps you do not know how to remove the correction area in Word, or the author himself does not know. In any case, in this article we will look at how to do this in detail. Namely, how to accept changes and how to delete comments.
Ways to remove the correction area in Word
Many users of the Word program know how to use the editing mode. This mode is quite popular in editorial circles, when the resulting work needs to be sent for revision, indicating all the shortcomings. And if you are still an inexperienced user, then perhaps you do not know how to remove the correction area in Word, or the author himself does not know. In any case, in this article we will look in detail at how to do this. Namely, how to accept changes and how to delete comments.
Working with notes in Microsoft Word
In addition to well-known tools for working with text, the Microsoft Word text editor also has a number of functions that ordinary users rarely use. Having the skills to work with all the functions of Word will allow you to work in the program more efficiently and create more convenient and readable documents. In this article, we will take a closer look at how to remove comments in Word, and also talk about what they are and how to insert them into a text file. Let's figure it out. Go!
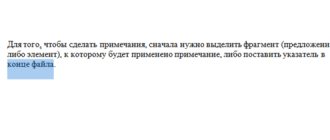
In large documents, you often need to insert notes for the material.
What are notes? These are small explanatory notes for a sentence, word, picture, which may contain a date or a link to the source used. There you can provide any additional information you deem necessary.
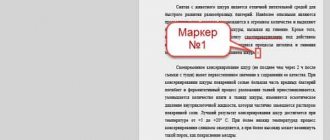
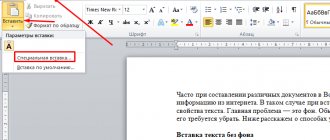
To insert a comment into the text, you need to go to the “Review” tab. Identify the word you want to add an explanation to and highlight it. In the toolbar, find and click the New Note button. After this, the selected word will be marked in red, and a field with a small block, also red, will appear on the right side of the window, in which you can leave any explanations, notes and other information. The square brackets indicate "D1", but you can instead enter other letters, signs or symbols that will appear next to the highlighted area of text, indicating that there is an explanatory note for it. Often the signs “?”, “!” are indicated in square brackets. or explanation number.
We accept changes
Before telling you how to remove the correction area in Word, you must first familiarize yourself with the toolbar. In the “Review” tab, you are interested in only one group - “Changes”. It is here that you will find the tools that will help you say goodbye to the area of corrections in the document.
So, before you there is a document that has been edited using the Corrections tool. You understand that you need to correct the text and want to remove the reviewer’s comments. To do this, in the “Corrections” tool group, click the “Next” button. You will be taken to the first comment. There are two options: you can click on the “Accept” button or the “Reject” button.
After clicking on the “Accept” button, the changes made by the editor will be accepted and the text will be corrected. If you do not agree with the comments and want to leave the text the same, then click the “Reject” button so that the text correction (Word) does not occur.
So, methodically, one by one, delete the note, accepting it or, conversely, rejecting it.
To the author: how to work in correction mode
Revision tracking mode flags all changes to the text. We at the “By Rules” editorial bureau check the text only in this mode - it allows customers and our specialists to control all changes in the file and leave visual comments on the text.
Word Revision Recording Mode: How to Enable Change Tracking and Customize the Type of Revisions
In recent versions of Word, change tracking is enabled as follows: tabbed ribbon → Review → Corrections. You always receive files from the bureau with the correction mode already turned on.
When the Corrections button is disabled, edits are not highlighted. When enabled, new words and characters are typed in colored font, and deleted ones are placed in the fields marked “Deleted” or crossed out, depending on the settings for the type of corrections. Scroll through the examples:
The type of corrections (in text or in callouts) is configured in the Show corrections → Callouts menu of the Review tab:
How to interact with the editor
You have received a text edited by an editor. It looks something like this:
Review your changes. If you are not happy with any editorial changes, discard them and either make your own or write a note. There is an editor's note - respond or correct the text accordingly.
How to approve and discard revisions
To approve the editor's edits or save the original version without edits, select the fragment with the corrections and click the Accept or Reject button on the Review tab:
For the same purpose (accept/reject), you can right-click on the correction and select the desired one:
You don’t have to mark the editor’s approved corrections in any way—the editor himself will accept the edits at the proofreading stage.
If you want to see what the changed text looks like, you can hide the edits for a while: they will remain in the text, but will not be highlighted in color. In the Review panel, click the Change View mode drop-down list and select Revisions (the text will be clean, but the comments will remain visible) or No Revisions (the comments will also be hidden):
There you can also select the Source document mode to see the original author's text. As you work, you can switch between “was” (Original Document) and “now” (No Corrections) to see the difference. Scroll through:
How to work with notes
- If the editor has questions and misunderstandings, then the reader will likely have questions as well. We ask that you correct the text directly, taking into account the editor's note, rather than writing a comment to the editor. It is better to leave a note, and make the associated edit while tracking corrections is active: the person who asked the question will both see the edit and remember what caused it. Let us remind you that this mode is already active in all files that we send to authors.
- When the editor suggests a wording option in a comment, you can agree with it or not. If you agree, make a correction to the text; if not, write about it in your note (the word “no” is enough) or delete the note with the option.
- If you want to discuss an editor's note, create a new one next to it. The editor will see both his question note and your answer note. It is very clear and clear who said what.
To leave a comment or ask a question, select the appropriate piece of text, click the Create a note button and write down your thought. The second option is to hover over the editor's comment and a button will appear to add a response.
Notes will be visible in the margins if you select Show corrections in callouts and Show only comments and formatting in callouts in your revision appearance settings, or pop up when you move your cursor over text with a colored background if you select Show all revisions in text. Scroll through the examples:
Reference
Don't have Word for Windows? The principle of operation in change tracking mode is generally the same in all popular text editors. Here are links to some instructions:
We accept all changes immediately
So, we have already figured out how to remove the correction area in Word using step-by-step acceptance or rejection of comments, but what if all the comments in the text are appropriate, and you want to accept them all instantly. Or reject them all at once. Fortunately, this can be done.
To immediately accept all changes, you need to click on the arrow in the “Changes” tool group, which is located under the “Accept” button, and select “Accept all changes” from the drop-down list.
If you want to immediately reject them, then you need to do all the same manipulations with the “Reject” button.
Accept changes
Notes left can be marked as completed. Then the user who created them will know that the recommendations were taken into account and editing was done. To accept the changes:
- Open a text editor.
- Go to footnote left .
- Select the “ Review ” tab.
- Click on the “ Accept ” command. Here in the settings you can accept all corrections at once and stop tracking. Just click on the arrow and go to all corrections.
Corrections in documents - misleading or revealing the truth
One of the standard situations in a company is editing, while in another case several people work with one document. One created it and sent it to another for verification, who checked it and sent it further or returned it back. This is how corrections appear, which are marked with callouts, red font, etc.
Of course, after finishing working with the document, there is no need to show corrections and you need to somehow turn it off.
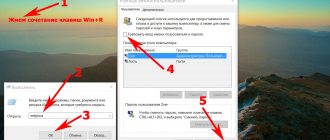
To disable corrections in Word 2003, you need to go to the “VIEW” menu - “Review” - and click on the “Accept corrections” button. We save the document and, to make sure, exit it and enter again.
In 2007, we are also looking for this treasured button, which is located in the “review” tab and is called “Accept”
Quantity
Comments on the article:
Comment author: Elena Date: 2019-07-30
JUST THANK YOU SO MUCH.
Comment author: Alexander Date: 2016-12-12
Everything great is simple when you know it. Thank you.
Comment author: Anatoly Date: 2016-11-26
Comment author: Peter Date: 2016-02-17
Comment author: Galina Date: 2016-02-01
very clear, THANK YOU.
Comment author: Marina Date: 2015-11-23
Is it possible to accept only formatting corrections and leave the rest?
Comment author: Grateful Date: 2015-07-29
Warmest thanks, I understood right away and everything worked out! Hooray!!
Comment author: Ekaterina Date: 2015-05-27
everything worked! But when further working with this document it makes callouts again(((What to do.
Author of the comment: Zhoresovna Date: 2015-04-04
Holy true cross - only your instruction clarified everything and worked! I fought for an hour. Our deepest bow and sincere gratitude! Irina Zhoresovna Kozhanovskaya
Comment author: Sergey Date: 2014-12-12
Thank you very much this info saved me))))
Comment author: Olenka Date: 2013-12-19
Thanks a lot. I scoured the entire Internet, but only this link really helped get rid of the scourge of visible corrections!
Editing mode in a Word document
The editing mode differs favorably from editing in that the entire intermediate process of working on a document is visible directly in its text. Used when several users collaborate on one document.
Visually, all edits are highlighted in red and have their own designation in a special font with callouts containing information on each of them. For example, the deletion of text will be highlighted with a strikethrough or a balloon with the deleted text, depending on the selected mode for displaying edits.
How to enable patch edit mode
All corrections are registered in the Word text editor on the “Review” tab through a group of commands in the “Record Corrections” and “Changes” sections.
In the 2003 edition of Word, the Corrections feature set is located in the Tools section, with available commands displayed in the toolbar.
An alternative way to open the edit mode is the combination “Ctrl” + “Shift” + “E”.
After enabling this mode, you can make changes to the text.
How to enable do not disable tracking
As noted above, all corrections when the Corrections mode is enabled are tracked and noted in the text. To avoid uncontrolled corrections to the text, the document author must enable a disable option to disable correction tracking.
This action is carried out as follows:
- Select the “Review” menu tab.
- In the “Write corrections” command block, expand the list of the “Corrections” buttons.
- Select the command “Prohibit disabling tracking”;
- In the “Block registration” window that appears, enter the password twice.
- Confirm your intention with the “OK” button.
To remove a ban, the user must enter a password.
How to Hide a Note in Word 2010
Notes may interfere with document viewing. You can hide them so as not to be distracted from working on the text:
- Open a Word document with comments and go to the “Review” menu tab.
Reference! To return notes removed in this way, it is enough to again about in the list of displayed corrections.
Removing unnecessary values
Now let’s figure out how to remove the review area in Word 2007, 2010. To remove all corrections or comments at once, you can simply accept or reject each of them. To do this, when viewing them, you need to click on the buttons of the same name in the “Review” tab. Clicking the Next button will easily move you to the next change and allow you to make a decision about it.
For very voluminous texts that have a large number of edits and notes, you can remove the correction area in Word in another way. Or you have a situation where all amendments and comments have ceased to matter. If you need to accept the edits in the document, click on the “Accept” drop-down menu. All you have to do is select “Apply all changes to the document.” Similar actions apply if edits to a file are rejected. Select the drop-down menu and click the corresponding “Reject all changes to document” button.
As you can see, this useful feature will be useful to many users of the Microsoft Word product. It will help facilitate the work on texts that are written in a team. And it will significantly reduce operating time. After all, each user will be able to view all the necessary tags in the file themselves.
Blog about technology, technocracy and methods of dealing with rakes
How to Comment a Note in Word 2010
If you don't want to change an existing note, but want to add to it, you can create a note on the note:
Step 1. Open a Word document with a note and click on its text.
Step 2: Click on the “Create Note” icon in the “Review” menu.
Step 3: Enter additional note text.
Step 4. Click anywhere in the document to exit note editing mode.
You can create multiple nested notes. They will be connected to the same section of text.
Afterword
When working with text fragments in Word, you need to take into account that for ease of reading, the author or other users could make the notes and comments made hidden from other authors. Since your word processor won't display these things by default when you open a file you've received from another user, you may not know they're there until you turn them on. Accordingly, before working with it or transmitting it anywhere, you should check for the presence of reviewed areas, and if available, accept or remove them from the text. In Word, this is done in just a couple of mouse clicks.
At the same time, you must remember that there is only one way to protect your edits from prying eyes: make copies. The fact is that any user can remove corrections and comments from a Word document, since there is no distributed editing model in this word processor; this would be too much of a complication of the model. Therefore, if you want to make notes and edits just for yourself, then create a separate copy for yourself. But this approach also has a disadvantage, because then you will have to track changes in the copy that you left for public use.
How to Delete a Note in Word 2010
When you're done with a note (or it was created by accident), you can easily delete the note:
Step 1. Open a Word document, select the note to delete and right-click on it.
Step 2: Select "Delete Note" from the menu that appears.
You can also select a note and click the Delete Note button in the Review section of the menu.
On a note! You can cancel deletion by pressing “Ctrl+Z”.
Disabling change logging
Deleting all recorded changes to a document is a two-step process: first disable change logging, and then accept or reject changes to the document. The result is a document that you can share with other users.
Disable patch logging
Go to review
>
Registering changes
.
Deleting recorded changes
To permanently remove all revisions, accept or reject changes, and delete comments.
Click View
, >
Next
>
accept
or
reject
.
Word saves or deletes the change, and then moves on to the next one.
To save all changes at once, click the arrow below the Invite
and select
Apply all changes
.
Deleting notes
Select Note and click Check
>
Delete
.
To remove all comments at once, click the comment, and then under Go to Review
Click the arrow below the
Delete
and choose
Delete all comments in document
.
Advice:
To perform a final check, run the Document Inspector.
This tool checks for corrections and comments, hidden text, personal names in properties, and other information. To launch the Document Inspector, select File
>
Details
>
Check for Issues
>
Check Document
.
Disable patch logging
Go to review
>
Registering changes
.
Deleting recorded changes
To permanently remove all revisions, accept or reject changes, and delete comments.
Click View
, >
Next
>
accept
or
reject
.
Word saves or deletes the change, and then moves on to the next one. To save all changes at once, click the arrow next to the Save
and select
Apply all changes
.
How to Delete All Comments in Word 2010
Once you've finished working on a document, you can quickly clear it of all user notes:
Step 1. Open the Word document in which you want to delete all notes.
Step 2: Click on any note in the document.
Step 3: Click on “Delete All Comments” in the drop-down list of the “Delete Comment” button in the “Review” section of the menu.
All user comments will be removed from the file.
Find out information with step-by-step instructions on how to work in Word for dummies from our new article.
Change mode in Word
To enable or disable the display of the corrections area in Word, you should find the “Review” tab in the top line of the Settings Ribbon and click on the button with the corresponding inscription. There is an arrow at the bottom of this icon, which means that clicking on it will open a drop-down list in which you can choose to display the review area. After that, you can make corrections and also insert comments into the text, and anyone who opens this file will see them, and the document creator can accept or reject them. If you are the author of this text, then you will just need to do this.
Sometimes such recorded changes are hidden when the text file is opened in a word processor. Then you will have to enable them from the same menu. Next to the button of the same name there will be a “Tracking” item. By clicking on it, you will receive a drop-down list in which you will need to mark all the proposed items. After this, the required elements will be displayed in full in the editing window. Actually, if you want to display not all the edits made and recorded, then select only the items that interest you in this menu.
How to Delete All One User's Comments in Word 2010
If multiple users worked on a document, you can delete all notes from each of them. For this:
Step 1. Open a Word document with notes from two or more users.
Step 2: Open the Reviewers list in the Show Revisions section of the Review menu.
Step 3. Leave those commenters whose notes you want to erase marked.
Step 4: Select any remaining note.
Step 5: Click Remove Displayed Notes from the Remove Note button list in the Review menu section.
Step 6: To get your saved notes back, go to the Show Revisions section of the Review menu.
On a note! You can also include notes from just one or a few selected users by checking the boxes next to their names.
Enable change tracking mode
To use Track Changes, all you need to do is turn on review mode when you open a Word document and before you start editing.
- Go to Review on the ribbon.
- In the middle of the “ Record corrections ” group, click the “ Corrections” , after which all changes will be recorded .
Now, if you make any changes to the document, such as deletions, inserts, and formatting, they will be recorded.
How to make a comment in Word
While comments are not part of change tracking, they are necessary for document review, so we'll mention them here as well.
To leave a comment on a document:
- Hover your cursor over the place where you want to leave a comment, or highlight the text you are commenting on.
- Go to Review on the ribbon.
- In the Notes group, click New Note .
Show changes in Word
Sometimes you may only want to view certain types of edits. For example, maybe you've made a lot of formatting changes, such as making text bold, but you only really need to see insertions and deletions. There are ways to reduce the amount of markup you see!
DISPLAY FOR REVIEW
Show for review is an option that allows you to see simple markup, all markup, no markup, or original.
- Corrections : Collapses the markup and shows changes integrated into the text. The only indication that a line has been changed is a red stripe to the left of the affected lines.
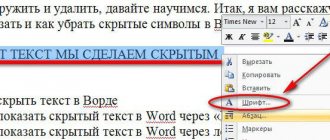
How to remove a note?
There are several ways to remove marginal notes. The first method involves selecting the tag itself. You need to right-click on it. Select “ Delete ” from the list.
For the next method, the user needs to go to the “ Review ” section after selecting a footnote. Next to the creation command is the opposite one. Just click on “ Delete ” to completely remove the display of recorded changes from the document.