Introduction
Using the convenient Microsoft Office Word software application, which has a clear intuitive interface, even a novice PC user can convert any document. The program allows you to format data, highlight it with color, color the space around a certain block, and also create various kinds of tables. The product's multifunctional tools have enormous capabilities that are necessary to beautifully and competently manage tabular data stored in several formats. Using a text editor, you can create, merge, or split any tablespace. Although all of the above steps are simple, some people may have difficulty putting these steps into practice. In this article we will look at ways to help you create a table break or connect several separate fields with cells.
Most often, the need to combine graphs divided into several parts is required as a result of subsequent data formatting when the document boundaries increase or decrease. This kind of manipulation leads to a complete discrepancy between the previously created page breaks and their endings. The user has to re-combine everything and then split it in accordance with the new rules.
In this article we will talk about simple “horizontal” division and union relative to rows. The software features of the Word application are such that in practice, vertical division or standard merging relative to columns simply will not work.
Method No. 1
Using the “show all characters” tool
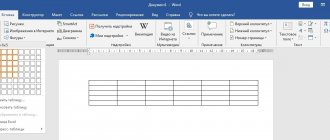
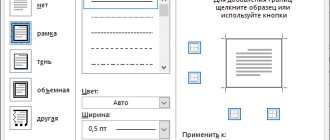
You can correct the division of tables using the “show all characters” tool. Indicated by the symbol (¶).
This tool can be found in the toolbar in Word as shown in the image below. Or press the key combination (Ctrl+*).
In order to get acquainted with the toolbar and other functions, you can read the article - “How to work in Word...”.
Displaying paragraph marks and other hidden formatting symbols
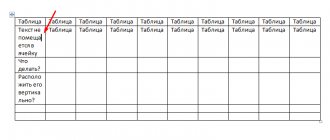
Click on the icon (¶) and see the text transformation. New icons have appeared in the text and table. We are interested in the completed paragraph mark. It is hidden imprinted when we press the Enter key.
Between the tables we see that there is one such icon.
Complete paragraph mark between tables
If you press the Enter key under this icon, you will see that another similar sign appears below the previous one.
Two complete paragraph marks between tables
So, to remove the gap between the tables, you need to connect the paragraphs, that is, remove their ending marks.
Click the Delete or Backspace button and simply delete these icons.
Working in Word 2003
Merging tables in Word that have the same number of columns is quite simple; to do this, the user needs to place the cursor directly on the break line, which is located under the first block of table data, then gradually press the Delete button. After a few moments, the previously separated data will be combined into one table.
Don’t despair if your table blocks contain columns that have different widths; to do this, you just need to align them in width. There is no need to perform this time-consuming operation manually; the user will be helped by the very useful command “Align column widths”, which is located in the context menu, called up after selecting the table and clicking on the selected area. There are times when automatic alignment does not meet the wishes or needs of the consumer, so you first need to merge the two parts of the broken table, and then manually adjust the width in a way that is more appropriate for the specific data.
How to join a broken table
If you need to connect a previously broken table, you can do this in two ways. The first method is to remove all characters that are between the tables. To do this, it is best to first enable the display of non-printing characters. This is done using the button on the “Home” tab.
After this, you need to place the cursor between the tables and delete all the characters that are between them. To delete characters, use the Backspace and Delete buttons on your keyboard. Once all characters between tables have been removed, the tables will be joined automatically.
The second way to join a broken table is to use the Cut and Paste commands. In this case, you need to select the entire second table and cut it using the Ctrl-X key combination.
Next, you need to place the cursor directly after the first table and paste the previously cut table using Ctrl-V.
If everything was done correctly, the broken table will be joined again.
And the text that was between the two tables will move down a little.
How to remove frames and borders from WORD 2016 tables
Universal solution
As practice shows, there is one most convenient method in a text editor that allows you to quickly combine tables that, due to their characteristics, have the same number of columns with different widths. So, in order to use a unique method and equalize the width of columns in several subsequently merged tables, you will have to first select the second table and simultaneously hold down the Ctrl+X buttons. This action causes the cut data to be placed on the clipboard. Then you need to place the cursor on the line that is located next to the first table. Simultaneously pressing the Ctrl+V buttons will allow you to paste back the copied data into the area where the cursor is currently located.
Select the second table you want to merge with the first and click Cut
At first glance, this method may seem more complicated than the first, however, after the work is done, the user himself will be able to appreciate the convenience and simplicity of this method, which does not require either time or labor. It is worth noting that this kind of manipulation can be used even when the tables have very extensive formatting.
...and click Insert
TOP 5 Ways to Merge Tables in Word
MS Word is a fairly simple program, but in its different versions some functions are activated in completely unexpected ways. This often confuses users because what works on one computer may not work on another. One of the editor’s sore spots is how to combine tables in Word.
Content:
Brief description of possible methods
We will provide a list of all merge options for all existing versions of Word.
You don't have to figure out which version you have and look for a solution for it. You just need to quickly try the methods on the ready list until you find the one that suits you.
Here are some table merging techniques:
1
By removing all characters between tables.
2
By copying and pasting the second table into the last row of the first (Ctrl+C and Ctrl+V).
3
By copying and pasting the second into the first using the Paste as new lines option.
4
Horizontal connection
Let's look at them all in order, with detailed instructions and screenshots.
back to menu ↑
Delete all characters in between
This method is the most common and is described in all manuals. This is especially true of older versions of Word: any tables are joined automatically if you erase everything written between them.
Here's how to do it:
1
Place the tables one above the other. If there is text between them, cut it out and paste it somewhere else.
2
Place the cursor on the empty space between the objects.
3
Press Backspace or Delete, which will eliminate the gap between the objects and automatically merge them.
4
If this does not happen, then try activating the Display all characters function in the main section. This will allow you to see and remove hidden characters, if any.
5
Simply position the cursor next to paragraph characters and also delete them using Backspace or Delete. If you can’t erase a paragraph character, try doing it by searching and replacing characters. In this case, the second line in “Symbol replacement” must be left empty.
If there is a repeating column or row, select it and press Delete.
If the method does not work or you cannot find the functions you need, then move on to the next option.
back to menu ↑
Copy directly Ctrl+C and Ctrl+V
The simplest copy-paste usually works with tables. Convenient in its simplicity and lack of additional steps.
Here's what to do:
1
Select the table you want to paste.
2
Use Ctrl+C to copy or Ctrl+X to cut. You can also right-click and select Copy or Cut.
3
Place the cursor in the last row of the first table.
4
Use the combination Ctrl+V or right-click on the cell with the cursor and select Paste. Objects will be merged without breaking formatting
When selecting, you need to capture the table itself, and not just the text inside it. Otherwise, only the content will be copied, which will break the entire structure.
If this method did not work in your version of Word, then move on to the next one.
back to menu ↑
Copy and paste new lines
The method works on later versions of a text editor and is a type of table copying.
Here's how it works:
- Select and copy the second table to the clipboard (Ctrl+C combination)
- Right-click on any of the first columns
- In the drop-down menu, select the “Paste as new rows” function and the copied table will be glued to the main one
Typically, one of the three methods above is suitable and solves the problem. Now let's look at a non-standard merge option.
back to menu ↑
Horizontal merger
Sometimes you need to glue tables horizontally so that they are joined at the sides rather than at the top and bottom. This can be done using a variation of the copy-paste method.
Here's how it works:
2
Place the cursor behind the first table where the first row ends.
3
Paste an object from the buffer in any convenient way. Automatic merging will occur immediately. If necessary, remove the duplicate row or column.
This was the last method of unification. Now you can quickly select and use a working method even on an unfamiliar computer with an unknown version of a text editor.
back to menu ↑
If all else fails
The likelihood of such a coincidence is low, but judging by user comments on forums, it can happen. Here's what you can try:
back to menu ↑
Conclusion
Some features in Word change from version to version, causing confusion among users. If you regularly print documents on public computers, it is easier to learn all the merging options. Selecting a working method in each specific case will take no more than 10 seconds.
If nothing works, then try updating Word or carry out the necessary actions in Word-OneDrive.
You can watch the training video using the link below.
back to menu ↑
Video: How to Combine Tables in Word 2020 | How to Join Tables in Word 2016
10 Total Score
Feedback from our readers is very important to us. Leave your rating in the comments with reasons for your choice. Your opinion will be useful to other users.
Did our article help you?
10
Add your review
Separation of information blocks
The need to split a table in Word arises no less often than to merge it. One of the simplest and fastest ways to help achieve your plan is to use a special combination of buttons. To create a gap, placing the cursor on a line will help, which after the division will take place in the new table space.
After the user has decided on the location of the break, he must simultaneously press the Ctrl+Shift+Enter buttons. With just one click, the whole canvas will be divided into 2 parts.
A more complex method that allows you to make a break in Word will most likely also not cause any difficulties. To execute it, you need to place the cursor in the same line, which will be the first in the new table, then find the subcategory in the main menu that is responsible for working with tables. Among other commands, you should find the “Layout” tab; by clicking on the “Split” command, the entire table space will be divided into two independent parts.
The command is available in the Layout section of the main menu