DVD format
Physically, the DVD format is similar to a CD, with the difference that a laser beam with a shorter wavelength is used to work with DVD discs. Due to this, a high recording density is achieved. Also, there are DVDs with an additional data storage layer, which doubles the amount of data stored on one side. A single-layer DVD can record up to 4.7 GB per side, and a double-layer DVD can record up to 8.5 GB.
There are several types of DVD media. DVD Forum initially defined three types: DVD-R, DVD-RW, and DVD-RAM. DVD-RAM is a physically rewritable format, but it is not compatible with the standard DVD Video format.
How to start the disc burning process
First, you need to insert a blank recordable disc into the drive. The disk is read for some time, and after recognizing it, Windows 8 will offer you a choice - select “Write files to disk”
.
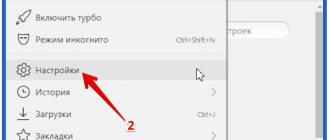
If you have disabled autoloading from optical media, then you need to go to “Computer” and double-click the left mouse button on the optical drive icon. Once clicked, a dialog box will appear offering two options for burning the disc.
Make your choice depending on how you will use your drive.
• As a USB flash drive – This type of storage is used with the Live File System, which allows you to save, edit and delete files at any time. This disk will be used under Windows XP and later versions of Windows.
• With a CD/DVD player – This type of recording allows you to record your files and close the disc session for playback in a CD/DVD player or on any personal computer. After closing the disk, files can be added, but those files that were previously recorded cannot be deleted.
Logical organization of DVD Video
Unlike a CD, which consists of tracks listed in a TOC (Table Of Contents), a DVD has a UDF file system.
DVD Video is logically divided into the following parts:
- First-Play Section. Plays first immediately after the disc is inserted into the device
- VMGI (Video Manager Information). Video manager information
- VMGM (Video Manager Menus). Video manager menu
- VTS (Video Title-Sets). Video Application Kits
Each Video Application Suite (VTS) is logically divided into
- VTSI (Video Title Set Information). Video application information containing control data.
- VOB (Video Objects). Menu
- VOB (Video Objects). Data
- VTSI backup
Each VOB (Basic Disc File Unit) includes video, audio, subtitles, and navigation data. When a VOB is played, the player not only plays the video in sequence, but also follows navigation commands to display menus, accept commands from the user, etc. Each VOB includes individual cells linked together using Program Chains. PGC) that provide the required interactivity using a simple programming language designed for DVD Video. PGCs are used to regulate the playback of video, audio and subtitles in VOBs, display menus, and enter and execute user commands. There are three types of PGC: sequential play, random play and shuffle play. Individual cells can be used by more than one PGC, which can define different sequences of video playback, for example to provide seamless branching. PGCs are subject to a set of instructions for basic programming, including mathematical and logical operators, conditional branches, countdown, etc. There are 16 regular registers for more complex programming, and 16 system registers.
DVD-Video file organization
VOBs and other data are located in the VIDEO_TS directory. The table below shows an example disc with one set of video applications.
| File name | Description |
| VIDEO_TS.IFO | VMGI File (Video Manager Information) |
| VIDEO_TS.VOB | VMGM File (Video Manager Menu) |
| VIDEO_TS.BUP | VMGI backup file |
| VTS_01_0.IFO | VTSI file |
| VTS_01_0.VOB | A set of video objects for the VTS menu |
| VTS_01_0.BUP | VTSI backup file |
| VTS_01_1.VOB | The first video object from the first set of video objects |
| VTS_01_2.VOB | Second video object from the first set of video objects |
Audio, video and subtitles can be contained in no more than 9 VOB files related to a given video application, each of which does not exceed 1 GB in size. Thus, while a DVD-5 will have no more than 5 VOB files pertaining to a video application, a DVD-9 may require all 9. The VTS*.* files may be repeated for each Video Application Set (VTS) and will be named VTS_02* accordingly. *, VTS_03*.*, etc. For each VTS there will be one .IFO and .BUP file, plus one or more .VOB files.
How to burn a disc using "With a CD/DVD player"
If you want to burn a disc for playback on other devices, then you must specify “With CD/DVD player”
and click on the next button.
Add files to the disk that you plan to burn. This way you will create a link for each file when you write it later, and the operating system will create temporary files. To start the data recording process, click on “Finish recording”
.
The built-in data recording program will prompt you to specify the disk name and select the recording speed before starting the recording process. Make a choice and move on.
While your files are being written to disk, you must wait a while. The time it takes to write data depends on the amount of data, the type of disk, the hardware configuration and, of course, the speed you have chosen.
After burning the disc, a dialog box will appear giving you the opportunity to create another disc with the same files. If you want to create another copy of the data, click in the checkbox “Yes, write the same files to another disk.” Otherwise, just click on the "Finish"
.
Stream Requirements
One of the mandatory requirements of the DVD Video standard for a video stream is that it must be encoded in MPEG-1 or MPEG-2. Thus, to encode video prepared for recording, an MPEG-1 or MPEG-2 codec is required. MPEG-2 is preferable to use because it is more advanced and modern, however, if you need to get an output video stream with a bitrate below 1 Mbit/sec (about 10 hours of video on a standard single-layer DVD media), then in this case it is better use the MPEG-1 codec.
A digital video stream reproduced in the countries of the former CIS must meet one of the requirements listed below, due to the fact that standard DVD players may simply refuse to play a video object if the format of the video stream in it does not meet the specified requirements.
| Video codec | Audio codec | Frames per second | Frame width | Frame height | Aspect Ratio |
| MPEG-1 |
| 25 | 352 | 288 | 4:3 |
| MPEG-2 | 352 | 288 | 4:3 | ||
| 352 | 576 | 4:3 | |||
| 704 | 576 | 4:3 | |||
| 720 | 576 | 4:3 | |||
| 720 | 576 | 16:9 |
The MPEG encoding process eliminates redundant video data in a series of adjacent frames. Two adjacent frames usually contain many of the same image elements. The information in them differs by a small part from all the information contained in the frame. Video compression is performed, which uses not all the data of each video frame, but the dynamics of frame changes, since in most successive frames of one video plot the background almost does not change, and clearly noticeable changes occur in the foreground. For example, a small object moves smoothly against a constant background. In this case, complete image information is stored only for reference images. For the remaining frames, only difference information is digitized: about the position of the object, the direction and magnitude of its displacement, about new background elements that open behind the object as it moves. Moreover, this difference information is calculated not only in comparison with previous images, but also with subsequent ones (since it is in them that a previously hidden part of the background is revealed as the object moves). Reference frames in an MPEG video stream must be inserted every 15 or 18 frames, due to the fact that it is the reference frames, or I-frames, as they are also called, that are used by video viewers when fast-forwarding or rewinding the video.
To comply with the DVD Video format, the bitrate of the multiplexed stream should not be higher than 9.8 Mbit/s and not less than 300 Kbit/s. This parameter must be taken into account when receiving the final MPEG stream.
Basic concepts and definitions
DVD video. To play DVDs with video, you need a DVD drive and an MPEG-2 decoder (that is, either a household DVD player with a hardware decoder, or a computer DVD drive and a software player with a decoder installed). DVD movies are compressed using the MPEG-2 algorithm for video and various (often multi-channel) formats for audio. The bitrate of compressed video varies from 2000 to 9800 Kbps, often variable (VBR - variable bitrate). The standard video frame size for the PAL standard is 720×576 pixels, for the NTSC standard it is 720×480 pixels. The audio data in a DVD movie can be in PCM, DTS, MPEG, or Dolby Digital (AC-3) format. In countries that use the NTSC standard, all DVD movies must contain a PCM or AC-3 soundtrack, and all NTSC players must support these formats. Thus, any standard disc can be played on any standard hardware. In countries using the PAL standard (most of Europe, including Russia), at first they wanted to introduce PCM and MPEG-2 formats as the audio standard for DVD, but under the influence of public pressure and going against the wishes of Philips, DVD-Forum included Dolby AC-3 to the list of optional audio formats on discs and mandatory formats in players.
PAL (Phase-Alternating Line). An analogue color television system developed by German engineer Walter Bruch and introduced as a television broadcasting standard in 1967.
NTSC (National Television Standards Committee). National Television Standards Committee. Analogue color television system developed in the USA. On December 18, 1953, color television broadcasting using this particular system was launched for the first time in the world. NTSC has also been adopted as the standard color television system in Canada, Japan and a number of countries on the American continent.
MPEG (Moving Picture Experts Group). Moving Image Expert Group. A group of specialists under ISO that meets to develop standards for digital video and audio compression.
MPEG-1. A group of standards for digital audio and video compression adopted by MPEG. MPEG-1 video is used, for example, in the Video CD format. Video CD (VCD) video quality is approximately the same as VHS video cassettes.
MPEG-2. A group of standards for digital coding of video and audio signals approved by ISO - International Organization for Standardization / IEC Moving Picture Experts Group (MPEG). The MPEG-2 standard is primarily used for video and audio encoding in broadcasting, including satellite broadcasting and cable television. MPEG-2, with some modifications, is also actively used as a standard for DVD compression.
Number (frequency) of frames per second. The number of still images that replace each other when showing 1 second of video material and create the effect of moving objects on the screen. The higher the frame rate per second, the smoother and more natural the movement will appear. The minimum indicator at which the movement will be perceived as uniform is approximately 10 frames per second (this value is individual for each person). Traditional film cinematography uses 24 frames per second. PAL and SÉCAM television systems use 25 frames per second (25 fps or 25 Hertz), and the NTSC system uses 29.97 frames per second. Good quality computer digitized video footage typically uses a frame rate of 30 frames per second. The upper threshold frequency of flickering perceived by the human brain is on average 39-42 Hertz and is individual for each person. Some modern professional cameras can shoot at up to 120 frames per second. And special cameras for ultra-fast shooting shoot at a frequency of up to 1000 frames per second and higher, which is necessary, for example, for a detailed study of the trajectory of a bullet or the structure of an explosion.
Interlace scanning. Scanning of video material can be progressive (interlaced) or interlaced. With progressive scan, all horizontal lines (lines) of the image are displayed simultaneously. But with interlaced scanning, even and odd lines (also called frame fields) are shown alternately. Interlaced scanning is often called interlacing or interlacing in English. Interlace scanning was invented to display images on picture tubes and is now used to transmit video through “narrow” channels that do not allow the image to be transmitted in full quality. PAL, SÉCAM and NTSC systems are all interlaced scanning systems. New digital television standards, for example, HDTV, provide progressive scan. Although technologies have appeared that allow simulating progressive scanning when displaying material with interlace. Interlace is usually indicated by an "i" after the vertical resolution, such as 720x576ix50 for PAL video. To suppress the unpleasant effects that occur when viewing interlaced video on a progressive screen, special mathematical methods called deinterlacing are used.
Progressive scan. Unlike interlaced scanning, where only half of the image is formed per frame (either even or odd lines), with progressive scanning the entire image is formed, i.e. all lines. Currently, interlaced scanning is used only in cheap CRT televisions.
Deinterlacing The process of creating one frame from two half-frames of interlaced format for later output on a progressive scan screen, such as a computer monitor. Used in computer video processing systems, flat panel TVs, etc.
Permission. By analogy with the resolution of computer monitors, any video signal also has a resolution, horizontal and vertical, measured in pixels. Typical analogue television resolution is 720x576 pixels for PAL and SÉCAM standards, at a frame rate of 50 Hertz (single field, 2x25); and 648x486 pixels for NTSC, at 60 Hertz (single field, 2x29.97). In the expression 648x480, the first number indicates the number of points in a horizontal line (horizontal resolution), and the second number indicates the number of lines themselves (vertical resolution). The new standard for high-definition digital television HDTV offers resolutions of up to 1920×1080 at a flickering frequency of 60 Hertz with progressive scan. That is, 1920 pixels per line, 1080 lines.
Number of colors and color resolution of the video signal. Described by color models. For the PAL standard, the YUV color model is used, for SÉCAM the YDbDr model, for NTSC the YIQ model, in computer technology it is mainly used RGB (and αRGB), less often HSV, and in printing technology CMYK. The number of colors a monitor or projector can display depends on the quality of the monitor or projector. The human eye can perceive, according to various estimates, from 5 to 10 million shades of colors. The number of colors in video material is determined by the number of bits allocated to encode the color of each pixel (bits per pixel, bpp). 1 bit allows you to encode 2 colors (usually black and white), 2 bits - 4 colors, 3 bits - 8 colors, ..., 8 bits - 256 colors, 16 bits - 65,536 colors, 24 bits - 16,777,216 colors. In computer technology, 32 bits per pixel (αRGB) is standard, but this additional α-byte (8 bits) is used to encode the pixel's opacity (α), rather than color (RGB). When a pixel is processed by the video adapter, the RGB value will be changed depending on the value of the α-byte and the color of the underlying pixel (which will become “visible” through the “transparent” pixel), and then the α-byte will be discarded, and only the RGB color signal will go to the monitor .
Bitrate. The width (otherwise known as speed) of a video stream or bit rate is the number of processed bits of video information per second of time (denoted “bit/s” - bits per second, or more often “Mbit/s” - megabits per second; in English designated “bit/s” and “Mbit/s” respectively). The higher the video stream width, the better the video quality in general. For example, for the VideoCD format the video stream width is only about 1 Mbit/s, and for DVD it is about 5 Mbit/s. Of course, subjectively the difference in quality cannot be assessed as fivefold, but objectively it is so. And the HDTV digital television format uses a video stream width of about 10 Mbit/s. Using the video stream speed, it is also very convenient to evaluate the quality of video when it is transmitted over the Internet. There are two types of stream width control in a video codec - constant bit rate (CBR) and variable bit rate (VBR). The VBR concept, now very popular, is designed to preserve video quality as much as possible, while reducing the total volume of the transmitted video stream. At the same time, in fast scenes of movement, the width of the video stream increases, and in slow scenes, where the picture changes slowly, the width of the stream decreases. This is very convenient for buffered video broadcasts and transmission of stored video material over computer networks. But this is not suitable for bufferless real-time systems and for live broadcasting (for example, for teleconferences) - in these cases it is necessary to use a constant video stream speed.
Screen aspect ratio. The aspect ratio of the frame is the most important parameter in any video material. Since 1910, motion pictures have had a screen aspect ratio of 4:3 (4 units wide by 3 units high; sometimes written as 1.33:1 or simply 1.33). It was believed that it was more convenient for the viewer to watch a film on a screen of this shape. When television appeared, it adopted this ratio and almost all analogue television systems (and therefore televisions) had a screen aspect ratio of 4:3. Computer monitors have also inherited the television standard of the parties. Although back in the 1950s, this idea of 4:3 changed radically. The fact is that the human field of vision has a ratio of not 4:3. After all, a person has 2 eyes located on the same horizontal line - therefore, a person’s field of vision approaches a 2:1 ratio. To bring the frame shape closer to the natural field of view of a person (and, therefore, enhance the perception of the film), the 16:9 (1.78) standard was introduced, almost corresponding to the so-called “Golden Ratio”. Digital television also mainly focuses on the 16:9 ratio. By the end of the 20th century, after a number of additional studies in this area, even more radical aspect ratios began to appear: 1.85, 2.20 and up to 2.35 (almost 21:9). All this, of course, is designed to immerse the viewer deeper into the atmosphere of the video being watched.
PCM. Pulse code modulation (PCM or Pulse Code Modulation) is used to digitize analog signals before transmitting them. Almost all types of analog data (video, voice, music, telemetry data, virtual worlds) allow the use of PCM modulation. To obtain a PCM modulated signal from an analog signal at the input of the communication channel (transmitting end), the amplitude of the analog signal is measured at regular intervals. The number of values digitized per second (or digitization rate) is a multiple of the maximum frequency (Hz) in the analog signal spectrum. The instantaneous measured value of the analog signal is rounded to the nearest level from several predefined values. This process is called quantization, and the number of levels is always taken as a multiple of a power of two, for example, 8, 16, 32 or 64. The level number can be respectively represented by 3, 4, 5 or 6 bits. Thus, the modulator output produces a set of bits (0 or 1). At the receiving end of the communication channel, the demodulator converts the sequence of bits into pulses with the same quantization level that the modulator used. These pulses are then used to restore the analog signal.
How to burn a CD and DVD with the program and other information!
Today, the use of CDs, DVDs and other disk media is still relevant for various tasks. Gradually, CD and DVD drives will replace flash drives, since they can now be connected to a TV and various audio / DVD players, viewing and listening to the desired content directly from flash drives!
But it is still convenient to use CD/DVD discs, for example: for recording boot programs, for recording movies in DVD format (if it is not convenient to watch on a computer, and the TV and DVD player do not support flash drives), for recording audio CDs (if your player again does not provide for connecting flash drives), and also in some cases for simple file storage. True, hardly anyone needs the latter...
And since the use of such storage media as CDs and DVDs still makes sense and in some situations you can’t even do without them, I decided to tell you how you can record various types of information on them: music, DVD movies, and boot program images!
For example, I still use CDs and DVDs mainly for recording boot programs. Let me explain... A boot program is one that will load on the computer before the operating system starts. Basically, these are utility programs, for example, for partitioning hard disk partitions into partitions, checking for viruses, launching various backup and recovery tools, launching a Live operating system (one through which graphically you have full access to all your files on the computer and serves to perform some tasks of recovery, copying, repairing the current system).
When writing flash drives, various problems often arise. Either the computer for some reason does not load the program from the flash drive, or the program itself is not written correctly to the flash drive so that it can then work as a bootable one. But the disk will always work, and the main thing is that it has no physical damage and that’s all. I recorded it quickly and don’t have to worry about loading it later. 
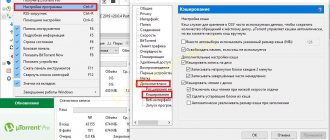
There are many programs for burning discs. There are both paid and free ones. In general, I consider it unreasonable to use paid programs for banal recording of discs, since all these simple functions are also available in free ones!
I will highlight 2 good programs: ImgBurn and AshampooBurningStudio FREE. The first one has more settings options, but the interface is less suitable for a beginner. And the second is extremely understandable and, perhaps, any computer user can understand it. Using her example, I will now demonstrate the possibility of recording various types of CD/DVD discs...
Let's start by installing the program.
Installing Ashampoo Burning Studio FREE.
The first step is to download the program. And I strongly recommend that you always do this from the official website of the developer, otherwise you risk running into an installer that contains various viruses, ransomware and other crap.
Here is the link to download the program from the official website:
ashampoo.com
On this page, go down a little to the line AshampooBurningStudio FREE and click on the “Download” button on the right:
The size of the program installer is between 30-35 MB, which is quite small.
When a new page opens, after a few seconds the program will begin downloading to your computer, after which you can run the downloaded file and begin installation:
First of all, the program prompts you to select the installation language. The default is already “Russian”, so just click “OK”:
In the next window, accept the license agreement by clicking “I agree, continue”:
Next, you are given the opportunity to change the path for installing the program, but I recommend leaving the one that will be set for you by default. You can also enable/disable the creation of a shortcut on the desktop after installation and select for which users this program will be available through the Start menu (only for you or for everyone). The last setting does not make sense as such, since the program can still be run by any user, unless, of course, you configure rights through some other means.
Click “Next”:
Next, the program will copy the necessary files to the installation folder (takes a few seconds) and that’s it! The program is installed. In the last window, click the “Finish” button:
If in the last window there was a checkmark “Launch AshampooBurningStudio FREE”, then the program will start immediately.
Let's get started with the program!
Working with Ashampoo Burning Studio FREE!
At the moment the program is launched, its official website may open, which you just need to close.
Immediately after launch, a window will appear asking you to activate your full free license. Click the “Continue” button below:
Next, another window with an advertising offer may immediately appear. Since the program is completely free, when working with it, you may periodically see advertisements, like the one in the image below. Just close it with the “Close” button or the “No, thanks” button:
So, we see this program interface:
There are several sections for recording different types of discs, everything is simple and clear.
Let's first consider what, in my opinion, is the most important thing - how to burn an image with a boot program to disk.
We burn the bootable version of the program to disk!
A boot program designed to be written to disk is usually a single file called an image.
The image file usually has one of the following formats: ISO, CUE, BIN. These are the main formats. There are, of course, others, but they are less common.
And let’s assume you downloaded a bootable version of the antivirus in order to scan your computer for various threats as thoroughly as possible, even before starting Windows, which will make the scan more effective.
Here is a file that needs to be written as an example:
As you can see, it has an ISO extension and was downloaded from the official Kaspersky antivirus website.
Burning such a disc is very easy!
To do this, move the mouse cursor over the “Disk Image” section and select “Burn Image”:
In the next window, click “Browse” and select the file with the image of the desired program through a regular Windows Explorer:
After that, click “Next”.
The next window will check the disk. Since we have not yet inserted the disk, we will see a message stating that it is not in the drive:
We insert the disk and wait until the information in the window is updated.
Note. If you suddenly have several disk drives connected to your computer, you need to select exactly the one into which you inserted the disk. It is selected from the “CD/DVD drive” list, as shown in the image above.
Keep in mind that you can use both CD and DVD discs for recording. The choice depends on the size of the data being recorded. Any boot program (if there is only one program and not an assembly) is unlikely to have a size larger than 700 MB, which is exactly what a simple CD disk can hold.
After you receive the message “The inserted CD-R is good” in the window (instead of “CD-R” your disc type will be displayed: CD-R, CD-RW, DVD or DVD-RW), you can move on by clicking on the bottom right "Burn CD" button:
We don't need the "Advanced Settings" button.
The following window will open and immediately begin writing the file to disk:
ATTENTION! Do not interrupt the recording of the disc, do not press the “Stop” button, because this may damage your disc!
After waiting for the recording to complete, you will receive a message in a small window about the successful completion of the operation, where you need to click “OK”:
Options for further actions will be available below. We need to return to the main menu, so we press the corresponding button:
That's all! The boot program image is written to disk and now you can boot from it and use it!
Booting a computer from a disk often requires settings in the BIOS.
I will talk about what BIOS is and how to configure it to boot from disk in a separate article a little later.
What is a computer BIOS and what is it for?
So, we recorded a boot disk with the program. Let's go further and look at how to burn a disc with a movie and music...
We burn a disc with a movie or music!
The principle of recording each of the file formats through this is similar to each other. Now let's look at how to burn a disc with a movie. In the example, I will show a DVD video recording.
Burn a disc with a DVD movie.
To record this type of disc, open the corresponding “Video” section and select “VideoDVD disc from folder”:
You will also see other possible options for burning video to disk, for example “VideoCD”. This format makes sense if the video is very small and will fit on a CD.
Let's move on to the settings window, where first of all you can specify the name of the DVD itself. You can write anything here and some DVD players will display this name on the panel. Next, use the “Browse” button to select the folder with the movie on your computer.
A DVD movie usually consists of 2 folders “AUDIO_TS” and “VIDEO_TS”. There may not be an "AUDIO_TS" folder at all, so if there is only one folder, that's okay! You need to specify the path to the “VIDEO_TS” folder.
Having selected everything, click “Next”.
Now you need to insert a blank DVD into the drive and wait until the information is updated. If the disk is not displayed, you may need to select a different drive (more details). Then click the “Burn DVD” button:
Next, the recording process will begin, after which you will receive a completion message and suggestions for further actions. I talked in more detail above when I talked about burning a boot disk with the program. Everything is similar here.
After 20 minutes (depending on the volume), the disc will be recorded, after which it can be viewed on any DVD player. This is in case the computer is not convenient (for example, the screen is small), and TVs and DVD players do not support the ability to connect a flash drive with a movie.
If you can connect a flash drive with a video file to your TV or DVD player, or your computer has a large screen where it will be convenient to watch a movie, then there is no point in burning a disc from DVD video.
There is also nothing complicated about recording a disc with music...
Record a disc with music.
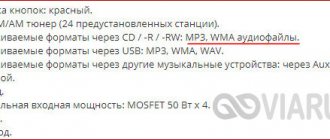
The main music format is MP3. In this format, you can fill a single CD with a hundred songs. Also sometimes they use a simple format - AudioCD. The difference is that it can only hold 80 minutes of music (usually 10-15 tracks), but such a disc can be played on any audio player, while an MP3 disc cannot be played on a player that does not support MP3. respectively.
Today, most modern players also support connecting flash drives, which eliminates the need to burn discs with music. Pumped the necessary songs onto a flash drive, stuck it into the player in the car or somewhere else and listened calmly
But still, not everyone has the opportunity to connect flash drives and listen to music from them. In this case, I’m telling you how to burn a CD with music!
So, to record music, you need to go to the “Music” section in the program and select the desired disc format:
I have outlined the main ones in the image above.
In the next window, you need to use the “Add” button to select the music files from your computer that you want to burn to disk:
In this example, I've chosen to burn a simple audio CD, so I can see the timeline below. If you are writing such a disc (which will be readable on any player), then make sure that the number of recorded minutes does not exceed 80! After all the songs have been added, you can delete anything unnecessary using the corresponding “Delete” button or continue recording.
If you are writing an MP3 disc, then instead of a minutes scale, at the bottom there will be a scale with the amount of data in megabytes, as in the example below:
For a CD, let me remind you, the maximum you can record is 700 MB. If you add so many songs that the volume exceeds 700 MB, the program will automatically switch to MP3 DVD recording mode and the scale will change its appearance to the size of the DVD disc (which will fit 4.7 GB of data):
DVDMP3 will also play successfully on MP3 players.
By selecting all the songs (regardless of the disc version) and clicking “Next”, you will be taken to the window for checking the inserted disc, from which you will proceed directly to the recording process. I have already written in more detail about these steps above and in this case there will be no differences.
So we looked at the principle of recording music and video on a disc.
And now let's look at the last option that may be useful to someone - burning a disc with any data.
Burn a disc with any files!
In addition to special formats such as DVD video, disc image burning and others, you can burn a disc with mixed content. For example, you can burn a number of folders with documents, pictures and videos to disk and give it to someone to view.
In general, such a function today, I think, is no longer relevant at all. Almost anything and any amount of data can be transmitted via the Internet. Small files are sent by mail, through social networks and chats, and large (and small documents too) can be uploaded to online disk storage and a link can be provided to anyone to view and download them.
I described what online storage is and how to use it in the article:
How to store files so you can access them from any device?
As a last resort, files can be copied to a flash drive, USB or external USB hard drive.
If you just need to store data and not transfer it to someone, then using a disk for this today would also be very strange. It is also easier to upload all the data to online disks and keep a copy on a second hard drive.
But still, someone else may need to burn a disc with mixed content, so I decided to touch on this point...
A simple disk with data can be burned without using third-party programs, directly through Windows Explorer. To do this, insert the desired disk into the drive, select it through the “My Computer” window, select the type of information to be recorded and click “Next”. Example:
To write data, it is best to select the type “USB Flash Drive” as in the image above.
And now all that remains is to drag and drop the necessary files onto the disk!
There is no need to press any separate button to record. Having transferred all the necessary files to the window, the disk can be removed. However, it will be ejected after a few seconds rather than immediately because Windows will perform a special write operation on it so that it can be read by other computers.
That's the whole process.
And using the Ashampoo Burning Studio FREE program, burning a data disc is just as easy.
You need to select the “Write data” section and the “New disk” item:
A window will open where you need to add all those files and folders that you want to burn to disk. To do this, click “Add” and select files through the Windows Explorer that opens:
The scale below shows the occupied space and, in general, how much you can write to the disk. To proceed to the entry, click “Next”.
And then comes a window checking the inserted disc, after which the recording itself occurs. I have already talked about all this above, here. Therefore, if you have a question, follow this link and read.
But most likely no questions will arise, since everything is intuitive
At this point, we looked at options for recording the main types of disks that you may still need today, despite their gradual replacement with flash drives.
I plan to write a separate article about recording programs on flash drives. Well, there’s nothing to say about recording regular files and music on a flash drive. I copied everything I needed and it’s ready!
I hope the article will be useful for beginners...
Good luck to you! All the best and see you in touch