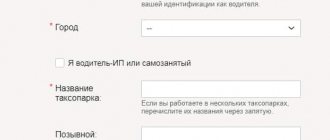
Setting up Yandex Disk is called by right-clicking on the program icon in the tray. Here we see a list of recently synced files and a small gear in the lower right corner. That's what we need. Click and find the item in the drop-down context menu "Settings".
Basic
On this tab, you configure the program to launch when you log in, and enable the ability to receive news from Yandex Disk. The program folder location can also be changed.
If you are actively working with Disk, that is, you constantly access the service and perform some actions, then it is better to enable autoloading - it saves time.
Changing the location of the folder, according to the author, does not make much sense, unless you want to free up space on the system drive, and that is where the folder lies. You can transfer data to any place, even to a flash drive, however, in this case, when you disconnect the drive from the computer, the Disk will stop working.
And one more nuance: you will need to ensure that the drive letter when connecting the flash drive matches that specified in the settings, otherwise the program will not find the path to the folder.
It’s difficult to say anything about the news from Yandex Disk, since during the entire period of use, not a single news arrived.
Synchronizing data between computers - Disk - Yandex.Help
Let's say you drew a picture kartinka.jpg on a computer disconnected from the Internet, and then uploaded a photo with the same name from your mobile phone to Drive.
When you connect your computer to the Internet, Yandex.Disk will begin synchronizing. Having detected different files with the same names, Disk will rename one of them: as a result, the files will be called kartinka.jpg and kartinka (2).jpg.
After you log in to the program, the Yandex.Disk icon in the Windows tray or in the Mac OS X menu bar displays the synchronization status:
- — all files are synchronized;
- — synchronization is in progress;
- — an error occurred during the synchronization process.
In Windows Explorer, the same icons are displayed for each file in the Yandex.Disk folder.
To see the speed of synchronization, hover your cursor over the Yandex.Disk icon: the upload and download speed will be indicated in a pop-up window.
Yandex.Disk determines which parts of the file have been changed and uploads only the changed fragments to the server, and not the entire file.
To save space on your computer, you can disable synchronization of individual folders. These folders will be deleted from the computer, but will remain available on the service page and in other Yandex.Disk applications.
Detailed instructions for setting up selective synchronization:
- in the program for Windows;
- in the Mac app.
yandex.ru
Account
This is more of an informational tab. Here you can find your Yandex account login, information about volume consumption, and a button to disconnect your computer from Disk.
The button performs the function of exiting Yandex Disk. If you click again, you will have to re-enter your login and password. This can be convenient if there is a need to connect to another account.
There is not enough space on Yandex.Disk
If there is not enough space, new files will not be able to be downloaded and synchronization will not occur.
To check, go to the cloud page and here you need to check the cloud storage fullness scale.
Yandex.Disk fullness scale
The scale is located in the side left column, at the bottom of the page.
To start synchronization, you will have to clear the storage of unnecessary files, or take measures to expand it.
How to increase disk space can be found here.
Synchronization
All folders that are in the Disk directory are synchronized with the storage, that is, all files that fall into the directory or subfolders are automatically uploaded to the server.
Synchronization can be disabled for individual folders, but in this case the folder will be deleted from the computer and will remain only in the cloud. It will also be visible in the settings menu.
Selective folder synchronization
The Yandex.Disk 3.0 program allows you to synchronize not all files from your Disk with your computer in order to save space on your computer. For example, if you often work with the Documents folder, enable synchronization for it - this folder will be stored on your computer. The remaining folders will be stored only in the cloud, but will also be available in the program.
Detailed instructions for setting up selective synchronization:
- in the program for Windows;
- in the macOS app.
Autoload
Yandex Disk allows you to automatically import photos from a camera connected to your computer. In this case, the program remembers the settings profiles, and the next time you connect you will not have to configure anything.
“Forget Devices” button unlinks all cameras from the computer.
Uploading and publishing files
After installing the program, a new disk appears in Explorer named “Yandex.Disk” . You can use it just like a regular disk, i.e. delete, copy, rename files, etc., and as soon as files are changed, the POISON icon in the notification panel makes itself known.
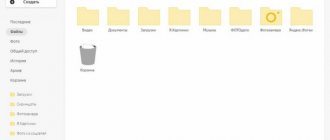
What does my Yandex Disk look like?
Public access to data
Probably the most popular use of Yandex.Disk is the ability to publicly access your data. I use this function all the time, probably like the vast majority of users of this program. Access can be given to both a separate file and a folder with data.
The idea is to create a public link, by clicking on which the person to whom you provided the link using the Web interface can download files or folders.
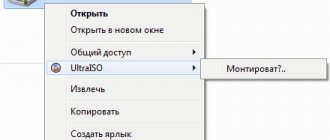
This is done very simply - right-click on the file / or folder (which we want to publish) in the drop-down menu on the Yandex Drive , select copy public link, the link is copied to the clipboard, which we then transfer to the right person in any convenient way.
We provide access to data
Setting up sharing
Another very convenient feature is sharing on your cloud storage. You create some folder on the resource and make it common to the people you select. After this, people to whom you have given access can upload their data to this folder.
Access can be full or read-only. The invitation is carried out by sending a link to the user's email address. The only condition is that your friend must have Yandex mail.
The procedure is similar to the previous one, only select the item Configure sharing . Next, enter the invitee’s email address, set the type of access (full or read) and click Invite .
Sharing
Your friend receives the letter and follows the link to your resource through the Web interface.
Screenshots
On this tab, you configure hotkeys for calling various functions, the type of name and file format.
The program allows you to use the standard Prt Scr , but to take pictures of a specific area you will have to call the screenshot via a shortcut. This is very inconvenient if you need to take a screenshot of part of a window maximized to full screen (a browser, for example). This is where hotkeys come to the rescue.
You can choose any combination, the main thing is that these combinations are not occupied by the system.
Move all files to another storage location
For help with a public message
- On the first account, move all files and folders to one folder.
From another account, open this public message and click the Save button on Yandex.Disk.
With the help of a private folder,
you can open access to folders on Drive for friends or colleagues. Once they have access, they will see a copy of the shared folder in their Drive.
Changes you make to a shared folder (such as renaming or adding a file) will be visible to all participants. Information about the changes will also be displayed in their History.
Full folder access will allow members to edit your files and upload new ones. This way you can work on the same data together.
Note. You can create 50 shared folders and accept invitations to 50 other users' folders.
- Folder Access Permissions
Proxy
You could write a whole treatise about these settings, so we’ll limit ourselves to a short explanation.
Proxy server is a server through which client requests go to the network. It is a kind of screen between the local computer and the Internet. Such servers perform various functions - from encrypting traffic to protecting the client PC from attacks.
In any case, if you use a proxy and know why you need it, then configure everything yourself. If not, then it is not needed.
Yandex Disk: how to use - step-by-step instructions
So, I convinced you, and you decided to install Yandex Disk on your computer. Now let’s take a closer look at how to use Yandex Cloud (also called Yandex.Disk, since it is a cloud data storage).
2.1. How to create Yandex Disk (registration in Yandex Cloud)
In order to start using Yandex.Disk, you need to register and create a mailbox from Yandex
(if you already have one, go straight to the second point).
After you have selected the operating system that you have installed, the download of the distribution will begin.
3. How to install Yandex Disk on a computer
. Open the downloaded file, the further installation program will start, which will end with the following message:
Personally, I always uncheck the boxes and do not install any additional applications, but you can leave them. Click the “Finish” button. Congratulations, you are amazing :)
The installation of Yandex Cloud on your computer has completed. Now in the settings you need to specify your email login and password, after which you can safely use all the functions of the cloud storage.
After installation, a Yandex.Disk shortcut will appear on the desktop:
The folder is also available when you go to My Computer:
On the Internet, you can go to Yandex.Disk from your email or via the link - https://disk.yandex.ru/client/disk
4. Installing Yandex.Disk on a smartphone
. Free apps are available for iOS and Android, so you can easily download them from the App Store and Google Play. The application for iOS does not have a very high rating, there are some shortcomings, all of which can be seen in the reviews.
2.3. Yandex Disk: how much free space?
Immediately after registering and installing Yandex.Disk, 10 free GB of space
in the Cloud. This is quite enough for a start; it lasted me about six months. What to do if there is not enough space?
- Additional free 10 GB for inviting friends
. You can get 512 MB of free cloud space for each friend you invite. Go here - https://disk.yandex.ru/invites and you will see your referral link, which you need to copy and send to your friends. After each user registers using your link, you will receive additional disk space, and the invited friend will receive an additional 1 GB.
- Additional up to 250 GB as a gift from Yandex partners
. Various promotions are regularly held that will allow you to get additional gigabytes of free space. You can track current promotions on this page.
And of course, as you can expect from Yandex, you can buy additional space
. However, the pleasure does not come cheap:
If you need a lot of space in the Cloud, but don’t want to pay, you can create several mailboxes and create Yandex.Disk for each of them.
2.3. Login to Yandex Disk
Registration has been completed, the available space has been sorted out, the question arises -?
You can view downloaded files in several ways:
1. Open the Yandex.Disk folder shortcut on the Desktop, if you did not delete it after installation.
2. Open Yandex.Disk in the My Computer folder.
3. Click on the Yandex.Disk icon in the taskbar, located in the far right corner of the screen.
4. Log in to your Yandex mail through any browser and at the top there will be a link to the Cloud:
6. Go to the Yandex main page while logged in to your email. In the upper right corner there will be a link to Yandex.Disk:
2.4. How to upload files to Yandex Disk - 7 easy ways
Let us now consider the most important point, because of which we took all these actions -. Again, there are several ways to do this:
1. Via context menu
. Select the file that needs to be uploaded to the Cloud, right-click on it and select the item: “Yandex.Disk: Copy public link”:
2. Copy the file to the Yandex.Disk folder
(I wrote above how to enter it). By default, this folder is synchronized automatically, so when you copy there, all files will be immediately added to your Disk.
3. Upload files via mobile app
iOS or Android. I can consider this method in a separate article, if you leave such a wish in the comments.
4. Upload a file to the Cloud via browser
. To do this, simply drag and drop the selected files into a browser window with Yandex.Disk open:
5. Copying other people's files
.
If someone shared with you a link to a file that is stored on Yandex.Disk, you can easily save it to your Cloud. To do this, you need to follow the sent link like https://yadi.sk/*** and click on the “Save to Yandex.Disk” button on the right. .
You can upload photos from various social networks to Yandex Disk in almost one click. To do this, go to it through a browser, select “Photos from networks” in the left column and log in to the desired social network. At the time of writing, uploading photos from VK, Instagram, Odnoklassniki, FB, Mail and Google+ is relevant. . If you install the browser extension, you will be able to save photos to your Yandex.Disk directly from the sites you visit and immediately share the link with friends. They also often ask how to upload a folder to Yandex Disk
. The principle is the same as stated above in the files section. But there is one more additional advantage - the folder can be assigned to Shared access. This way, other users to whom you grant access rights will be able to view and download files in this folder, as well as upload their own files there.
How to upload a video to Yandex Disk?
– is also a very popular question from Cloud users. This is due to the fact that video files are usually large, and many people worry that they simply won’t “fit” and cannot be stored there. This is not true, video files, just like photos, can be uploaded and stored on Yandex.Disk.
2.5. Yandex Disk: how to transfer files to another user
You can also remove access to the file by clicking the mouse and switching it to the OFF position.
If for some reason you need to remove Yandex.Disk from your computer, then you should do the same as with a regular application - use standard operating system tools.
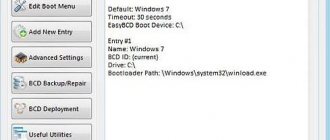
Go to: Start -> Control Panel -> Programs and Features
In the window that appears, select Yandex.Disk (usually it is the last one in the list) and click the “Delete” button. The downloaded files will remain in your account; only the application will be deleted from your computer.
Yandex.Disk is a cloud service owned by Yandex that allows users to store their data on servers in the cloud and transfer it to other users on the Internet. The advantages of using Yandex disk are obvious:
1) Everything you post on this service will be available from anywhere (where there is Internet) and from any device (laptop, tablet, smartphone);
2) Files and folders on Yandex disk can be easily transferred to another user;
3) Security of data storage. The risk of irretrievable loss of information if a hard drive/USB flash drive fails is very high. If you store files on a remote server, if the operating system is rearranged or the disk fails, your data will not disappear;
3) Cloud storage will add free space to your physical disk. In the future, cloud storage can be increased.
How to connect a Yandex drive to a network drive on Windows 7.
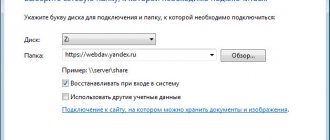
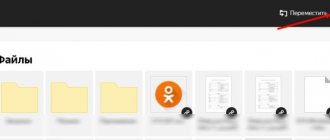
Using Yandex disk through a web page is quite inconvenient... you need to constantly visit the site, get used to the web interface, it is much easier to connect the Yandex disk to a network drive and use it just like a regular hard drive or flash drive. To do this, you need to go to Computer on Windows 7 and find the “ Map network drive”
“, press it.
In the connection window, in the “ Folder”
» enter
https://webdav.yandex.ru
Please note that the “
Restore when logging in
” checkbox is checked.
Click the " Done
" button.
The connection window will open.
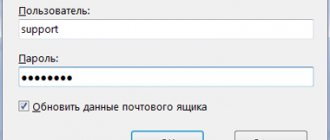
After a few seconds, a window will appear asking you to enter your login and password, enter your login and password to connect to the Yandex disk.
You will have a Yandex disk network drive, now you can use it like a regular flash drive - delete, create files and folders.
How to connect a Yandex drive to a network drive on Windows 8/Windows 8.1
Connecting a Yandex network drive to a network drive on Windows 8/Windows 8.1 is not particularly different from Windows 7. But to avoid problems with creating a Yandex network drive, I will describe how to do this on this operating system.
The first thing you need to do is go to “This PC” in Windows 8.1, this can be done by right-clicking on “ Start”
" and select "
Explorer
" or use
the keyboard shortcut +
.
After that, on the top panel, select “Computer” - “Map network drive”
.
Then in the Folder
» enter
https://webdav.yandex.ru.
Click the
"Done" button.
Method 1: When the file is placed in the cloud
Immediately after uploading a file to Yandex Disk, you can generate an address leading to it. To do this, you need to set the slider next to the name of the uploaded file to the “On”
. After a few seconds, a link will appear nearby.
All you have to do is click on it and choose how you would like to apply it: simply copy it, send it via social networks or email.
Method 2: If the file is already in the cloud
Method 3: Yandex Disk program
The dedicated Windows application also provides the ability to share storage contents. To do this, you should go to the “clouds” folder, open the context menu of the desired file and click “Yandex.Disk: Copy public link”
.
A message in the tray will confirm that everything worked out, which means that the resulting address can be pasted anywhere using the Ctrl+V key combination.
Attention! To perform the above steps, synchronization must be enabled in the program.
Additionally
This tab configures automatic installation of updates, connection speed, sending error messages and notifications about shared folders.
Everything is clear here, I’ll only tell you about setting the speed.
Yandex Disk, when synchronizing, downloads files into several streams, occupying a fairly large part of the Internet channel. If there is a need to limit the program's appetite, then you can check this box.
Now we know where the Yandex Disk settings are and what they change in the program. You can start working.
We are glad that we were able to help you solve the problem. Add the Lumpics.ru website to your bookmarks and we will be useful to you. Thank the author and share the article on social networks.
Describe what didn't work for you. Our specialists will try to answer as quickly as possible.
How synchronization occurs in Yandex Disk
Synchronization of the Yandex Disk application and the cloud service is already configured automatically. You can monitor the progress of the process in the system tray. Opposite the Yandex Disk application icon there should be one of the icons:
- Green icon with a check mark – all files are synchronized;
- Blue icon with arrows – synchronization in progress;
- Red cross – an error occurred during the synchronization process.
You can see similar icons next to files located in the Yandex Disk directory on your computer.
If you need to upload a large file to Disk, the old version of which is already there, then you may notice that this file is loaded in a couple of seconds. The fact is that in this case, not the entire file is downloaded to Disk, but only those fragments that have been changed by the user.
Are other people's folders taking up space on my Disk?
No, a shared folder only takes up space on its owner's Drive. When you accept the invitation, the service will copy the entire folder to your Disk, but the space occupied by the folder will not be taken into account. Therefore, you can accept an invitation to access a folder of any size, regardless of the size of your Disk.
If you run out of space on your Drive, you won't be able to upload files to a shared folder, even if you're not the owner of the folder. For uploading to a shared folder to be available, there must be some free space on your Disk, although the files will not take up space.