While working in the Microsoft Word word processor, many users are looking for an answer to the question of how to number pages in Word in order to assign numbers to the pages of a document. If you have a number, it is easier to find the information you need in a multi-page document; to do this you will need to go to a specific page.
Most users do without page numbers because they work with small documents. If a document has many pages, numbering will make it much easier to navigate and work with the document.
Page numbering in Word is often used for the following types of documents: coursework, abstracts, dissertations, various instructions and manuals. Based on this, users have questions about how to number pages in different cases.
Word has several ways to insert numbers in a document. This guide contains instructions on several ways to insert numbers in a Word document: automatically number pages, number pages in Word without a title page, number pages starting from a specific sheet.
The information in this article works in the following versions of Word: MS Word 2020, MS Word 2020, MS Word 2013, MS Word 2010, MS Word 2007.
How to number pages automatically in Word
First, let's look at how to do page numbering in Word in the simplest way. This is an automatic way to add numbering to all pages of a document from start to finish.
Follow these steps:
- Open the desired document in Word.
- Go to the "Insert" tab.
- In the “Header and Footers” group, click on the “Page Number” button.
The drop-down context menu provides options for selecting the location of numbers on the page:
- Top of the page.
- At the bottom of the page.
- In the margins of the page.
- Current position.
- It is necessary to select the appropriate option for the arrangement of numbers on the sheets of the document. To do this, click on the corresponding menu item.
- A window will open with examples of the location of the number on the document page. Click on the appropriate template.
Numbers will be added to the pages of the Word document in accordance with the previously selected location.
- Click on the “Close Header and Footer Window” button to exit insert mode.
Page numbering in Word 2007, 2010, 2013 and 2020
In all versions older than Word 2003, numbering is the same. The screenshots below are based on Word 2020, but they will also work for older versions.
To add numbering in an open document, go to the “Insert” tab. In the “Header and Footer” section, click “Page Number” and select a numbering position. In the screenshot below, I have chosen the footer location with centered placement.
After this action, numbering will appear at the end of each page, as well as displaying a header and footer. To close the display of headers and footers, click the “Close Header and Footers Window” button.
If desired, you can change the numbering format, for example, by making the numbers not Arabic, but Roman. To do this, again go to the “Insert” tab and in the “Page Numbers” item open “Page Number Format”.
Here you can choose the appearance, as well as which number the numbering will begin with. Why this may be required you will find out in the next paragraph.
Removing numbering from the title page
In most educational institutions, one of the requirements for document formatting is the absence of numbering on the title (first) page. If you simply enable page numbering, as shown above, then the numbering will be on the first sheet. To start numbering from the first page, but not display it on the title page, you must do the following.
Go to the “Layout” tab and click on the “Page Setup” link, as shown in the picture below.
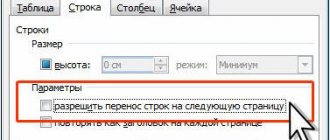
Go to the “Paper Sources” tab and check the “Distinguish between first page headers and footers” checkbox. After that, click OK.
Now numbering is carried out as before, but its number is not displayed on the first page, in our case number 1.
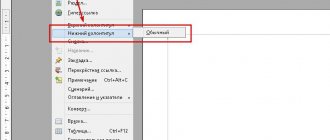
When you want the numbering not to be displayed on the first page (title page), but on the second so that it starts with the number 1, you need to set the numbering from 0 in the menu “Insert” - “Page Number” - “Page Number Format”. the first page will start with number 0 without display, and the second page will start with number 1, the third page with number 2 and so on.
Numbering from the third page
Let's complicate the task a little. We need the numbering to be present, but not displayed on the first and second pages. After all, the first page is usually the title page, the second can be a table of contents, where numbering is also not required.
To number from the third page you will need to do an operation called “Page Break”. First, return all numbering settings to default if you have hidden the numbering display on the cover page. Let's assume that you currently have numbering enabled from the first page and the number 1 is displayed on the title page, the number 2 on the second page, and so on.
For convenience, turn on the display of all characters in Word. To do this, on the “Home” tab, click on the “Display all signs” button.
Now that you have all the characters in your documents displayed, including spaces and empty lines, left-click on the last character on the first page of the document. Then on the “Layout” tab, click “Breaks” - “Next Page”.
Do the same steps with the second page of the document. If you did everything correctly, then the enabled display of all characters function will show you break lines at the end of the first and second pages. In the picture below they are shown with red arrows.
Now the third page is numbered 1. If you want it to be numbered 3, then in the menu “Insert” - “Page Number” - “Page Number Format” set the value to “Start from 3”.
There is only one problem left, on the first two pages we have page numbers displayed. To remove them, select the first page, go to the “Layout” tab - “Page Options”. Next, in the “Paper Source” tab, check the box next to “Distinguish between first page headers and footers.”
Do the same on the next page of your document.
Thus, we were able to make sure that the numbering on the first two pages was not displayed and started from the third, and from the number we wanted.
By the way, this method with a break allows you to start numbering not only from the third page, but from absolutely any one.
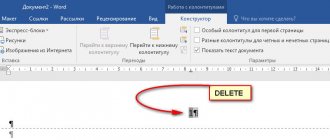
To remove numbering, double-click on any page number and press the DEL key. All numbers will be removed from the document.
How to number pages in Word starting from a specific number
Sometimes, users have questions about how to number pages starting from a certain number in order, and not from the first, as is usually done in most cases.
The following settings need to be made:
- In the Microsoft Word window, go to the “Insert” tab.
- Click on the "Page Number" button located in the "Header and Footer" group.
- Select the numbering location on the document page.
- In the context menu, click on the “Page Number Format...” item.
- In the Page Number Format window, in the Page Numbering option, enable the "start at:" option, and then select the appropriate page number.
- Click on the "OK" button.
In this case, the number you selected will be displayed in place of the first page, and then the numbers in ascending order.
How to number pages in Word without a title page
Quite often, users have a question about how to number pages without a title page. There is no page number on the title page, although it may be included in the numbering of the Word document.
When inserting page numbers, we need to fulfill the requirement: number the pages, starting from sheet 2. Go through the following steps:
- Perform page numbering automatically.
- Double-click the left mouse button on the number “1” on the first sheet of the document.
- In the “Design” menu, in the “Options” group, check the box next to “Special header for the first page.”
- Close the Header and Footer window.
After this, the number display will disappear from the first page of the document, and on the second page the numbering will continue from number “2”.
If you want to continue numbering on the second page from number “1” without taking into account the title page, follow these steps:
- Enter the “Insert” menu, go to the “Header and Footers” group, click on the “Page Number” button.
- In the context menu, click on “Format page numbers...”.
- In the “Page Number Format” window, in the “Page Numbering” option, in the “start with:” parameter, select “0”.
- Click on the "OK" button and then close the Header and Footer window.
Page numbering without a title page in Word 2020
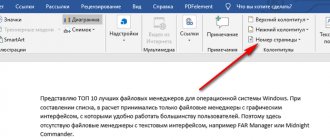
So, open the desired document. Find the “Insert” tab. In it, click on the “Header and Footer” button. In the menu that opens, select “Page Number”. A menu will open with options such as at the top or bottom of the page, in the margins, and so on.
Next, select the desired arrangement option. Headers and footers can be placed at the top or bottom of the page, in the margins. If, for example, you decide to put the classic numbering at the bottom, or at the top of the page, you will see this image:
This is a drawing for numbering from above; naturally, when numbering from below, the picture will look the other way around. The examples show what the number will look like on the page. Choose the option that you like best. In addition, in the designer menu, by selecting the “position” tab, you can adjust the distance from the top and bottom edges of the page.
When arranging pages at the top or bottom, depending on what you have chosen, you will see a dotted line in the corresponding place. This is the header and footer where the pages are numbered. After you exit the header and footer editing mode, the dotted line will disappear, but the number will remain.
It is worth noting here that the figure will not be available for change. If you need to edit page numbers, you need to double-click on the number location area and the header and footer frame will open. Now the dotted line has reappeared and you can change the numbering.
When setting up pages this way, you number starting from the first. But, most often it is necessary to start numbering from the second page, since the first one always appears as the title page. To change the numbering order, again in the “Designer” menu, select the “Options” item and in the menu that opens, check the “Special footer for the first page” item.
As a result, the number will disappear on the first page, and numbering will begin on the second. You can also format page numbers. To do this, select in “Header and Footers” - “Page Number” and there click on the “page number format” field.
After this, a window will open in which you can change the settings and make the numbering as necessary. Word can format a number, include chapters in a document, and set styles.
In the “number format” field, you can select a numeric or alphabetic display of page numbering. Digital can be configured in both Cyrillic and Latin. And at the very bottom there is a “page numbering” field with two points: “Continue” and “Start with”. Having chosen the second one, in the field next to it we indicate which number to start the designation with. By setting the number 2, your numbering will start from number 3, if 3, then from the fourth, and so on. That is, the number you enter in this field is the starting number for the first page.
How to number pages from sheet 3 or subsequent sheets - 1 way
There are situations when it is necessary to number pages from sheet 3 or any other subsequent sheet. At the beginning of the document there is often a title page or table of contents, so the numbering on these pages looks inappropriate.
You may also be interested in:
- How to remove numbering in Word
- How to make a background in a Word document - 5 ways
We use the following solution to the problem with two options:
- In a Word document, automatically insert numbers onto pages.
- Click the mouse cursor below, after the last line on the first sheet of the document.
- Open the "Layout" tab (in Word 2007 and in Word 2010 - the "Page Layout" tab), in the "Page Setup" group, click on the "Breaks" button.
- From the Page Breaks menu, in the Section Breaks group, select Next Page.
- Go to the second page of the document, place your mouse cursor at the end of the page, select "Breaks" and then "Next Page".
- Repeat this operation for those pages that should not have numbers.
- Go to the first page of the document, and then click anywhere with your mouse cursor.
- Go to the “Insert” menu, in the “Header and Footers” group, click on the “Page Numbers” button.
- In the context menu, select “Format page numbers...”.
- In the “Page Number Format” window, in the “Page Numbering” setting, in the “start with:” option, put the number “0”.
- Click on the "OK" button.
Go to the second page of the document and do the same. If you need to start numbering from “4”, “5” or another page, perform the same operation for each page.
In our document, on the first two pages there is the number “0”, and the numbering in Word starts from the third page, where the number “1” is now located. We need to remove the “0” from the first two pages of the document.
- Double-click on the number “0”, a footer will appear on the page.
- In the "Design" tab, in the "Options" group, select "Special header and footer for the first page."
- The number “0” will disappear from the document page. Repeat these steps on the second page of your Word document.
- Finally, click on the “Close Header and Footer Window” button.
As a result, there are no numbers on the first and second pages, and numbering starts from the third sheet of the Word document.
To change the numbering order, for example, if you want the third page to display "3" instead of "1", change the numbering order.
- Click on the number "1".
- Open the “Insert” menu, click on the “Page Number” item.
- From the open menu, select “Format Page Numbers...”.
- In the “Page Numbering” section, in the “start with:” setting, set the number “3”, and then save the changes.
Numbering from the second page
Quite often, the first page in a document should be the title page. According to the rules, it is not numbered. Some people do this by creating a separate document with just this sheet and creating another file with the main content. This, of course, can be done, but it’s not very convenient. It is much easier to set up the numbering in a certain way - so that it starts from the second page.
1. Number the pages in the usual way (Insert - Page number).
2. Then, in the same place, in the “Insert” tab, click on the “Footer” or “Header” button (depending on where your numbers are). And select “Change header/footer” from the list.
3. Next, a new tab “Designer” opens, where you need to click on the item “Special footer for the first page” so that a bird appears there. Then click on the “Close footer window” button on the right.
There is another way to remove the number from the first page:
In the “Page Layout” tab, click on the small button with an arrow at the bottom, where “Page Options” is.
A small window will open where you need to open the “Paper Source” tab and there check the “first page” checkbox. Well, and, of course, click “OK” for the changes to take effect.
How to make numbering in Word from page 3 - method 2
Now we will look at a similar option:
- Set automatic page numbers to Word document pages.
- Click after the last line on the first page of the document.
- In the "Layout" tab (in Word 2007 and in Word 2010 - "Page Layout"), click on the "Breaks" button located in the "Page Setup" group.
- In the “Page Breaks” context menu, in the “Section Breaks” group, click on “Next Page”.
- Double click on page 3 where you want the numbering to appear.
- In the “Transitions” group, click on the “Same as in the previous section” button.
- In the "Options" group, uncheck the box next to "Custom footer for first page."
- In the "Header and Footer" group, click on "Page Number".
- Select the location of the numbering elements, and then click on the “Page Number Format...” item.
- In the “Page Format” window, in the “start with:” numbering parameters, put the number “1” or the number “3”, depending on which number you want to start numbering on page 3 of the document.
We number sheets from the third page in a Word 2010 document (without a title page)
Sometimes a situation arises when it is necessary to number pages not from the first or even the second sheet, but from the third or fourth. The steps described above will not help to do this. Or rather, they will be needed, but already at the second stage of the numbering process. And first you need to make breaks on the sheets.
So, open the document. Since we need numbering from the third page, we therefore move to the bottom of the second page, where we place the cursor at the end of the text. Then go to the “page layout” tab. Here you need to select the “Breaks” item, where we click on the “Next page” field.
This will create a page break. After this, we number all pages in full, as described earlier. Select the desired format. As a result, the entire document will be numbered. And we need to number only from the third sheet.
Let's move on to the third page. Double click on the page number to call up the headers and footers. Select the page number (this is number three). At the top we find the “Same as in the previous section” button and turn it off.
When turned on, it is highlighted in yellow. Having disabled the button (the yellow color has disappeared), we go up to the first page, select the number and delete it with the del button. Scrolling down to the second page, we will see that its number has also been deleted. But on the third and subsequent pages the numbering remained.
How to make numbering from page 3 of a document - method 3
Using this simple method, you can remove numbering from the first pages of a document, starting to display numbers from page 3 or the next one. We use the insert shapes feature, which covers the numbers on the document page.
This method is best used when the user has already finished editing the document, in order to avoid formatting violations. Otherwise, with further editing, the formatting of the document may change, because of this, the figures may shift in space, and hidden numbers may become visible again.
In the Word file window, do the following:
- Click on the first word on the document page.
- Go to the “Insert” menu, in the “Illustrations” group, click on “Shapes”.
- Select rectangle from the context menu.
- Place a shape outline (rectangle) around the number.
- Click on the "Shape Fill" button.
- From the Theme Colors menu, select white.
The number will disappear because it is covered by the figure. On the page we still have the outline of the figure that needs to be hidden.
- Click on the "Shape Outline" button, select white color for the outline.
- Click in the Word document window.
An empty space will appear in place of the number. We hid the number with a white figure.
Do similar actions for the next, or for the next few pages. As a result, the numbering in the document will be displayed from 3 or another subsequent page.
How to change the format of numbers in pagination
If necessary, the user can change the number format used when numbering the pages of a Word document. By default, the program uses regular (Arabic) numbers.
The application provides Roman numerals, lowercase or uppercase letters of the Latin alphabet, which can be used when numbering pages, instead of regular numbers.
According to GOST, the following requirements are imposed on the numbering of documents:
- Arabic numerals are used;
- numbers are placed above the text at the top of the page;
- The numbering includes appendices and a list of references.
Some institutions and organizations use different rules for page numbering in Word.
To change the number format, follow these steps:
- Open the “Insert” tab, in the “Header and Footers” group, click on “Page Number”.
- In the menu that opens, select “Page Number Format...”.
- In the “Page Number Format” window, in the “Number Format:” parameter, select the desired format, and then click on the “OK” button.