As you create a text document, you may need to use footnotes to explain the meaning of individual words or terms.
Footnotes are especially often necessary when writing abstracts, reports, scientific articles or dissertations.
Sometimes Word text editor users create footnotes manually, but this approach is time-consuming and not very correct. Because Word has special tools for this. In this article we will talk about how to correctly make a footnote in Word 2003, 2007, 2010, 2013 or 2016.
Definition and purpose.
A footnote is something like a note to explain a word or phrase. It can both complement and clarify certain points. For example, they are often used in books to explain points, phrases or some foreign expressions.
Looks like a small number after the word above, which makes a link to a phrase or word. An explanation for it will, as a rule, be at the bottom of the page or at the end of the text itself.
They are used to ensure that the reader is not distracted from the main idea of individual sentences and can focus on the context. Often the need for footnotes arises at the bottom of the page in a term paper or when preparing any other scientific work.
As always, I will explain everything in detail and in simple terms. It is worth noting that we will consider the method both in newer offices (2007, 2010, 2013, 2020, 2019) and in the older edition of 2003. So, let’s not dwell any longer on the preface and let’s get down to business!
Converting Footnotes
To convert footnotes, follow these step-by-step instructions:
- Open dialog box «Footnotes».
Opening the "Footnotes" dialog box
- Click the button «Replace…».
Click the “Replace…” button
- From the list of conversion options, select the one you need, then click «OK».
Select the option we need and click “OK”
Now that you are familiar with adding footnotes, it should make your work in Microsoft Word much easier. Footnotes are useful for books and essential for scientific papers. If something didn’t work out for you, we recommend that you re-read the article again.
How to create a callout at the end of a page in modern Office.
First of all, I propose to consider the more current editions of Office, from 2007 to 2020. These instructions will be universal for each of these versions. Instructions for Office 2003 will be immediately after this one.
So, first you need to open the document. After this you need to: select the text to which we will refer. Or we simply move the cursor to the place of the future footnote and left-click on this place.
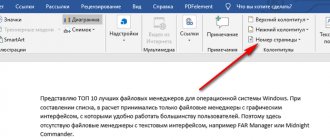
After this, pay attention to the top panel of the program window. We need the “Links” tab and in it click the “Insert footnote” button.
After these steps, we will see that the program has added a superscript number and automatically moved us to the bottom of the page in order to enter an explanation.
When adding a description, there is no need to scroll to the bottom of the sheet or document to view it. When you hover over a callout number, you will see its description in a pop-up message.
If you need to add more callouts, then simply do everything in the same way. New numbers will be added to the existing ones.
This is already enough to answer the question of how to make a footnote in Word 2010 at the bottom of the page. This instruction was only suitable for adding them at the end of the page, so let's now look at a method for adding explanation links to the end of the document.
How to remove a footnote
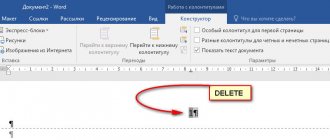
To delete a footnote or endnote, highlight its number or marker in the text and press Delete or Backspace.
Footnotes in Word 2020 – Remove a footnote in Word
If you delete one of the numbered footnotes, Word will update the numbering of the remaining footnotes.
Footnotes in Word 2020 – Update numbering of footnotes in Word after deletion
How to create a balloon at the end of a document in a modern version of Office.
So, a link to an explanation at the end of the text is called an “endnote.” To add it, you need to do the same things as in the previous paragraph. Similarly, select the text for which it is needed or place the cursor in this place and click with the left mouse button.
Go to the "References" tab at the top of the document and click the "Insert Endnote" button.
After these steps, the program will take us to the last page of the document to enter a description.
These were the basic steps, but there are more flexible and detailed options, so let's look at them.
What are footnotes?
MS Word supports two main types of footnotes: footnotes and endnotes. Regular ones are located at the bottom of the page and are separated from the main text field by a horizontal line. These are the most common, but are only suitable for posting a small number of short notes.
Regular footnotes
If you need to give detailed explanations on certain issues, indicate sources of information, provide quotes and opinions, it is better to use endnotes. For them, one or several pages are allocated after the entire information block of the document or section.
Endnotes
In addition, the marking of footnotes varies. In the last century, symbolic designations were popular. The first footnote was replaced with a “*”, the second with a “**”, and so on. Modern standards for the design of documents and printed publications recommend designating footnotes in Arabic numerals in ascending order.
Detailed callout settings.
If you need to configure more detailed parameters, we can refer to the settings window. Let's see how to do this.
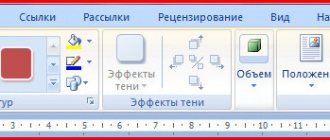
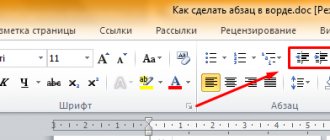
We again need to place the cursor or select the text, and then go to the “Links” tab, but this time we will need to click on the small arrow in the “Footnotes” module. I show it in detail in the screenshot.
After clicking on this arrow, a settings window will open in front of us.
Looking at this window we can set the parameters in more detail, namely:
- In the Position module, you can select the position of the leaders
- In the "Format" module, you can define the type of numbering you need or select a marking symbol. You can also choose whether you want to continue numbering them in all sections or whether you need to restart them on each page or in each section.
- In the “Apply Changes” module, you select where in the document you need to apply these parameters - in the entire document or only in the current section.
After selecting the parameters you need using the context menus, click on the “Insert” button and admire the settings you applied.
Let's now look at how to remove unnecessary explanation links.
Working with footnotes in Word
To add a footnote to text, you must first select the word or phrase that will be used as a note, and then specify the options for displaying it in the target document. This article will discuss the process of adding and editing notes, as well as setting their parameters in the Word word processor.
Adding a footnote
To include footnotes in the text of a file in Word, use the “Footnotes” section of the “Links” tab.
- To add a regular footnote placed at the bottom of the page, place the cursor after the desired word or phrase, click the “Insert footnote” button and write the text of the explanation below.
- To insert a footnote at the end of a document or section, click “Insert Endnote.” In this case, all notes created in the open document will be at the end of the section or document. Notes are numbered in the same way - end-to-end throughout the document.
By default, added notes are numbered sequentially throughout the document (the second footnote will be numbered 2, the third footnote will be numbered 3 on all pages).
Set footnote options
To edit the default settings that apply to newly created footnotes, you must click on the arrow button in the lower right corner of the “Footnotes” section.
- The first step is to choose for which notes the parameters will change: for regular or trailing notes.
- The place for explanatory text is also indicated here: for regular footnotes these parameters are “At the bottom of the page” and “At the end of the text”, for footnotes at the end of a section or document – “At the end of the section” and “At the end of the document”.
- To change the way leaders are numbered in a document, you must define the “Numbering” parameter. For example, you can specify that footnote numbering should begin again on each page, in a new section, or leave the default continuous numbering (the “Continue” option). In the same dialog box, the format of the number itself is set.
Please note that starting numbering from a new section becomes possible only if at the end of the desired section on the “Page Layout” tab, select “Next Page” from the “Breaks” drop-down menu. This will allow the program to complete the current section.
Thus, the functions built into Word for working with footnotes greatly facilitate the process of creating a well-organized logical structure of a document.
Editing Leaders
What should I do if I need to remove unnecessary callouts? It's simple. To do this, simply select the one that needs to be deleted and press “Backspace” (a key for erasing entered characters) or “Delete” on the keyboard.
After deletion, the numbers of others will be updated taking into account the deleted one. Pay attention to the first screenshot and the callout with the number “2”. After that, take a look at the screenshot below to understand how this system works.
This is where we finished looking at setting up and adding callouts on modern versions of Office. Now let's look at how to do this on an older one.
Editing footnotes
Find out detailed instructions from the new one - “How to make an underscore on the keyboard.”
You can change the basic settings for footnotes and endnotes using the advanced menu. It allows you to set the specific location of an object (1), change the type of marking (2), set the initial numbering values (3) and perform a number of other actions.
The controls listed above look like this in the dialog box that opens.
Window for editing footnote parameters
To open the expanded menu, you must click on the corner icon of the “Footnotes” field in the “Links” menu.
In the “Links” menu, click on the corner icon of the “Footnotes” field
On a note! In the end, I would like to note that you can significantly speed up the placement of footnotes by using keyboard shortcuts. Thus, the combination CTRL+ALT+F places a footnote at the bottom of the page, and CTRL+ALT+D places an endnote.
How to make a callout for the 2003 version of Office.
As we already remember, in the 2003 version of Word there is no advanced graphical interface and all options are located in multiple pop-up lists. Adding callouts is no exception.
To begin, just as in previous cases, select the desired text or place the cursor in the desired location and click with the left mouse button.
After that, go to the top of the application window and find the “insert” menu and click the left mouse button. In it, select the “link” item, hover the cursor over it and then left-click on the “Footnote” command.
The already familiar settings window will open.
Unlike the more modern version, in the 2003 edition all settings are made only in this window, regardless of the position of the future leader. I see no point in repeating what settings are located in this window. If you missed it, scroll a little higher, where I described each point in detail.
After selecting the necessary parameters, click on the “insert” button and check the presence of the newly created leader in its proper place.