First steps
Using Snapseed is quite easy. Immediately after opening the application, you will be prompted to select a photo from the gallery. And you will proceed to editing the photo, where you will see three tabs: “Styles”, “Tools” and “Export”.
“Styles” are a set of filters that can be applied to your photo. Unfortunately, you cannot customize styles manually in Snapseed.
But they can be created. Just edit the image and select the “Save settings” function. To find it, simply scroll to the bottom of the styles bar and click on the plus sign icon. You can then apply the new filter to any image.
If you want to share your style, use the QR code. After scanning it, the device automatically overlays the saved style on the image. This function is located in the Edit Filter Set menu.
Before processing the image, don't forget to look at the settings. There you can select a dark theme and change export and publishing options.
If you want to get maximum quality when saving a photo, do not forget to select PNG or JPG 100% in the “Quality and format” item.
Use the Perspective Tool
If you're shooting an image where the subject is too close to the camera, you won't have much of a background to work with. This can cause interference during the editing process as you need enough background to highlight the subject. There are also situations where you're shooting the front of a beautiful building, but it's not quite straight. Well, if you are in such a situation, you can use the Perspective tool to add more space to the background or change the perspective of the image . You can also use this tool to tilt and rotate the image. Be sure to use this tool carefully as it can distort your images if you make too many changes.
Tools
Snapseed has everything you need for basic photo editing: cropping, image rotation, double exposure, adding text and much more.
Each tool has its own parameters. To adjust an image, for example, in the Adjustments tool, you need to scroll the screen horizontally and change the brightness, contrast, light balance and highlights.
Click the checkmark when you're ready to move on to another tool. If you want to correct any step, use the “Edit filter set” button, which is located in the upper right corner. In the “View Changes” menu, you can edit all your actions, repeat certain effects, or delete them.
Many Snapseed tools have ready-made filters that already have their own automatic settings. For example, open the Curves tool and go to the Styles window. A lot of them. So take a look at everything and find the one that suits you best.
The same can be done with the Coarse Grain tool. This is where all the coolest Snapseed filters are. Some of them can be compared in quality to the set of another popular editor VSCO. Just set the grain to zero and select a style.
Snapseed
snapseed . Apple platform users have long adopted the power of the Snapseed graphics package, developed by Nik Software. Their creation has stood the test of time, gained many fans, and pragmatic users liked the speed, simplicity and quality. It is therefore logical that the search giant decided to acquire this company and speed up the process of introducing this graphics product into its ecosystem. To say that the Google Play brand store is experiencing a shortage of photo editors is to be lying. Today, everyone can choose a graphic editor and get maximum capabilities, simplicity, etc. Then why, one might ask, another one? The answer is simple - because it is different. Indeed, looking at Snapseed, you immediately get the feeling that this is something new and very interesting. The interface is friendly, and the possibilities are limited only by your imagination. Snapseed has most of the standard options, a kind of gentleman's set in the environment of graphic solutions. For example, the application has a function for changing brightness, contrast, white balance, crop, etc. By the way, the creators of Snapseed are also the authors of some good plugins for the desktop version of Photoshop. This means that we are dealing with technological photo processing algorithms. In fact, the finished works really look very, very nice, even despite the “standard filters”. What I mean by this is that thanks to the Snapseed package and seemingly “standard filters”, you can end up with an image that is much more interesting, if I may say so – brighter, juicier. I will not describe all the functions; I will only dwell on those points that attracted my attention.
Interface . This application, in my opinion, offers the highest friendliness and gives a feeling of complete comfort. At the bottom there is a set of icons that give access to everything you need at a specific step in image processing. By swiping up and down you can select the desired option (brightness, white balance, etc.), and by sliding horizontally you can strengthen or weaken the effects of the filter.
SelectiveAdjust . An interesting feature that allows you to locally edit a photo, i.e. you can put an end to it and make the face lighter or add richness to the sky, etc.
Straighten & Rotate . This function allows you to rotate and straighten a photo. A very necessary feature for those who often “overwhelm” the horizon. The implementation is beyond praise.
Filters . In general, all presented filters are implemented at a decent level, but I would like to specifically mention the Drama and Black & White filters. For example, thanks to the Black & White filter, you can turn a completely unremarkable street into a real slum or make a portrait “like film” with noise and pretty shadows. And the Drama filter will add some artistry and mystery to the photo.
Snapseed seems to be the most advanced, fast and fun image editor on Android.
Is he the best? Hard to say. But in conjunction with Pixlr Express, I definitely wouldn’t want anything else. Features: DOWNLOAD:
| Snapseed - v.2.0.93990626 | [File size - 23.4 Mb] | 2015-06-01 23:24 |
| Snapseed | 2015-06-01 23:25 |
Mask overlay
A very interesting function that allows you to remove or enhance any effect in a certain place in the picture.
In the “Edit filter set” menu, select the desired action and click on the “Mask overlay” button. All you have to do next is adjust the strength of your tool (in this case the HDR Effect tool) and drag your finger over the areas where you want a mask.
If you select the “Apply mask” mode in the menu, these places will turn red.
Snapseed: what is this app?
Snapseed is a free photo editing app from Google for Android and iOS devices.
see also
You can take great photos with your smartphone at night using manual settings.
The program offers many options for working with photos, but unlike most apps that focus on working with filters, Snapseed gives you much more control over the basic properties and structure of the image. .
You may ask: how does a free application from the largest IT manufacturer in the world compare favorably with other analogues and even paid applications? Having used Snapseed for a short but fascinating period of time, we will say this:
1. Extremely broad functionality; 2. Excellent debugging and speed of operation; 3. Well-thought-out menu (no need to navigate through submenus, looking for the right filter or tool); 4. Quality of work.
Package that includes Adobe Lightroom
In general, the program, which is not intended for professionals, will be convenient for use by users of any age and any level of sophistication. For example, in professional applications like Adobe Lightroom (also available in the AppStore) everything is not so simple.
Adding text
Just select the tool of the same name and type on the keyboard what you want to see in your photo. There are quite a lot of options for styles and fonts, so look through them all and choose the one that suits you best. From there, go to choosing the color of your text.
You can invert text in the Opacity menu. The photo will fit inside the letters, and the rest of the screen will be filled with the color you chose for the text. This may be useful for those who want to quickly make a logo.
"Mask overlay" will allow you to hide part of the text or remove it to the background. Just set the effect of the “Text” tool to 0, and then carefully paint over the part that should be in front with a mask.
Extension
A tool that will allow you to increase the size of your photo and level its horizon. It has three main fill modes: black, white and smart. The most interesting is the last one, however, it works far from ideal. If you need to expand the photo a little around the edges, then use a white fill, it certainly won’t make things worse, and if you like experiments, then try the [Smart] mode.
Framing, perspective and expansion
Each of these tools will allow you to change the size or format of the image, as well as hide unnecessary elements (this could be trees or corners of houses).
If in the Crop tool you simply select the image size you need, then Perspective will help you correct the distorted perspective in the photo. Use drag and zoom gestures and the app will automatically fill in the empty edges of your photo.
The Expand tool automatically enlarges your photo and straightens the horizon. In it you can choose three fill modes: “Smart”, “White” and “Black”. But the first one does not always cope with the task correctly. So it's better to use a regular white fill.
Cropping
A tool designed to change the size and format of your image. Ideal for those who post photos on Instagram. Using this function is very simple, you just need to follow these steps:
Select the [Crop] tool, then, depending on our needs, leave it either in a custom format or set it to a square. Now you can crop the photo and remove parts you don't need by dragging the corners to the position you want.
Portrait processing
To do this, Snapseed offers you five tools. The first one is called “Portrait”. There are several styles of face lighting here. You can also adjust the chiaroscuro correction, skin smoothing, and eye brightening for a more noticeable glow.
The Head Position tool will also come in handy. Just move your finger slowly across the device screen and you will be able to choose the perfect angle.
And in this tool you can change the size of the pupils and the tips of the mouth. Ideal for those who want to add a smile to their photo.
“Blur” will hide unnecessary details in the photo. Snapseed automatically detects an elliptical area around the face and leaves it untouched while blurring everything else.
If you want to achieve a bokeh effect, be sure to leave enough detail in focus. This way you will avoid the effect of freezing in space, and your photography will become more professional.
Using the “Spot Correction” you can get rid of small imperfections on the face or cover up an extra fragment, and the “Brush” tool will make your photo brighter or, conversely, darker.
Snapseed how to use
So, we need to answer the main question, Snapseed, how to use it? It's actually a user-friendly program. Follow a simple scheme for using the program:
- download and install it on your mobile device;
- launch the Snapseed application on your phone;
- take a photo of your face and add the photo to the application using the “Add” button;
- then click on the “Tools” tab;
- select the tool you need to change the photo, for example, correction;
- Next, open this tool and swipe your finger on the photo to make changes to it;
- Click on the checkbox on the right side of the application to save the processed photo.
This application is free and even a beginner can learn to use it. Next, let's work with it in practice.
Snapseed, how to use it on Android and iPhone
First, let's look at the use of the Snapseed program in phones developed on the Android platform. So, launch the program on your phone (Screen 2).
Next, a window will open in which there will be a message - “Click anywhere to open the photo.” Click on the selected location in the application and add a photo from your phone to it.
When the photo is loaded into the application, the control panel will be displayed (Screen 3).
All we need to do is select the management section – “Tools”. Select it and set the brightness correction on the photo.
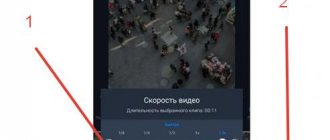
For example, you need to take a light photo. We swipe up or down on the phone and the brightness of the image will change noticeably.
You can set the sharpness of the photo by first selecting this settings option from the “Tools” section.
If we click on the “Brush” tool, we can paint the background of the image with different colors. For example, a picture requires red color. Select it from the color palette and drag your finger around the photo to paint the background of the picture red.
You can use this application on iPhone. It works in the same way as on Android.
Is it possible to use Snapseed on a computer?
You can use the Snapseed program on your computer. There are two ways to do this:
- Using the Android Bluestacks emulator.
- Use the program online via Google.
We will not describe the entire operation of the program here. Let's just say that in Bluestex, working with this program will be inconvenient if you have a weak computer.
Find this program in the emulator, then open it. You add photos to it and edit it, as we discussed above on the phone. All actions will be the same, because this is an Android emulator.
We will look at the online program a little lower in the article.
How to use Snapseed online
So how do you use Snapseed online? The Google Photos service, which works on the basis of this application, will help you with this.
We open the Google browser on the computer and click on the list of applications from which we select “Photos” (Screen 4).
This is the Snapseed application from Google, which is available online.
Next, go to it and click the “Upload” button to add a photo from your computer to the program (Screen 5).
Then, click on the “Edit” button to edit the photo (Screen 6).
In the photo editing panel, you can select a color style and increase or decrease the brightness of the photo. Next, click the “Done” or “Download” button to save the modified photo to your computer.
The online service has few functions for photo editing, so it is better to use the application.
Download and use the Snapseed app
Snapseed is available for Android and iPhone and is free to download and use. Download it on your device to start using it. No registration required, no subscription, just give the app access to your images and camera and that's it. Since I'm using the Android version, this tutorial will follow that. The iOS version may be slightly different, but should be largely similar, if not the same.
- Open Snapseed on your device.
- Click the "+" icon in the center and select an image from your gallery.
- Select Looks or Tools at the bottom of the page to access many of Snapseed's features.
See
It looks like filters, essentially. They are pre-programmed and offer a selection of views that can save time on manual editing. Select Looks and a slider will appear at the bottom of the screen. Scroll and select Look to filter the image. Select one if you like it, or tap Back to leave the screen.
tools
The tools are where the real strength of Snapseed lies and where most of the learning curve lies. There's a selection of tools, from brushes, healing tools, to dramatic filters and vignette tools. This is probably where you'll spend most of your time when using the app.
export
The third tab at the bottom is “Export” and allows you to save images in various formats. Saving is the only place where Snapseed lets you down. There is one save that records your changes. There is no autosave and you cannot unsave. Where other image editors will allow you to save and then undo the changes, once you save the change in Snapseed, you're done.
Save as is a way around this and you'll find the option under Export. If you simply select Save, Snapseed will overwrite your original image with your edited one. You must manually save a copy to preserve the original.
Snapseed 2.0 update
In April 2020, Snapseed released a great update. A large range of new tools and features have been added. These new features allow you to gain new knowledge in photo editing using Snapseed.
Just recently another update brought back the Grunge filter (which was removed in the previous update), along with several other tweaks and improvements.
I don't think I'm exaggerating when I say this is probably the best and most comprehensive update I've seen. What was once just a great photo editor is now a must have. Almost every photo will be edited using Snapseed at least once.
The entire look and feel of the app has changed in Snapseed 2.0. These were such drastic changes that those who have been using the application for a long time were initially confused when they first opened the application after the update. But the new format is so intuitive that users didn’t get confused for long!
The application has two sections for editing: tools and filters. The Tools section includes all the tool settings that Snapseed offers, while the Filters section contains a wide range of adjustable preset filters.
Since the app has many features, it will take several articles to explain how to use all the tools. In this first tutorial I'll be focusing on basic editing tools, but be sure to take the time to read further articles where we'll look at advanced editing tools and filters.
Before we start looking at the main editing tools, it's worth noting some other improvements that make Snapseed much more advanced.
Snapseed 2.0 Screen Structure
The new screen layout is designed in such a way that everything you need is at hand. When you open a photo in Snapseed, you have several options across the screen.
In the top right corner you can open a new photo. If you tap Open, you can open a photo from your Camera Roll, use the camera to take a photo, paste a photo you copied from elsewhere, or simply open the latest image on your device.
The Edit button (pencil icon in a large white circle) at the bottom right of the screen provides access to editing tools and filters.
When you're done editing the image, you can click the Save button at the top of the screen. Next to the Save button there is a Stacks icon (Stacks are discussed below).
There are three vertical dots nearby. Clicking on these dots brings up a menu where you can undo the edit, go back to the original image, share the image on various social networks, open the edited image in another application, get help, get feedback, adjust settings and get detailed information about the photo.
Stacks
A significant improvement in the new version of Snapseed is that the edits are not permanent. This means that you can return to any previous point during the editing process at any time. In the old version of Snapseed, the only option was to go back to the original image and have to start over. Edits are now reflected in “stacks”.
At the top of the screen (next to the Save button) you will see a number. It shows how many edits you have in the current stack. Clicking on this number displays a list of edits you have made on the right side of the screen.
You can use this list to visually go back in time, reapply any adjustments, remove an edit, paint something with a brush, or use any applied effect.
This is a fantastic opportunity. This gives editing more flexibility since you can change any part of the process at any time. The stack brush allows you to remove a specific effect or edit part of an image by touching the area you want to remove.
Zoom function
Another interesting improvement is that you can now zoom in on the object you're editing. This means you can see how your changes to individual parts affect the entire image. This also makes the editing selection tool easier to use than in previous versions of the app.
Using the Vintage Tool in Snapseed
The vintage tool is one of my favorite tools in this application. Although I call it a mood filter, technically it's not. This is a quick way to add real character to an image and make it look like a scene from True Detective or taken from a magazine set in the 1950s.
- Open your image.
- Select Tools and the Vintage tool.
- Browse through the different filters below until you find one you like.
- Select the checkbox once done.
In addition to the predefined filters, there is a color balance tool at the bottom of the window. If you haven't found a filter that suits you, find the next best one and use this mixer icon to play with the colors. Then check the box to commit the changes.