What is MySQL?
MySQL is a free relational database management system. MySQL is developed and supported by Oracle.
MySQL is a very popular DBMS, it is actively used on the Internet as a data storage system for sites, in other words, the vast majority of sites on the Internet use MySQL to store their data.
The note! What is a DBMS.
I recently conducted a data analysis of several official DBMS popularity rankings and other statistical information to determine which DBMS is truly the most popular, and as a result, MySQL is currently the most popular DBMS in the world. You can familiarize yourself with all the results of my analysis in the material - TOP 5 popular database management systems.
MySQL 8 editions
MySQL 8 comes in several editions.
MySQL Standard Edition
MySQL Standard Edition is an edition with standard functionality, it allows you to implement high-performance, reliable and scalable applications.
MySQL Enterprise Edition
MySQL Enterprise Edition - this edition includes full functionality and a set of additional tools that are designed to achieve the highest scalability, security and reliability.
MySQL Cluster Carrier Grade Edition
MySQL Cluster (CGE) is a distributed database that combines linear scalability and high availability. It is designed for mission-critical applications.
MySQL Community
MySQL Community Edition is a free edition that can be absolutely freely downloaded from the official MySQL website. The editors support all the necessary functionality for the implementation of full-fledged Internet resources.
You can read more about MySQL editions on the official website - https://www.mysql.com/products/
Step-by-step installation of MySQL 8 on Windows 10
Now we will take a step-by-step look at the entire process of installing MySQL 8 in the Community edition on the Windows 10 operating system.
In addition to the MySQL server, we will also install MySQL Workbench - this is a tool that is used to develop databases and administer MySQL Server.
Note! Installing MySQL 8 on Windows 10 requires Microsoft .NET Framework 4.5.2 or later.
Step 1 – Download MySQL 8 for Windows 10
To proceed with installing MySQL 8, you first need to download the distribution kit of this program.
You can download MySQL 8 in the Community edition, as already noted, absolutely free from the official website, here is the link to the download page - https://dev.mysql.com/downloads/installer
After going to the page, you can choose how to download the distribution; we are offered two methods:
- Download the Web installer - a small program that downloads all the necessary components to install MySQL. Can be used to install MySQL on computers with Internet access;
- Download the full installer - a MySQL program distribution that includes all the necessary components. In this case, you can use this distribution to install MySQL on a computer with or without Internet access. For example, you can download this file on a computer where there is internet, and use it to install MySQL on another computer that is without internet.
For example, let's download the full distribution of the MySQL program; to do this, click “Download” next to the corresponding item.
Then we are asked to log in using our Oracle credentials, if we have them, or to register, thereby creating an Oracle account. However, if you do not want this, then at the bottom there is a link “No thanks, just start my download”, clicking on which will immediately start downloading MySQL.
Click on this link and wait for the download to complete.
As a result, you should download the file mysql- installer- community-8.0.18.0. msi file is approximately 415 megabytes in size.
Step 2 – Run the installation and select the MySQL installation type
Next, run the downloaded file, which will eventually launch the MySQL installer. First, select the installation type.
We are offered several options:
- Developer is the default option, it involves installing everything that a developer needs, including MySQL Server, MySQL Workbench and other tools for working with MySQL;
- Server Only – this option involves installing only the MySQL server;
- Client Only – this option involves installing only the client part for working with MySQL Server, i.e. the server part will not be installed;
- Full – installation of all components included in the distribution;
- Custom – custom installation, in this case you can install only what you need.
The default option, i.e. Developer is suitable for most cases, especially if you install MySQL on your home computer for some of your own purposes (learning MySQL, learning SQL, and so on).
I leave this option, click “Next”.
Note! The installation program interface, like the MySQL Workbench program interface, is in English.
Step 3 – Check and Install Additional Components
The installer will then check your system for components that are required for some MySQL extensions to run. In my case, the installer gave two warnings for the MySQL For Excel and MySQL For Visual Studio extensions. If you plan to use these components, you will need to address these concerns. To do this, in turn, you need to install these components (i.e., select them and click “Execute”; some may be installed automatically).
However, if you do not use the MySQL For Excel and MySQL For Visual Studio extensions, you can immediately click “Next”.
The note ! Installing Visual Studio 2020 Community on Windows 10.
The installation program will issue a warning regarding the absence of some components, click “Yes”.
Step 4 – Installing MySQL Components
Everything is ready to install MySQL, at this step the installation program will display all MySQL components that are ready for installation, click “Execute”.
As a result, the sequential installation of MySQL components will begin.
Step 5 – Complete installation of MySQL components
When a green check mark appears next to each item, the installation is complete.
Click “Next”.
Step 6 – Configuring MySQL Components
All components are installed, but not all are configured, so we need to configure them. The installer will show you which specific components need to be configured. In our case, these are MySQL Server, MySQL Router and Samples and Examples.
Click “Next”.
Step 7 – Configuring MySQL Server (High Availability Option)
First, we definitely need to configure MySQL Server.
First of all, we configure the “High Availability” parameter, which is responsible for how the MySQL server will be installed. In our case, as in most others, the standard “Standalone MySQL Server” is required - this is the classic option for installing MySQL Server.
Therefore, select the first item and click “Next”.
Step 8 – Configuring MySQL Server (Type and Networking)
Next, we configure the server type and network. In our case, we can leave everything as default:
- Type – Development Computer;
- Protocol – TCP/IP;
- Port – 3306;
- The “Open Windows Firewall ports for network access” checkbox must be checked.
If necessary, you can fine-tune MySQL Server using advanced parameters. To do this, check the “Show Advanced and Logging Options” checkbox.
To continue, click “Next”.
Step 9 – Configuring Authentication Method in MySQL Server
MySQL version 8 supports a new authentication method, which is recommended to be used, leave it as is and click “Next”.
If necessary, you can select the second item, which was used in MySQL 5.
Step 10 – Setting up MySQL Users
After this, we need to come up with a password for the root user (this is the main MySQL administrator).
In addition, we can add additional users; to do this, you need to click on the “Add User” button.
And enter the required data:
- User Name – enter the user name;
- Host – leave “All Hosts”;
- Role – select the user role;
- Password and Confirm Password – we come up with and enter the password that this user will have.
Click "OK".
After this, the user will be created.
Click “Next” to continue.
Step 11 – Setting up MySQL Service on Windows
Now we need to set up a MySQL service that will run on Windows.
We can ask:
- Windows Service Name – Service name;
- “Start the MySQL Server at System Startup” – if this checkbox is checked, the MySQL service will start when Windows starts;
- Run Windows Service – under which account the MySQL service will run in Windows. Standard System Account is a system account.
You can leave everything by default, that's what I do.
Click “Next”.
The note! "God Mode" in Windows - what is it and how to enable it in Windows 10?
Step 12 – Applying MySQL Server Settings
All MySQL Server settings are configured, but we still need to apply and save them. To do this, click “Execute” on the next window.
Step 13 – Completing MySQL Server Setup
When all the checkboxes are checked and the message “Successful” is displayed, the process is completed, click “Finish”.
The MySQL Server status will be changed to "Configuration complete".
To continue setting up, click “Next”.
Step 14 – Configuring MySQL Router
In this case, we are offered to configure the MySQL router, but this is not necessary, we can immediately click “Finish”.
To move on to setting up the next component, click “Next”.
Step 15 – Installing Test Data on MySQL
Next, we can install test data on MySQL Server, for example, for training. To do this, enter the Root user password and click “Check” to check, if the connection is established, then everything is fine and you can continue.
Click “Next”.
To apply all parameters and start extracting test data to MySQL Server, click “Execute”.
The process is complete when the checkboxes are checked and the “Successful” message is displayed.
Click “Finish”.
Step 16 – Finish Configuring MySQL Components
All components are configured. Click “Next”.
Step 17 – Completing the entire MySQL installation and configuration process
MySQL Server and all the components necessary to work with it are installed and configured: this includes MySQL Workbench, various connectors, documentation, and even a test database.
To immediately start MySQL Workbench after installation is complete, check the “Start MySQL Workbench after Setup” checkbox.
Click “Finish”.
The note! Installing Microsoft SQL Server 2020 Express on Windows 10.
Installing MySQL server 5.7.11 on Windows 7 step-by-step instructions
1.
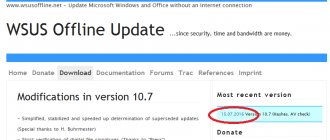
Download MySQL 5.7.11 for Windows
We go to the official website of the product ( https://www.mysql.com/downloads/ ) and the page for downloading free components ( https://dev.mysql.com/downloads/ ).
Go to the MySQL Community Edition tab
Select downloads community server
When downloading, carefully select the installer without confusing the computer system type bit-32 and bit-64 Windows 7. Although a 32-bit program will run on a 64-bit processor.
To download, select MySQL Installer MSI
For convenience, from the MySQL installation methods we take not the ZIP archive, but the MSI Installer. This is an automatic installer that will download selected software products via the network. The disadvantage of the file is that it only works on machines connected to the Internet, but it is compensated by the ease of installation.
You don't need to register to download MySQL
Let me remind you that you can see the system type of your machine in the Start→Computer→Properties→System Type menu.
Checking the processor type on the computer 2.
Running the installer
We check the downloaded exe file for viruses with our antivirus program. If the file was taken from the official website, it is guaranteed to be safe.
Launch the MySQL 3 installer.
Incidental installation of software products
To install the MySQL server, two required programs must be installed on your computer:
- .NET Framework 4
- Visual Studio C++
By default, Windows 7 is already equipped with these programs, although there may be smaller versions.
When you run the MySQL installer, it will inform you about the need to install the necessary software products. As far as I remember, the installer will download the necessary programs. If not, install them yourself. There is nothing complicated about this, but you can read from me:
- Install .NET Framework 4
- Install Visual Studio C++
4.
License Agreement
We continue with the MySQL installation. License Agreement window. This is standard license signing.
installation of MySQL server 5.7.11 on Windows 7 license agreement 5.
Choosing a Setup Type
It is at this stage that we select the installation type, or rather, the MySQL kit to be installed.
- Developer Default (MySQL Server, MySQL Workbench, Connectors included)
- Server Only – select and install it, server only.
- Client Only
- Full (MySQL Server, MySQL Workbench, Connectors to choose from)
- Custom
If you clearly understand what you are doing, you can select Custom and in the set of software products, select the desired package.
By default, the DBMS will be installed in the folder: C:\Program Files\MySQL\MySQL5.7
Let me explain once again why you might find it useful to install Server Only. For example, you do not use Visual Studio on your computer or you are studying the SQL language and want to understand from the inside how to work with databases from the command line, and not “play” with visual pictures.
6.
Installation
Installation server mysql 5.7.11
7.
Product Configuration
Installing the MySQL 8 configuration.
Type and Networking
Type and Networking MySQL 5.7.11
On the local machine, MySQL supports the TCP/IP port - check the box;
Please note: If you check the box: Open freewall port for network access, you will not need to make additional permission settings in the Windows 7 firewall.
9.
Account and Roles
Set the MySQL password
Here we need to set a password for working in MySQL. Let's not break traditions and set the password: root . By the way, you won’t be able to get to the next page without setting a password.
Set the MySQL 10 root password.
Windows Server
This is the MySQL startup settings window. If you need the server to start when the machine starts, then select the checkbox, as in the photo. If you want to run it as needed, do not select the checkbox (it’s better to check the box).
MySQL configuration for Windows server
Here we slow down: Look at the checkbox: Show advanced options (show additional functions).
11.
On the next page the service will be filled with configuration, which will be indicated by green checkmarks.
12.
Installation completed
All! Installation of MySQL server 5.7.11 on Windows 7 is completed. You can make a copy of the entry to the clipboard and put it on your desktop.
installation of MySQL server 5.7.11 on Windows 7 is completed
Launching MySQL Workbench
After installing MySQL, all the necessary shortcuts that you can use will appear in the Windows 10 menu. For example, you can use the corresponding shortcut to launch the MySQL Workbench 8 environment.
The note! If you are interested in SQL and T-SQL, I recommend taking our T-SQL courses, with which you will learn from scratch how to work with SQL and program using the T-SQL language in Microsoft SQL Server.
Part 1: Checking configs
In version 8 of MySQL, query_cache was removed.
In fact, it was deprecated in version 5.7, but has now been removed completely. Accordingly, it is necessary to remove the associated directives. And to cache queries, you can now use external tools - for example, ProxySQL. Also in the config there were outdated directives about innodb_file_format. If in MySQL 5.7 it was possible to select the InnoDB format, then the 8th version already works only with the Barracuda format.
Our result is the removal of the following directives:
- query_cache_type, query_cache_limit and query_cache_size;
- innodb_file_format and innodb_file_format_max.
To check, we will use the Docker image of Percona Server.
We will place the server config in the mysql_config_test directory, and next to it we will create directories for data and logs. Percona-server configuration test example: mkdir -p {mysql_config_test,mysql_data,mysql_logs} cp -r /etc/mysql/conf.d/* mysql_config_test/ docker run —name some-percona -v $(pwd)/mysql_config_test:/etc /my.cnf.d/ -v $(pwd)/mysql_data/:/var/lib/mysql/ -v $(pwd)/mysql_logs/:/var/log/mysql/ -e MYSQL_ROOT_PASSWORD=${MYSQL_PASSWORD} - d percona:8-centos Result: either in the Docker logs or in the directory with the logs - depending on your configs - a file will appear in which the problematic directives will be described. Here's what we had:
2020-04-03T12:44:19.670831Z 0 [Warning] [MY-011068] [Server] The syntax 'expire-logs-days' is deprecated and will be removed in a future release. Please use binlog_expire_logs_seconds instead. 2020-04-03T12:44:19.671678Z 0 [Warning] [MY-013242] [Server] --character-set-server: 'utf8' is currently an alias for the character set UTF8MB3, but will be an alias for UTF8MB4 in a future release. Please consider using UTF8MB4 in order to be unambiguous. 2020-04-03T12:44:19.671682Z 0 [Warning] [MY-013244] [Server] --collation-server: 'utf8_general_ci' is a collation of the deprecated character set UTF8MB3. Please consider using UTF8MB4 with an appropriate collation instead. Thus, we still needed to figure out the encodings and replace the outdated expire-logs-days directive.
Connecting to MySQL using MySQL Workbench
To connect to the MySQL server and look at the database objects, tables, views, and so on, run MySQL Workbench, for example, as above. As a result, MySQL Workbench will open, where on the start page we will already have one connection to the local server, which will be made as the root user.
Click on it.
Then enter the password to save it and not have to enter it every time you connect, we can check the “Save password in vault” checkbox.
Click "OK".
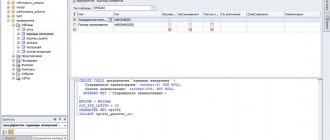
As a result, we will connect to the server, and to look at the data schema, we need to go to the “Schemas” tab in the navigator window.
In addition, we can hide unnecessary windows by using special icons in the upper right part of the MySQL Workbench environment.
The data schema will be displayed; now we can see what objects are in the database and, for example, learn to write SQL queries.
For clarity, I have hidden the side window.
In this example, we sent a SELECT query to retrieve data from the address table. As you can see, the data is back and everything is working.
The note! You can find even more articles on various DBMSs in the section of the site - Databases and SQL language.
Working with Oracle, SQL Server, MySQL databases - JetBrains DataGrip 2020.1
JetBrains DataGrip
is the latest software, which is a functional package of tools for working with Oracle databases, SQL Server, MySQL, Sybase, HyperSQL, DB2, SQLite, etc. A product with a multi-cursor text editor, syntactically highlights code, supports work with control systems for Subversion, Git, etc. Code generation, working with databases thanks to a functional tool. Efficient graphical interface for creating, adding and making changes in tables or columns with the corresponding script. Changes made by copying the generated DDL query can be put into the editor, then simply working with the code. Maintaining DataGrip automatic code completion, increasing the speed of writing queries. When typing code, the IDE perceives the context and does the work itself: writes code based on keywords and names of database objects, takes into account dependencies when creating JOINs, selects parameters for implementing a function, characterizes the table in INSERT statements. Adaptation of IDE for basic objects.
System requirements:
Operating system
(64-bit versions only): Microsoft Windows 10 / 8.1
Minimum:
RAM: 2 GB Disk space: 2 GB Screen resolution 1024x768
Recommended:
RAM: 4 GB or higher Disk Space: 5 GB SSD recommended for optimal performance Monitor resolution: 1920x1080
Torrent Working with Oracle, SQL Server, MySQL databases - JetBrains DataGrip 2020.1 in detail:
DataGrip
is a multi-core database. If your DBMS has a JDBC driver, you can connect to it via DataGrip. It provides database introspection and various tools for creating and modifying objects for supported engines: ·Database Objects DataGrip analyzes all the objects in your databases and displays them in folders grouped by schema. It also provides an interface to add and edit tables, columns, indexes, constraints, etc. Data Editor A powerful data editor allows you to add, delete, edit and clone data rows. Navigate through the data using external keys and use text search to find anything in the data displayed in the Data Editor. navigation ·Fast navigation takes you to an object, whether it was just created in your code or already read from the database. Going to the action symbol allows you to find objects by their name. Writing SQL
Like any decent IDE, DataGrip provides intelligent code completion, code review, live error highlighting, quick fixes, and refactoring capabilities. This saves you time by making the process of writing SQL code more efficient. ·Smart Text Editor As with any IntelliJ IDE, DataGrip includes a code editor to help you be more productive. Transform and move blocks of code, use multi-cursors to control selection, format code to match a specific style, and much more. ·DataGrip Code Completion provides context-sensitive, schema-aware code completion, helping you write code faster. Completion knows the table structure, foreign keys, and even the database objects created in the code you edit. ·Code Generation Forget about writing typical code by hand: DataGrip does it for you. It generates code to modify objects such as tables, columns, etc. based on the user interface. Moreover, it helps you get DDL for tables and provides DML queries from result sets. ·Code Analysis and Quick Fixes DataGrip identifies possible errors in your SQL code and suggests the best options to fix them on the fly. It will immediately inform you about unresolved objects, the use of keywords as identifiers and will always suggest you a way to solve the problem. ·Refactor and find using DataGrip to correctly resolve all references in your SQL files. When you rename database objects from SQL, they will also be renamed in the database. You can quickly find which stored procedures, functions, and views use your tables. ·Customize the appearance DataGrip comes with dark and light themes. Each of them can be fully customized, so you can create the one that suits you best. The same works for over ten pre-configured keymaps. Executing queries
The Query Console in DataGrip is a basic necessity for any SQL developer. Create multiple consoles, each with its own schema and query parameters. ·Query Console Specify the console behavior for executing queries: choose whether you want to execute the smallest statement or the largest. ·Local History Each console supports schema switching and provides local history to keep track of all your activity, protecting you from losing any of your work. ·Diff viewer Use the diff viewer to compare two console snapshots in local history or two query results. DataGrip highlights the differences between them and allows you to control the level of comparison criteria using a tolerance parameter. Import/Export Options
Import data from CSV or any DSV file. DataGrip also has a powerful mechanism for exporting data to various formats. You can even create your own export formats. ·Import CSV Enjoy a dedicated user interface to import CSV and TSV files into your database. You can map each column of the imported file to a table column in your database, which can be an existing table or a new table created during the import process. ·Export as text Any table or result set can be exported to a variety of formats, including CSV, JSON, XML, and HTML. You can even create your own export format. ·Export as queries Any table or result set can also be represented as a batch of UPDATE or INSERT statements, which can be useful for changing data. Miscellaneous Features
Among other things, DataGrip comes with support for custom options, a CSV editor, a chart builder, version control support, and many more features. ·Custom Parameters DataGrip supports running parameterized SQL queries. Add your own parameter patterns using regular expressions and select the SQL dialects to which these patterns will apply. ·VCS support DataGrip provides a unified interface to most popular version control systems, providing a consistent user experience with Subversion, Git and GitHub, Mercurial, CVS, Perforce and TFS. ·Charts Explore your tables and their relationships with an insightful chart.
Treatment procedure:
1.Run the program and select evalutate free. 2.Drag the jetbrains-agent.jar file into the IDE window. 3.Restart the IDE. 4.You will see the JetbrainsAgent Helper dialog box. Select the license type (select "License Server") and click the "Install" button. 5.Restart the IDE Done.
Screenshots Working with Oracle, SQL Server, MySQL databases - JetBrains DataGrip 2020.1 torrent:
Download Working with Oracle, SQL Server, MySQL databases - JetBrains DataGrip 2020.1 via torrent: