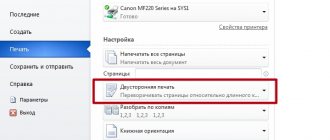
How to make a presentation: step-by-step instructions
A presentation is a brief and intelligible presentation of information that allows a person to explain the essence of the issue much more effectively. Presentations are created by many users at different stages of life: schoolchildren, students, businessmen, etc. Today we will take a closer look at creating a presentation.
First of all, a few words about the program for creating presentations. Today there is a fairly large selection of office applications, some of which are distributed on a paid basis, while others are completely free. These include LibreOffice, OpenOffice, Microsoft Office and many others. Today we will look at the process of creating a presentation using the example of perhaps the most popular program for these purposes - Microsoft PowerPoint.
A few words about the material
Before you start creating a presentation, you must take care of the material:
1. Text.
Of course, the entire textbook should not fit into the presentation. The presentation should include the shortest possible text that will eloquently speak about the essence of the issue and explain certain important points.
2. Pictures.
A presentation without pictures not only looks dull, but can also explain the topic that concerns you less clearly to your audience. Use both your own pictures and those downloaded from the Internet in your presentation. The main thing is that the pictures are strictly on topic.
3. Graphs and diagrams.
Graphs and diagrams are developed during the presentation process. Another good way to clearly demonstrate information.
4. Video and music.
Optional, but if you have video or audio related to the topic, you can add it to your presentation.
5. Plan.
Without a pre-created plan, presentations, in most cases, completely lose their information content. Be sure to set the goal of the presentation, think step by step where the presentation will begin, how you will get to the heart of the matter, and how it will end.
Getting started in Microsoft PowerPoint
Creating and deleting slides, setting up a template
Each presentation has separate slides that briefly demonstrate certain information.
To add a new slide to PowerPoint, in the “Home”
Click on the
"New Slide"
.
If you click on the icon itself, a simple slide will appear on the screen, which can be modified later if necessary. If you click on the “New Slide”
. An additional menu will appear on the screen, in which you will immediately be asked to select a slide template.
Switching between slides is carried out in the left area of the window, where their thumbnails are located. If necessary, slides can be moved to a new position in the presentation. To do this, hold the mouse cursor on the slide, and then move it to a new presentation area. As soon as you release the mouse button, the slide will lock in its new position.
Extra slides can be deleted. To do this, right-click on the slide thumbnail and in the window that appears, select “Delete slide”
.
If you want to change the slide template, then right-click on the slide and in the window that appears, go to “Layout”
. An additional window will open on the screen in which you can select a new template for the slide.
Change the appearance of your slides
All slides are white by default. To add variety to your slides, you can give them a new background.
To do this, go to the “Design”
and pay attention to the
“Topics”
. There is already a set of selected themes where the fonts and background are configured. If you're in a hurry, use themes for your slides.
To see how a theme will look on your slide, just select the slide thumbnail and hover your mouse over the theme you like. If you like the theme, apply it by simply left-clicking on it once.
After applying the theme, the “Options”
. which provides several options for the appearance of your theme.
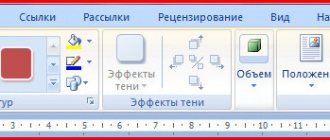
Even further to the right is the “Background Format”
. By clicking on it, an additional menu will open in the right area of the window, in which more detailed background settings can be made: it is possible to apply and adjust the fill, add your own image available on the computer, etc.
By default, the selected background will be applied only to the current slide, but, if necessary, all slides can be given a similar background - you just need to click on the “Apply to all”
.
Working with the text component
And so we smoothly moved on to working with text. Adding text is very easy: just click on the desired block of the slide, after which you can enter the text or paste it from the clipboard.
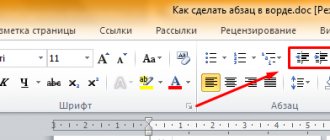
Pay attention to the small icons that appear around the perimeter of the frame: circles allow you to expand or, conversely, reduce the block in which the text is placed, and the arrow is responsible for rotation, i.e. you can rotate the text at any angle.
“Format” tab in the program
. Here you can make detailed text settings, as is done in Microsoft Word: font, color, size, location on the page, gap, etc.
Working with charts, graphs and tables
We smoothly move on to a visual demonstration of information.
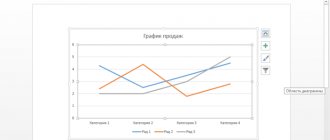
Charts and graphs allow you to clearly show the dynamics of something, for example, profit figures for the last and current quarter.
First of all, go to the slide where the chart or graph will be located. If the slide contains several blocks reserved for images and graphics, then select the one you need with a mouse click.
To add a chart or graph to your presentation, go to the Insert
.
and then click on the item "Diagram"
.
A window will appear on the screen in which you will need to select the appropriate graph or chart option.
A table with indicators filled in for example will be displayed on the screen. In the first column you will need to enter the names of the parameters, and in the second - indicators for each of the specified parameters.
If you need to place a table on a slide, open the soft slide and select the block in which the table will be placed.
Go to the "Insert"
and select
"Table"
.
A simple table editor will open on the screen, in which you will need to manually specify the number of rows and the number of columns.
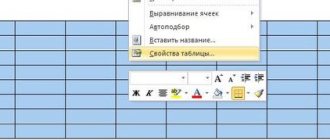
After creating the table, the “Designer”
. in which the appearance of the table is configured in detail.
Filling out the table is carried out in the usual way - you just need to select a cell, after which you can proceed to filling it out.
Working with pictures
Let's move on to the images. To add a picture to a slide, go to the desired slide, select the block in which the image will be added, go to the “Insert”
and select
"Pictures"
.
Windows Explorer will open on the screen, in which you will need to insert the desired image.
An image will be displayed in the desired area of the window, which can be stretched, narrowed and rotated in the same way as it was done with text.
“Format” tab will also automatically open on the screen.
. in which the display of the picture is configured: borders, correction, adding effects, etc.
Working with music and video
Inserting sounds and video into a presentation is done in the same way: go to the desired slide, select the block into which the media file will be inserted, open the “Insert”
and select
"Video"
or
"Sound"
.
Working with Animation and Transitions
When the main part of the presentation is ready, you can move on to setting up animations and transitions. Transitions will ensure a smooth and beautiful change from one slide to another, and animation will allow you to beautifully display the contents of the slide.
To configure transitions, open the “Transitions”
. and then select the appropriate one from the proposed transition options.
You can optionally apply a different animation to each slide, but if you want to keep the same transition style for all slides, click the “Apply to all”
.
You can also adjust the duration of the transition from one slide to another, and, if necessary, each transition can be accompanied by sound, and you can choose one of the proposed sounds or upload your own.
By default, the program moves from one slide to another with a mouse click, but, if necessary, the program can do this automatically. “On click” option.
. and then specify the time for which the slide will play.
Now a few words about animation. To add animation to a slide, go to the Animation
.
select the desired slide, and then the object for which the animation will be applied. Next you just have to click on the item “Add animation”
.
A fairly large list of available animations will be displayed on the screen. After applying the animation, the system will immediately demonstrate it, after which you can leave it as is, change it to another, or delete it completely.
To the right, you can configure whether the animation will play automatically or on a mouse click, and adjust the duration of the animation, as well as the delay.
The creation of the presentation has come to its logical conclusion, which means it’s time to save it to your computer.
To do this, click on the “File”
and go to the
"Save"
.
If necessary, specify the name of the presentation and location on your computer, and then click on the “Save”
.
And a few words about how to show a presentation. In order to show a presentation on your computer, you need to open it in PowerPoint and go to the “Slideshow”
.
and then select one of the options: “From the beginning”
or
“From the current slide”
.
If, when setting up transitions, you set the slides to automatically change, then you just have to wait for the presentation to complete; if not, you will switch between slides yourself with mouse clicks.
A small conclusion. And although we have not covered all the nuances of working with PowerPoint, this article will give you a comprehensive idea of working with this program.
Similar news
How to save a presentation correctly?
We have already considered the question of how to make a presentation in Word. Now let's look at how to save the project correctly. Versions of Word 2007 and 2010 do not have the ability to convert a Word document into presentation format, although earlier versions had this function. What to do now? It is enough to follow a simple and understandable algorithm of actions. Save the Word document in one of the possible Word formats. Saving can be in both .doc and .docx formats. Next, you need to open the location where you save the document. And then open it using Power Point. To do this, right-click on the file. If the program is not in the list, select it in the “Select program” item. If necessary, use the “Browse” item. It is also necessary to uncheck the section that allows you to use the program to open all files of this type.
You will need
- - Personal Computer;
- — Microsoft Word application;
- - Microsoft PowerPoint application from Microsoft Office;
- — ABBYY FineReader program.
Instructions
It's easy to do. The main thing before work is to determine its topic, select text content (it can be typed in a separate text document) and illustrations. Once all the components of the presentation are prepared, start creating it. To do this, you will need Microsoft Office tools - PowerPoint or Word. In the latter application, by the way, you can make a good presentation with animation, images, footnotes and inscriptions.
To work in Word, create a "Microsoft Word Document", open it and add text. You can type it while creating a presentation or copy it from another document and paste it into the project. Place text on the page using tabs, adding drop caps, a variety of fonts, and color.
Add photographs, graphs, and pictures to your document as needed. To do this, use the functions “Copy” (Ctrl+Ins), “Paste” (Shift+Ins), “Cut” (Shift+Del). Place pictures on the page by first selecting “Page Setup” from the “File” menu and specifying their orientation: or landscape. Add footnotes and captions to images. To do this, use the drawing and autoshape modes.
To set the size of a picture, right-click on it and find the “Picture Format” option, where you can adjust the size, color, transparency, and position in the text. In the Format menu, set the background, fill, and page borders. You can also use any relevant image as a background image. Place it in the background, set the transparency percentage and save the changes.
Make your own elementary drawings, adding layer after layer to the picture. Word Art objects also look great on the page. Add them from the Insert menu or click on the corresponding icon in the drawing panel.
In addition, Word has the ability to add elementary animation to text. Select the required fragment, select the “Format” menu and go to the “Font” item. In the window that opens, find the “Animation” button and mark the appropriate option in the list.
When your material is ready, save it (to do this, select the “Save As” option) in one of the possible formats: XML document, web page, web page in one file, web page with a filter, or any other.
To convert a presentation from Word to PowerPoint format, print the created one and save it as a doc. document, preferably in color. And then use the ABBYY FineReader program, with which you scan the document, recognize its pages and transfer them to PowerPoint. The program will do the rest of the work on its own. You will only need to save the presentation and configure animation and other parameters in it.
Bright, colorful and functional presentations are created using Microsoft PowerPoint. To use it, launch the program and select “New” (Ctrl+N) from the “File” menu. Then go to the Page Setup option and specify the size of the slides, their orientation, and how text and notes will be placed.
In the toolbar, select the “Create Slide” section and click on it as many times as the number of pages required for your project. If the number of slides is insufficient, you can add additional pages at any time.
From the Slide Builder menu, select Layout, Design (Background), Layout. They can be individual for each slide. To apply the appropriate changes to the slides, select the required pages and click on the desired design or template. As you design your presentation, you can edit the slides and add additional elements to them.
To post material, click on each part of the page layout and enter the data. When editing, use the functions “Copy”, “Cut”, “Paste”, etc. Add images to your project in the same way. If necessary, select the font size and color, background, fill color, etc. to design the pages.
In the “Slide Show” menu, configure the duration of the slides and the effects of the animation used. Once all changes have been made, save the presentation to your computer, disk, or removable media.
Sources:
- how to create a menu in word
The Microsoft Word program allows you to perform various operations with text - enter, edit and format depending on the user's needs. Using the Word text editor, you can insert various files
- charts, tables, graphs and multimedia.
Instructions
In the “Insert Picture” window that opens, select the image you want to insert and click on the corresponding button (“Insert”). In MS Office 2003, to insert pictures, click on “Insert” → “Picture” → “From File” and then select the picture. If necessary, change the parameters of the picture: its position, size, etc.
To add a video clip or music file to a MS Word 2007 document, go to the "Insert" tab and click on "Clip". In the right pane, click on "Arrange Clips". Then open File → Add Clips to Organizer. Select a video clip or song. Hold the file with the left mouse button and drag it into the document.
You can also insert a clip or music into MS Office 2007 and 2003 using “Insert” → “Object” → “Create from File” → “Browse”. Select the media file and click Open, then OK. The file will appear as an icon. When you double-click, you will be given the option to open it or embed it first and then open it.
To insert a font (and this is also a file) into Word, press Win + R and type Fonts or open Start → Control Panel → Fonts. Drag the font you want to install into the folder. Restart Word - close the program and open it again. Select from the list of fonts the one you have installed and want to use.
If you need to insert data from an MS Excel table into a Word document, select the data that you want to insert from Excel into the document. On the “Home” tab, click the “Copy” button from the “Clipboard” group (for MS Word 2007) or press Ctrl+C (for MS Word 2007/2003). Place the cursor in your Word document where you want to paste the data. Paste using Ctrl+V.
Click the “Insert Options” button next to the data and check one of four possible commands: “Keep source formatting” (the data will be presented as a table in MS Word), “Insert as a picture” (the data will be inserted as a picture), “ Keep Source Formatting and Link to Excel (to link to Excel data that will update when changed) or Keep Text Only (to keep the data as text).
Insert a diagram from MS Excel according to the diagram described above. Use the "Insert Options" to edit the appearance of the chart: "Chart" (the inserted chart from Excel will communicate with the original document), "Excel Chart" (the entire Excel workbook will be available), "Insert as Picture" (the chart will appear as drawing), “Keep original formatting” (the original chart format will be used).
note
If you don't have the Paste Options button, turn it on. In MS Word 2007, click the Microsoft Office button, then Word Options. Next, in the "Advanced" category, select the "Cut, copy..." group and check the box next to "Display paste options menu." In MS Word 2003, "Insert Options" is enabled using Tools → Options → Edit → Show Paste Options Buttons.
Sources:
- How to insert a picture into a document?
- how to insert a word document into excel
When working with long text divided into sections and subsections, it is convenient to use the content for search and navigation. The text editor MS Word allows you to create a table of contents automatically.
Creating a presentation framework in MS Word
Updated: 10/15/2016 12/29/2016 | Author: slam_n9ne
Almost every computer has the Microsoft Office package installed, which includes a number of specialized programs. Each of these programs is designed for a different purpose, but they have many similar functions. So, for example, you can create tables not only in Excel, but also in Word, and presentations not only in PowerPoint, but also in Word. More precisely, in this program you can create the basis for a presentation.
When preparing a presentation, it is extremely important not to get bogged down in all the beauty and abundance of PowerPoint tools, which may well confuse an inexperienced PC user. The first step is to focus on the text, determining the content of the future presentation, creating its backbone. All this can be done in Word, and we will talk about this below.
A typical presentation is a set of slides that, in addition to graphic components, have a title (title) and text. Therefore, when creating the basis of a presentation in Word, you should organize all information in accordance with the logic of its further presentation (display).
Note: You can create titles and text for presentation slides in Word, but it is better to insert the image into PowerPoint. Otherwise, graphic files will not be displayed correctly, or even be completely unavailable.
1. Decide how many slides you will have in your presentation and write a title for each of them on a separate line in the Word document.
2. Under each heading, enter the required text.
Note: The text under headings may be multiple paragraphs and may contain bulleted lists.
3. Change the style of the headings and text underneath them so that PowerPoint can automatically arrange each piece into its own slide.
- the Heading 1 style to each of them ;
the Heading 2 style to it .
Note: The window for selecting styles for text is located in the “Home” in the “Styles” .
4. Save the document in a standard program format (DOCX or DOC) in a convenient place.
Note: If you are using an older version of Microsoft Word (before 2007), when selecting the format to save the file (the “Save As” ), you can select the PowerPoint format - PPTX or PPT .
5. Open the folder with the saved presentation base and right-click on it.
6. From the context menu, click Open With and select PowerPoint.
Note: If the program is not listed, find it through the “Select program” . In the program selection window, make sure that the checkbox next to “Use the selected program for all files of this type” is not checked.
The body of the presentation, created in Word, will be opened in PowerPoint and divided into slides, the number of which will be identical to the number of headings.
We'll finish here, from this short article you learned how to make the basis of a presentation in Word. A specialized program - PowerPoint - will help to qualitatively transform and improve it. In the latter, by the way, you can also add tables.
We are glad that we were able to help you solve the problem.
In turn, you can also help us. even slightly.
Editing function
The multifunctional text editor Microsoft Word will help anyone who wants to create slides for a presentation, which can later be edited.
When the main presentable advertising “backbone” has been created, you need to take care of editing the text. Immediately at this point you can begin to change the overall appearance, color and font size, as well as the entire style. You can accomplish this by highlighting the headings after the appropriate parameters have been set in the command ribbon.
If you managed to create a presentation in Word that has an attractive design, do not forget about the font size. According to experts, there is a certain text size for a specific group of listeners. It is best to choose a size that is half the age of the oldest person viewing the presentation. As practice shows, the text chosen in this way turns out to be easy to read for almost everyone.
Before creating slides, do not forget about the color scheme, which will become the main background, since the color of the words being typed will depend on it. The perception of a presentation directly depends on the color of the text. Therefore, it is best to choose a color scheme that will contrast with the main background. It is preferable to opt for a combination of white and black or red and blue.
The appearance of the main font should, first of all, be readable rather than beautiful. Before you apply this or that design, you should see how it looks on the big screen. The right font helps make a Word presentation more attractive and modern. That is why, instead of the usual Times New Roman, you need to use, for example, Lucida Console.
How to make a presentation in Word
When preparing a presentation, it is important not to “get bogged down in the pretty things”, of which there are many in PowerPoint. By focusing first on the text, you can quickly determine the content of the future presentation. Therefore, the familiar and well-known Microsoft Word 2010 program can be a good assistant for creating the basis of a presentation, with its subsequent refinement in PowerPoint. Let's look at how to make a presentation in Word.
In order to fundamentally understand how to make the basis of a presentation using the Word program (in Word), you need to remember what a typical presentation looks like. This is a set of slides. In the standard, each of them has a title and text.
Accordingly, when preparing a presentation in a text editor, it is worthwhile to arrange information in advance in the appropriate presentation logic. You don’t have to insert pictures for now, as they will be displayed later on the slides. At least for me.
You can choose the number of text lines as needed. The volume of text entries should not be made too large, as such slides will be difficult to perceive.
We need to change our row styles a bit so that PowerPoint can automatically lay them out across the required number of slides.
- Place the cursor on the first line and select the HOME tab on the ribbon. Here we need the STYLES group.
- For slide titles, select the “Heading 1” style, and for the text, “Heading 2”.
Now you need to save the document. However, Microsoft Word 2010, and indeed version 2007, do not have the ability to save directly to PowerPoint. Those. Converting Word to PowerPoint from a text editor will not work right away, as it could be done in earlier versions. In particular, the logic of action there was as follows: “Click FILE, highlight SEND and select the desired command - Microsoft Office PowerPoint.”
They offer a variety of SAVE AND SEND options, but without PowerPoint.
A suitable file type (.pptx or .ppt) is completely missing even if you save the document using the SAVE AS command.
It would seem that it is no longer possible to use Microsoft Word to prepare presentations.
Everything turns out to be much simpler if you do a simple sequence:
1. Save the document in one of the Word formats. Saving can be with .doc and .docx extensions
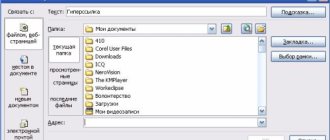
2. Open the location where the document is saved, select it and right-click via OPEN WITH US to launch Microsoft PowerPoint,
3. If it is not in the list, then you need to SELECT THE PROGRAM. Then, in the SELECT PROGRAM window, find PowerPoint. If necessary, use REVIEW
Don’t forget to remove the checkbox where it says “Use the selected program for all files of this type.”
As a result, a document made in Word is opened in PowerPoint for subsequent editing of its appearance.
Sources:
Almost every computer has the Microsoft Office package installed, which includes a number of specialized programs. Each of these programs is designed for a different purpose, but they have many similar functions. So, for example, you can create tables not only in Excel, but also in Word, and presentations not only in PowerPoint, but also in Word. More precisely, in this program you can create the basis for a presentation.
Lesson: How to make a table in Word
When preparing a presentation, it is extremely important not to get bogged down in all the beauty and abundance of PowerPoint tools, which may well confuse an inexperienced PC user. The first step is to focus on the text, determining the content of the future presentation, creating its backbone. All this can be done in Word, and we will talk about this below.
A typical presentation is a set of slides that, in addition to graphic components, have a title (title) and text. Therefore, when creating the basis of a presentation in Word, you should organize all information in accordance with the logic of its further presentation (display).
Note: You can create titles and text for presentation slides in Word, but it is better to insert the image into PowerPoint. Otherwise, graphic files will not be displayed correctly, or even be completely unavailable.
1. Decide how many slides you will have in your presentation and write a title for each of them on a separate line in the Word document.
2. Under each heading, enter the required text.
Note: The text under headings may be multiple paragraphs and may contain bulleted lists.
Lesson: How to make a bulleted list in Word
3. Change the style of the headings and text underneath them so that PowerPoint can automatically arrange each piece into its own slide.
- the Heading 1 style to each of them ;
- the Heading 2 style to it .
Note: The window for selecting styles for text is located in the “Home” in the “Styles” .
Lesson: How to make a title in Word
4. Save the document in a standard program format (DOCX or DOC) in a convenient place.
Note: If you are using an older version of Microsoft Word (before 2007), when selecting the format to save the file (the “Save As” ), you can select the PowerPoint format - PPTX or PPT .
5. Open the folder with the saved presentation base and right-click on it.
6. From the context menu, click Open With and select PowerPoint.
Note: If the program is not listed, find it through the “Select program” . In the program selection window, make sure that the checkbox next to “Use the selected program for all files of this type” is not checked.
The body of the presentation, created in Word, will be opened in PowerPoint and divided into slides, the number of which will be identical to the number of headings.
We'll finish here, from this short article you learned how to make the basis of a presentation in Word. A specialized program - PowerPoint - will help to qualitatively transform and improve it. In the latter, by the way, you can also add tables.
Lesson: How to insert a Word table into a presentation
We are glad that we were able to help you solve the problem.
Ask your question in the comments, describing the essence of the problem in detail. Our specialists will try to answer as quickly as possible.
Did this article help you?
Not really
To create an electronic presentation in Word, you need to follow a few simple steps.
Structuring information
In order to make a presentation in Word, you need to understand the very principle of its creation. In particular, you should know that any single slide is a small separate subtopic that gradually reveals the general idea. This is why in the Microsoft Word text editor you should start by structuring your headings.
As an illustrative example, the presentation should begin with a “Main Heading,” followed by several minor subheadings, counting from 1 to 10.
Prepare a plan
Preliminary preparation should be the foundation for subsequent design and content. At the first stage, pay attention to the following nuances :
- Thinking through the topic;
- Determining the quantitative slide/text ratio (redundancy of the latter is a common mistake);
- Building a logical structure of the report.
Be aware that the finished material should be converted into presentation format. The “Word” environment allows you to compose a high-quality text part and select its graphic support.
How to create a presentation in Word - the principle of information distribution
Undoubtedly, it is necessary to present the material to the listener in an interesting, bright and exciting way. Only in this case will the presentation be effective. To do this, at the initial stage it is necessary to structure the text. This is not difficult to do. A presentation is all about time, slides, information. This is something that the human brain cannot perceive for more than 20 minutes on one emotional level. Therefore, the duration of the presentation should not exceed this time period. This leads to the calculation of the number of slides. So, for a presentation of 20 minutes there should be no more than 10-12. It is on this number of slides that all information must be presented in a concise but accessible form.
Printed work in Word
Launch the program. On several lines, type the identifying words “ Heading ” (or similar), under which the information blocks will be located. These words are formed according to the principle of seniority. Let's say H2 must include H3. Create texts , adjusting them in every possible way using intuitive functions on the top panels.
Word has many tools for:
- Placement of text;
- Selecting font sizes and types;
- Designing tables and more.
Don’t be lazy to use tabs and use italics or underlining in the right places. The main thing: intelligible and catchy.
Information blocks
Each presentation starts with a title page. The main title in this case will reflect the topic that is gradually revealed. The subsequent structure of the speech is built according to the list (for example, if we are talking about a presentation of a company):
Information blocks on the slide
To create such a project, you need to place the name of the company on the first slide, and the mission of the company and its slogan on the second. The text should not include more than 6 subheadings in a row.
Then the slides reflect basic information about the company, including:
- company experience;
- principles of its operation;
- certificate information;
- information about the availability of licenses;
- advantage over competitors.
Sheets with current promotions and special offers will be relevant. Attention is focused on them the most, because these materials should look colorful and understandable. The last images show contact information and remain visible until the end of the speech. It is acceptable to use simple generalizations or general conclusions. These slides should not be overloaded with text and tables.
Important! Contact information must contain information that is current at the time of presentation.
Adding Images
Pictures are a fundamental element of a presentation. For some listeners, text is not as important as tasteful backgrounds and rich images.
We recommend satisfying your “visual appetite” with the following things:
- Several layers of thematic drawings . A mini-gallery always looks impressive;
- Animation . The dynamics on the screen are highly appreciated by the audience.
First, an attractive picture is found, then it is copied and pasted onto the Word page. Next (optional) the fields are adjusted in length and width using pressed LMB on the markers. You can add a frame for a nice decoration.
Important point: place more emphasis on the text component , since later you can work hard on the drawings in Power Point.
Information blocks
Each presentation starts with a title page. The main title in this case will reflect the topic that is gradually revealed. The subsequent structure of the speech is built according to the list (for example, if we are talking about a presentation of a company):
- introductory part;
- acquaintance;
- achievements, opportunities;
- main activity.
To create such a project, you need to place the name of the company on the first slide, and the mission of the company and its slogan on the second. The text should not include more than 6 subheadings in a row.
Then the slides reflect basic information about the company, including:
- company experience;
- principles of its operation;
- certificate information;
- information about the availability of licenses;
- advantage over competitors.
Sheets with current promotions and special offers will be relevant. Attention is focused on them the most, because these materials should look colorful and understandable. The last images show contact information and remain visible until the end of the speech. It is acceptable to use simple generalizations or general conclusions. These slides should not be overloaded with text and tables.
Important! Contact information must contain information that is current at the time of presentation.
Export a presentation
A .docx (.doc) file created in Word can be easily converted to .pptx (.ppt):
- Save your work in a standard format;
- Right-click on the file and in the drop-down menu click on “Open with”. Here “Power Point” is selected.
Now all that remains is to run the modified file and make the final edits.
To really get results quickly, you need to take advantage of the combined power of several office programs. We'll show you how this works using PowerPoint as an example.
Once you've uploaded your Word document, you'll have a nearly finished presentation that just needs a little polishing. Once you have chosen your topic and target group, you can begin.
How to make a good presentation - 7 tips from experts
So, you need to give a presentation. Don't be afraid, it's easy when you learn from the best.
There's an art to creating and delivering great presentations, and here at Biteable we like to think we know a thing or two about what makes a good presentation.
In this post, we'll share all our tips on how to act like a boss. Went!
Content and design
How to make a good presentation
Creating a good presentation starts with creating content. No matter how compelling your message is, if you don't get it out of your head and onto the screen in a simple way, you'll see a sea of blank faces. So where to start?
Create a clear structure.
When it comes to what you want to say, break it down into three simple sections: Your presentation requires an introduction, a body, and a conclusion.
- Wonderful introduction . Your introduction should briefly summarize what you are going to talk about and why it is useful or relevant to your audience.
- Offer a body of evidence . In the body of your presentation, you provide facts, quotes, and evidence to support your main points.
- Let's summarize with key findings . At the end, you return to your original statement and give the audience some key takeaways about how they can put into practice what they learned.
- No more than 10 slides in total . Who wants to scroll through pages and pages of slides? Nobody, that's who. If your presentation is 10 slides long, even if your presentation is 30 minutes long, you will give the audience a chance to digest the messages on the screen according to your speech.
Limit the number of copies on each slide.
Less is more, especially when it comes to good presentation. Too much text and your audience will simply read the screen instead of looking at you and feeling the emotional impact of your message.
- No more than six words per slide . Marketing king Seth Godin says we should only have six words on a slide—that's not a lot of text. Choose your words carefully and rewrite until you get the right word.
- Consider the “minor information” . We called ourselves Biteable because research has shown that information is retained better when it's broken down into smaller chunks. Videos are a great way to learn, and studies show they are 95% more interesting than text.
Be creative with design details.
Good design can make or break a presentation. If you don't have the budget for a designer, tools like Visme or Canva can help you make great slides, while Pexels or Unsplash offer stunning royalty-free images.
- Use color sparingly . Bright colors can be blinding, but too many colors can be intimidating. Use colors that best suit your message. We recommend sticking to one or two (not counting black and white) for your palette to keep it looking consistent.
- Match the font . Consistent design makes you look more professional. Don't switch between uppercase and lowercase letters, Times New Roman and Comic Sans, and 8-point and 30-point text sizes. Stick to one font and one size. You can change the emphasis with words later, but keep the on-screen text consistent for a more cohesive message.
- Format for perfection . An awkward line on a slide or an image with bad pixel art will turn some people off as it will make it look like you didn't try very hard (or worse, that you're just not very good). Make sure your text is aligned and neat, as in example below.
Polish several times
As with well-worn shoes, good presentation often requires several rounds of cleaning before they become shiny and shiny.
- Start a mess . Don't be afraid to start a mess. Using a non-linear writing tool like Milanote allows you the flexibility to explore and write out your initial ideas before you even open Powerpoint or Keynote. Put your ideas side by side and discover new connections you haven't seen before.
- Ruthlessly edit . At first, you may have a huge amount of information and you'll wonder how you're ever going to get it down to six words on a slide. Everything is fine. Continue to mercilessly edit until you have reduced your message to the essentials.
- Have someone watch it . A fresh pair of eyes can do wonders when it comes to improving your presentation. Find a trusted mentor or colleague to review your work. If you don't know anyone who can help, an online writing assistant like Grammarly can help you solve a lot of problems.
Did you know? Did you know?
Steve Jobs used to spend 2 days preparing a 20-minute presentation.
Delivery
How to make a good presentation
The way you deliver your slides is just as important as their content and design. Here are some quick pointers to help you deliver your message in a compelling way.
Make a powerful discovery
How you start and end your presentation will make all the difference. Viewers usually make a decision about someone in the first 7 seconds, so take those first moments into account.
- Be different . You are giving a presentation about saving tree frogs in Costa Rica. You start with a funny story about a man who escaped on bananas to the UK. This kind of story is unusual and unexpected for your audience, so they will sit up and take notice.
- Ask a Question . Rhetorical questions are a great way to frame a topic and introduce ideas. Martin Luther King Jr. said, “There are those who ask the civil rights people, 'When will you be satisfied?' »»
- Tailor it to your audience . What do you know about your audience? The more you know, the better. Especially if you know what they like and don't like. Insert an appropriate metaphor or popular culture reference. In her commencement address at Stanford University, Oprah Winfrey told graduates about the lessons she learned and how they entered "life's classroom."
Be real
Oscar Wilde said: “Be yourself; everyone else is already taken.” Lack of authenticity will be noticed a mile away. Whatever you say, speak from the heart and don't try to impress - there's no need to prove what you're saying, just to get the point across as you see it. After all, that's why you're here, and there's nothing more you can do.
- Use humor . Humor is great for presentation, but skip it if you feel it's forced. Telling a humorous story can break down barriers, make you more likable and make your message more memorable (and people are surprisingly generous with laughter), but the slightest whiff of desperation will kill the funny vibe.
- Don't be afraid to mess up . The fear of making a mistake can be very nerve-wracking. Relax, even the best speakers fail or are unlucky. Theresa May, the former Prime Minister of England, once stumbled and coughed during a presentation when someone even handed her her resignation letter. However, she fought like a pro and simply accepted it and moved on. It's OK.
- Open up and be vulnerable . Brene Brown, a researcher whose presentations have received over ten million views, says: “Sometimes the bravest and most important thing you can do is just show up. It means you tell the truth and dare to be a little uncomfortable while telling a meaningful story. . It will connect your audience with you like never before.
Make a plan for smooth operation.
With all the preparation you put into the content and design of your presentation, it can be easy to lose sight of other variables that are within your control for a smooth delivery.
- Do a practice task . There's nothing like reading it out loud to make sure your message makes sense before you deliver it. Try recording your presentation on video so you can watch it closely and see if your speech matches the slides. This will also help you determine the execution time.
- Use remote . A clicker or remote will help you face your audience without having to go back to your laptop. Popular speaker Garr Reynolds says the remote is essential for pausing and moving your presentation along so you have time to be spontaneous and in control.
- There is backup material . Not everything you say will resonate with your audience. It's better to be flexible enough to change the game as needed. Steve Jobs prepared jokes in advance to fill the time when the technology he used to give a presentation didn't work. Preparing for any eventuality will help calm your nerves and make you feel better.
- Use a timer . When you get into the flow of your message, it's easy to get off topic or even spend too much time asking questions from the audience. Put your phone on airplane mode and set a stopwatch as soon as you start speaking. A quick glance at your desk during a break will help you make sure you're not working overtime.
8: Finally, Focus on Audience Value
You are coming to the end of your presentation. How can you make sure it remains in their memory forever? Experts recommend focusing on the feeling you want your audience to take home.
- Leave an emotional impression on the audience . “They may forget what you said, but they will never forget how they made you feel,” said poet Maya Angelou. Leaving an emotional impact on them, from a piece of moving music video to a line from a song or poem, will strike that resonant chord and end on a high.
- Use the pause to remove your keys . Do you want viewers to remember something specific? Speak slowly and pause at the end. Silence will emphasize what you said and make it meaningful.
- Make your core message sing . A call to action is the best way to end a presentation in a compelling and compelling way. What do you want your audience to do next? At the end of the presentation, Tony Robbins tells a great story, emotionally pushing the audience towards change.
Make your next presentation stand out with one of these templates.
You've learned from the pros and are now ready to work on your next presentation. Make it memorable with these high-quality video presentation templates.
Video marketing insights sent to your inbox weekly.
Thanks for subscribing
You'll now receive our fresh-from-the-oven emails every week!
Mmmmmmm toasty!
,
1Prepare a rough sketch in Word
Open a new blank document and write all the headings you will need in your presentation. In order for PowerPoint to work with this later, the headings need to be formatted according to the hierarchy. From "Heading 1" PowerPoint will create a new slide.
Subordinate formats (Heading 2, Heading 3, etc.) will be assigned to the first "Heading 1" and will end up on the same slide. Texts without headings will be completely ignored. Once you've created your plan, launch PowerPoint and select File | Open". Navigate to the document location, change "All PowerPoint Presentations" to "All Structures" and open the file.
How to Quickly Insert Word Documents into PowerPoint
Note: Watch this short video tutorial or follow the steps below.
Insert a Word Document File into PowerPoint
The first way you can add a Word document to a PowerPoint presentation is to go to the Insert tab and select Object. Let's select Create from file and then find and point to our Word document.
Find the Word document file you want to insert into PowerPoint and click Open.
For our first example, let's check the As icon and click OK. You can now see the Word document icon in the presentation. The file is actually inserted into a PowerPoint presentation. You can open this file in Word by double clicking on the icon.
The Word document file is now in the PowerPoint presentation.
Even if you send this presentation to someone, the Word document file will still be there and they will be able to open it.
Inserting the text of a Word document into
Another way that works with Word documents is to put some content from the file into the presentation. Let's repeat the same steps, but this time, we won't check the As icon option.
If you only want to add the contents of a Word file to PowerPoint, do not check the As icon option.
When we click OK, we will see a text box with the contents of the Word file. The text may need to be re-formatted, but it is still much faster than creating it all over again.
Let's finish!
You've just learned how to insert a Word document into PowerPoint in two different ways. Don't forget to hand them over whenever you need to work with Word and PowerPoint documents.
5We develop individual design
If you don’t like any of the ready-made solutions, on the “Design” tab, in the “Options | "More options", click on the "Colors" option and select "Adjust colors". In the left part of the window, specify the desired color scheme, set a name and save the theme.
Now click on the “Fonts” button, select “Customize fonts”. After choosing the one that suits you, save your option. Now, in the Themes group, click on the bottom-right arrow and select “Save current theme.” You will find your own design in the “Custom” group.
Create a PowerPoint Presentation from an Outline
In this course:
If you've already outlined your presentation outline in Word and are now looking for a quick way to add slides to your presentation, you can import your Word outline into PowerPoint.
Creating a structure in Word
On the View
Click the
Structure
.
The structure will be created automatically, after which the Structure
with the corresponding tools.
If your document contains headings (any level from H1 to H9), then they will be organized by level.
If the document does not have headings and subheadings, then its structure will be displayed as a bulleted list, in which each paragraph is highlighted with a marker. To create or change headings and their levels, and customize the document structure:
Select a list item.
In the Structure level
select
Level 1
for slide titles and
Level 2
for bullet points.
When you're done editing your document, select Close Outline View
.
If you need help creating an outline, see Create an outline in Word.
Saving structure in Word
To save the document, click the Save
, give the file a name and click
Save
again.
Click Close
to close the document.
Note:
You must close the Word document to insert it into a PowerPoint presentation.
Import Word Outline into PowerPoint
Open PowerPoint and on the Home
Click the
Create Slide
.
Select Slides from Outline
.
In the Insert Structure
Browse to and select the Word outline, and then click the
Insert
.
Note:
If your Word document does not contain Heading 1 and Heading 2 styles, PowerPoint will create a slide for each paragraph.
Recommendations for importing a structure
You can import an outline into PowerPoint in .docx, .rtf, or .txt format.
If the structure is a Word document
Apply a title format to any text you want to add to your slide.
For example, if you apply a Normal
style to a block of text, Word won't transfer that text to PowerPoint.
If your structure is a .txt file
Use indentation to indicate heading levels. Any unaligned lines of text will be used as titles for new slides.
In PowerPoint, to successfully convert your outline to slides, you must follow these steps:
If your structure is a Word document:
Apply a title format to any text you want to add to your slide. For example, if you apply Normal
style for a block of text, Word will not transfer that text to PowerPoint.
Save the Word document as an RTF file. In PowerPoint for macOS, you can only import Word documents saved in rich text format. Click File
>
Save As
, and in the
File Format
select
Rich Text Text (.rft)
.
If your structure is a .txt file:
Use indentation to indicate heading levels.
Remember that any unaligned
lines of text will be used as titles for new slides.