12/10/2018 Category: Errors and problems Author: Ekaterina Vasilyeva
Every error that occurs in Windows 10 when trying to perform a particular operation is usually accompanied by a code. It indicates the possible causes of this error, and therefore helps to quickly find a solution to the problem. What is the explanation for error number 0x80070005? What should the user do to quickly fix it?
- Login to administrator account
- Running the diagnostic tool for Update Center
- Resetting the Update Center settings
- If the reason arose during system recovery due to insufficient free disk space
- If the System Volume Information folder was mistakenly set to Read-Only status
- Removing registry errors using CCleaner
Video: how to use CCleaner
- Video: how to restore the system in several ways
What does error 0x80070005 mean?
Users see error code 0x80070005 after various actions on the PC:
- activation of “ten”;
Error 0x80070005 may appear after trying to activate Windows 10
- restoring the operating system;
- updating the system and individual utilities.
Any of these operations fails - the user receives a special message about this (in a separate window or in the “Settings” window, where “Windows Update” is located).
In 10, an error may appear after an attempt to update the operating system.
A common explanation for an error with this code is insufficient access rights to system files, lack of permissions that are necessary for certain operations. Therefore, if an error occurs, first log in as an administrator, not a regular user.
System restore may not complete due to antivirus blocking
However, if you are logged in as an administrator on the “Desktop”, but the error still appears, it is caused by another factor: blocking by the antivirus, full access to the System Volume Information system directory is disabled, viruses on the device, and more.
Troubleshooting methods:
There are several causes of unexpected results; they are associated with insufficient rights, lack of free space, virus infection, and incorrect values in the registry. Further methods are aimed at eliminating all possible sources of error.
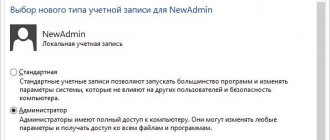
Using Administrator Rights
First of all, it is better to start fixing the failure with this method. It is likely that the current user does not have sufficient rights to manage Windows security. The issuance of administrative rights for a given user should help with this phenomenon.
Instructions:
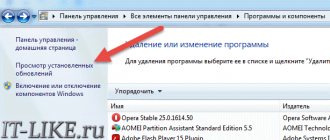
- Through RMB on “Start” we open “Control Panel”.
- Go to the “User Accounts” section.
- Click on the “Change your account type” element.
- Set it to “Administrator” and use the “Change account type” button.
- Log in to Windows again.
Access to the system folder
Error code 0x80070005
may appear due to restricted access to the System Volume Information directory. Some data is added to it to protect and manage the disk.
What should be done:
- Right-click on the System Volume Information folder (located in the root of the system drive) and open “Properties”.
- Remove the selection from the “Read Only” item in the “Attributes” section.
- Click on the “Apply” button and close the window.
Important! By default, the required folder is hidden. To see it, you need to activate showing hidden files in the system. To do this, click on the “View” tab in “Explorer” and check the box next to “Hidden elements”.
Cleaning the place
One common source of error is lack of disk space. Windows can't download updates or rollback if it runs out of free space. To combat the problem, you just need to free the disk.
Guide to action:
- Open “This PC” via a shortcut on the desktop.
- We check that there is free space on drive C (or another system drive).
- If the section is clogged, right-click on it and go to “Properties”.
- Select the “Disk Cleanup” option.
- Select all temporary data and click on “Ok”.
- Confirm the procedure with the “Delete files” button.
Healthy! We can free up a lot more space by deleting personal files (games, movies, music) if they are no longer needed, or moving them.
Checking the system for viruses
System damage cannot be ruled out as a cause of the failure. Viruses could compromise the integrity of Windows files and cause a wide variety of crashes, including 0x80070005. For example, often malicious code deprives the current user of administrative rights. An antivirus program will help remove the infection and restore the system to its original state.
We can use a third-party antivirus (any of the popular ones) or run a scan using standard system tools. In the first case: launch the browser, download the application, for example, Dr. Web, install and start scanning.
0x80070005 how to fix Windows 10
system means:
- Press Win + I and select “Update and Security”.
- Go to the Windows Defender page.
- At the end of the page, click on the “Check offline” button.
- After the reboot, the process of searching for infection and fighting it will begin.
Working with the registry
In the Registry Editor we can set the required level of rights for users. If the problem is lack of privileges, this method should work.
Login to administrator account
Try changing your account type on your PC first to log in as an administrator:
- Call up the “Run” panel using R and Win - in the empty line write control panel or control to launch the “Control Panel”.
Enter the command control panel and click on OK
- On the panel, look carefully for the block called “User Accounts”.
Open the User Accounts panel section
- In the central part of the window, click on the third link “Change your account type”.
Follow the third link to change your account type
- We put a mark to the left of the administrator - click on the change button.
Set “Administrator” and save changes
- We log out and log in again or simply restart the PC.
Running the diagnostic tool for Update Center
If the problem occurs after running a Windows update, try to fix the problem first using the built-in diagnostic tool:
- In the “Search” of the system (the icon in the form of a magnifying glass or the search bar on the “Taskbar”), enter the query “Troubleshooting”.
Write “Troubleshooting” in the search bar
- If the search bar cannot be opened, launch the Settings window via I and Win or through the Start menu (gear under the profile icon). In “Settings”, click on the “Updates and Security” tile and go to the “Troubleshooting” tab.
- We find the item dedicated to the “Update Center” - open it with a single click.
Expand the Windows Update menu
- Click on “Run the troubleshooter.”
Launch the diagnostic tool using the gray key
- A check will begin in the wizard window - wait for completion. The diagnostic tool may immediately detect that you are missing certain updates on your PC.
Wait while the system tries to determine what the problem is
- As a result, the tool will find a solution method - click on “Apply fix”. If this is an update download, the tool will immediately begin downloading.
Follow the "Apply this fix" link
- The report will show the problems found and indicate whether they were fixed or not. Click on “Close”. If the update has already been downloaded (look in the first tab “Update Center”), restart the PC so that the updates are installed.
Read the report and click “Close”
Resetting the Update Center settings
If the diagnostic tool does not solve the error, reset the center settings. To do this, we will use a special script that will first stop the center, reset its parameters, and then start the process again. Follow these steps:
- Copy and paste the following commands into Notepad: @ECHO OFF echo Reset Windows Update echo. PAUSE echo. attrib -h -r -s %windir%system32catroot2 attrib -h -r -s %windir%system32catroot2*.* net stop wuauserv net stop CryptSvc net stop BITS ren %windir%system32catroot2 catroot2.old ren %windir%SoftwareDistribution SoftwareDistribution.old ren "%ALLUSERSPROFILE%application dataMicrosoftNetworkdownloader"downloader.old net Start BITS net start CryptSvc net start wuauserv echo. echo Ready echo. PAUSE
Save the script in Notepad (the file must have a .bat extension)
- Click on “File” and then on “Save As”. We write .bat as the extension at the end of the file name.
- Using the right mouse click, click on the newly created file. We run it as administrator.
- Reboot the computer.
Restarting the service after deleting downloaded content
There are also cases where the downloaded 1903 update files are incomplete or corrupted. This is due to various reasons, from unstable Internet connections to damage to the modules themselves.
To fix this, first stop the update service, delete all downloaded files, and then start it again. This will reinitialize the update process and new components will be downloaded from scratch. First, make sure you are logged in as an administrator.
Disabling a service
In an interpreter window (Win + R), run the command services.msc, which will display local services on the screen.
Find the Windows Update service in the list, right-click on it and go to Properties.
Click on the "Stop" button. Save the changes by clicking on the “Apply” button.
Deleting downloaded files
Now you need to go to the Windows Update directory and delete all the updated files that are already present.
In the Run window, paste the directory address:
C:\Windows\SoftwareDistribution
Delete everything in the SoftwareDistribution folder (or copy if you want the data back).
Starting the service
Now you need to start the service again. Initially, Update Manager may take a few minutes to calculate the information and prepare the manifest for download. Wait for the process to complete.
Go to the Windows Update service, open its properties. Now run it again.
Then try updating your OS and see if error message 0x80070005 appears.
If the System Volume Information folder was mistakenly set to Read-Only status
The system partition System Volume Information stores the data necessary to perform the above actions on the PC (restore, update, etc.). If it is set to Read Only, the system will generate error 0x80070005. You can fix this by changing the directory status:
- First you need to enable showing hidden folders in Explorer. You can quickly do this as follows: in the universal search bar “tens” type the query “show hidden folders” - the panel will immediately show the desired window.
Search for "Show hidden files and folders"
- In the settings window, go to the very bottom of the list and set the value to “Show hidden...”. Save and apply all changes.
Enable showing hidden folders and files and save the value change
- Expand the contents of the system disk and find the System Volume Information directory - it will be the root one.
Find the System Volume Information folder on the system drive
- In its context menu (right-click) click on the last line.
In the System Volume Information context menu, click on “Properties”
- Remove the black square o.
Remove o
- Click first on “Apply” and then on OK. Try updating or restoring again.
Click "Apply" and then OK
System Restore or creating a restore point failed
Now about access error 0x80070005 when using system recovery functions. The first thing you should pay attention to is your antivirus: very often such an error in Windows 8, 8.1 (and soon in Windows 10) causes the protection functions of the antivirus. Try using the settings of the antivirus itself to temporarily disable its self-defense and other functions. As a last resort, you can try to remove the antivirus.
If this does not help, then you should try the following steps to fix the error:
- Check to see if your computer's local drives are full. Clear if yes. It is also possible that the error appears if System Restore uses one of the disks reserved by the system and you need to disable protection for this disk. How to do this: go to Control Panel - Recovery - System Recovery Settings. Select the drive and click the “Configure” button, then select “Disable protection”. Attention: this action will delete existing restore points.
- See if the System Volume Information folder is set to Read Only. To do this, open “Folder Options” in the Control Panel and on the “View” tab, remove o, and also enable “Show hidden files and folders.” After that, on drive C, right-click on System Volume Information, select “Properties”, check that there is no o.
- Try running Windows selectively. To do this, press the Win+R keys on your keyboard, type msconfig and press Enter. In the window that appears, on the “General” tab, enable either diagnostic startup or selective startup, disabling all startup items.
- Check if the Volume Shadow Copy service is enabled. To do this, press Win+R on your keyboard, type services.msc and press Enter. Find this service in the list, start it if necessary and set it to start automatically.
- Try resetting the repository. To do this, restart the computer in safe mode (you can use the “Boot” tab in msconfig) with a minimum set of services. Run Command Prompt as an administrator and type netstopwinmgmt and press Enter. After that, rename the WindowsSystem32wbem epository folder to something else, for example repository-old. Restart your computer again in Safe Mode and enter the same netstopwinmgmt command in the Command Prompt as an administrator. After that, use the command winmgmt /resetRepository and press Enter. Restart your computer normally.
Additional information: if the error is caused by any programs related to the operation of the webcam, try disabling webcam protection in your antivirus settings (for example, in ESET - Device Control - Webcam Protection).
Removing registry errors using CCleaner
Error code 0x80070005 may appear if you have a lot of erroneous entries in your registry. You can remove them using a third-party CCleaner utility from Piriform. To get the result, the free version of the program is enough:
- Go to the official CCleaner website using this link. Scroll down the site a little to the list of versions - download the free one (Free). Click on the green “Download” button.
Click on “Download for free” in the Free panel
- On the next page with the table, click on the Download link in the first column.
Go to Download.com link
- Install the utility using the downloaded installer. Go to the “Register” block in the application interface. Click on the “Search for problems” button.
Select all types of errors and click on “Search for problems”
- We are waiting for the application to finish searching for problems with the registry.
Waiting for CCleaner to finish scanning
- When the check is finished, click on the second blue button in the lower right corner of the “Correct Selected” window.
Click on the “Fix Selected” button
- Click on “Yes” to save a backup copy of the registry.
Agree to save a backup copy
- We save it in any convenient place and make sure to remember it so that in case of problems everything can be quickly restored.
Save a copy in a convenient place
- After this, we immediately click on “Correct marked” - we wait for completion.
Click on "Fix flagged"
- After this, we run the check for errors in the registry again, since the program may not find all the errors at once. When the phrase “No problems found” appears, repeat the update, activation, or other action you need on your PC to check if the error disappears.
Video: how to use CCleaner
If the reason is that the antivirus is blocking some programs
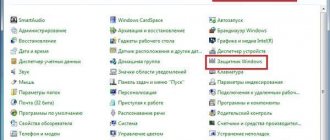
An antivirus that is constantly running on your PC (Avast, Windows Defender, Kaspersky, McAfee and others) may mistakenly block downloading an update or performing any operations on the PC. To make sure that this is not the case, temporarily deactivate the utility’s protection. First, we will describe the procedure for Windows Defender (the built-in antivirus “dozens”):
- Expand the Windows tray - click on the Defender sign (white shield).
In the Windows tray, click once on the white shield
- If it is not there, open the “Settings” panel, go to the “Security and Update” section and go to the block dedicated to PC security. Click on the button to launch the Defender interface.
In the "Security" tab, click on "Open Center..."
- In Defender, go straight to the settings - click on “Options” (the item at the bottom of the window in the left area).
In the Windows Defender window, click on the Settings section at the bottom left
- Under the block with protection notifications, click on the link leading to a list with additional parameters.
Open the Virus & Threat Protection Settings link
- We deactivate the first point about real-time protection using the toggle switch under the parameter.
Click the toggle switch to disable Defender real-time protection
- Click “Yes” to agree to save the changes.
Allow Windows Defender to make changes to the OS
- As a result, you will see a red mark with a cross and a message stating that the device is now vulnerable. Now try to restore or update the system - the error should disappear.
After disconnecting, a notification will appear indicating that the PC is vulnerable
If you currently have an active antivirus from a third-party developer, you need to deactivate its protection. In the case of Avast, this is quite easy to do:
- In the Windows tray, find the icon of a third-party antivirus - click on it, but not with the left, but with the right mouse button and once.
Find the Avast icon in the Windows tray
- In the context menu of the icon that appears, open the second list for managing screens - just hover the mouse arrow over the line.
- Select one of the deactivation modes - the time for which the antivirus will completely disable its protection. In the case of further updating or recovery, it may take about half an hour, so we set the maximum in this case - 1 hour.
Select 1 hour shutdown
Scan your PC for viruses
First, use the “native” antivirus for your PC, that is, the one that is constantly active. This can be either standard Windows Defender or any third-party protection product. Regardless of the program, before running the scan, make sure that the utility has all the necessary updates.
As an additional tool, it is recommended that after this scan you select a portable scanner - an antivirus that does not require installation and does not conflict with the current PC security utility. There are many examples of such programs: Kaspersky Virus Removal Tool, AVG, Dr. Web CureIt, Microsoft Safety Scanner and others. Let's talk about the scanning procedure using a proprietary utility from Microsoft itself:
- Open this link - it leads to the official source of the company. Among the two links, click on the one that corresponds to the bit size of your system.
On the Microsoft website, on the page for the protective product, click on “Download”
- Launch the downloaded document and click “Yes” to give permission to change system parameters.
Click on “Yes” in the system window
- Check the box at the bottom of the window and click “Next”.
Accept the terms of the agreement
- Using the same key on the next interface page, start the scanner.
Click on “Next” to start the check
- Check the circle next to the full check and click “Next” again.
Select full scan and click “Next”
- Wait for the scan to complete successfully.
Wait for Microsoft antivirus to finish scanning
- If threats are displayed, feel free to delete them in the results window. If the program does not detect anything suspicious or dangerous, simply click on “Finish” and move on to other solutions.
Click "Done" in the results
If the reason is damaged files that prevent you from updating and activating Windows
If certain system files on your PC are damaged, the operating system will simply not be able to successfully perform the operation of restoring or installing an “update”. In this situation, the solution will be an official utility from a corporation called SubinACL:
- We go to the official Microsoft resource - to the SubinACL application download page. Click on the red Download button and wait for the download to complete.
Download SubinACL from the official Microsoft resource
- We launch the file through the panel with a list of previously downloaded files and click Next on the initial screen.
Start installing the program
- Place a checkmark next to I accept the terms and click Next.
Check the first box and click Next
- As the folder in which the program will be installed (Install to line), use the Browse key to select the system drive (just the letter C without the Program Files directory and other folders). We start installing the program using the Install Now button. We are waiting for the completion of the procedure.
Using the Install button, begin the SubinACL installation process
- Now open regular Notepad or another text editor, for example WordPad. Copy and paste the text: @echo off Set OSBIT=32 IF exist “%ProgramFiles(x86)%” set OSBIT=64 set RUNNINGDIR=%ProgramFiles% IF %OSBIT% == 64 set RUNNINGDIR=%ProgramFiles(x86)% C: subinacl.exe /subkeyreg "HKEY_LOCAL_MACHINESOFTWAREMicrosoftWindowsCurrentVersionComponent Based Servicing" /grant="nt servicetrustedinstaller"=f @Echo Gotovo. @pause
Paste commands into Notepad
- Click on the “File” menu and click on the “Save As” line.
From the File menu, select Save
- In the name we insert script.bat. Bat here acts as a system extension that corresponds to the Command Line console. It will execute the commands inserted into the text file. We save the document in a convenient place, for example, on the “Desktop”.
Name the file script.bat and choose a save location
- Find the file and call its context menu. In it, select to run the document with administrator rights.
Select the line “Run as administrator”
- We are waiting for the commands to complete execution in the console. When Gotovo appears, click on any button. Close the console window and restart the device. The error should disappear.
Fixing error 0x80070005 using subinacl.exe
The first method is more related to error 0x80070005 when updating and activating Windows, so if you have a problem when trying to restore the system, I recommend starting with the next method, and only then, if it doesn’t help, return to this one.
To get started, download the subinacl.exe utility from the official Microsoft website: https://www.microsoft.com/en-us/download/details.aspx?id=23510 and install it on your computer. At the same time, I recommend installing it in some folder close to the root of the disk, for example C:subinacl (it is with this location that I will give the code example below).
After that, launch Notepad and enter the following code into it:
In Notepad, select “File” - “Save As”, then in the save dialog box, select “File as type” - “All files” and specify the file name with the .bat extension, save it (I save it to the desktop).
Right-click on the created file and select “Run as Administrator”. Upon completion, you will see the inscription: “Gotovo” and a prompt to press any key. After that, close the command prompt, restart your computer and try the same operation that gave you error 0x80070005 again.
If the reason is that the Volume Shadow Copy service is disabled
An error with the code also appears if a service called “Volume Shadow Copy” is currently deactivated in the operating system. You can solve the problem by enabling it in the system window:
- To open the “Services” window on the display, simply type the corresponding request in the “Search” panel.
In the search, enter the query “Services”
- If the icon in the form of a magnifying glass or the search bar is missing on the “Taskbar” on the left next to “Start”, hold down R and Win and type the request in English letters services.msc - you can simply copy and paste it.
Paste services.msc into the “Open” line
- Immediately click on the header of the first column “Name” so that services with Russian names go to the beginning of the list - this will make it more convenient to search for the line “Volume Shadow Copying”. Double-click on the line with the left mouse button.
Find the "Volume Shadow Copy" service
- In the drop-down menu with values for the process startup type, select “Automatic”.
Set the service to start automatically
- Click on the service start button itself - wait until the system turns it on. Click on “Apply” and close all windows - repeat the update or restore after which the error appeared.
Start the same service and click on “Apply”
Ways to fix error 0x80070005 Windows
While working on a computer, many users encounter system errors that sometimes confuse them. It is for this reason that many begin to panic as soon as they find the error message 0x80070005 on the screen.
What such an error is and how to deal with it is certainly difficult for a beginner to figure out.
However, if you study the recommendations of experienced users, everything will instantly fall into place; it will be easy to understand the questions of what error 0x80070005 is and how to fix it in Windows 10.
Resolving error 0x80070005 Windows.
What is error 0x80070005
If automatic updating is installed on your computer, your PC will independently perform such tasks without your participation, notifying you that such actions have been completed successfully. Unfortunately, it may happen that the system informs you of an unpleasant surprise, reporting the occurrence of an unknown error 0x80070005.
It is this unfortunate error that becomes an obstacle to receiving the desired update, as well as a reason for a deterioration in mood. Also, this message pops up when the user suddenly decides to activate Windows.
We will help you understand the main reasons for the occurrence of such an error, and also help you perform certain actions to “force” the operating system to obey you flawlessly.
Causes
If you understand what causes error 0x80070005 to occur, then it will be easier to understand why you are denied access. If you dig deeper into the problem, you can understand that it occurs because the operating system is trying to obtain update or activation files that are located on a remote server.
You will also have to deal with such an incomprehensible situation if you want to restore the operating system. It is at such moments that you suddenly discover that access to the server storage is for some reason closed, and accordingly, the system instantly notifies you that it cannot fulfill your request.
So, now that you understand why the error occurs, you can start learning how to fix the problem.
Solutions
So, we suggest you start taking responsible actions. There are several options for solving the problem that notifies you of an error code such as 0x80070005 in Windows 10. Let's consider the first option, which allows you to eliminate the failure automatically. We suggest running the command line.
This is quite easy to do if you press two keys – Win and R, then in the line that opens, write the first command “cmd”. By the way, please note that all these actions must be performed exclusively on behalf of the administrator; if you ignore this recommendation, your actions will fail.
In the window that opens, the distinctive feature of which is a black background, enter sequentially:
- sfc/scannow
- dism/online/cleanup-image/scanhealth
- dism/online/cleanup-image/restorehealth
Type the commands carefully, without missing anything, so that your actions aimed at checking the disk for errors will be successful.
Sometimes it will be quite enough to carry out such actions automatically, after which the problem will be solved. Unfortunately, it is not always possible to guarantee that in your case everything will happen exactly like this.
This method only works when the integrity of system components is compromised. In other cases, we suggest taking other actions.
The SubInACL utility is a good helper for most users. We recommend downloading the utility from the official Microsoft website.
After downloading, the utility needs to be installed, take your time, perform all the steps sequentially, based on our recommendations.
In particular, at the time of installation the system will ask you to indicate the location where the program should be installed. It is important to place the utility on the root system partition.
After this, open a standard notepad and enter the code we offer in its free field. By the way, it is much easier to copy it than to type it, this will avoid accidentally missing any character. So, open a notepad, write in it or paste after preliminary copying the ready-made code we offer:
@echo off
Set OSBIT = 32
IF exist "%ProgramFiles(x86)%" set OSBIT = 64
set RUNNINGDIR = %ProgramFiles%
IF %OSBIT% = 64 set RUNNINGDIR = %ProgramFiles(x86)%
C:\subinacl\subinacl.exe /subkeyreg "HKEY_LOCAL_MACHINE\SOFTWARE\Microsoft\Windows\CurrentVersion\Component Based Servicing"/grant="nt service\trustedinstaller"=f
Now you need to save the notepad with the .bat extension.
After this, run the utility as an administrator. Then it will begin its “activity”; all you have to do is wait for the process to complete, about which you will be notified by the “Gotovo” message that appears. To ensure that all changes are successfully applied to your PC's operating system, we recommend that you restart your computer. In most cases, code 0x80070005 will no longer appear.
These simple steps will correct serious problems that initially seemed incredibly difficult to fix. However, this script is not a magician for all occasions. Sometimes you have to look for other ways to solve a problem. You should pay attention to how much free space is available on the disk used during system recovery.
By the way, when performing the described actions, do not forget to disable the antivirus or firewall, since they may prevent all actions from being performed, including renaming or deleting the contents of the SoftwareDistribution folder. Sometimes it is even useful to abandon one antivirus program in favor of another. A more powerful and reliable antivirus can successfully eliminate the virus threat that is often the culprit of the problem that worries you.
It will also be useful to reset the TCP IP parameters. Such actions allow you to solve the problem with the network, as well as restore consistency between components if “non-native” drivers were previously installed. Resetting parameters is easy to do if you enter two commands in sequence:
- netsh int ip reset;
- netsh winsock reset.
Don't forget to press the Enter key after each command. At the end of the steps, it is important to remember that the computer needs to be rebooted. After a successful start, enjoy the stable operation of your OS. We also suggest studying the rules for eliminating errors that often occur during system recovery.
First of all, we suggest you figure out whether you have access rights to the System Volume Information directory located on the system disk. Since we will be working with hidden directories, do not forget to enable the display of hidden files and directories.
Such manipulations are important; in the course of all subsequent actions, you will need to enable the volume shadow copy service. We also have to change the attributes of the System Volume Information directory, for this reason, display the properties of this directory if you find a checkbox next to the “Read Only” parameter. , be sure to remove it.
For the necessary changes to take effect, you need to reboot the OS, after which start safe mode.
Next you will have to work with the command line again, write “net stop Winmgmt” in it. After this, redirect your attention to the “System32” folder, in which you will find a sufficient number of subfolders, among which you need to find “WBEM”.
Having found it, click on it and open it, find the “repository” directory in it. We have to rename this directory. There is no need to come up with any complicated names.
It will be quite enough to put a dot after the main name “repository” and add “Old”. Since we made certain changes again, you will have to restart your PC again, and when restarting it, select safe mode.
Now enter the initial stop command, then write “winmgmt /resetRepository”.
We reboot again, only this time we start Windows as usual. Most likely, after starting the OS, you will be satisfied that an unexpected error during system recovery no longer pops up and annoys you. Restoring system files will no longer be a problem.
So, it is possible to understand such a technical issue as the occurrence of error 0x80070005, but only with the utmost care.
Source: https://nastroyvse.ru/opersys/win/kak-ispravit-oshibku-0x80070005-windows.html
Granting user rights in the Registry Editor
If all of the above methods do not work, try expanding the rights of your account in the Registry Editor. Remember that changing registry settings is a responsible task. Carry out everything strictly according to the instructions:
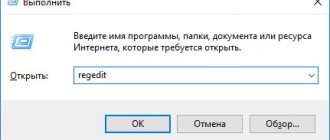
- Call the “Run” panel using the R and Win buttons - type regedit to open the “Registry Editor” interface.
In the line write the command regedit
- Allow the editor to change system parameters.
Click "Yes" to allow the editor to make changes
- Right-click on the first main branch with the word ROOTS at the end and select the “Permissions” line.
Select "Permissions" from the context menu
- In the “Security” tab of the “Group Permissions” window, look for your account in the first menu. If it is not there, click on “Add”.
Select your “account” from the list or click on “Add”
- Enter the account name. If you don’t remember, click on the “Advanced” button.
Enter your account name manually or click “Advanced”
- On the right side of the new window, click on “Search”, select your account - click on OK in this and previous windows.
Click on "Search" and select your account
- In the security section, select the added account and in the menu below, check the “Full access” checkbox in the first “Allow” column. We apply the changes, close all windows and reboot the device so that all the changes take effect.
Set “Full Control” to your account and click “Apply”
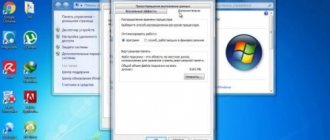
Restoring a system or returning your computer to its original state
The “ten” has a function to return the PC to its original state. This is a last resort method to solve the problem with code 0x80070005 (if activation or update fails). In essence, this is a reinstallation of the existing version of the operating system with the possible saving of user files. In this case, you will not need to look somewhere for an installation disk or other media with an OS distribution - the PC will use the files already available in the system. Let's describe the recovery procedure:
- Call the Start panel using the button on your keyboard or by clicking on the icon in the bottom left corner. Click the gear icon in the left column above the button to shut down or restart your PC. Instead, you can hold down I and Win and wait for the system panel with parameters to appear.
Click the gear in the Start bar
- When the Settings window opens, select Security & Update.
Open in Update & Security settings
- Switch immediately to the fifth tab “Recovery”. Select the first option - click on “Start”.
Start the recovery using the "Start" button
- Your computer will reboot - a blue menu will appear, in which you will be asked to choose between two recovery options: with saving personal documents (your utilities, however, will be permanently deleted - you will just have to install them again) or with complete deletion of all existing information.
Choose whether to save files or not
- After that, click “Next” on the next page. The recovery process will take about 20 minutes - possibly more.
Click “Next” to begin the recovery
Error 0x80070005 when restoring Windows
Another typical situation where a user may encounter error 0x80070005 is when restoring the operating system. Here are some tips on what to do to resolve error 0x80070005:
It is worth noting that if the methods for resolving access error 0x80070005 during Windows recovery did not work, you can try using the solution to activate or update the system.
An error with the character code “0x80070005” usually occurs on the Windows 7 operating system (it occurs less frequently on more recent versions of the OS). This error indicates that your device cannot be activated when updating the operating system. And in order to solve this problem, experts identify several options.
You need to download a program called “subinacl”. It is best to install it in the root of the disk. Therefore, during installation, we write the following path for it: C:\subinacl\ or D:\subinacl.
Next you need to download the Done.zip archive. We unpack it and find in the contents a file called “Done.bat”. We transfer this file to the “subinacl” folder created in the root of the program. After moving, hover the cursor over the file itself and press the right mouse button. Select the “run as administrator” option. A black window with information will open in front of you; after the word “Done” is displayed in it, you need to press the spacebar. After this, we reboot the device and try again to perform the action that caused the error.
If the previous option does not work, try opening the command line (press and hold the WIN+R button at the same time). Paste services.msc into the line and press the confirm button. A window with a list of services will open in front of you; we need Volume Shadow Copy.
Double-click on this service with the left mouse button. After starting it, reboot the computer and repeat the operation that caused the error “0x80070005”.
For the next option, we will also need to launch the command line (WIN+R). This time, write “systempropertiesprotection” in the line and click “OK”.
We look through the list of disks that opens. We need the one opposite which “Enabled” is written in the protection column. Click the configure button. In the menu that opens, in the “Disable protection” section, check the box and confirm the changes with the “Ok” button. We restart the computer and try to perform an operation that causes the error “0x80070005”.
Sometimes, the problem with the code “0x80070005” occurs if the antivirus is not working correctly on the computer. Try to temporarily disable it, or better yet, delete it. If the error stops appearing after this, then you should either update your antivirus or download a new one.
Hello friends. Something did not go well for Microsoft when releasing the latest cumulative update for Windows 10, which updates the system to version 1803. Microsoft delayed the release of the update for a whole month due to some problems in the system. The problems were supposedly fixed, we received the update on April 30, everything seemed to be fine, until, as individual system functions were in demand, we began to encounter their inoperability. One of these functions is system protection. In Windows 10, rolling back to restore points does not work for many people. How can I solve this problem?
So, friends, in version 1803 of Windows 10, many are faced with problems when rolling back the system to restore points. After a rollback attempt, the system returns to the current state and reports:
"System restore was not completed successfully."
In this case, a different error code may be indicated - 0x80070091
or
0x80070005
, but other error parameters are identical:
System Restore crashes when restoring a directory from a restore point.
Source: AppStaging
Destination: %Program Files%\WindowsApps
An unexpected error occurred while restoring the system. (0x80070005)
Existing online solutions to the problem
There is little information about this on the Internet. On the Microsoft Community forum, all arrows are traditionally translated to third-party products. In this case, third-party antiviruses are chosen as the scapegoat. But, for example, in my case, when I tried to rollback, not only did the third-party virus not work, but even the standard Windows Defender was disabled. Another tip from the experts from the Microsoft Community is to roll back in safe mode. He also did not give positive results when tested.
On one of the IT websites I found a radical solution, which, judging by the reviews, did not help everyone, however, some wrote about the success of the proposed operations. This radical solution boils down to deleting the very WindowsApps system folder that is indicated in the error message after an unsuccessful rollback. Since this folder is a system folder, it is not easy to remove it from a running Windows environment:
- First you need to become its owner in the security settings, i.e. get full access with the right to overwrite data;
- then rename it to WindowsApps.old;
- and only when Windows automatically restores this folder, delete the renamed WindowsApps.old folder.
The essence of this manipulation, as we see, is the automatic recovery of the WindowsApps folder.
In my case, testing this method was unsuccessful. The WindowsApps folder, even after gaining full access to it, did not want to be renamed - neither standard Windows tools nor third-party utilities Unlocker and LockHunter helped. Without any problems, this folder was deleted only from the LiveDisk environment - when it was not blocked by any system processes. After this, the test rollback to the restore point was completed successfully. But this move, naturally, had a side effect - all UWP functionality of Windows 10 stopped working. Neither the Start menu, nor the Settings application, nor other modern applications opened.
Site position
But, friends, even if my experiment with deleting the WindowsApps folder had ended successfully, I would hardly recommend it to you. This kind of interference with Windows system files is not the best solution to problems. If one problem is solved, then another problem inevitably appears. And is such questionable decisions necessary if you can roll back to recovery points from the Windows 10 recovery environment. This environment runs on installation media. In this case, the running system will not block the WindowsApps folder, and the rollback to the restore point should be successful.
As for the possibility of launching a rollback from a running system environment, Microsoft is most likely already aware of the problem and is working to fix it. The issue will probably be resolved over time. “Ten” has long been nicknamed “eternal beta”, but, alas, we have what we have. I know, friends, how many of you are indignant about the dampness of Windows 10, but as a solid solution and to prevent the appearance of new bugs after installing cumulative updates, I can only offer:
- Using Windows 8.1;
- Usage
How to roll back a system from a recovery environment on installation media
But let's return to solving the pressing problem. In my case, when I tried to roll back to a restore point from a running system environment, I received error 0x80070005, the rollback from the installation media was successful. For those who may not have performed this operation outside the environment of a running system, watch how it happens.
– flash drive or DVD. We set the boot from this media in the BIOS. We go through the first stage of the installation wizard, at the second stage we click “System Restore”.
In the “Select Action” menu, select “Troubleshooting”.
We choose the system itself.
The process of rolling back to the restore points will begin. Click “Next”.
Select a point.
To make troubleshooting easier, Microsoft developers use special error codes in their operating system. So, the code indicated in the header indicates that some kind of problem has occurred in the system related to the operating system update subsystem. How you can fix error 0x80070005 in Windows 10 will be discussed in this article.