Bringing back familiar icons
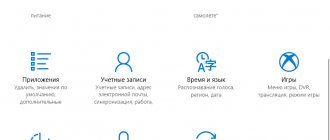
This can be done in several ways, the main advantage of which is simplicity. On the desktop, right-click and select “Personalization” from the context menu:
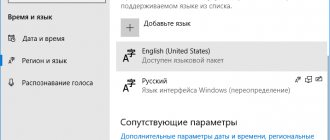
This action will take us to the settings window. Select “Themes” in the left list, and click on the “Icon Options” link on the right:
A small lyrical digression. Want to change the background? There is a separate item for this in the previous window. The settings are simple and will be clear without further explanation. And to visualize the standby mode, select “Lock screen” and at the bottom of the right block we find the “Screen saver settings” link.
Working with Windows 10 virtual desktops
Using additional virtual regions is as easy as creating them. We'll walk you through three main tasks: switching between desktops, running applications on them, and uninstalling them. Now let's talk about everything in order.
Switching between desktops
You can switch between desktops in Windows 10 and select the desired area for further use as follows:
- Press the Windows and Tab keys together on your keyboard, or single-click the Task View button at the bottom of the screen.
- As a result, you will see a list of created desktops at the bottom of the screen. Click LMB on the thumbnail that corresponds to the desired workspace.
Immediately after this, you will be on the selected virtual desktop. It is now ready to use.
Running applications in different virtual spaces
At this stage there will be no specific recommendations, since the operation of additional desktops is no different from the main one. You can launch various programs and use system functions in the same way. Let's just pay attention to the fact that in each space you can open the same software, provided that it supports such a possibility. Otherwise, you will simply be transferred to the desktop on which the program is already open. Also note that when switching from one desktop to another, running programs will not automatically close.
If necessary, you can move running software from one desktop to another. This is done as follows:
- Open the list of virtual spaces and hover your mouse over the one from which you want to transfer the software.
- Icons of all running programs will appear above the list. Right-click on the required element and select “Move to”. The submenu will contain a list of created desktops. Click on the name of the one to which the selected program will be moved.
- In addition, you can enable a specific program to appear on all available desktops. You just need to click on the line with the corresponding name in the context menu.
Finally, we will talk about how to delete unnecessary virtual spaces if you no longer need them.
Removing virtual desktops
- Press the Windows and Tab keys together on your keyboard, or click the Task View button.
- Hover your mouse over the desktop you want to get rid of. In the upper right corner of the icon there will be a button in the form of a cross. Click on it.
Please note that all open applications with unsaved data will be transferred to the previous space. But to be on the safe side, it’s best to always save your data and close the software before deleting your desktop.
Please note that when the system is rebooted, all workspaces will be saved. This means that you don't have to create them again every time. However, programs that load automatically when the OS starts will only run on the main desktop.
That’s actually all the information we wanted to tell you in this article. We hope our tips and guides have helped you.
We are glad that we were able to help you solve the problem. Add the Lumpics.ru website to your bookmarks and we will be useful to you. Thank the author and share the article on social networks.
Describe what didn't work for you. Our specialists will try to answer as quickly as possible.
A couple of clicks and desktop icons
A window will appear in front of you where you need to check the boxes next to the icons that we want to return to the desktop. Confirm your selection by clicking the “Apply” or “Finish” button.
Just?
This way you will place the deleted (more precisely, hidden) icons in the “tens” work area. The developers did not pursue the goal of hiding the necessary functions from you, they provided the opportunity to choose. If you need a shopping cart - pick it up, if you need quick access to the control panel - get it. Just check the required icon!
By the way, in the previous window you can change the appearance of the icons by clicking on the “Change icon...” button. The choice is small, but there is. If you want to diversify the design of not only your desktop, but also windows, taskbars, and other elements, then you can find themes (there are a lot of them on the Internet) and install them on your PC.
Creating virtual desktops in Windows 10
Before you can start using desktops, you need to create them. To do this, you just need to do a couple of steps. In practice, the process looks like this:
- Press the Windows and Tab keys on your keyboard at the same time.
You can also click LMB once on the “Task View” button, which is located on the taskbar. This will only work if the display of this button is turned on.
- After you complete one of the steps suggested above, click the button labeled “Create Desktop” in the lower right area of the screen.
- As a result, two miniature images of your desktops will appear below. If you wish, you can create as many of these objects as you like for further use.
- All of the above actions can also be replaced by simultaneously pressing the “Ctrl”, “Windows” and “D” keys on the keyboard. As a result, a new virtual area will be created and immediately opened.
Having created a new workspace, you can start using it. Next we will talk about the features and subtleties of this process.
A couple more clever ways
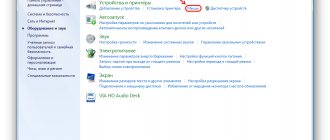
I don’t know about you, but I often had problems with displaying the “Personalization” item. There may be several reasons for this, but let’s not go deeper now. So, to access the design settings, you should open the “Control Panel” and enter “icons” in the search field. Among the results, the “Personalization” section will appear, which has disappeared from the context menu:
Further steps were described earlier in this article.
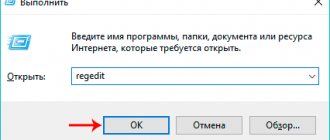
The following method is very simple and requires only a few correct keystrokes. First you need to open the “Run” console (Win + R), where you enter the following set of commands:
Rundll32 shell32.dll,Control_RunDLL desk.cpl,,5
Let's reveal a little secret: you can simply copy the line above and paste it into the input field. When finished, click “OK”:
We've sorted out the icons. Did everything work out for you? If not, we are waiting for your questions in the comments. If yes, we hope for flattering reviews + likes.
Many people are interested in how to change the size of icons on Desktop. Now there will be more instructions on this matter.
- Right-click on the desktop;
- Move the cursor to the “View” item;
- We choose the appropriate option.
As you can see, there is nothing complicated.
Expanding desktop functionality
Using Windows 7, many became accustomed to widgets that provided users with additional functionality and various useful information. But in the “ten” they were removed from the basic configuration. The developers tried to replace them with Start menu tiles, but not everyone liked this implementation.
Now we will look at two applications that will help make your desktop lively and interesting.
Windows 10 second desktop: hotkeys
The creators of Windows initially focused on the use of a manipulator, but still provided a set of hot keys to control various actions. PC control was not ignored and the following combinations were created for it: WIN + CTRL + left and right arrow keys on the keyboard.
Pressing at the same time will smoothly move one screen, replacing it with another. The moment of transition is shown in the screenshot. The screens are separated by a red line.
WIN+CTRL+D – create a new one. It smoothly moves over the current one, and by clicking on “Task View” you will see the second or subsequent one created.
WIN+CTRL+F4 – close the active one. In this case, a transition occurs to the previous one. You can also close the screen with a cross in the upper right corner in screen selection mode.
That’s all the wisdom of working with Windows 10 virtual desktops. But they provide unlimited possibilities for organizing open windows. Work with pleasure!
Gadgets Revived
Completely free software that provides access to the previous features available on the “Seven”. Even the interface is the same. So you won't get confused in the settings.
After installing the application, call the context menu on the desktop. A new item should appear - “Gadgets”:
Now you can return the clock, information about CPU and memory load, calendar, exchange rates, weather and much more:
8GadgetPack
More functional software that is distributed disinterestedly, but has some problems with translation into Russian. Not such a problem, don’t you agree?
In addition to the standard set of gadgets, you can switch to an advanced selection mode, which provides additional functions (system monitors, unit and currency converters, volume control, etc.).
I hope my recommendations helped you. If you have any questions or something doesn’t work out, I’m waiting for your comments.
Sincerely, Victor