The responsiveness of a mouse in Windows often has a huge impact on the comfort of using a computer, comfort when surfing the web and navigating web pages, the speed of scrolling the wheel in dynamic games and when reading from the screen. It would not be amiss to say that in the “top ten” all these parameters can be flexibly configured, adapting and adapting the settings in accordance with your own personal preferences and needs. How to do this will be discussed in today’s material.
Mouse sensitivity is a rather subjective thing. Everyone has their own preferences for how quickly they can scroll their wheel, how quickly they can move their cursor, and how quickly they can press buttons twice. To adapt all this “for yourself,” the system has some mechanisms and tools.
Why do you need to change mouse settings?
Like any control, a computer mouse is universal in use by anyone. However, in some cases it is necessary to “adjust” the parameters based on the user’s preferences. Some people prefer high cursor sensitivity, while others prefer a non-standard pointer. These and other parameters are configured using basic Windows tools. By correctly setting up the mouse on your computer, you can achieve higher speed when working with routine tasks, for example, in office programs.
Gamers should be included in a separate group of users, since gaming mice can have from 4 to 10 or more buttons, providing maximum control over the situation in dynamic games. For each button, you need to specify a command using special utilities, usually included with the manufacturer. We will also touch on this type of software in our material.
Setting up mouse buttons
Mouse settings in Windows 7 and 10 are no different from those in older versions of the operating system. There is only a slight difference in the display of the main parameters.
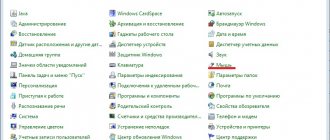
To get to the settings menu, you need to go to “Start/Control Panel/Hardware and Sound/Mouse” (for Windows 7) or “Start/Settings/Devices/Mouse” (for Windows 10).
The settings menu appears in front of us and its first tab is “Mouse Buttons”.
The first parameter, “Change button assignments,” is necessary for people who use the mouse with their left hand. It is indispensable for left-handed people and people with limited mobility.
Double Click Speed allows you to set the amount of time between the first and second click of the left button. To adjust the mouse, use the speed slider, and to check, use the folder control icon.
Sticky Mouse Button makes it easier to drag and select multiple objects on the desktop and in Explorer. This option was originally created to simplify work with outdated mechanical mice equipped with a rubberized metal ball. However, some users still use it now.
Accessing settings in different versions of Windows
The manipulator settings section in the simplest version in all systems can be accessed through the “Control Panel”.
But in the seventh version of the system you need to use the equipment and sound section (devices and printers), and in the eighth and tenth the settings are made as a separate item.
In addition, if you are solving the problem of how to increase mouse sensitivity on Windows 10, to access the corresponding section, you can use the options menu, in which you select the device item, and then select the mouse and touchpad. To access the window of other parameters, use the additional settings item (the same window will appear as in Windows 7).
We adjust the wheel (SCM)
All modern optical mice are equipped with a special control element - a wheel. It is used for scrolling web pages, documents in a text editor, for quick navigation in a file manager and other tasks. It also combines the function of the third (middle) button when you press it.
Let's look at the second tab of the mouse properties “Wheel”.
“Vertical scrolling” allows you to set the number of lines that will be scrolled through in one step of rotating the wheel. A too small value will force the user to scroll harder through the SCM, and a large value (or a “per screen” value) will reduce the accuracy of searching for an object. You need to find a “golden mean” for yourself, which by default is 3 lines.
The “Horizontal scrolling” option is relevant for devices with joystick-type wheels, which allow you to move through text and pages horizontally. The setup principle is similar to the previous point.
Setting pointer parameters
All actions and mouse movements we perform are displayed on the screen in the form of a graphic symbol - a cursor. It appears on the screen immediately after connecting the device to the computer and remains active in the Windows environment.
To configure the mouse cursor, go to the “Pointer Options” tab.
The “Move” item is a slider for adjusting the speed at which the pointer moves across the screen. Too much speed can make mouse control inaccurate, and too little speed can make mouse control inconvenient. You can also set the accuracy of the mouse sensitivity settings on Windows 7,8 and 10 by checking the appropriate box.
“Home position in the dialog box” allows you to bind the cursor to the window control buttons at the moment it opens. This rather outdated option was useful for mechanical mice. It reduces the number of movements of the device on the surface and, accordingly, the rotation of its ball.
Setting up a mouse in Windows 10 using standard tools - step-by-step instructions with screenshots
In the standard settings of Windows 10 there are not many settings for the mouse, however, as well as few functions for the pointer itself. Using OS tools, you can configure: the speed of cursor movement across the screen area, scroll properties, the interchange of right and left buttons, as well as some visual effects.
Basic mouse button settings in Windows 10
You can configure the mouse as follows:
- Press the Win+I key combination and open the “Devices” applet.
Press the Win+I key combination and open the “Devices” applet
- Go to the “Mouse” tab and change one of three settings:
- “Select the main button”, the default is left, the choice is between the left and right buttons;
- “Scrolling with the mouse wheel”, the default is scrolling lines, can be replaced with scrolling pages. In the latter case, setting the number of lines per scroll will be inactive;
- “Scroll inactive windows”, if this option is enabled, you can scroll documents or pages when you hover over a window, without highlighting it as active.
Basic settings include changing buttons and scroll variations
Video: How to change mouse scroll speed
Advanced Mouse Options: Advanced Mouse Settings in Windows 10
In addition to those described above, there are other settings for the cursor. To open them, in the same “Mouse” tab, click the “Advanced mouse options” button.
In the “Mouse” tab, open “Advanced mouse options”
How to adjust mouse sensitivity
Sensitivity, also known as movement speed, is adjusted in the “Pointer Options” tab.
- In additional parameters, open the above tab. Then, in the “Move” column, move the slider towards “Faster” or “Slower”, depending on the effect you want to achieve.
In the “Pointer Options” tab, move the slider in the “Move” column - You can also check the box next to “Enable increased pointer accuracy.” This parameter “slows down” the cursor in the area of the buttons so that users do not miss the mark.
After each change to the settings in the “Advanced Settings”, you must click OK or “Apply” for the settings to take effect and be saved.
How to adjust the scroll wheel and scroll speed
In general, the wheel settings in “Advanced Settings” are not very different from those on the main settings page:
- Go to the “Wheel” tab and configure two scrolling parameters:
- in the vertical one, you can choose to scroll by lines and their number. Or set the page scroll option;
- in the horizontal one, you can only select the number of characters for scrolling.
In the “Wheel” tab, set the scrolling parameters
As my experience shows, horizontal scrolling in more or less new mice no longer works. Instead, a smooth scroll function has been introduced in all directions. To do this, you need to press the wheel in the window with the document, after which a special icon will appear with pointers in all four directions. Further movement of the cursor around the screen will be accompanied by scrolling of the document. The speed is adjusted by the distance from the point where the cursor was when the wheel was pressed to the current position. The further the pointer is, the faster the document scrolls. This scrolling method is especially effective when reading or searching for information in large documents; I use it very often.
Other settings
In addition to customizing pointer and scrolling options, Advanced Options also allows you to visually customize the cursor, change left- and right-handed mouse buttons, and enable the sticky feature:
- To visually change the cursor, go to the “Pointers” tab and select one of the options from the “Schemes” filter.
Go to the “Indicators” tab and select one of the options from the “Schemes” filter
- After the change, save the changes with the OK or “Apply” button.
The function of changing buttons and turning on sticking is located in the “Buttons” tab:
- Open the tab, then select the toggle switch between “For right-handers” and “For left-handers.”
- We enable the sticky function by checking the box of the same name at the bottom of the tab.
We enable the sticky function by checking the box of the same name at the bottom of the tab
Changing the appearance of the cursor
After we have figured out the button and sensor parameters and changed the mouse sensitivity, we can move on to changing the appearance of the pointer on the screen. Some users strive to make it practical and strict, while others want a unique, non-standard option. Often, modified pointers come with themes for Windows 7, 8, 10.
To change and change the icon, go to the “Indicators” tab.
The “Scheme” item contains images of icons from themes installed in Windows. From the “Settings” menu, the user can select the size, color and shape of the pointer for each specific situation or action, for example, when the system is busy or when working with text. The Browse button allows you to select a separate cursor image file. The last two parameters are enabled by default, and are responsible for enabling the shadow cast on the screen by an arrow, and allowing the standard icon to be changed to a custom one from another theme.
Setting the mouse speed in games
Mouse sensitivity in online games is one of the most important parameters for avid gamers, because a second of delay can result in the death of his character for the player. There are separate menus for adjusting mouse sensitivity in games; consider one of these games – Counter Strike. To do this, go to the game settings by selecting the “Options” menu item.
In this menu, go to the “Mouse” tab and in the “Mouse sensitivity” section, select the desired parameter that will allow you to control the character with maximum convenience. Changing mouse parameters exists in almost every game, and you can find them in the settings.
Additional settings
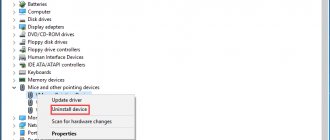
In the mouse properties menu, we did not touch the last tab “Hardware”, since it is responsible for checking the functionality of the device and updating the driver, which is rarely used in practice. However, it has one useful option that allows you to wake the PC from standby mode by moving the mouse. It is located along the path “Hardware/Properties/Power Management”.
To facilitate the work of people with disabilities, the system offers a special plan for setting up the manipulator. It is located in the menu “Start\Control Panel/Accessibility/Change mouse settings”.
The Mouse Pointers option serves as a more focused version of the Pointers tab discussed above. It is necessary for users with visual impairments.
The next item allows you to use the numeric keypad to move the cursor around the screen, thereby replacing the mouse. This option is indispensable for people with severe motor impairment.
The last option, “Simplified window management,” is sought after by many users who want to disable automatic window alignment. Here you can activate auto-switching between windows by hovering the mouse cursor over them.
Mouse Button Settings
The main utility window is divided into 2 halves.
On the left side there are profiles, on the right side there is a list of layers.
For each of them, you can choose your own functions for the keys and wheel, including scrolling and tilting.
Rice. 17. List of functions that can be set to any mouse key.
When you first launch the program, you can see the standard Default option among the profiles.
For further customization, it is worth creating an additional list element, giving it a suitable name - for example, “ For work ” or “ Game ”.
The setup process requires the following steps.
First you need to create and name a new layer, then move on to binding certain actions to mouse buttons.
By pressing the key whose functions will change (it is highlighted in yellow), the user selects the appropriate option from the drop-down list.
In the list you can find dozens of functions, which are conventionally divided into several categories:
- emulation of pressing any keyboard key, including “ Enter ” or “ Escape ”;
- pressing multiple key combinations – for example, “ Ctrl ” + “ C ” to copy or “ Ctrl ” + “ V ” to paste;
- system actions, including changing volume settings, calling a screensaver, and even turning off the computer (although setting such an action to a mouse button is not recommended due to the risk of accidental clicking);
- functions for working in the browser - for example, opening bookmarks, creating and refreshing a page;
- calling Windows utility tools to the screen;
- internal actions of the utility - switching between layers, enabling modifier keys;
- performing complex actions, including simulating pressing multiple buttons on the keyboard.
In addition to standard features, the program allows you to create your own functions that are not provided by default.
To configure them, use the “ Simulated keys ” item. In the window that opens, enter the codes for the required buttons or actions.
Once you've set presets for one layer, you can move on to the next by selecting.
Individual functions are selected for different games, for Internet surfing and working with documents or computer-aided design systems.
A suitable program can be found in the list by clicking on the “ Add ” button in the lower left corner.
Rice. 19. Adding a game to the list of application layers.
X-Mouse Button Control
After reviewing the basic settings of a computer mouse in Windows, we got to non-standard solutions in the form of third-party software. We are talking about reassigning the buttons of gaming devices (remapping) using special utilities. They will only be useful if your mouse has several additional buttons. There is no point in reconfiguring non-game models.
The X-Mouse Button Control utility acts as a universal option for inexpensive game controllers and “no-name” models from the Middle Kingdom. In it you can create from one to five layers of action bindings, for example, in games, player, explorer. You can also save new commands based on hold time and button combinations. There is also a cursor sensitivity adjustment scale with many add-ons. The current profile is saved as a separate file in the directory with the program, from where it can be copied and used on another computer without any problems.
To start using X-Mouse Button Control:
- Go to the website https://www.highrez.co.uk and select the “Latest version” link. The download of the exe file will start automatically.
- Install and launch the program. The launched X-Mouse Button Control is located in the taskbar tray.
The main right part of the window is reserved for buttons and functions associated with them. Above it are tabs with layers of settings and a menu with additional options. On the left is a list of saved profiles and action buttons above them.
How to adjust the speed of double-clicking the left mouse button?
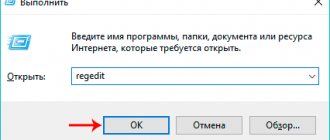
When opening folders and launching programs, we often double-click. But sometimes it may not work. What could be the reason? If the mouse is not clogged and works properly, the answer to this question is the incorrectly set value of the double-click speed of the accessory. Let's configure this parameter. We go to the control panel by right-clicking on the start button in the lower left corner and select the appropriate item in the list that appears.
Assigning a folder owner in Windows
In the category dedicated to printers, faxes and other additional devices, select the “Mouse” subcategory and go to the specified section.
The interface of this section may be slightly different from what is available on your computer, but I can assure you that all the options for lowering and increasing mouse sensitivity are concentrated here, and all you need to do is delve into the presented section of the control panel.
So, go to the first tab “Buttons”, and set the parameter corresponding to the speed of double pressing the main key of the controller.
We increase or decrease this indicator by accurately selecting the desired value on the scale and confirming it by pressing the “Apply” and “OK” keys.
Manufacturer's software (Razer Synapse 2.0)
It's time to consider the most advanced solutions for customizing your computer mouse. Most well-known brands of gaming devices release their own software to maximize the implementation of their capabilities. Such programs work only with licensed computer mice, and have many variations in control and backlight settings. As an example, we will take the Razer Synapse 2.0 utility for the company’s devices of the same name.
Razer Synapse 2.0 is a cloud-based utility for configuring Razer gaming devices. When you first start it, the system automatically detects the mouse model and selects the necessary driver for it. All parameters saved by the user remain on the remote server, which allows you to customize the control on any PC.
We will skip the long story about how to download and work with it in full, and will immediately move on to a brief overview of the capabilities for working with mice:
- Having selected the desired device at the bottom of the window, consider the first menu in order - “Settings”. Here the player can create his own preset of buttons and their assignments, or select a pre-made one from the list.
- The next tab, efficiency, allows you to configure the device’s optical sensor, its sensitivity (DPI), and the speed of cursor movement on the screen. There is also an option to select the polling frequency of the port to which the mouse is connected, for smoother operation.
- In the “Backlight” tab, the user can configure the backlight effects of the body and mouse buttons (if provided by the model), and also select the degree of brightness of the glow. To create a uniform color scheme for all connected gaming devices, there is an “Apply to other Chroma-enabled devices” button.
- The fourth tab in the window is “Calibration”. It refers to defining the boundaries of the mouse pad to increase the accuracy of cursor positioning on the screen.
Calibration in automatic mode can be done if you have a proprietary mat from Razer; you just need to indicate its name.
Manual calibration is used in all other cases. It is extremely simple and takes only a few seconds.
- In the “Macros” section, the player can bind a sequence of keyboard keystrokes to one or more mouse buttons. All created macros are also saved in the cloud service for later use.
- By going to the “CHROMA Applications” tab, the user will be able to configure the dynamic glow of the mouse. Active actions in the game will change the intensity, flickering, and color of the glow in real time.
We noted the following advantages of Razer Synapse 2.0:
- “Friendly” beautiful interface in Russian with a clear description;
- There are many settings that are not available in standard programs;
- Thanks to the cloud service, the saved settings can be applied on any PC;
- Syncs the settings of all connected gaming devices (provided they are from Razer).
We didn't find any flaws, but it's a little disappointing that the software doesn't work with mice from other manufacturers. But this is understandable because the company’s goal is to distribute its products on the market.
You can download the program and find out detailed information about it at https://www.razer.ru/product/software/synapse.
Installation and configuration
During the installation process, the program prompts you to choose where the configuration files will be saved - by default, the user profile folder is automatically installed.
Here you can erase all previous settings for mouse buttons if the utility has already been installed on your computer before.
To do this, check the box “ Delete (reset) any existing X-Mouse Button Control settings ”.
Rice. 14. Program installation process.
After installation, the program appears as a tray icon - while it is running, the mouse keys can work in accordance with the configured settings.
By going to the main window of the utility, you can see the English interface.
For more convenient work with X-Mouse Button Control, the user should change the settings and select Russian.
Rice. 15. Setting the utility interface language.
To change, click on the Settings button located in the lower left corner, open the Language and select “ Russian ” from the drop-down list.
The change translates most of the inscriptions into Russian, although sometimes the translation may not be entirely correct.
Rice. 16. The main program window when switching to Russian.
Conclusion
In our new article, we showed you how detailed it can be to configure the simplest computer device - a mouse. We hope that after reading this you will not need to search for additional information.
For a comfortable game and work on a PC, it is enough to limit yourself to standard Windows tools. This is usually enough for owners of standard and gaming devices with a couple of additional buttons.
If you are the owner of a branded gaming device with a large set of buttons and rockers, then be sure to use the utility from the manufacturer. Only it can reveal the full functionality of the mouse.