Published on 09/06/2017 1 Comments
By default, system updates are found, downloaded and installed automatically; the computer only informs the user that the update process has been completed. A reboot is also performed automatically to complete the installation. But these and other parameters can be changed without resorting to third-party programs.
- 2 Search for available 2.1 updates
via Windows Update - 2.2 Through third-party programs
- 3.1 Video: setting up an update center in Windows 10
- 6.1 Video: uninstalling updates in Windows 10
About the update center
The Update Center is the place where all settings and functions related to system updates are located. In Windows 10, the number of settings that could be changed without third-party applications and editing the registry has greatly decreased compared to previous versions of the operating system. For example, you cannot completely prohibit downloading and installing updates using the standard method.
Also, the settings for the Home edition of Windows 10 are reduced: some functions available in the professional and higher versions are missing. You can find the update center only in the system settings; it has been removed from the Control Panel:
- While in the Settings app, which can be found through the system search bar, expand the Update & Security tab.
Go to the “Update and Security” section - The first subsection is “Windows Update”. Almost all of the actions described below will be carried out in it.
"Windows Update" and its settings in computer settings
Manual update management
In very small businesses, including shops with only one employee, it is quite easy to manually configure Windows updates.
Settings > Update & Security > Windows Update. There you can adjust two groups of settings. First, select "Change activity period" and adjust the settings to suit your work habits. If you typically work in the evenings, you can avoid downtime by configuring these values from 6 pm to midnight, causing scheduled restarts to occur in the morning.
Then select “Advanced options” and the “Choose when to install updates” setting, setting it in accordance with your rules:
- Select how many days to delay installation of feature updates. The maximum value is 365.
- Choose how many days to delay installation of quality updates, including cumulative security updates released on Patch Tuesdays. The maximum value is 30 days.
Other settings on this page control whether restart notifications are shown (enabled by default) and whether updates can be downloaded on traffic-aware connections (disabled by default).
Before Windows 10 version 1903, there was also a setting for selecting a channel - semi-annual, or target semi-annual. It was removed in version 1903, and in older versions it simply does not work.
Of course, the point of delaying updates is not to simply shirk the process and then surprise users a little later. If you schedule quality updates to be delayed for 15 days, for example, you should use that time to check updates for compatibility, and schedule a maintenance window at a convenient time before that period ends.
Find available updates
There are several ways to check for updates: through running commands, third-party applications from Microsoft, and the update center.
Via Windows Update
The standard and easiest way is using the update center: just click the “Check for updates” button. If updates are found, you will receive a notification containing the name and unique update code that begins with KB. When you confirm that you want to install the found updates, their downloading will begin, and then installation, followed by a reboot of the computer.
Click on the “Check for updates” button
The only thing that is required of you is to provide your computer with a stable connection to the Internet and power supply. A terminated process can cause a variety of errors, which will lead to a breakdown of the operating system.
Through third party programs
If updating through the update center is impossible for some reason, use the Windows 10 Updates program by downloading it for free from the official Microsoft website. No matter which update method you use, information stored on your hard drive and third-party applications will not be affected.
Download the Windows 10 Updates program from the official Microsoft website
Possible settings for home edition
Settings for the home edition of Windows are very limited. The only thing that can be changed is the time when the computer will automatically restart. A reboot is only necessary if there are updates downloaded but not installed. You can do it right away or choose one of two options:
- reboot at a time automatically selected by the computer. He selects it by analyzing the user’s activity;
- setting date and time manually.
Selecting the time to restart the computer to install updates automatically or manually
Once you have decided on the reboot period, you can check the update settings.
- You can check for downloaded but not installed updates at the top of the same page in the “Available updates” block. For more detailed information, click on the “Details” button.
Click on the “Details” button in the “Available updates” block to check for updates
- The Details window will indicate which available updates require a restart. If you hover over one of the updates, you will get an even more detailed description.
We receive detailed information about the update
- Information about installed updates is located in the update log, from which you can proceed to remove them if necessary.
Information about installed updates
This concludes the actions available in the home version of the operating system. All other settings can be done using third-party programs, the command line, editing the registry or other system parameters. But it is strictly recommended to perform deeper settings only for those who understand this, otherwise changing system settings may lead to errors.
Video: Setting up Update Center in Windows 10
How to set up updates for Windows 7 and 8 operating systems!
In my previous article, I talked about what updates are for operating systems, how to set up updates using Windows 10 as an example (since this system is very recent and not everyone is familiar with it yet) and how to fix the main problems with Windows updates. You can read about all this here. In the first comment to the article, I was asked to talk about setting up updates for the release of Windows 7. And since people need it, I decided to write detailed instructions for setting up updates for this version of Windows, since the interface there is radically different from Windows 10 and not every beginner knows , where to look for these update settings. By the way, for Windows 8, setting up updates is no different; I will also touch on this point in this article.
In Windows 7 and 8, there were slightly more update settings than in the new Windows 10 system. Much was removed from the latter, considering it unnecessary for the user, and some were simply automated.
So, let's get to the main thing.
Setting up system updates in Windows 7
Most of the settings for all settings in Windows 7 and 8 are located in the so-called Control Panel. In Windows 10, some settings were removed from there and moved to the Settings menu, including update settings.
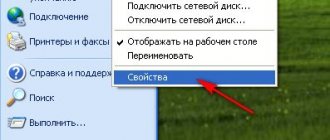
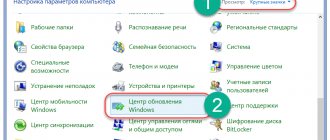
So, in Windows 7, open the “Start” menu, then “Control Panel”:
Next, go to the “System and Security” section:
In the list of available settings that opens, select “Windows Update”:
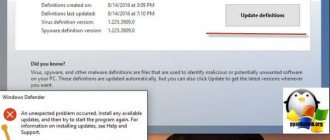
If for some reason you do not have automatic download and installation of updates for Windows activated, then when you go to this section you will see a warning:
If the system is not updated regularly, it means it becomes more vulnerable, since updates come with various system security patches, program fixes, new driver versions, and so on. In other matters, in a previous article I already talked about this in more detail.
In Windows 10, for example, automatic updates can no longer be turned off. They can only be postponed for a certain period. On the one hand, this is good. A beginner will no longer have to configure anything in these updates. Everything is basically set up. On the other hand, if a person works in some village or any other place where there is perhaps no unlimited Internet, then he will regularly encounter traffic . traffic will be spent on downloading updates and users may not even notice it. And some updates can be 500Mg or 1Gb in size or even larger.
But in general, if you do not have restrictions on Internet traffic, then downloading updates must be set to automatic mode. In Windows 7, to do this, go to the “Settings” subsection:
Here I recommend setting all the settings as I have in the image below, with the exception of the update installation time:
You can set any time. It is at the specified time that the computer will check for new updates and download them, if any. For example, I usually set the time later, when the computer may no longer be in use (10-11 pm). It’s better to set the frequency of checking for updates to daily.
In this case, we have set automatic download and installation of updates. But there are also these options:
- Download updates, but the decision to install is made by me.
In this case, updates will be automatically downloaded from the Internet, but will not be automatically installed. You can choose a convenient time for installation. I don’t consider this option useful and have never used it myself, because installing updates automatically, as a rule, never interferes.
- Look for updates, but the decision to download and install is mine.
In this case, updates will neither be downloaded nor installed automatically. Only their search will be performed. I recommend enabling this option if you work via metered Internet (with traffic restrictions). In other cases, this option is useless.
- Don't check for updates.
By selecting this item, you will completely disable checking for new updates and their automatic downloading and subsequent installation. This option can also be used if you work via the Internet with limited traffic and if you do not want to search for updates yourself.
To save the update settings, do not forget to click “OK” at the bottom of the current window:
These were the settings for searching and installing updates. In addition to the fact that the system itself will find and install updates (if you have made such settings, of course), you can search for them yourself. To do this, in the previous window, go to the “Search for updates” section:
By going to this section, the system will begin searching for new available updates and then begin installing them. In principle, you don’t need to go into this section at all if you have the “Install updates automatically” mode set.
If you need to see what Windows updates have been installed, go to the View update history section.
In the window that opens, all installed updates will be displayed in the list, indicating the installation date, importance and status (installed or not):
This is what setting up updates for Windows 7 is like.
How to get into the update settings in Windows 8!
In Windows 8, everything is the same, the only difference will be in the order in which you go to the control panel. Let's look at how to set up updates in Windows 8.
In Windows 8, the Start menu is made very inconvenient for many people and many functions there are hidden too far, making it actually completely useless for me. For example, when I had Windows 8, I didn’t use this Start at all. It is also more convenient to open the Control Panel not through the Start menu (because it takes a long time), but otherwise.
While on your desktop, move your mouse cursor to the lower right corner of the screen and hover there for a second:
A sidebar will appear on the right, where we click “Options”:
At the top of the list of parameters, the “Control Panel” button we need will appear:
Well, then you will see the already familiar control panel window:
All further actions are no different from those described above about Windows 7. That is. go to “System and Security”, then “Windows Update” and you will be taken to the section with Windows 8 update settings.
With this article, I think I have now closed the topic of updates in the Windows operating system, since I reviewed the update settings for all the latest versions of this operating system. Expect new articles
Have a nice day and see you soon in the next article! Bye 
Possible settings for other editions
In professional and higher editions, all the functions of home Windows described above are available. But besides them, there are other settings that help you configure the conditions for receiving updates in more detail.
- Go to "Advanced options" in the update center.
Click the “Advanced options” button
- In additional settings, you can choose one of two options: automatic, that is, when updates are received and installed without your knowledge, or manual, when everything happens automatically and without your permission, but you can determine the time to restart the computer, which is necessary to complete the installation of updates.
Select automatic receipt of updates or mode with notifications
- The Defer Updates feature allows you to avoid installing some updates until 8 months after they are released. Security updates and versions that are considered important by Microsoft will be installed even if this feature is activated, and all others will wait until the feature expires or is deactivated. You should only postpone updates if your computer contains very important data or something greatly depends on its stable operation. If you don’t install the update right away, other users will have time to try it out for themselves and find all the shortcomings that Microsoft will fix with the next update or replacing the existing one.
We activate the “Delay updates” function so as not to install updates immediately after downloading them
- In the How and When to Receive Updates section, you can allow or block receiving updates from other computers. This feature allows you to reduce the load on Microsoft servers due to the fact that users who have already received updates on their computer begin distributing them to other users. If this function is enabled, then you also become a participant in the program, that is, you distribute and receive updates.
We indicate where to receive updates from
- In the “Change activity period” section, you can set the time frame during which you usually use the device; it should be no more than 12 hours. During this time, the computer will not automatically restart to install updates.
Specify the period of activity
Windows Updates: Common Problems
Problems with updating Windows 10. Before the updated and all-consuming system from Microsoft had time to take its place in the sun, users were hit with a flood of problems related specifically to receiving and installing updates. The problems continue to this day.
“The update is not applicable to this computer.” Everything related to the reason for this error and why Windows will never receive the specified update. Let's check what is installed and what, despite the pleas and persuasion of Windows, will no longer suit you.
_____________________________________________________________________________________________________________________________
Error 0x80240017. The article discusses solutions to a common error in the Windows operating system, as a result of which it refuses to install updates for the Microsoft Office suite in Windows 10.
_____________________________________________________________________________________________________________________________
Windows refuses to install updates. The article describes a small problem due to which the system refuses to update at all. If you encounter similar symptoms, check your antivirus: does it even exist? Otherwise, apply the settings described in the article.
____________________________________________________________________________________________________________________________
Windows slows down after updates. This may be due to security updates against discovered data leakage issues working against your processor.
How to prevent Windows 10 from updating automatically? Here are two ways to help you avoid recurring and annoying errors due to system updates.
How to temporarily remove the Grub bootloader to install updates? The article describes a solution to a problem that arises for users with a multiboot system. If both Windows and Linux are installed on your computer, Windows will not be able to update. In the article we sequentially remove Grub, install WBL and put Grub back again.
Prohibition on self-updating
If you do not want your computer to install all available updates, you can prevent the installation of certain versions using the official Show and hidden updates program available on the Microsoft website, or completely deactivate the service that downloads updates:
- Launch the Services application.
Open the “Services” program
- Scroll down to the Windows Update service and open it.
Open the Windows Update service
- Stop the process and set the startup type to “Disabled”, otherwise the service will start back after the system is restarted. Done, the update center is deactivated, which means updates will no longer appear on your device.
Stop the update service and set the startup type to “Disabled”
Uninstalling updates
There are two types of updates: downloaded and installed. They can be removed from your computer.
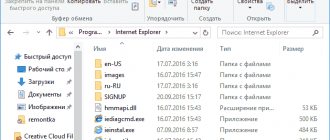
- The downloaded files are located in the Windows\SoftwareDistribution\Download folder, which is located on the main system drive. Delete the contents of the destination folder to get rid of updates. You can find what you need by subfolder name and creation date.
Delete the contents of C:\Windows\SoftwareDistribution\Download
- To roll back the system and erase installed updates, go to the update log and click on the “Remove updates” button.
Click the “Uninstall updates” button to remove installed updates
- You will be redirected to the “Control Panel”. In the general list, find the required update and use the “Uninstall” button to erase it, and then restart the computer to complete the procedure.
Select and remove the installed update
There are also other folders on the computer that store a cache of updates and previous versions needed for system rollback and recovery. They can also be cleaned, but this is not recommended.
View the list of updates
The system has a section where you can view the full list of installed updates. To view the data, you must:
- Open the “Start” menu, go to the “System” folder in the list of applications, launch the “Control Panel” component.
- Having set the viewing mode to “Category”, follow the hyperlink “Remove programs”.
- Click on the “View installed updates” item located on the sidebar.
A list of updates with a code designation, information from the publisher and installation date will be displayed. If necessary, the user can uninstall the program by highlighting the required one and clicking the Remove button.
Note! You can only scan installed updates.