Proven methods for removing protection from a drive
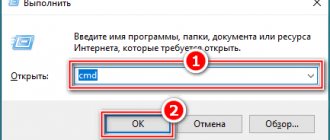
On the Internet, there are a lot of recommendations for getting rid of this problem, both hardware and software, and most importantly, the authors of such posts write that his method is “the best.” We present to your attention the “TOP 7 effective ways” on how to remove write protection from a flash drive, all of them have been tested and confirmed by a large number of users. Hardware method using the Windows command line First you need to launch the line, we do this by simultaneously pressing the spirit keys on the keyboard: Windows + R. The “Run” window will open, enter the command “cmd” and press the OK button;
The system response is to open the command line;
You must enter "Diskpart";
and press Enter. A new window will open - disk management program;
To continue, enter “list disk”, confirm the action by pressing the Enter button;
In the window that opens, a list will appear on which you need to determine the number of the required media, focusing on the amount of memory, in our case it is Disk 5 - an 8Gb flash drive. Select a disk using the command: select disk }{, where -}{ is the disk number, in our case 5;
After it has written to you: “Disk }{ has been selected,” enter the following command, which will remove the block from all protected files that had a “read-only” error when opened. Command: attributes disk clear readonly (can be copied);
When “Disk attributes have been successfully cleared” is displayed, you can exit the program by entering the “Exit” command. After closing the utility, check the media for functionality. Once you are confident in the operation of the method, you can continue to use the device without extra costs. Scanning for viruses One of the most relevant ways to solve the problem under consideration is also scanning the media for virus infection. To do this, you will need to go to “My Computer” and right-click on the name assigned to the device by the operating system, for example, “Disk Z”. Then select “Check for viruses” in the menu. After a few minutes, the scanning result window will appear on the screen. This method can be applied to any antivirus software installed on your PC. The flash drive can be write-protected by unauthorized installation of virus software. A clearly demonstrated method will help solve this problem, and will also protect your computer from automatic installation of unnecessary gadgets. Hardware button on the carrier. Mechanical protection Some models of portable USB drives have built-in protection that is turned on/off using an installed button. Be sure to pay attention to this; to allow recording and moving, the button must point to the “open lock.” Formatting Often, to eliminate such errors, utilities created for formatting are used. Remember, using this method will completely delete all files from the media. Applying Windows Group Policy It is possible to restrict rights by local group policy; eliminating such infringement of rights should be carried out by following the algorithm: Simultaneously press Windows + R and enter the command gpedit.msc, click OK;
In the window that appears, go through the tabs sequentially:
- Computer configuration;
- Administrative Templates;
- System;
- Access to removable storage devices.
Next, go to the line “Removable drives: Deny reading”;
By clicking twice, an option window will open;
Set o → “Apply” → and confirm by clicking “Ok”. By completing such a simple process, you can easily remove the interference in the infringement of the rights to use the media and continue working.
Installing and removing write protection on a flash drive
Are you afraid that your information may be stolen from your work computer and taken away on a flash drive? Or, on the contrary, are you afraid of losing data stored on a flash drive because it can be easily deleted? How to protect files from being copied to removable media without prohibiting its use in the system? How can I protect what I copied from being deleted?
Write protection of a flash drive can be implemented in several ways, depending on the goals being pursued. Some of them prohibit writing to a removable disk using the system itself, which makes it impossible to write files to any flash drive on your computer, while others allow you to prohibit writing to a specific medium, regardless of which computer it is connected to. Let's look at them in more detail:
Prohibiting writing to removable media by editing the registry
Small changes made to the registry will allow you to prohibit writing to any removable drives. In order to make the necessary settings, open the “Run” window using the Win/R key combination and launch the registry editor (to do this, enter the “regedit” command in the window and press the Ok or Enter button):
In the editor we are interested in the HKEY_LOCAL_MACHINE section,
in which we will sequentially open /SYSTEM/CurrentControlSet/Control/
In the Control subsection we need to find the StorageDevicePolicies folder (and if it doesn’t exist, create a new one) and in the WriteProtect parameter replace the value zero with one:
To do this, double-click to open the parameter and edit its value:
If we created StorageDevicePolicies ourselves, we need to create the WriteProtect parameter in it, for which we need to right-click to open the context menu, select “32-bit DWORD parameter” and assign the name WriteProtect to the new parameter, then change its value to one , in the manner indicated above.
After closing Registry Editor, restart your computer to apply the changes. Writing to removable disks is no longer available, nothing can be copied to a flash drive, and existing files on it cannot be deleted or renamed:
To disable write prohibition, you must return the WriteProtect parameter to zero.
Prohibiting writing to flash media by changing group policy
Another way to achieve similar results is to make changes to Local Group Policy. Open the editor using the familiar Win/R keys and entering the gpedit.msc command in the Run window:
Let's sequentially follow the path Computer Configuration / Administrative Templates / System / Access to removable storage devices:
Here we are interested in the “Removable drives: disable writing” parameter, which must be set to enabled:
This method is good because it does not require a system reboot to apply the settings - after clicking the “Apply” button, the prohibition of writing to disks is activated immediately.
Also, recording is immediately disabled and turned off; just set the “Removable drives: write prohibit” parameter to “Not set” or “Disable”.
Both methods are good for prohibiting writing on your computer, but they are not capable of protecting important data on a flash drive when used to transfer files to another computer. This requires a completely different approach:
Write-protection of a flash drive by setting access rights
To use this method, you need to format your flash drive using standard Windows tools into the NTFS file system:
All data will be destroyed, so if you have important documents on it, first copy them to your hard drive, and after formatting, return them to the flash drive.
Next, we need to set access rights; to do this, right-click on the image of the removable drive in Explorer and select “Properties”:
In “Properties” we are interested in the “Security” tab, where we can make changes to the file system access rights:
Programs to fix errors
If the above hardware fix methods did not give the desired result, you should try using software. Soft disks are intended for expensive storage media; for less valuable storage devices there are also a lot of programs, for example: JetFlash Recovery Tool - a free program in the public domain, designed for media from A-Data and Transcend. Its main functionality includes the ability to eliminate writing and reading errors, as well as unlocking. After downloading the utility from its creator’s resource, run it using the file of the same name, .exe format. After waiting for installation, click the JFRecoveryTool.exe shortcut. When the working window opens, insert the USB flash drive into the USB input and click “Start”. After the process is completed, check the drive to see if the error has been resolved.
Apacer Repair is a utility created individually for media produced by Apacer Technology Inc. It is also applicable for third-party drives. The functionality can eliminate recording problems. It is recommended to download the program from the official resource, where it is posted and is available for download completely free of charge. After completing the download process and connecting the USB drive, run the utility. First of all, she will do the formatting, for which there will be a warning. By clicking “Format”, the successfully completed process will allow you to forget about the recently disturbing problem. Knowing the brand name of your carrier, it will not be difficult for you to select the required program; there are tons of them on the Internet. It is to solve such problems that manufacturers create them and post them on Internet resources; it is worth noting that they are all freely available. It is not always possible to determine the true cause of a malfunction and remove write protection. But having used the above methods, based on the result you will understand exactly what to do next: safely use a working device, or buying a new one will become an inevitable event. We do not guarantee the safety of information!
An error message appears
What causes the “Disk is write protected” message to appear?
- incorrectly configured Windows OS or damaged USB flash drive;
- In special cases, storage devices have switches that block accidental recording. The on position of the switch protects against writing to the device;
- viruses transmitted through another computer also lead to an error message or when installing third-party unknown software;
Viruses blocking the flash drive system
- A flash drive can issue such an alert when a file system with a large amount of information storage is overloaded;
- mechanical use of confidential information;
- a software/hardware ban has been installed in the OS;
- damaged/disconnected PC ports;
- unsuccessful completion of formatting;
- wear of memory chips damages blocks with sectors on the device;
- sudden removal of the flash drive from the USB port while it is being used by any program on the PC;
- conflict of the flash drive after disconnecting it from the TV and connecting it to the PC due to operating and hardware differences in the structure of the systems;
- overheating or unstable power supply.
Types of write protection
By analogy with the reasons for the “media is write-protected” error, write protection methods can also be divided. A classic example of hardware protection would be the presence of a special switch (on the body of a flash drive) that turns on and off the ability to write to a flash drive.
Software protection consists of various types of software systems designed to prevent unauthorized use of the drive.
When deciding how to remove the protection if “The disk is write protected”, first of all check if there is a special small switch on the case. It is always present on SD cards, and is somewhat less common on regular USB drives. Accidental switching is not uncommon when a flash drive is carried in a pocket.
Also, be sure to check the functionality of the flash drive in other USB ports, or even better, on another computer. If you are the owner of a desktop computer with a system unit, it is preferable to check the flash drive by connecting to the ports on the back wall of the system unit. The problem may lie in poor contact, poor-quality wires, or failure of the USB controller.
How to remove entry protection in Registry Editor
- To get to the main Registry Editor environment, use two keys “Win + R”. In the line, write the command “regedit” and use the Enter button on the keyboard.
Enter the command and click “OK”
- The left column of the Registry Editor menu contains registry options. Open the Edit panel at the top, select Find and type “StorageDevicePolicies” (without quotes). Check all the boxes and click “Find Next”.
Enter the command in the search window and click “Find Next”
- On the right side, a value called WriteProtect with a parameter of 1 (in the "Value:" line) results in an error. Click on it 2 times with the mouse and in the small window do not change anything except “1” to “0”, confirm your actions with the “OK” button.
Change the value in the parameter from “1” to “0”.
Close all running programs and restart the PC for the value to take effect. After this, you can check the USB device.
If you do not see a line in the right column named "StorageDevicePolicies", then you should follow the steps below:
- Stop at the “Control” section, right-click on it to launch an additional window, in which you should select the “Create” line and then select “Section”. Give the section a name “StorageDevicePolicies” and click on any area of the menu.
Give the new section a name
- Go to the right side of this section and right-click on an empty area, bring up the “New” line, and in it click on “DWORD Value 32”.
Create a parameter
- Name the section "WriteProtect".
We call the section “WriteProtect”
- Run it by double-clicking on it to ensure the value number. It should automatically be assigned the number “0”.
We check the value is equal to “0”
Leave everything as it is, close the “Registry Editor” and restart the PC.
Prohibiting writing to flash media by changing group policy
Another way to achieve similar results is to make changes to Local Group Policy. Open the editor using the familiar Win/R keys and entering the gpedit.msc command in the Run window:
Let's sequentially follow the path Computer Configuration / Administrative Templates / System / Access to removable storage devices:
Here we are interested in the “Removable drives: disable writing” parameter, which must be set to enabled:
This method is good because it does not require a system reboot to apply the settings - after clicking the “Apply” button, the prohibition of writing to disks is activated immediately.
Also, recording is immediately disabled and turned off; just set the “Removable drives: write prohibit” parameter to “Not set” or “Disable”.
Both methods are good for prohibiting writing on your computer, but they are not capable of protecting important data on a flash drive when used to transfer files to another computer. This requires a completely different approach:
How to remove write protection via Command Line
One way to remove the USB device error when trying to write is to use the “Command Line” to enable recording.
- In the Windows search engine (next to the “Start” button or in its menu), write cmd and select the requested item. Open it by right-clicking to run as administrator.
Launch Command Prompt as administrator
- Next in the line you need to enter the command “Diskpart” (write or copy all commands without quotes). Use the Enter key after each command you enter.
Enter the command “Diskpart”
- Type "list disk".
Enter the command “select disk”
- Enter “select disk 1” (1 in this example is a flash drive).
Enter “select disk 1”
- The entered text “attributes disk clear readonly” will delete all data on the USB drive.
Enter “attributes disk clear readonly” to clear all attributes
- The new “clean” command will delete all downloaded files from the flash drive.
Enter “clean” to clean the flash drive
- To create a partition, use the “create partition primary” command.
Create a partition using the command “create partition primary”
- Enter the command “format fs=fat32”, which will format it to FAT32.
We format the flash drive in FAT32
- Enter the "exit" command to exit the Command Prompt. Now you can restart your PC and check the USB flash drive by writing some files to it.
Unblocking via Diskpart
We use Diskpart when we cannot remove write protection from a flash drive. The interpreter manages the commands entered by the user when working with the disk.
- Click “Start” and type “cmd”
- Right click on the program
- Find “Run as administrator”:
- Enter “diskpart” and confirm your choice
- A program window opens that manages disks
- Enter “list disk” and confirm:
- We determine the serial number of the removable media, focusing on the amount of memory
- After selecting the drive via “select disk”, you must enter “attributes disk clear readonly” into the line, this will remove the blocking of files that are allowed to be read
- When “Disk attributes have been successfully cleared” is displayed, enter the “Exit” command, which will terminate the utility:
- Now you can check the operation of the removable media.
How to remove protection through the “Local Group Policy Editor”
This method may also have an effect on fixing a disk write error.
Step 1. To launch the “Policy Editor” menu, use two keys “Win + R” and enter “gpedit.msc”, activate the command with the Enter key or the “OK” button.
Press “Win+R”, enter “gpedit.msc” and press Enter
Step 2. In “Local Computer”, enable “Computer Configuration” and select “Administrative Templates”.
Select “Administrative Templates”
Step 3. Next, in the “System” folder, select “Access to removable storage devices.”
Select "Access to removable storage devices"
Step 4. On the right side of the editor, select all the “Removable drives” sections one by one and activate the “Disable” value:
- Right-click on one of the items “Removable drives: Deny execution” and click in the “Edit” window.
Select “Change”
- In the additional window, select “Disabled”, click the “Apply” and “OK” menu at the bottom.
Select “Disabled”, click “Apply” and “Ok”
Close the Local Group Policy Editor window and restart your PC.
Via Group Policy Editor
Let's look at how to remove protection from a micro flash drive using this method:
- After pressing Windows and R, type “gpedit.msc” in the line and confirm your decision:
- Open “Computer Configuration”, then the “Administrative Templates” section
- Go to the “System” item, then move to “Access to removable storage devices”:
- Let's get acquainted with the "Removable drives: Deny reading" option. Then deactivate it by right-clicking twice. In the menu that opens, select “Disable” and confirm the decision.
If using these methods does not solve the problem, then the Good Deeds Service specialists will help. We work around the clock. We provide consultations over the phone or visit your home or office at a convenient time.
Call or leave a request in the chat if you have any questions or urgently need help.
How to recover a Transcend flash drive using JetFlash Recovery Tool
You can download the program if you follow the link: https://www.transcend-info.com/Support/Software-3/ and install it on your computer. This free version is available for download with USB device recovery functions. The utility's interface will be understandable even to an inexperienced PC user, and in a short time, within 5 minutes, you can fix the error that appears when starting a USB flash drive.
In the example, the transcend jetflash v30 2Gb flash drive will be used.
- Connect the flash drive to the port located on the motherboard. Now launch the program shortcut.
- Leave the “Repair drive &...” checkbox and click on “START”.
Check the box “Repair drive & erase all data”
Click on “START”
- The program will start the process of automatically restoring the internal environment on the flash drive.
Automatic flash drive recovery process
- If the flash drive is successfully restored, a notification window will appear as in the screenshot below.
Successful flash drive recovery
In case of fatal malfunctions with the USB device, a warning window will appear that your flash drive cannot be fixed using the program.
Window with a notification about unsuccessful recovery of a flash drive
USB copy protection
Why seriously and cheerfully? Serious because it really works - it protects files from copying. Cheerful? You should have seen with what facial expression and with what speed the bad people pull out the flash drive from the computer (the photo of the criminal will be unnoticed by the web camera, if there is one, and will be saved). You will know who tried to tinker with secret data.
The work of the miracle program Usb2Exit is based on human psychology. Knowing the principle of its operation, I pulled out (there is no other way to say it) the flash drive from the laptop. Honestly. This is the protection against copying data to USB.
The formatting of the media is simulated when an incorrect password is entered. But the imitation is so high-quality that before you even think about it, the USB flash drive is already in your hand. For those who don’t know, formatting means completely deleting any data.
In fact, the program does not delete anything, so don’t worry. The only thing she really does is take a photo of the person inserting the flash drive into the computer (sometimes that’s enough). Let's look at the program in more detail and in pictures.
Top 5 programs to disable write protection
| Photo | Name | Description |
| JetFlash Recovery | The program supports flash drive manufacturers A-DATA, JetFlash, Transcend. System resources are practically not used, due to the simple interface and basic functions of the undemanding utility. Brings significant fixes to restore working functionality of flash drives | |
| USB Flash Drive Online Recovery | A free utility designed to recover a flash drive. The English version has a simple and intuitive interface. Without an Internet connection, it refuses to scan and correct errors. Requires user registration | |
| Kingston Format Utility | Fixes all common errors with protection and other bugs. During diagnostics, it permanently clears all files. Supports FAT32 system only. No separate installation of the utility is required, no registration, does not contain advertising and is absolutely free | |
| HP USB Disk Storage Format Tool | A simple, universal utility with a simple English interface for removing protection from a flash drive. Designed to format a wide range of USB device manufacturers. With the provided application, bootable flash media with MS-DOS OS are created | |
| AlcorMP | A program for “resurrecting” flash drives from the microchip manufacturer Alcor is more suitable for experienced PC users. The utility analyzes the memory of a USB drive and can be used to reflash the device controller. The developers stopped developing their program, but the released version continues to stably and confidently treat and also restore flash drives, correcting write errors |
Software removal of write protection
After making sure that there is no mechanical protection problem, we proceed to checking the software. By default, the flash drive is formatted using the FAT32 file system. A small number of users are aware of the limitation in this file system to the maximum file size of 4Gb. This results in a twofold situation: formally there is permission to write, but a message about the impossibility of doing so appears. If you need to transfer large files, format the drive using NTFS - a system where there are no such restrictions. To do this, open “My Computer,” right-click on your removable drive and select “Format.” In the window that appears, in the “File system” line, select NTFS, click “Start”.
Important! It is always better to use “safe removal” before removing the flash drive from the connector. Due to some features regarding flash drives formatted in NTFS, this should be a mandatory rule.
The blocking can be set in the Windows registry. The Windows key combination + R will open the Run window, type regedit and click OK.
In the editor window, go to the HKEY_LOCAL_MACHINE\SYSTEM\CurrentControlSet\Control\StorageDevicePolicies section, where you will see the WriteProtect parameter on the right. Double-click on the parameter to bring up a dialog for changing the parameter, set the value to 0. The StorageDevicePolicies section may be missing and you will have to create it. To create, right-click the previous Control section, select “New > Section”, the name should be StorageDevicePolicies. In the empty area on the right side of the window of the newly created section, right-click again, select “New > DWORD Value” in the menu, select 64 or 32 bits, depending on the bitness of your system. Name the parameter WriteProtect and set the value to 0 as described above. Be sure to reboot and check the result.
Make sure that recording to removable devices is not prohibited by group policy. Similarly to launching the Registry Editor, execute gpedit.msc, which will bring up the “Local Group Policy Editor”. Follow the branches “Computer Configuration - Administrative Templates - System - Access to Removable Storage Devices”. On the right, check the “Removable drives: Deny writing” option. It should be disabled or not set. If the option is enabled, double-click on it, select Disable, and apply the selection. Don't forget to reboot before checking.
Check the system with a good antivirus with the latest databases. There are a number of malicious programs that block the ability to work normally with connected portable storage devices.
How to remove write protection from a flash drive
If the file to be written is large, the failure may be caused by the file system. Flash drives are initially set to FAT32 format – it works with files up to 4Gb. If the file size is 4Gb or larger, change to NTFS.
The problem may be hidden in the OS settings; let's look at several ways to solve such problems.
Via the Windows Registry
You can enter the registry in various ways. Protozoa:
- Use the “Win + R” keys to call “Run”. Enter the value “regedit” in the line and click “OK”.
- Second option: “Start” – “Search” – enter the value “regedit”, run.
In the window that opens, go to “HKEY LOCAL MACHINE”, find the “SYSTEM” section, then select the “CurrentControlSet” subsection, find “Control”, select “StorageDevicePolicies” from the list, find “WriteProtect” on the right.
Double-clicking the mouse will bring up a dialog for changing the parameter, the value of which should be “0”; if “1”, it means that a prohibition has been set, which must be removed by setting the parameter value to zero.
If there is no “StorageDevicePolicies” section, you need to create it. Right-click “Control”, in the “Create” list select “Partition”, for which name indicate “StorageDevicePolicies”.
In the right part of the created subsection, right-click on the mouse to call “Create”, where select the line “DWORD parameter”, value 64 (32) bits (depending on the OS). Assign the name “WriteProtect”, the value is “0”.
Reboot and check the result.
Check whether group policy is disabled
Call “Run”, enter “gpedit.msc”, “OK”. The editor will open.
On the left, find the “Computer Configuration” branch: go to “Administrative Templates” (when clicked, a window will open), select “System”, and find “Access to removable storage devices” in the list.
When clicked, a list will open where you can select “Removable drives: Prohibit recording.” Check that it is not specified or disabled.
Reboot, check.
Using the command line
Open “Command Prompt” through the “Start” menu, you can use “Search” by typing “cmd”, run with administrator rights.
A window opens.
Enter text commands:
- “select disk X” (X - device number);
- “detail disk” – detailed disk data, optional;
- “attributes type “Diskpart”, input;
- “list disk” – will show available disks;
- look at the USB flash drive No., which can be seen by size (in the example given, No. 1, size – 7441 MB);
- type “disk clear readonly”, which will remove the read-only setting;
- "clean" will delete volumes and partitions, if necessary;
- “create partition primary” (if necessary) will recreate the primary partition;
- “formatfs=fat32” will format the partition in FAT32 (you can select NTFS with the fs=ntfs command), if necessary.
After each command, press “Enter” and type “exit” to finish the work.
Remove write protection in total commander
A significant number of Windows users prefer the Total Commander file manager, which offers extensive features and ease of use. It is important to understand that Total Commander is essentially just a convenient add-on for Windows, so everything described in the article applies to it. However, there are nuances. Try copying your files in Windows Explorer, if there are no problems with copying in Explorer, in Total Commander open “Configuration > Settings: File Operations” and select “Automatic selection of copy method”. The authors of some builds of this manager set settings that cause such failures.
Remove write protection in the command line (cmd)
How to remove protection from a write-protected flash drive using the command line. The method is a little more complicated. Find the Command Prompt application in the Start menu and run it with administrator rights. Next, enter the following commands one by one, confirming each entry by pressing Enter.
Attention! All contents of the flash drive will be deleted permanently!
- Diskpart – launches the disk management utility;
- list disk – will display all disks connected to the system; you need to determine which one is your flash drive, for which you can use the size of the disk;
- select disk X – targets the program to a disk; instead of X, specify the number of the desired disk;
- detail disk – will show detailed information about the selected disk to ensure that the choice is correct;
- attributes disk clear readonly – resets the read-only attribute;
- clean – all volumes and partitions on the disk will be deleted;
- create partition primary – re-creates the primary partition;
- formatfs=fat32 – formats the partition using the FAT32 file system (you can select the NTFS file system with the fs=ntfs command);
- exit – ends the program.
Programs for removing write protection
Flash drive manufacturers take care of solving various types of problems that arise with their products, releasing proprietary utilities for restoring problematic devices. Do not forget that you must run any of these utilities with administrator rights. These useful programs can be freely downloaded from the respective manufacturers' websites. Transcend calls it JetFlash Recovery, Silicon Power calls it USB Flash Drive Recovery, Adata calls it USB Flash Drive Online Recovery, and Kingston calls it Kingston Format Utility. Their use is quite simple and does not cause difficulties even for beginners.
The programs listed below are designed for advanced users and you should read the documentation before using them. Independent developers release their own universal programs that are not tied to any vendor, but have similar functionality.
Popular representatives: HP USB Disk Storage Format Tool, D-Soft Flash Doctor, AlcorMP.
The latter only works with drives on the controller of the same name, but all have the same task - to help restore the problematic device. When faced with finding a solution to how to remove protection from a flash drive, as a last resort, you should try to reflash it. Flash Drive Information Extractor will tell you complete information about the type of controller, the memory used and even the production date. After extracting the necessary data, all that remains is to find the required firmware and flash driver, which is usually not difficult for Google or Yandex.
Bottom line We hope that the described methods helped you restore the functionality of the flash drive. If you still do not achieve results, you will have to worry about choosing a new flash drive since it really cannot be repaired.
Disable write protection on the command line (Windows)
Protection can also be deactivated using the command line. To open it, type cmd in the system search, right-click on the found element and select “Run as administrator.”
- In the window that appears, enter the command diskpart and press Enter.
- Then type list disk and Enter again.
- When the disk table opens, determine by size which one is your flash drive and remember its number.
- Enter the command sele disk [number of your flash drive] (indicate the number without square brackets) and press Enter.
- Then attributes disk clear readonly and again - Enter.
After this, the write protection should be removed and the flash drive will work as it should.
The write-protect message on Mac may be caused by a software glitch on the flash drive. In this case, you should check the drive using Disk Utility. Open it in Finder → Programs → Utilities.
In the sidebar, select the problematic flash drive. Then click “First Aid” in the top menu and click “Run”. If the system finds errors on the drive, it will try to restore it.
If none of the above helps, try using built-in tools or third-party utilities. This will erase all content from it, but you can first copy important data from the drive to your computer.
If you cannot format the disk, you may have to use special utilities from the manufacturers.
How to remove write protection from a flash drive - instructions!
The “disk is write-protected” or “flash drive is write-protected” error usually happens at the most inopportune moment. If you started reading this article, then you turned out to be one of those “lucky” people who at one point decided to put something on your flash drive, but in the end received a message from the system that you cannot write data to the disk and now this very protection needs to be removed. A person who has encountered something like this for the first time reasonably appears completely bewildered. Let's try to find out the reasons why we can't write files to a flash drive and figure out how to fix this problem. Content:
Proven ways to solve the problem
Let's explore all the options.
Method 1: Find the switch
Many USB-type devices have a special switch, often located on the side, that easily turns the write-protect feature on or off. So, check your drive for this particular switch. Then, to lock or unlock your device, simply slide it up or down.
Checking the drive for the presence of a switch
Method 2: Try using a different card reader or adapter
Some readers are made with a write-protect feature. So, when you receive an error message, it is not always true. It's better to use another card reader or adapter.
Method 3: Run the troubleshooter
A pop-up message does not always indicate that the memory card or flash drive is actually write-protected. To resolve the issue, try running the Windows Error Checker and see if the problem can be resolved.
- Right-click on the storage device under Computer.
Right-click on the storage device in the “Computer” section
- Then click Properties and go to the Tools tab.
Click “Properties” and go to the “Services” tab
- Click "Check">"Check and Repair Disk".
Click “Check”, then “Check and repair disk”
Wait for the process to complete. Finally, see if the write protection issue is resolved.
Method 4: Reset your computer's registry
If your computer is set to always write-protect any external device, you will be faced with restricted file access every time. To resolve the issue, try resetting the registry as shown below:
Step 1. Press Win + R. As a result, the “Run” command will appear. Type "regedit" and press Enter.
Press the Win + R buttons
In the “Run” window, write “regedit” and press Enter
Step 2: Click on “Computer” and go to the “StorageDevicePolicies” section as shown in the screenshot below.
Click on “Computer” and go to the “StorageDevicePolicies” section
Step 3: On the right, look for “Write Protect.”
Find "Write Protect"
Step 4. Right-click on “Write Protect” and select “Change” from the menu.
Right-click on “Write Protect” and select “Edit”
Step 5: Change the DWORD value from "1" to "0".
Change the DWORD value in the “Value data” window from “1” to “0” and click “OK”
Important! In most cases, the above section is missing. To solve the problem, simply right-click on the “Control” folder and name the new section “StorageDevicePolicies”. Then click on the empty field on the right and create a DWORD value called “write protect”. Enter the value “0”.
Method 5: Use the appropriate software
Are you still unable to disable write protection on your memory card or flash drive even after trying the above four methods? Then take advantage of the capabilities of the accompanying software. It will surely remove write protection with just a few clicks. Open Google or other similar websites and do an internet search. Unfortunately, such programs are not always free. We can recommend D-Soft Flash Doctor, AlcorMP or HP USB Disk Storage Format Tool.
D-Soft Flash Doctor program
Method 6: Run an antivirus scan or quick format
If you are sure that write protection is not installed, this error may occur due to a virus infection or damage to some part of the device. So, to check your flash drive for malware infection, run an antivirus scan. If the program does not detect dangerous or suspicious information, simply format the device and see if this makes a difference. If clearing the table of contents cannot be performed, then it is better to look for a new drive.
Running an anti-virus scan
Protect files from copying using Windows
To protect your computer from being copied to removable media, you need to make some changes to the registry.
So you need to do the following:
Click “Start” in the lower left corner or the two keys Win and R;
in the “Open:” window, write regedit and click “Ok”;
find the line HKEY_LOCAL_MACHINE and open the tree in the following sequence - /SYSTEM/CurrentControlSet/Control/;
in the Control folder, find the StorageDevicePolicies subfolder; if it does not exist, you will have to create it;
open the WriteProtect parameter by double clicking; In the “Value:” box, enter one in place of zero and click “Ok”.
If you create your own StorageDevicePolicies folder, the WriteProtect parameter is not there and will have to be created. In the registry editor, right-click and in the “Create” item (however, it is the only one) select the “DWORD Value” sub-item, name the new parameter “WriteProtect” and change its value to “1” according to the above scheme.
Having completed all the operations, close the editor and restart the PC. The machine has become completely protected from copying to external media.
Useful tips
- Buy a new storage device. The write protection error often pops up when the memory device is physically damaged. So, if you have tried several methods mentioned above, but all of them have not yielded the desired result, then serious physical damage is the cause of the problem. You have no choice but to simply buy a new storage device.
Physical damage to the flash drive
- If possible, back up your data on a memory card or flash drive. No matter which method you are going to try, the data on the device is still important to you and cannot be deleted or lost, right? If possible, always back up necessary information. It must be present on another medium.
Backing up a flash drive with USBFlashCopy program
- Recover data using special software. You also have nothing to worry about if you are unable to copy data to other disks or flash drives, or format them. To finally gain access to important information, use third-party software. It will not solve the write protection problem, but it will restore damaged files and you can extract them to another device. So, download any utility we offer and check whether photos, documents, videos and other types of files are recovered. Well-known storage device manufacturers include Transcend and Silicon Power. To solve problems, try using the JetFlash Recovery or USB Flash Drive Recovery utility.
JetFlash Recovery utility for recovering files from a flash drive
Read practical tips in the new article - “How to recover a flash drive without formatting.”
Loss of “USB drive”
Perhaps the most well-known security risks associated with "USB flash devices"
, are those that occur when the device is lost.
If you have a password protected, or better yet encrypted, "USB flash drive"
, then you don’t have to worry if you suddenly lose it.
Considering the fact that all the data stored on it is saved by you on another medium (personal computer, laptop, cloud data storage), everything will be fine with your data. It is astronomically unlikely that anyone will be able to break the encryption (unless using modern commercial, expensive software). Therefore, your data will remain safe, no matter if your USB device
.
You can use special software to encrypt the data on your drive or buy a device with an encrypted partition.
But the loss of "USB device"
, not protected by a password, is a completely different matter. We're talking about possible serious security issues in this case, depending on the importance of the data being stored. Of course, if it's just your resume or documents intended for a wide range of users, then you don't have to worry. On the other hand, if these are personal documents related to professional activities or constituting a trade secret, then the situation becomes much more complicated. Losing a device containing such data may result in a security risk and may have negative consequences for you or your professional activities, including large fines or loss of your job.
An easy way to avoid losing your USB stick
- is to make sure that you store it in a safe place. The ideal place would be a place that will prevent accidental loss of the drive (perhaps an inside pocket of the bag that closes with a zipper or latch). This location should also protect the drive from any possible damage, as excessive shaking or external pressure can break the drive or corrupt the data on it.
Reasons why the flash drive is write protected.
Using Google, I found many solutions to this problem and below I will try to present them systematically in order to make the work easier for my readers who are faced with a similar problem.
Step No. 1 Checking the mechanical record blocker.
Some flash drives are equipped with an additional switch (1) on the side surface, which allows you to turn on and off the ability to write to the media. It looks something like this:
Take your flash device out of the computer and carefully examine its side surface; if the switch is in a position that allows recording, or you do not have such a “gadget” at all, then proceed to the next steps.
Step No. 2 Checking the Windows system registry.
Sometimes a flash drive is write-protected due to damage or changes in the system settings of the operating system registry.
To find out, you need to follow the following path:
C:\WINDOWS\regedit.exe
Double-click the regedit.exe file. In the window that appears, click on the tabs below:
- HKEY_LOCAL_MACHINE(2);
- System(3);
- CurrentControlSet(4);
- Services (5);
- USBSTOR (6).
On the right side of the dialog box, double-click “Start” (7). By default, it has a value equal to three (8) (writing is allowed); for you it should also be equal to this value. If it is different, correct it to three and click “Ok” (9).
Is your flash drive still write protected? Then let's move on.
Step No. 3 Formatting the flash drive.
There are several formatting methods in the Windows operating system. This can be done through the context menu, Explorer, disk management, etc.
Due to a number of problems, it will not be possible to format a write-protected flash drive using the above methods, so in this situation it would be most effective to format it through the command line console. To do this, click the "Start" menu and select the "Run" tab (10)
A command panel window will appear in which you need to enter a formatting command (11) of the following form:
FORMAT H: /q /fs:fat32
Where:
- H is the letter of your drive assigned to it by Windows;
- q – quick formatting parameter;
- fs – file system;
- exfat is a type of file system, to choose it correctly, read my article - a file system for a flash drive.
You don’t have to specify the /fs:exfat parameter, then the drive will be formatted to the file system that was on it previously.
Press “Enter” - a black window will appear in which the current process will be written:
You may need to press Enter a few more times until the window disappears.
Step No. 4 Recovering data from a flash drive
If important information was stored on your flash device, and its loss is very undesirable for you, then it is necessary to perform data recovery. I won’t describe in detail how this is done, as I wrote about this earlier in the article: how to recover deleted files. If anyone is interested, read the article above, everything is written there in detail.
That's basically it, the article has come to an end. Of the above methods, step #3 helped me bring my drive back to life. I’m sure this post will help you save a lot of time and fix the problem faster.
PS: If your flash drive is still write-protected, I think it’s worth trying low-level formatting of the flash drive.
Automatic backup programs
There are such programs: Acronis True Image, Iperius Backup
These are entire harvesters for redundancy. You can configure them to back up a file or folder via the cloud, make incremental copies, send files to external drives, etc. You can set up a backup on a schedule, for example, at the end of each working day.
✅ Reliable.
✅ Many backup options, flexible settings.
❌ To use such programs, you need to understand all these technical terms and be able to distinguish an incremental backup from a full one.
❌ As a rule, programs are paid.