Formatting a flash drive is a software process of forming the logical structure of a flash drive with the subsequent deletion of all data stored on it. A file structure or file system is a certain order, a way of organizing the storage of information on a medium or its partition (in the case of a hard and solid-state drive). It determines the length of the file name, its structure, maximum occupied space, renaming method, etc. Some file systems provide additional service capabilities - distribution of access rights to data, encryption, archiving.
There are two types of formatting: full and quick. During the quick formatting process, the file table of the flash drive, which stores paths to files, their names, attributes, etc., is cleared, then a new data structure is formed and a master boot record of the drive is created. After quick formatting, the operating system perceives the media as free of any information. The data itself and its structure are not physically affected in any way. In the process of writing files to a flash drive formatted using the quick method, the data on it, marked as deleted, is simply overwritten with new bits of information.
Full formatting is the same clearing of the table of contents (file table) with the formation of the data structure of the flash drive, but with the overwriting of each sector of the flash drive with a zero bit. During the full formatting process, the logical disk or drive will be additionally checked for the presence of bad (bad) sectors on it, into which it is impossible to write information.
Many users wonder why and whether it is necessary to format a flash drive on various forums and blogs, but most of them never receive a clear answer. Let's try to understand the main reasons that require formatting removable flash drives.
Reasons for formatting a flash drive
- Removing viruses
Flash drives very often become victims of malware and viruses. Sometimes their number reaches dozens of malicious files on one flash drive, which can prohibit the user from making changes to the file system of the flash drive. In this case, formatting is the best solution - it will remove all malware in a matter of seconds.
- Changing the file system
Operating systems of the Windows family can work with multiple file systems of data storage devices. The most common of them are NTFS and FAT32, each of which has its own advantages and disadvantages. Recently, users have increasingly begun to record disk images and movies in ultra-high resolution, occupying up to ten or more GB, onto flash drives. But when copying a file that occupies more than 4 GB, a flash drive with the FAT or FAT32 file system produces a similar error:
Why does it occur? In the FAT32 file system, 4 bytes are allocated for writing a file, which equal 32 bits (4 bits multiplied by 8 (bits in 1 byte) and we get 32). Two possible bit states (zero and one) to the power of 32 equal 4 gigabytes: 232 4 GB. The file size cannot exceed this value, because it will not be possible to indicate its size - there are simply not enough addresses for this. As a solution to the problem, the NTFS file system appeared, where this drawback was eliminated.
There are cases of replacing the NTFS file system with the outdated FAT or FAT32. This happens when an old version of Microsoft's operating system is installed on the computer. For example, Windows 2000 does not always correctly detect and work normally with the NTFS file system. The same goes for older motherboard chipsets that do not support the NT file system.
- Quickly clean a flash drive from a huge number of files
Even with the advent of the high-speed data transfer interface on which new flash drives work, USB 3.0, the rate of deletion of a significant number of files, for example, photographs, or distributions of portable programs, takes quite a long time. There is nothing to say about devices operating via the outdated USB 2nd generation interface - the removal process can take many minutes. To quickly delete a significant number of files from a flash drive, it is sometimes easier to copy the necessary data from it and use the quick format function to clean the flash drive.
- Purchasing a new device
As a rule, new flash drives do not need formatting - the manufacturer has already determined their file system. To ensure that the device is fully operational, it is recommended to format it using the full format function to check each memory cell of the device for functionality. Even if you fully trust a global brand, it is better not to neglect the opportunity to once again verify the functionality and integrity of the product.
- Creating a bootable USB flash drive
A very common reason to format a USB drive is to create a bootable USB flash drive. As mentioned above, during formatting, the Master Boot Record or MBR is formed. This is necessary so that the basic input/output system or BIOS can find the MBR boot device in its first sector. The main characteristic of the master boot record is the presence of a certain signature (digital code) in its last bytes. The bootloader is needed to detect the active partition, which is the flash drive, and transfer control to the primary instructions contained in the bootloader.
- When errors occur
Formatting, as already mentioned, is an excellent method for eliminating problems with the structure of a flash drive. During a full format, the flash drive will be checked for the presence of non-working memory cells and, if possible, they will be replaced with backup ones or excluded from the file table. They will simply be marked as broken or non-existent for Windows. In this way, you can slightly extend the life of the drive and eliminate some problems (bad sectors, for example) that cause freezes, errors, etc.
Why format a flash drive to NTFS. What are the advantages over FAT. Flaws.
Before you decide what NTFS has advantages and disadvantages, you need to get to know it better.
NTFS is the latest file system developed for storage devices used in Windows operating systems starting with XP. In edition 2000, this file system does not always work stably. It was based on HPFS, which has quotas, logging and access restrictions in its arsenal. Compared to its predecessor, NFTS is slightly inferior in performance.
The size of a partition in NTFS is limited only by the volume of the hard drive; of course, there is a limit, but before it is reached, the volume of hard drives and, especially, flash drives must increase by many orders of magnitude. This file system supports all cluster sizes, the standard of which is a 4 KB data block.
The free space of the volume is divided into two parts: about ~12% of it is occupied by the metafile. It will not be possible to write other data to this area. Even when the metafile occupies a small volume, its reservation area will be reduced by 2 times. The remaining space is available to the user for storing his information.
The main MFT metafile is a file table. It is divided into 1 KB areas, each of which stores a record about one of the documents placed in the section, including the metafile itself, oddly enough. The first metafiles are of a service nature and are the key to the functioning of a logical partition or flash drive. They are stored in the middle of the disk/flash drive, which is a guarantee of security and increases the reliability of the data carrier.
MFT stores all information about all files in a partition (their size, location in the form of addresses of clusters or memory cells in the order in which they are accessed, attributes). The table also stores files that occupy tens and hundreds of bytes (up to 1 kB). Any document in NTFS is a data stream, which is very convenient, for example, in the case of adding the artist or author of the document. It is not always possible to see this data in the usual way, but there are a lot of utilities for this. Document sizes are displayed as real, not including “attached” streams. It happens that after deleting a file that occupies several kilobytes, hundreds of megabytes are freed. This is because a stream of freed megabytes in size was attached to it.
File and directory names in NTFS can reach a length of 255 characters in Unicode, and the number of documents stored in one directory cannot exceed 65635, which is equal to 64 K. Directories are a link file containing a list of documents that are stored in it , in compliance with the hierarchy.
NTFS is a reliable and self-sufficient file system that can put itself in order after failures thanks to the use of the so-called transaction method, when the action is performed completely or not at all. To put it simply, the patient is either healthy or not; according to the NTFS interpretation, there cannot be patients. For example, if, when copying a file, it turns out that there is not enough space for it (several files are written in parallel to one volume, otherwise the operating system warns about the lack of free space on the disk) or part of the document falls on a damaged block, such a write is considered not made and the process is interrupted. Also, all transactions that were carried out before turning off the power or pressing “reset” are canceled, which is fraught with unpredictable results: the place is designated as free, and the MFT indexes return to their previous position. Thanks to this, turning off the power during high disk activity will not even require running the chkdsk utility, because no failures will occur in the file system.
File fragmentation in NTFS is one of its main problems that has not been resolved over several decades of its existence. It is as follows: the MFT zone reserves the first 12% of disk space, and when the disk is filled to 85 percent or more, this zone is reduced by 2 times and so on several times. Thus, the drive will have several “terminations”. The result is extreme fragmentation of files written to the area that was reserved for MFT. Also, files are fragmented quite well even with a large amount of free space on the drive. This happens due to the imperfection of the algorithm for detecting free sectors.
Additional features of the NTFS file system:
- Hard Links feature or hard link is a rarely used option. It allows one file to have several names and be in several directories at the same time (excellently implemented in Total Commander along with the NTFS Links program;
- Symbolic Links – the ability to create virtual directories. Used to set shorter paths to folders stored in the wilds of your disk;
- encryption – any type of data can be easily encrypted to prevent confidential information from falling into the wrong hands.
From the above, the main advantages of NTFS over FAT follow:
- the maximum size of a occupied file is 264 GB versus 232 = 4 GB in FAT;
- availability of encryption, archiving, user rights, quotas;
- automatic recovery from errors;
- actual unlimited partition size;
- more efficient use of free space (fragments of several files can be written to the cluster);
- quick file search;
- high reliability;
- support for long document addresses and long file names.
Disadvantages of the NT file system:
- reduced operating speed compared to FAT and HPFS;
- significant data fragmentation, which reduces the efficiency of the drive;
- the need to carry out regular defragmentation;
- extremely low operating speed of a drive that is more than 80-85% full.
The flash drive is not formatted in NTFS: troubleshooting using Windows tools
If the flash drive is not formatted in NTFS, one of the solutions may be to remove the volume label or change the media letter. In principle, you can try to format it from the disk management partition. When performing this operation, it is recommended to use quick formatting rather than full formatting. For the Windows XP version, it is better to use the command line to avoid problems and errors. It contains the command format /fs:ntfs e: /q, where e is, again, the letter of the USB device.
Format a flash drive in Windows 7, 8, 10
The process of creating a new file structure of a flash drive, that is, formatting it, occurs in a similar way in the latest editions of Windows. There are no differences in the process, except for the options for calling some windows.
Before starting formatting, you should close all programs that use the flash drive, otherwise Windows will display an error about the impossibility of completing this process due to the use of the flash drive by some service or program, as in the screenshot.
- We connect the drive to the computer.
We are waiting for autorun to appear and/or the flash drive will be scanned for viruses and malicious applications by the installed antivirus, if this function is activated.
- Call up the context menu of the drive and select “Format...”.
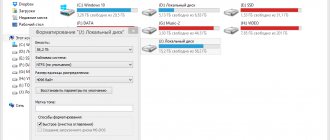
- In the formatting window that appears, set the following parameters:
- file system – NTFS;
cluster size – standard or 4096 bytes (this is standard);
- volume label – enter the name of your flash drive or leave the field blank;
- formatting method - depending on the purposes of formatting, the field can be left blank to completely reset the flash drive and check it for bad sectors, or you can only clear the main file table.
- The operating system will ask the user for confirmation, notifying that all information on the media will be destroyed. Before confirming, be sure to make sure that there are no important files on the media or that they have been copied to your hard drive. The procedure for restoring lost documents may take a long time and may not be successful.
- We confirm the start of the formation of a new file structure of the flash drive with or without checking its memory chips for defects by clicking on “OK”.
- We wait until the operating system completes formatting.
When the operation is successfully completed, the following window will appear.
Never turn off the computer or remove the flash drive from the USB port while this process is taking place.
- Close it by clicking on the “Ok” button.
Our flash drive is formatted in the NTFS file system and is ready for use.
As for the name of the flash drive (volume label), it is easy to change. Just call up the drive’s context menu and select “Properties”. In the window that appears, in the first tab, look for the name of the flash drive (in our case, WIN7) and change it to the desired one.
When finished, be sure to click “Apply” and close the window by clicking on the “Ok” button.
Formatting drives can also be done in several alternative ways, but the meaning of the operations will remain the same.
Via the command line
- Open the command console by entering “cmd” in the “Run” menu.
This window is called up by the key combination “Win + R”.
- In the black window that appears, enter a command like: format /fs:NTFS i: /q, where:
- format – system command to format a disk;
/fs:NTFS – parameter responsible for the file system that is created during the drive formatting process;
- i: - letter designation of the volume, which is our flash drive;
- /q – analogue of the absence of a drive label.
- The operating system will display the result of the future formatting, ask you to enter the flash drive label and/or request confirmation of the operation. Confirm formatting by pressing “Enter”.
- We are waiting for the process of forming the file structure of the flash drive.
- Close the command line window by clicking on the cross or entering the command “exit”, confirming it by pressing the “Enter” key.
If you want to set the label of the USB drive, instead of “/q” you should add the following parameter: /v:Disk_label.
The flash drive is formatted and ready to use.
FAT and NTFS
The article is intended primarily for novice users , so I have omitted some points. For example, converting FAT and NTFS requires more steps and there is a risk of losing data - that's why I didn't mention it.
Briefly about what a file system is: it is a way of organizing information on media (hard drives, DVDs, flash drives, etc.) Because in addition to recording any information, you also need to organize it. The simplest example of a way to organize data is files and folders. In fact, everything is more complicated from a technical point of view, but there are specialized articles about this. Currently, the NTFS , replacing the outdated FAT32. Flash drives (USB and SDHC, MicroSD, etc.) are most often formatted by manufacturers in FAT32 (less often - in FAT16). The differences between FAT versions are described on Wikipedia.
You will find the most complete list of differences between all file systems here, but I will tell you about the distinctive features of FAT32 and NTFS from the point of view of an ordinary user:
- NTFS supports drives up to 16 exabytes in size, while FAT32 only supports up to 8 terabytes - i.e. NTFS supports disks up to approximately 2,097,152 times larger in size.
- NTFS supports files up to approximately 16384 gigabytes in size. FAT32 - no more than 4 GB.
It is the limitation of the FAT32 file system that prevents files larger than four gigabytes from being written to flash drives. To change FAT32 to NTFS, the flash drive must be formatted - create a new data storage structure.
Do not forget to copy important information from the flash drive, because when formatting any storage medium, all data from it is erased. This also applies to flash drives.
Format using the HP USB Disk Storage Format Tool
HP USB Disk Storage Format Tool is a simple portable utility for creating the file structure and boot sectors on flash drives. One of the drawbacks of the program is the inability to specify the sector size of the future file system of the USB device.
Formatting a flash drive in the NTFS file system via HP USB FT is extremely simple.
- Insert the flash drive into the USB port.
- Let's launch the utility.
- In the first frame we indicate a flash drive if several portable devices for storing data are currently connected to the computer.
- In “File system”, select NTFS from the drop-down list.
- In “Volume label” you can set the label (name) of the drive.
- “Format options” - here we indicate the formatting option: full - do not check the box next to "Quick format" or quick (clearing the table of contents) - check the box.
- After making sure that there is no necessary data on the flash drive or that copies have been created in advance, we start the formatting process with the “Start” button.
- The utility will ask for confirmation, notifying the user that all data on the device will be destroyed.
If you agree, press "Enter".
Sometimes the utility may display the following error message:
Here we click “Ok” and close all applications using the flash drive. If this does not help, run HP USB FT as an administrator by selecting the appropriate option in the context menu of the HP USB FT.exe executable file.
- We are waiting for the end of the process, about which you will be notified by a message of similar content, which indicates the serial number of the flash drive and its capacity.
Convert files without data loss
To avoid losing data during conversion, you can use the standard “convert.exe” utility, but first you should check the disk for errors.
- you need to right-click on the flash drive and select Properties in the drop-down window;
- then you need to go to the service and select Perform check;
- After clicking on the Run scan tab, the Scan disk window will appear; in the Scan parameters you must check all the boxes.
It is advisable to close all programs in use before converting to avoid errors during the operation, which could result in lost access to the disk.
The utility is located on the local drive (C:)/Windows/System32/convert.exe.
You can call it by typing the command line:
In the window that opens, you need to specify the following data: convert -> (removable drive letter) -> : /fs:ntfs /nosecurity /x.
Then you should press Enter. After the conversion is completed, you must enter exit and press Enter again. This utility allows you to convert a file system without losing data via the command line.
Additional keys to the convert utility:
Convert volume: /FS:NTFS:
- Volume—defines the drive letter;
- /FS:NTFS - defines the file system;
- — activates the message input mode;
- — points to a file in the root folder to reserve space for NTFS system files;
- /NoSecurity - this parameter is responsible for the security of converted files;
- /X - force removal of the volume.
Despite the fact that Convert.exe allows you to convert the file system of a flash drive without losing data, before starting work it is still better to copy the data from the flash drive to your hard drive.
To avoid mistakes during conversion, you need to check the flash drive for free space.
In addition, you can use a free utility to format a flash drive from FAT32 to NTFS. Name of the utility HP USB Disk Storage Format Tool
.
Algorithm of actions:
To understand how to format a flash drive from exFAT to NTFS, you must first understand this concept.
The exFAT file system, which replaced the FAT system, has the following differences:
- reduction of overwrites of the same disk sector;
- increasing the cluster size to 32 megabytes;
- increasing the maximum file size to 16 exabytes;
- there is no limit on the number of files in a directory;
- support for access rights to files and directories has appeared;
- The efficiency of using free space has increased significantly, thereby significantly reducing disk fragmentation.
Video: How to format a flash drive to NTFS
To format a flash drive from exFAT to NTFS, you need to open the command line window: Start -> Run -> cmd.
To format, use the format command with the /FS switch:
Example command: format Z: /FS:NTFS
To format a flash drive in exFAT, you need to type the following command: format Z: /FS:exFAT
The exFAT file system consumes significantly less disk space for its system resources. It supports files that weigh more than 4 gigabytes.
If the flash drive is small and involves storing small files, then it is better to format it to the FAT32 system. It is best to format a large flash drive in exFAT. For external hard drives that have a USB 3.0 connector, formatting to NTFS is the ideal solution.
This article examined file systems, methods for formatting them, as well as formatting a flash drive for NTFS in Windows XP.
To format a flash drive into the NTFS file system in Windows XP, let's look at several methods. The first method is to format the flash drive using the Windows XP operating system itself. The second way is using third-party programs. Attention, as a result of formatting, all data contained on the flash drive will be deleted; before formatting, save all information!
Formatting a flash drive to NTFS using Windows XP tools
By default, in Windows XP the NTFS file format is not available. There are two types of formatting available: FAT and FAT32. In order to be able to format a flash drive in NTFS format, you need to change the type of data caching for writing to removable devices. The thing is that there are two types of data caching:
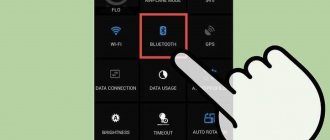
- Optimization of fast execution - recording caching occurs, which improves work with a flash drive. To correctly shut down the flash drive, you need to use the “safe shutdown” function.
- Optimization of quick removal - write caching mode is not used, which in turn allows you not to use the “quick removal” mode; you can simply remove the flash drive from the USB connector. So:
Start –>
Control Panel
->
System
->
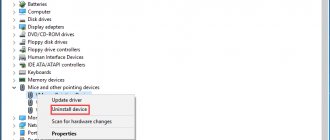
Device Manager
->
Disk Devices
->
In the list of devices we find our flash drive
->
Go to the properties of the flash drive
->
Look for the Policy tab, in the Policy tab change the switch to Optimize for execution and click
->
OK
Now the function of formatting a flash drive into the NTFS file system will be available in Windows XP. Go to the properties of the flash drive and in the drop-down list - File system, select the NTFS option, click start and wait for formatting to complete.
Do not forget, with this method, all data from the flash drive will be deleted; if it is valuable to you, save it in another location. There is a method that allows you to save data without loss, also using the Windows XP operating system itself.
Formatting a flash drive to NTFS using Convert.exe
The Windows XP operating system has a built-in program Convert.exe - File System Conversion Utility, which allows you to format a flash drive without losing data. But even in this case, it is recommended to back up all data recorded on the USB flash drive. To format an NTFS flash drive using convert.exe, follow these steps:
The information in this article will be useful to you even if you are not going to format the flash drive for the NTFS file system.
The fact is that sooner or later you decide to buy a flash drive for some of your needs. And if earlier, when USB drives had a capacity of less than 4Gb, then everything was fine even with the FAT32 file system, because anyway it was impossible to write a larger file there.
Nowadays there are flash drives of 32Gb or more. In this case, if you decide to copy a movie to it in one file that weighs more than 4Gb, you will not be able to do this with the FAT32 file system.
But this will become possible if you reformat the USB drive to NTFS
. Below you will find detailed information on how this is done for different versions of Windows operating systems.
Through the built-in file system conversion utility convert.exe
Windows has another tool for creating the file structure of a removable drive. Its important feature is the function of converting file systems of drives without deleting data from them. That is, using the utility built into Windows, you can easily convert the FAT32 file system to NTFS. There is no reverse function in convert.exe.
This is done using the command interpreter.
- Launch the command line by entering “cmd” in the Run window or the “Start” search bar.
To open the window for executing system commands, press the key combination “Win + R”.
- In the window, type a command like convert i: /fs:ntfs /nosecurity /x, where:
- conver – call a utility to convert the file system;
i – parameter – letter label of the flash drive (can be viewed in “My Computer”);
- /fs:ntfs – specifying the target NTFS file system;
- /nosecurity – parameter indicating that the data stored on the flash drive will subsequently be available to all users;
- /x – force stop the drive, if it is in use.
- We start the conversion process by pressing “Enter”.
- We wait about ten seconds for the utility to do its job.
- When the line “File system conversion is complete” appears, close the command line by clicking on the cross or entering the “exit” command.
We go to the flash drive using Explorer or a file manager and make sure the integrity of the files located on it and check the file system.
Keep in mind that to convert the file system, there must be a few percent of free space on the flash drive, and in case of conversion, it is still better to create a backup copy of the data located on the USB device.
How to format a flash drive for NTFS
In order to correctly format a flash drive in the system in NTFS under Windows XP, you first need to change the drive optimization.
- first you need to click on the My Computer shortcut on the desktop and select the flash drive;
- then, right-clicking on the desired flash device, go to the list that appears and at the bottom of the list click on the Properties function;
- when switching, you need to select the Equipment tab;
- in the All disks window, click on the flash drive, and at the bottom of the window - Properties;
- then go to the Policy tab, click on Optimize for execution and click on the OK tab;
- After all the manipulations have been carried out, you can carry out formatting work.
The correct procedure for formatting flash drives includes the following points:
- In My Computer, select the flash drive and right-click on it. In the list that opens, select Format...;
- then a window will appear in which you need to select a file system;
- after this, you need to set the cluster size (how to choose the cluster size was discussed above);
- Next, set the volume label;
- and click on the Start tab.
After all the steps, the flash drive will be formatted in NTFS under Windows XP.
It is known that the FAT32 file system prevents copying a file that weighs more than 2 gigabytes. Therefore, users often have a problem regarding how to format a flash drive from FAT32 to NTFS.
There are several ways to format a flash drive correctly in the system.
Third party programs
Finally, if the above methods for some reason did not produce a positive effect, and the flash drive is not formatted again, it can be converted to NTFS using special utilities like HP USB Storage Format Tool, Acronis Disk Director, HDD Low Level Format Tool, etc.
If you look at the first program, its interface is almost an exact copy of a standard Windows tool. However, as practice shows, this application works much better and more efficiently.
Using conversion instead of formatting
If the flash drive is not formatted in NTFS again, Windows can offer another tool that allows you to change the file system type, but without formatting, which few people know about. As stated, the data on the drive will be saved. But it’s better not to risk it and immediately move them to another place.
For this operation, use the command console (cmd in the Run menu). In it, for example, for a device with the letter “e”, the line convert e: /fs:ntfs /nosecurity /x is written, after which the enter key is pressed. To exit when the operation is complete, use the exit command.