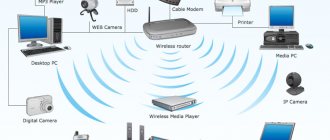
Nowadays, various manufacturers present a huge number of models of wireless routers, so device developers are forced to find their niches in the electronics market. A striking example of the successful implementation of this task were routers with support for USB modems. Moreover, the mobile network can be used either as the main one or as a backup one. Such models are popular among users in the country and in cars, due to their provision of significant mobility. This article provides a description and instructions for setting up the “tp link tl mr3020” portable router.
Mobile router
The Chinese manufacturer has provided its “Tp link tl mr3020” device with a very laconic and attractive design, without forgetting maximum practicality. Many will say that a simple copy was made from Apple devices, but this is only externally, because... The big advantage of the rather powerful hardware of the device is its versatility and adaptability (the device, despite its exceptional compactness, works perfectly with almost all major operators and mobile Internet providers).
Setting up and flashing the TP-Link TL-MR3020 router
TP-Link TL-MR3020 is a compact wi-fi router designed for accessing the Internet using an external 3G modem. Works great with Tandem 3G modem running OpenWRT firmware
Attention! Firmware is not installed on version 1.9!
You can download OpenWRT firmware for the TL-MR3020 router here:
Router setup:
- Connect the router to the computer using a network cable (WAN\LAN socket) or connect to a Wi-Fi network.
- Connect the 3G modem to the router using a USB cable
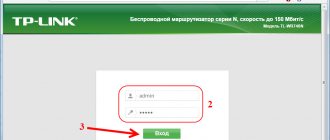
- Open your internet browser and enter the address: 192.168.0.254
- Enter your username and password to log in to the router management. Default login: admin password: admin
- In the router management console, go to the System Tools section, then to Firmware Update. Select the firmware file downloaded from the link above and click the update button.
- The firmware will take no more than 3 minutes. After flashing the firmware, the router will reboot. Enter 192.168.1.1 in the address bar of the browser - now you can log in to the router management console at this address. If a window appears like the one below, click Manage and Settings Luci.
- The login to enter the console is root, the password is not set, you can set it later yourself. Click Login.
- Go to the Network -> Interfaces menu, click the add a new interface button.
- Enter the name of the new interface without spaces, using only letters and numbers. Select UMTS/GPRS/EV-DO for the new interface protocol. Click apply.
- A window for detailed settings of the new interface will open. Fill in the fields as shown in the figure, fill in the APN field in accordance with your operator. Click save and go to firewall settings.
- Check WAN and click Save and Apply.
- If everything is configured correctly, a new WAN interface will appear in the interfaces menu and after a while it will connect to the Internet. The number of packages will increase. You can already check the functionality of the Internet.
- To configure Wi-Fi, go to the corresponding menu item. Go to Interface Configuration and enter the name of your network in the ESSID field. Leave the rest of the settings unchanged and go to the Wireless Security tab.
- Select the encryption type - WPA2/PSK - the most common and reliable encryption mode. In the key field, enter the password for your Wi-Fi. Click Save and Apply
This completes the router setup. Don't forget to leave your feedback on our website in the Projects menu.
Brief description of the device
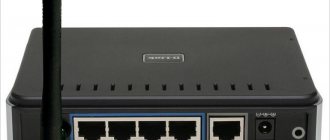
The front part of the tl mr3020 router has 5 indicators of device operating modes.
The side panel contains miniUSB and Ethernet connectors (for supplying power to the device and connecting to a network or computer, respectively). The manufacturer also installed a mode switch here.
There is a USB connector on the other side of the device. This is where the USB modem should be connected.
Device overview
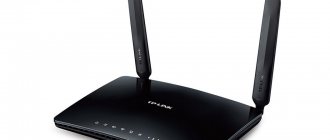
TP-Link is positioning it as a portable 3G/4G router running on the 802.11n Wi-Fi standard. The device looks very stylish and is very portable. On the top panel there is the inscription TP-Link, and there are also light indicators indicating the connection status. At one end there is a USB port for connecting a 3G/4G modem, at the other there is a connector for a wired connection, a socket for charging and connecting to a laptop, as well as an operating mode switch. On the bottom panel there is a sticker with the serial number.
The dimensions of the device are 74 × 67 mm with a thickness of 22 mm. The physical switch allows you to use the router as a 3G router, portable access point and WISP client router. Power comes from the network adapter or from a laptop to which the device is connected via a microUSB port. Its portability makes it ideal for travel. You can use mobile Internet anywhere within the coverage area. In addition, you can connect a modem via cable in a hotel room or at home and distribute the network to all portable electronic devices. Data exchange up to 150 megabits per second will allow you to complete any task.
What other features of TP-Link TL-MR3020?
- support for more than 120 models of USB modems;
- high level of security thanks to WPA/WPA2 support;
- quick setup using WPS technology;
- 300 megahertz processor and 32 megabytes of RAM.
Contents of the box with the router (device included)
The small light box contained the following:
- The router itself is “tl mr3020”;
- Flat Ethernet cable;
- Power supply adapter;
- USB-miniUSB cable.
The cords are short and justify the portability concept. Everything is done in white and light colors.
FOR UPDATE
IMPORTANT: To avoid problems when updating the software, please read the following information about the update procedure.
- Check that the hardware version and software version match. Installing the wrong software version may damage your device and void your warranty. (Usually V1.x =V1)
It is NOT recommended to install a software version that is not intended for your region. Click here to select your region and download the most current software version.
- DO NOT turn off the power during the update process as this may damage the router
- Do NOT update your router software over Wi-Fi unless this is the only way.
- It is recommended that all users stop using all Internet applications on the computer or disconnect the network cable from client devices before updating.
Note: Configuration files may not be installed correctly on new firmware versions that require a factory reset.
Recommendations for updating software: Wi-Fi router, Wi-Fi router with ADSL2+ modem, Wi-Fi signal amplifier
| TL-MR3020_V1_140123_RU | ||||||||||||||||||||
| Publication date: 2014-01-23 | Russian language | File size: 3.45 MB | ||||||||||||||||||
| ||||||||||||||||||||
Functionality and settings
The functionality of the “tl mr3020” is no different from routers used at home. It can be successfully used in an apartment by connecting a network to it via an Ethernet connector, after which this “little thing” will provide the entire house with Internet.
However, the main advantage of the device in question is the ability to use a USB modem, because The hardware filling and firmware “tp link tl mr3020” allows you to easily “digest” all USB modems sold in Russia by the three main mobile operators.
Installation and connection
Before setting up the connection, the TP-Link TL-MR3020 router must be positioned correctly. If it is connected to the computer with an Ethernet cable, it is installed close to the system unit. When setting up a wireless connection, it is better to place the router so that all rooms have the same signal reception.
After installation, you need to select the desired operating mode using the switch. When setting up access to 3G/4G networks, connect a USB modem, and, if necessary, connect the LAN connectors on the router and computer cases with a cable. If you are connecting to a wired provider, insert the Ethernet cable into the LAN connector of the router.
Connect the USB cable included in the kit to the mini USB port on the router body. Connect the other end of the cable to a USB port on a computer or laptop, to a network adapter or Power Bank. Turn on the device.
Operating modes
The device is capable of operating in the following 3 modes:
- Broadcast the Internet via Wi-Fi using a USB modem;
- It can use the existing Wi-Fi network and distribute its own Internet, and also use the incoming signal using the Ethernet connector for this;
- Use as an access point.
Setting up a router is not difficult and does not require much time. It is necessary to use the cord provided in the box to connect the router to the PC and, through a browser, by logging into the “admin panel”, make the necessary settings.
Connecting a PC to a Wireless Network
A smartphone/tablet is also suitable for setting up a TP-Link modem, but we will consider the good old connection from a PC or laptop. If the router is working, then it is already “distributing” the wireless network (or expanding its coverage area using WDS technology). It is called standard and boring - like TP-Link_15616, and is visible from any device. It works without a password and this needs to be changed as soon as possible.
We connect the computer to the new Wi-Fi network. The wireless connection icon in the Windows tray will be crossed out with a cross (or another icon of missing Internet).
You can configure your TP-Link router through a browser. We enter 192.168.1.1 (without www) into its address bar: this is the router’s control panel. Remember - the IP address, plus the login and password are printed on the bottom of the case? So, instant authorization - and we are in the depths of the access point. If it is possible to change the language, then in the case of TP-Link you can do this with confidence: the company is famous for its decent translation of its firmware.
How can I change my access code?
In order to ensure security and inaccessibility of the router settings to strangers, you need to change the password.
For this purpose, you need to click on “System Tools” and then “Password”, then the settings are performed according to the following algorithm:
- In the lines of the previous code and name, type admin;
- Next, in the new name section, you can again type “admin”;
- Then you need to come up with your own code and type it in the new password column;
- Then confirm that the password is entered correctly (depending on the device firmware).
Portable wireless…
Page 37
- Image
- Text
TL-MR3020
Portable Wireless 3G/4G Router
User guide
— 26 —
Key type
– You can select the WEP key length (
64-bit
,
128-bit
or 152-bit
) for encryption.
Disabled
means that key entry
WEP is not possible.
For 64-bit
encryption – You can enter 10 hexadecimal
characters (any combination of 0-9, af, AF, null key is not allowed) or 5
characters in ASCII encoding.
for 128-bit
encryption – You can enter 26 hexadecimal
characters (any combination of 0-9, af, AF, null key is not allowed) or 13
characters in ASCII encoding.
For 152-bit
encryption – You can enter 32 hexadecimal
characters (any combination of 0-9, af, AF, null key is not allowed) or 16
characters in ASCII encoding.
z
WPA/WPA2-Personal
Version
– You can choose one of the following versions:
o Automatically
– One of the options is automatically selected
authentication: WPA-Personal
or
WPA2-Personal
depending on
capabilities and request of the wireless station.
o WPA-Personal
– PSK (Shared Key) WPA password.
o WPA2-Personal
– Password PSK (Shared Key) WPA2.
Encryption
– Select
Automatic
,
TKIP
or
AES
.
Password
– You can enter characters in
ASCII
or
hexadecimal
format. Length must be between 8 and 64 characters if selected
hexadecimal
format and from 8 to 63 characters if selected
ASCII format
.
Group key update period
– Set the interval in seconds
key group updates. The value must be 0 or 30, or higher.
Enter 0 to disable the update.
5. Click Next
and you will be taken to the next page (see Figure 3-27). click
Reboot
to reboot the router and the settings take effect.
Internet setup procedure
Open “Network” and then enter “Internet Access”, where you define one of the following methods for connecting to the global network:
- Use as a priority 3G or 4G connection (WAN - backup);
- Use as a priority WAN connection (mobile network - backup);
- Use WAN without alternative;
- Use a mobile network (3G or 4G) without an alternative.
Setting up a connection via a mobile network
Below are two configuration options via 3G/4G:
- In order to set up a connection using a USB modem, you need to enter “Network” and then go to “3G”, where in the “Region” item indicate “Russia”, in the “Mobile Internet Provider” column indicate the name; then put o and o. Finally, click on the “Save” button;
- If the required “mobile Internet provider” is not available in the drop-down menu, it is recommended to go to “Advanced Settings” and install it. Next, enter the listed information and click on the “Save” button.
3G/4G setup
Before using a USB modem, you need to configure its connection:
- Go to “Network” - “3G/4G”.
- Select the region "Russia".
- In the “Service Provider” field, select your operator from the drop-down list.
- Check the “Connect automatically” checkbox.
- Do not change the "Authentication Mode".
- Save the setting.
This setup usually does not cause difficulties even for inexperienced users
If the operator is not on the list
TP-Link firmware takes into account most large operators, but some small regional operators will not be able to be automatically connected. In this case:
- Without selecting a region or operator, click the "Advanced" button.
- Enter the “Dial Number”, APN, “Username” and “Password” yourself. This data can be found in the agreement with the operator. If it is lost, call your operator and ask to dictate the necessary data.
- Set "MTU Size" to 1480.
In most cases, manual configuration is not required
Setting up a PPPoE connection
To do this, you need to take the following steps sequentially:
- In the “WAN Connection Type” line, indicate “PPPoE/Russia PPPoE”;
- In the “User Name” item, enter the name written in the contract with the provider;
- In the “Password” column, enter the code from the contract. Then sometimes it is necessary to enter “Confirm Password” - it depends on the firmware of the device;
- Set o to “Disable”;
- In the “WAN Connection Mode” section about;
- Next click on “Save”.
Setting up an L2TP connection
To do this, you need to take the following steps sequentially:
- In the “WAN Connection Type” line, indicate “L2TP/Russia L2TP”;
- In the “User Name” item, enter the name written in the contract with the provider;
- In the “Password” column, enter the code from the contract. Then sometimes it is necessary to enter “Confirm Password” - it depends on the firmware of the device;
- Set o;
- In “Server IP Address/Name” enter the server IP (extract from the contract);
- In the “MTU size” item, change the number to 1450 (you can specify a lower value);
- In the “WAN connection mode” section, set a dot on the “Automatic connection” item;
- Click on “Save”.
Procedure for setting up PPtP (VPN), if the IP address (DHCP) is issued automatically
To do this, you need to take the following steps sequentially:
- In the “WAN Connection Type” line, indicate “PPPoE/Russia PPPoE”;
- In the “User Name” item, enter the name written in the contract with the provider;
- In the “Password” column, enter the code from the contract. Then sometimes it is necessary to enter “Confirm Password” - it depends on the firmware of the device;
- Set o;
- In “Server IP Address/Name” enter the server IP (extract from the contract);
- In the “MTU size” item, change the number to 1450 (you can specify a lower value);
- In the “WAN connection mode” section, set a dot on the “Automatic connection” item;
- Click on “Save”.
Procedure for setting up PPtP (VPN) if the IP is static
To do this, you need to take the following steps sequentially:
- In the “WAN Connection Type” line, indicate “PPPoE/Russia PPPoE”;
- In the “User Name” item, enter the name written in the contract with the provider;
- In the “Password” column, enter the code from the contract. Then sometimes it is necessary to enter “Confirm Password” - it depends on the firmware of the device;
- Set o;
- Next, fill in the fields (copying them from the contract): “Subnet Mask”, “IP”, “Main Gateway”, “Server IP Address/Name”. In the “DNS” item, you can enter the DNS of the user’s provider;
- In the “WAN connection mode” section, set a dot on the “Automatic connection” item;
- Click on “Save”.
The process of setting up Wi-Fi on a router
To set up Wi-Fi, you must first open the “Wireless” window. Next, in the menu that appears, perform the following steps:
- In the “SSID” section, enter the network name;
- In the “Region” column indicate “Russia”;
- In the “Channel” item set “Auto”;
- The “Mode” field define “11bgn mixed”;
- Then set “Channel Width” to “Auto”;
- Then about;
- Next, check the box “Enable SSID broadcasting”
- Click on “Save”.