Causes
Like any other malfunction, there are several reasons for the appearance of this blue screen:
- System files or drivers are damaged.
- The problem is in the power supply settings.
- Presence of viruses.
- Conflict services.
- Lack of virtual memory.
- Outdated configuration.
- Malfunction of RAM memory.
- Malfunction of other components.
The above reasons also apply to another similar error:
- "video memory management internal"
The methods for eliminating it are identical.
After we have become familiar with all the possible reasons, we will move on to analyzing and solving each item.
If the OS does not boot, then all actions must be performed from safe mode.
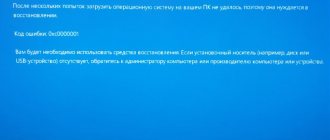
Memory Management error code - causes and solutions
The appearance of the “blue screen of death” causes panic among most users. They believe that this is the first signal indicating the need to reinstall the operating system. Among the most common causes of malfunction are:
- Driver failure or conflict.
- Recently installed new hardware that is out of sync with the OS.
- Programs that have recently been updated fail to function.
- A malicious utility was installed.
- There is a virus in the device memory.
- System files have been damaged by a virus attack.
- There were problems with the operation of the old device.
All these reasons for the error can be corrected yourself by carefully following the instructions. Before you begin, you must read all step-by-step guides to the end. If the user updated the drivers and after that a blue screen began to appear, you must perform the following steps:
- If you know which program caused the crash, you should try to return it to its previous version (roll back). Actions are performed through the “Device Manager”. In the list that appears on the monitor, you need to select the device whose program has been updated.
- Select “Properties” in the window that appears and switch to “driver”.
- Next, in the list that appears, click “Roll back driver”. The reason for performing the rollback must be indicated by selecting the appropriate item from those offered to the user by the operating system.
- Next you need to click “Yes” and wait until the previous version of the program is updated. This will take a few minutes. If, after performing the steps described above, the device began to operate in the same mode, then everything was done correctly.
If the cause of the failure was the connection of a new device, the first thing to do is disconnect it from the system. Most likely, it appears due to a conflict between drivers of incompatible or out of sync devices. You can correct the situation by installing new compatible drivers.
One of the most common reasons why the Memory Management error appears is malfunctioning (or old) hardware. Anything can cause a failure - malfunctions of the hard drive, sound card, RAM, etc. Therefore, in order to find out the root cause of the error, it is necessary to conduct a comprehensive diagnosis of PC components.
Checking important files
As a result of damage to system files, the operation of individual applications and the entire system can be disrupted. Therefore, first of all, I recommend checking the integrity of important files.
You can do this in the following way:
- Open the command line.
- Enter the phrase “sfc /scannow”.
- Press the “Enter” key.
- We wait for the operation to complete and restart the computer.
This tool is not always able to eliminate existing problems. Therefore, in addition to it, you must use the “DISM” utility. Internet access is required for it to work.
Instructions for launching "DISM":
- Launch the command line.
- Enter the phrase “DISM /Online /Cleanup-Image /RestoreHealth”.
- Click on the “Enter” key.
- After which the automatic downloading and replacement of damaged files will begin.
- We wait for the procedure to complete and reboot the computer.
Additionally, it is recommended to check the file system with the chkdsk utility.
Setting up a clean launch
If a Memory Management stop code appears after installing new software, it must be identified and removed.
For this:
- Click on the “WIN + R” keys, enter the phrase “msconfig” and click “OK”.
- In the first “General” tab, activate “Selective launch” and uncheck all the options.
- We move to the “Services” tab, activate the “Do not display Microsoft services” option and click “Disable all”.
- Click “Apply”, then “OK” and close the window.
- You will be asked to reboot, select “Exit without reboot”.
- Using the combination “CTRL+SHIFT+ESC”, launch the task manager and go to the “Startup” section.
- Now, using the right click, we disable the autorun of each program.
- Reboot the computer.
After that, repeat all the actions that caused the blue screen with the Memory Management error. If the failure does not occur again, then the problem is in one of the disabled services or applications. To identify a faulty component, you must turn on each of the services and programs one by one.
What is Video Memory Management error
It appears when the device’s video memory management is violated. If such a failure occurs frequently, it’s time to solve the problem:
- Install the ST Cleaner program on the equipment. It will not only clean system files, but also ensure that programs work efficiently.
- This error code indicates that the video card drivers are incompatible with the device, or the program is not working properly. To check if this is indeed the case, you need to temporarily disable your graphics drivers (via Device Manager).
Often this error occurs due to missing Java Runtime Environment software components.
In this case, Java is often reinstalled. The Programs and Features control panel allows you to view and uninstall all Java Runtime Environment components. To reinstall the software, it is recommended to first update the Intel HD Graphics Control Panel (improves graphics settings).
Identifying a conflicting driver
If you remember which device was last installed on the system, then simply remove it and check the result. If not, then you will have to look for an unstable driver from the very beginning.
We proceed in order:
- We start the OS in safe mode with command line support. To do this, at the time of startup, you need to press the “F8” key and select the appropriate item.
- Open the search using the “WIN + S” key.
- Enter the phrase “verifier”, right-click on the found component and run it as administrator.
- When the User Account Control window appears, you need to click on the “Yes” button.
- Check the option to create custom parameters and click Next.
- Activate the tests shown in the screenshot below and click “Next”.
- Oh and click “Next”.
- Wait for information about installed components to load.
- In the new window, click on the “Supplier” column. This way we will sort the list of applications by manufacturer. Check the boxes for all applications that are not supplied by Microsoft and click Finish.
- Next, a message will be displayed asking you to reboot, close it and restart the computer manually.
- If the system boots and starts working stably, this means that no problems with the drivers have been detected. Otherwise, you will see additional boot options from which you need to select Troubleshooting.
- Go to the “Advanced Settings” section.
- Select the item to view other recovery options.
- Go to “Download Options”.
- Next, click “Reboot”.
- In the list of boot modes, select “Safe Mode with Command Line Support”.
- Press the “WIN + R” keys, enter the “cmd” command in the only column and click “OK”.
- In the window that appears, enter the command “verifier / reset” and press “Enter”.
- Then we execute another command “shutdown -r -t 0”. The first will disable the looped reboot, and the second will boot the system in normal mode.
- After the OS boots, you need to go to the path “C:\Windows\Minidump”.
- The final folder will contain a file with the extension “.dmp”. To open this format, I recommend using the BlueScreenView program. Then something like this will be displayed:
At the bottom of the window, faulty components that cause the Memory Management error will be highlighted on a pink background. All that remains is to copy the names of the files and enter them into a search engine to determine which program they belong to, and then delete it.
How to fix?
Before starting work, I strongly recommend creating an OS restore point. Also, before following the instructions, please read them all the way through first.
Advice! If the error occurs while loading the operating system and you did not configure the creation of a restore point, then create a bootable Windows 10 USB flash drive using another work computer. Distribution.
Identifying and fixing the problematic driver
First, you need to find out which of the drivers loaded into memory caused the blue screen of death error:
- Enter Safe Mode. This will help avoid further mistakes.
- Enter verifier in the search bar
- In the Driver Validation Manager that opens, select “Create custom settings (for program code)” and click “Next.”
- Select the following test types: Special Pool.
- Mandatory IRQL check.
- Pool tracking.
- Deadlock detection.
- Security checks.
- Checking compliance with DDI requirements.
- Other checks.
Important! When checking, the system will display a blue screen with an error if it detects a violation when loading the PC. The operating system will reboot cyclically and will not allow you to log in.
If an error occurs, don't panic. After 2 unsuccessful attempts to boot the OS in a row, “Diagnostics” will start. If this does not happen, use a bootable USB flash drive to go to “Advanced options”.
Go to Diagnostics → Advanced Options → Startup Repair → click Restart and select Safe Mode with Command Prompt.
In the command line that opens, write:
- disabling verifier /reset
- reboot the computer in stationary mode shutdown -r -t 0
Advice! If a restore point is created, you can simply roll back to the operating state of the OS. Go to "Advanced options" → "System Restore" (using a restore point) and select a saved point to roll back.
Now you need to open the file with the scan results. It is located at: C:\windows\minidump
Use BlueScreenView. Open a crash dump to analyze the failed driver. It is highlighted in pink.
Based on the file name, use Internet search engines to determine which driver it belongs to. For example, NETwew01.sys refers to the Intel Wireless WiFi Link Driver.
The driver that failed needs to be reinstalled manually using Device Manager. Look for the driver you need on the official websites of the developers.
Advice! If within 24 hours after starting the check there are no more blue screens, the problem is not in the driver.
Hardware problem
A BSoD error is possible when the hardware is faulty. Analyze the hardware for errors:
- Use Memtest86 to analyze your RAM for errors.
- Then check the hard drive for bad sectors and bads.
- If you frequently encounter blue screen errors, update to the latest BIOS version.
- If the error occurs on devices with a built-in battery, use the “Balanced” power mode when working from the network. You can set it by right-clicking on Start and selecting “Power Options”.
Important! It is possible that a BSoD error was triggered by malware. Scan your system with free virus detection solutions Dr.Web CureIt! or Kaspersky Virus Removal Tool.
If you have a question while reading the article, write it in the comments or use the feedback form. Users of Microsoft products and the resource administration will try to help you.
RAM diagnostics
It is worth noting that diagnostics can last several hours, the exact time depends on the total amount of RAM. If you are not willing to wait, then move on to the next section.
So, how to start diagnosing RAM:
- A standard tool is available to Windows 10 and 8 users. To launch it you need to press “WIN+R”, enter “mdsched.exe” and click “OK”.
- Select the “Reboot and check” option. After this, the window will close, save your important data and restart your computer. Diagnostics will start automatically when the OS starts.
- Wait for the procedure to complete, then pay attention to the “Status” line; any errors found will be displayed here.
An alternative option is to use the MemTest86 utility. It runs under DOS and is independent of the operating system used. Suitable for both old Windows 7 and new Windows 10.
After replacing faulty RAM sticks, the Memory Management blue screen will no longer bother you.
Checking RAM
It’s worth noting right away that testing the correct operation of RAM takes a long time, during which it is not always possible to ensure uninterrupted diagnostics.
Therefore, if you are not ready to spend 3-4 hours (on average) checking the operation of the RAM, proceed immediately to the next step. For testing, you can use both standard tools and specialized software.
To start:
- Press the key combination “WIN+S” and execute the command “mdsched.exe”;
- The “Windows Memory Checker” window will open in front of you, where you need to click on the “Reboot and check” button.
After clicking the button, the window will close, save all open documents and restart your computer. The diagnostic utility will automatically start scanning when the operating system starts.
In addition to this test, you can use the Memtest86 program, which has long been recognized as a leader in this software category.
After downloading and burning the program onto bootable media, do the following:
- Boot from the created media by setting its priority boot in the BIOS or using the “Bootmenu”;
- After activating the program, “Memtest86” will begin automatically scanning the RAM, and you will not be required to do anything.
The check is cyclical and will continue until you complete it yourself. But it is necessary to take into account that a complete check of even one stick of RAM can take about 5-7 hours, so the best option would be to leave the computer with the program running overnight.
All errors found in RAM operation will be marked in bright red, leaving no chance of missing them.
The further course of action depends on the number and content of errors, for example, removing the RAM sticks and cleaning the contacts, or actually replacing the RAM.
Hard drive failure
A hard drive is a mechanical device that wears out over time and requires replacement. Run disk diagnostics using Victoria or MHDD.
If a large number of inaccessible sectors and errors are detected, you should urgently transfer important information to another device and purchase a new drive, preferably an SSD. It is SSD that is recommended to be used for the OS.
Malware
Also, do not exclude the possibility of your computer becoming infected with malware. Viruses can not only slow down a PC and steal important data, but also disrupt operation by causing various failures. It is often possible to fix the Memory Management error by searching for and removing all existing threats.
Instructions for performing the test:
- If the OS boots and there is access to the Internet, then you need to download anti-virus scanners and carry out the first scan with their help. It is advisable to run the scan in safe mode.
- If the OS does not boot, then you need to download all the same utilities through another device and transfer them using a flash drive or portable HDD to the main PC.
- Upon completion, it is recommended to install a comprehensive antivirus and perform the final scanning procedure.
- Clean your computer and registry using CCleaner or Reg Organizer.
After performing the above procedures, you can check the result by first restarting the computer.
Solution methods
The method for eliminating Memory Management error code 0x0000001a in Windows 7, 8, 10 will directly depend on the cause of the occurrence.
New software installed
In this case, you need to remove recently installed programs and roll back to previous versions of the device driver. You also need to perform a “clean” start of the system. For this:
- Press the key combination “ Win ” and “R ” .
- In the input field enter "msconfig", press "OK».
- Oh, uncheck the box next to "Load startup items».
- Go to the "Services", put a tick next to the item "Don't display Microsoft services" and click on "Disable all».
- Open Task Manager, tab "Autoload" On it, disable all applications by right-clicking on each one and clicking on the corresponding item.
- Restart your computer (PC) and reproduce the actions leading to the error.
How to fix error 0x0000007b when booting the system
If the error stop 0x0000001a does not appear, start all services, applications, and also update drivers one by one to identify the faulty component.
System files are damaged
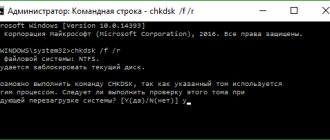
System files should be checked for integrity. For this:
- Enter in the search bar "cmd", right-click on the result.
- In the console that opens, enter the command “sfc /scannow».
- After the operation is completed, check the system with the command “chkdsk C:/F /R" You can enter it after the previous one.
- The system will issue a notification that verification is possible the next time it starts. Press “ Y ” , then “ Enter ” on the keyboard and restart the PC.
Driver conflict
Windows 7
For Windows 7, the procedure for fixing a blue screen with a memory management error is as follows:
- Go to menu "Start» — «Execute" Enter " verifier", press "Enter" The verification application will launch. Select the item " Non-standard parameters».
- Make active the item "Select individual parameters from a complete list».
- Select all items except "Simulating resource shortages" and press "Further».
- Reboot and examine the results.
Windows 8 and 10
In Windows 8 and 10, to fix the Memory Management error, we follow the following algorithm:
- Start your PC in safe mode. Go to line " Execute" and enter the command "verifier».
- In the window that opens, select “Create custom parameters».
- Check boxes Special Pool, Mandatory IRQL Check, Pool Monitoring, Deadlock Detection, Security Check, Other Checks, and DDI Compliance Check. Click " Further».
- Activate the item "Select driver name from the list».
- Sort drivers by supplier, disable products.
- Reboot to start the scan. Go to catalog " windows\minidump» on the drive. Use the BlueScreenView utility to read the memory dump. Study the information, pay attention to the files highlighted in color. This is where the cause of the error lies.
Fixing the error: System restore has been disabled by the administrator
Viruses in the system
The most banal, but this is also the most serious problem. It is worth installing an antivirus, for example, using the healing utility “Dr.WEB CureIT!”
Checking RAM and hard drive
Attention should be paid to storage devices. It is advisable to create a bootable USB flash drive and write the “memtest86” and “VictoriaHDD” programs onto it to scan the RAM and hard drive.
Checking the power supply
Sometimes it helps to fix the memory management error in Windows 7, 8, 10 by switching the PC to balanced operating mode . To do this, go to the “ Control Panel ” and find the “ Power Options ” item in the list. Set to balanced mode.
New equipment was installed
If you have recently installed a new RAM stick, a new hard drive, or a peripheral device on your PC, you should disable it . Often, a Memory Management error occurs due to incorrect interaction between the device and the motherboard. Before reinstalling the device, turn off the power to the PC and reset the BIOS settings to the original ones by closing the corresponding contacts on the board or removing the battery for a few minutes.
Other Possible Problems
Last but not least, the problem may appear due to an outdated version the motherboard BIOS It should be updated by first downloading the latest version from the manufacturer’s official website.
Cleaning the registry with utilities such as CCleaner and Auslogics Registry Cleaner can help.
Setting up the power plan
Try changing the power supply type to “Balanced” mode.
How to do it:
- Launch the run window with the command “WIN+R”, enter “powercfg.cpl” and click “OK”.
- Activate the “Balanced” item and close the window.
Check the result.
Driver Update
In more rare cases, BSOD with a Memory Management error can be eliminated only by updating the drivers. There are two ways, the first is to find and download each driver from an official source or use an automatic download program.
The second method saves a lot of time and is suitable even for inexperienced users. Therefore, let's consider the entire procedure using his example.
There are many automatic update applications, the most popular of which are SamDrivers, Drivers Pack Solutions and Driver Booster. Personally, I recommend using the latter option.
Detailed instructions:
- Download, launch the utility and click “Start”.
- We wait for the scan to complete, check all components and click “Update now”.
After completing the procedure, reboot the PC.
Virtual memory
It is possible that the blue screen with the “Memory Management” message appears due to insufficient virtual memory. Therefore, I propose to increase it.
For this:
- Press “WIN+R”, enter the command “sysdm.cpl” and click “OK”.
- Move to the “Advanced” section and in the “Performance” subsection go to “Settings”.
- Go to the “Advanced” tab and in the “Virtual Memory” section click “Change”.
- Uncheck the automatic volume selection option and activate “Specify size”. In the initial value column, enter “3500” and the maximum “7000”, then click “Ok” and close the open windows.
We reboot the system.
OS update
Updating Windows 10 can fix the Memory Management error and also improve the stability of your device.
- Enter the word “update” into the search bar and run the update checker.
- If you have new software, install it and then restart your PC.
After this, the problem should disappear.
You can start the Windows 7 update procedure through Windows Update, which can also be found using the search bar accessible from the Start menu.
MEMORY MANAGMENT WINDOWS 10 - error and its causes.
There are several main reasons why the unfortunate death screen appears. Here are the most common ones:
- Problem with newly installed hardware;
- The recently updated driver failed;
- A virus or malicious utility in the memory;
- Damage to system files by a virus or malicious utility;
- Problem with old equipment;
Below we will try to save you from the MEMORY MANAGEMENT by following the steps sequentially. All that is required of you is attentiveness and accuracy.
All actions. What you do on Windows and your computer is done at your own risk, and only you and no one else is responsible.