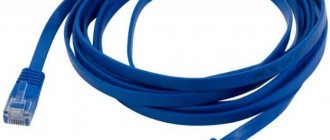
Network cable
As you already understand, the main “players” in solving our problem will be the network cable, network card, router (if possible).
Let's figure out where you can get them and how to prepare them for work.
The network card won't last long; it's hard to imagine even a non-modern computer or laptop without this device.
In 99.9 cases it is present in the computer and especially in the laptop.
So let's move on.
First, decide how long the network cable you need. If you use it only for temporarily connecting a laptop to a computer and only for data transfer, then a length of 2 meters will be sufficient. This is quite enough for comfortable work.
But if most of the time the laptop will be connected to the computer, and even more so if it is in another room, then measure the distance from the laptop to the computer and increase the resulting length by 1.5, this will protect you from unaccounted distances (corners, kinks etc.).
The type of network cable is twisted pair, it is not difficult to purchase, or you can simply order it via the Internet.
But pay attention to the category, it must be at least Cat 5.
How to connect the system unit to a laptop
The local network
The system unit and laptop can be combined into one local network. Most often, a local network between two such machines is created using a router. To establish such a connection, make sure that both machines (system unit and laptop) are equipped with an Ethernet interface, and that you have a network cable. Routers have several ports for connecting a corresponding number of devices, as well as a port for connecting to the Internet. They usually differ in color, but you can also tell them apart by their names. LAN connectors intended for devices are grouped by color and have numbers, and the WAN connector that provides Internet access to this network has a different color and is located separately in the router case. If you use this type of connection, the cable from your Internet provider must be connected to the WAN port, and the system unit and laptop, which we connect into a local network using a router, must be connected to the LAN ports, respectively.
Network output on the system unit
NOTE. When using Windows operating systems on devices, setting up such a network is very simple. Most of the communication between devices is done automatically, but you should pay attention to how you obtain an IP address from your ISP. Therefore, specify the correct method from those suggested in the properties of the IPv4 protocol.
Network output on a laptop
Such a connection of two machines into a local network also allows you to set up data exchange between them. To do this you will need:
- select a folder to share;
- right-click on the icon of this folder and select the “Individual people” option in the “Give access to” context menu;
- select users who will have access to this folder;
- set the folder access mode (two options are available - “Read” and “Read and Write”);
- click the “Share” button.
Granting access to folders
Now this folder will be available to selected users on the local network.
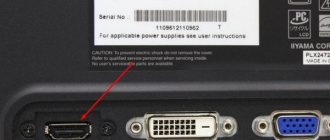
8P8C or RJ45
The computer is connected to the laptop using a network cable via special RJ45 connectors, the correct name is 8P8C.
To do this, the 8P8C connector must be connected to the network cable according to the diagram using a special crimp.
But, as a rule, there is no such crimping at home, and this matter requires skill, so we recommend immediately purchasing a network cable with connectors connected to it.
What does crimp look like?
In many stores they won’t even charge you money for this service, and if they do, it won’t be much.
Ready-made solutions are also already sold - patch cords. These are ready-made network cables with all the connectors mentioned above, ranging in length from 50 cm to 15 meters.
This is an excellent solution for people who travel a lot around the world and go on frequent business trips.
How can you connect?
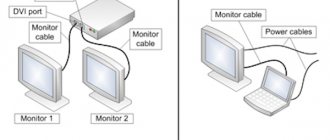
A laptop computer has the typical components of a desktop PC, including a display, so it makes sense that a method would exist. And he exists, and not even alone. Since each device runs on its own system, simply connecting the system unit to a laptop will not work, even if there are suitable connectors. Despite your enthusiasm, the device will load its own operating system. In order for one device to display information that comes from another, their functioning must be synchronized. Having only a PC system unit and a laptop at your disposal is not enough. To implement this plan, you will need additional means to ensure connection. Let's look at how to use a laptop as a monitor in different ways.
Switching with cable
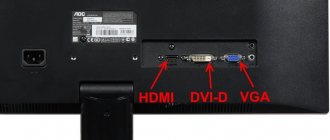
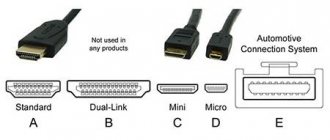
To connect via cable, you need to acquire the appropriate cord. The connection is made through HDMI, VGA or DVI video ports, depending on the option supported by the devices. Modern devices can be equipped with a DisplayPort connector, an alternative to HDMI. It is also possible to use an adapter if the ports of the devices do not match.
Option 1
You can make a laptop work as a display using HDMI, VGA or DVI video ports. To do this, perform the following steps:
- We connect the cord at one end to the corresponding port of the laptop, and at the other end to the connector on the computer;
- We start the laptop and go to “Display Settings” in any convenient way, for example, through the Control Panel. You can get to the settings section in different ways depending on the version of Windows OS. You can go to “Properties” by right-clicking the context menu from the desktop - select “Display Properties” - open the “Options” tab.
In the case of MacOS, open “System Preferences” and go to the “Monitors” tab, the remaining actions are similar to manipulations with Windows;
- The system will detect connected devices, so in the Screen settings item there will be a picture with several displays under numbers. Here we select the second one and install the laptop display;
- Mark the points for displaying visual data;
- If you plan to use your laptop as your default computer monitor, o.
Option 2
In addition, devices can be connected via Ethernet ports, in which case the method involves creating a local network. The Ethernet connectors of the laptop and the system unit are used for connection. We will need an appropriate cable (twisted pair), on both sides of which there are Ethernet connectors (RJ 45 standard). The wire is usually 0.5-15 meters long, which is enough to complete the procedure. We connect one end of the cable to the LAN port of the laptop, the other to a similar connector on the computer’s network card.
Remote access using software
A laptop running Windows 7 or higher can be connected to the system unit wirelessly using the Air Display application. The software is installed and activated on both devices. Using the program, you can switch displays, as well as use them simultaneously. Using a laptop as a monitor is possible when using remote access programs, such as TeamViewer, RDesktop, ZoneOS ZoneScreen, RAdmin, etc. With their help, you will use the display remotely. Each application has its own configuration nuances; you need to install the software on both a PC and a laptop. When a connection is established, one of the devices becomes a server, the other becomes a client; when performing actions from the master device, everything that is being performed on the server’s screen is displayed on the client’s screen. Pairing devices using TeamViewer is easy. To do this, you need to know the password and computer ID, which will be assigned when the application is launched on it. In the program window running on the laptop, you will need to enter this data in the appropriate fields. After this, the PC desktop will be available from the laptop display with the ability to control it, and the condition for the manipulation is a working computer monitor. Otherwise, the method is not suitable.
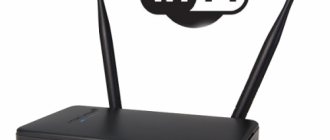
Pairing devices using Wi-fi wireless transmission
An alternative to a wired connection is a connection via a Wi-fi signal. The method is suitable when a desktop PC is equipped with a Wi-Fi module, but there is no cable or desire to use it. Almost all models of laptop computers integrate Wi-fi, with rare exceptions (in which case you can connect an external module in the form of a USB device). To use the laptop screen as a monitor, do the following:
- We activate the Wi-fi module on the laptop, as well as on a desktop PC. If you don’t have one on your computer, you can purchase a module with the ability to connect to a USB or PCI connector. It is better to choose a USB device, since a module plugged into the PCI port of the motherboard is not always convenient to use;
- We create a wireless network on one of the devices;
- To do this, go to the Network and Sharing Center through the Control Panel;
- Select the item “Create and configure a connection or network”;
- In the new installation wizard window, select from the list of options to connect manually;
- Fill in the fields (network name, security type, password), check the box for automatic startup when connected, click “Next”;
- The manipulations made ensure the creation of a network; it starts automatically. Once everything is ready, you can connect to it from a second device.
It is also possible to use a router, which allows you to connect several devices at the same time and combine them. A special program called MaxiVista can help you make a laptop a monitor for a system unit using Wi-Fi transmission. It is paid, but it is possible to use the version to get acquainted with the reduced functionality. After installing the software, the modules need to be configured remotely, indicating the sequence of monitors.
Setting up a local network
So, you have a network cable with connectors connected to it. Next, you need to connect it via 8P8C connectors to the network cards of your laptop and computer by inserting them into the RJ45 connectors, as shown in the photo.
The physical local network has been created, now it needs to be configured correctly.
Let's assume that you have Windows 7 OS.
Click “Start” and go to the control panel.
Next, go to the Network and Sharing Center.
Next, look at the menu on the left and go to the “Changing adapter settings” section.
If you already have a computer connected to a laptop, then in this section there should be a network connection icon, for example, as in the photo below.
Point the mouse at this network connection and right-click to bring up the menu.
Go to the “Properties” section.
Select the “Internet Protocol Version 4 (TCP/IPv4)” section and double-click on it.
In the window that appears, enter the following data:
- “IP address” – 192.168.1.1;
- “Subnet mask” – 255.255.255.0.
We don’t change anything else, he presses the “ok” button.
Now we do the same manipulations with the laptop, only where the IP address is indicated we set it to 192.168.1.2 and save everything by clicking “ok”.
That's it, the connection between the computer and the laptop is done, now you need to check if it works.
How to connect?
It is recommended to adhere to the following algorithm (using Windows 7 as an example):
- Turn off your PC and laptop.
- Connect one end of the HDMI cable to the laptop, the other to the HDMI output on the video adapter (not to the monitor).
- Turn on your PC and laptop.
- On your PC, go to the “Control Panel”, open the “Display” menu, go to settings.
In Windows 10, to get to the screen settings, go to “Windows Settings”, in the “System” section. Or even simpler - right-click on an empty space on the desktop, the “Display Settings” tab.
- In the “Multiple screens” drop-down menu, select “Extend desktop” (or duplicate, create a new desktop - it all depends on the needs of the user).
- On the laptop, too, go to the “Display” settings and select “Display desktop 1” (or “PC Monitor” - the parameter may be called that way, depending on the brand). After this, the image from the PC will be displayed on the display.
- In most modern laptops, switching operating modes of the built-in display can be done using hotkey combinations. The most common combinations are Fn+F4 and Fn+F8. You can find out more in the technical documentation or on the labels on the keyboard itself.
If there is no “Extend desktop” or “Duplicate desktop” item in the “Display” settings, then either the graphics adapter itself or the driver does not support this function. It is possible that the cable is faulty and is not transmitting a signal.
The following video explains how to set up multiple displays in Windows:
Similar image output settings can be set through the proprietary software of the graphics accelerator (NVidia, AMD, Intel, SiS). Moreover, in many cases there are more functions. For example, in software from NVidia you can not only configure the output of an image to a third-party display, but also at the same time adjust its brightness, contrast, or even enable “portrait orientation” of the displayed image.
After connecting the laptop to the PC via HDMI, the sound is automatically transmitted along with the video signal, and the audio card built into the PC is disabled. You can change this parameter in the “Control Panel”, in the “Sound” tab (by choosing the built-in audio codec instead of HDMI). Otherwise, no sound will be output to the headphones or PC speaker system.
Similarly, you can use a PC monitor as an additional or external display for your laptop. But in this situation, it will be easier to simply connect the monitor directly, bypassing the graphics accelerator of a personal computer.
Checking if the connection is working
The result of our work can be checked using the command line and the special PING command.
Don't be alarmed, there's nothing scary here.
We approach the device on which the IP address 192.168.1.1 was set; it can be either a computer or a laptop, depending on how you configured it.
By pressing the hot keys “ Windows + R ” (Windows is located to the left of Alt), we call up the “Run” window.
Then enter the command “CMD” into the line and click OK.
You will see a window like this.
As shown in the photo below, enter the command “PING 192.168.1.2” and see what the system “tells” us.
And the system tells us that 4 packets were sent, 4 were also received, which means the connection is established and the computer and laptop are connected.
Don't forget to share the disks and files you will be working with over the network.
Method 4. How to connect a computer to a computer via a USB cable
Let me make a reservation right away that connecting one computer to another via
a USB cable directly will not work
, since the USB cable itself is wired in such a way that there must be a master and a slave device. To create such a connection, you will need a special USB cable with a built-in chip, which are sold on various websites.
Typically, such a cord comes with a disk with drivers that ensure the operation of this device. If drivers are not included, they can be supplied automatically by the system itself. The cord may also include a file manager specially created to provide the functionality of this device. With its help, you can easily exchange files, just run it on both computers.
- After connecting and installing drivers, additional network adapters will appear in your network connections.
- We go to the Network Control Center
along the path described above, find our virtual adapter that appears and right-click on it and select
Properties
. - And then double-click on Internet protocol version 4
, and set the address IP168.3.1 (standard subnet mask) on one computer, and 192.168.3.2 (same mask) on the other. - We confirm and exit, now in the network environment of each computer we will see another computer.
Connecting the PC to the laptop
The procedure for connecting a laptop and a system unit is extremely simple due to the presence of special ports on literally all modern devices. However, the type of connection may differ significantly based on your connection requirements.
Method 1: Local Network
The topic under consideration directly concerns the creation of a local network between several machines, since connecting a PC to a laptop can be easily achieved using a router. We talked about this in detail in a separate article on our website.
In case you encounter any difficulties during or after connection, you can read the instructions for solving the most common problems.
Method 2: Remote access
In addition to directly connecting the system unit to the laptop using a network cable, you can use programs for remote access. The best option is TeamViewer, which is actively updated and provides relatively free functionality.
If you use remote access to a PC, for example, as a replacement for a separate monitor, you will need a very fast Internet connection. In addition, you should use different accounts to maintain a constant connection or resort to Windows system tools.
Method 3: HDMI cable
This method will help you in cases where the laptop needs to be used exclusively as a monitor for a PC. To create such a connection, you will need to check your devices for an HDMI connector and purchase a cable with the appropriate connectors. We described the connection process itself in a separate instruction on our website.
Modern devices may have DisplayPort, which is an alternative to HDMI.
The main difficulty you may encounter when creating such a connection is the lack of support for an incoming video signal on the HDMI port of most laptops. Exactly the same can be said about VGA ports, often used to connect PCs and monitors. Unfortunately, it is impossible to solve this problem.
Method 4: USB cable
If you need to connect the system unit to a laptop to work with files, for example, copying a large amount of information, you can use a USB Smart Link cable. You can purchase the necessary cable in many stores, but keep in mind that it cannot be replaced with a regular two-way USB, despite some similarities.
Note: This type of cable allows you not only to transfer files, but also to control your PC.
- Connect the main USB cable and the adapter included in the kit.
Connect the adapter to the USB ports of the system unit.
Connect the other end of the USB cable to the laptop ports.
Wait for the automatic installation of the software to complete, confirming via autorun if necessary.
You can configure the connection through the program interface on the Windows taskbar.
Use standard drag-and-drop to transfer files and folders.
Information can be copied and, having switched to a connected PC in advance, pasted it.
Note: File transfer works in both directions.
The main advantage of the method is the presence of USB ports on any modern machines. In addition, the availability of connection is also affected by the price of the required cable, which fluctuates around 500 rubles.