Completely disabled network
This problem is especially common on laptops. Many models have a special Wi-Fi indicator, which is located next to the battery charge indicator. If it is off or flashing red, there is a possibility that the network is disconnected.
To quickly enable your wireless network, you will need to follow these step-by-step steps:
- Press the Fn and F key combination. A function menu will appear where you can select to turn on the network.
- Use the Win + I key combination to go to Windows System Settings.
- Select the tab called “Network and Internet”.
- In this tab, you need to select the “Wi-Fi” functional section and make sure that the wireless connection is turned on, or, if necessary, move the slider to the “On” position.
Disabling TCP Autoconfiguration
A conflict in TCP protocol settings is another popular reason why the Internet may disappear or be disconnected for a while. Setting the settings manually will help both with a direct cable connection and with a wireless connection.
- To do this, just access the device properties: next to the clock in the lower right part of the screen, right-click on the connection icon and select “Network Center”.
- In the window that appears, carry out similar actions with the involved device and select “Properties” in the menu. In the list of components that are in the second field, select “TCP/IPv4” and call up the settings by clicking again on the “Properties” button.
- In the first field, enter the IP address, increasing the value after the last dot.
- Leave the subnet mask, which is written in the second field, unchanged.
- In the “Default gateway” field, enter the address of the router, which is indicated on the device body.
- DNS server addresses are usually left unchanged.
Saving the settings is confirmed by pressing the OK button.
BIOS settings are gone
The key combination for entering the BIOS is different for each computer model, but most often in Windows 10 the F2 key is used. You must enter the BIOS immediately before booting the device.
Once you enter the BIOS, in the Configuration tab you will need to find a functional section called WLAN or Wireless LAN. It is this line that is responsible for wireless communication. Make sure that it is set to Enabled (or select it if the opposite value is Disabled).
Secure network without Internet in Windows 10
In Windows 8/10, when the Internet is not working, a wireless network error may be accompanied by the message “No Internet connection, secure” or the message “Unidentified network”. This happens when, after successful work for many days, the Internet suddenly stops working.
Windows 10 message about suddenly lost access to the Network
But the “Protected” status is an indicator of working WPA-2 encryption; the “Protected” inscription appears on all detected wireless networks that are closed from unauthorized access with a software key. Consequently, its other semantic part - “No Internet connection” - reports that access to Network resources has been lost either on the router itself or on this PC/laptop/tablet.
The error “No Internet connection, protected” is specific to Wi-Fi networks, but “Unidentified network” is a common case for all networks, including cable.
You can try to fix the error by restarting Windows 10, turning off and then turning on the router, and also by unplugging and inserting the provider cable (or USB modem - when using mobile Internet). But when the problem is more serious, use the instructions below: the “No Internet connection, secure” error is only part of the overall problem, the solution of which must be approached comprehensively.
Checking connected devices through Device Manager
The reason Windows 10 won't connect to Wi-Fi may be due to a problem with the wireless transmission device itself. To verify this, you need to go to the device manager:
- Press the Win + X key combination to open the system menu.
- In the “Device Manager” functional window, find the “Network Adapters” section, where there is a complete list of devices currently connected to the computer.
The same check can be done using the “Adapter Properties” window. To do this you need:
- Right-click on the wireless network icon and select “Properties”.
- In the window that appears, you can see detailed information about the wireless adapter model, developer, description and version of the current driver.
- Here you need to find Internet Protocol version 4 TCPIPv4 and click on “Properties”. In the window that opens, check the boxes next to “Obtain an IP address automatically” and “Obtain a DNS server address automatically.” Save the changes by clicking OK, and then recheck the presence of a wireless network.
If you don't have this information or you don't have a wireless connection, use the following steps:
- Try updating your Wi -Fi . This can be done from the “Device Manager” window by right-clicking on the device and selecting “Update Drivers”.
- Try disabling this module completely . This can be done from the “Device Manager” window by right-clicking and selecting “Disable”.
After these manipulations, it is recommended to restart the computer. Sometimes several reboots in a row help.
How to solve a network adapter driver problem
Quite often, network problems are caused by errors or incorrect network adapter driver settings. In addition, sometimes Windows Update or third-party programs install on the system a driver that is not suitable for your network card. Of course, in this case it will not work stably.
How to update or roll back a network adapter driver
- Press Win + R. Type the command devmgmt.msc and press Enter .
- Expand the Network adapters and find the device that is causing the problem (it could be a Wi-Fi adapter or network card). Right-click on it and select Properties .
- Go to the Driver .
- If the Roll Back is active, click on it. The system will install the previous version of the driver. After this, you should restart your computer. If the problem is due to the new version, this step will help you. To avoid automatically installing an updated but incorrect driver, you can disable driver updates.
- If rolling back the driver did not solve the problem (or this option is grayed out), click on the Update driver .
- Select Automatically search for updated drivers . Windows will try to install a new version of the driver if it finds one. After this, you should restart your computer.
- If the previous step did not fix the problem, visit the website of the computer or motherboard manufacturer, download the network adapter driver from it and install it.
How to prevent the network adapter from turning off to save energy
When a non-critical computer component is not in use, Windows can turn it off to save power. The network adapter is also classified as “non-critical”, so you should take care to disable the power saving option.
- Press Win + R. Type the command devmgmt.msc and press Enter .
- Expand the Network adapters and find the device you need. If there are several of them, repeat the described operations for each.
- Right-click on the driver and select Properties .
- Go to the Power Management .
- Uncheck Allow the computer to turn off this device to save power and click OK .
Problems with the wireless distributor (external modem)
Most consumers install such modules to provide data transfer speeds much higher than they currently are. There are practically no problems with new modems, but older models experience numerous connection failures.
You can try pressing the “On/Off” button of the modem. This manipulation will completely reboot it and reset the connection. You can also pay attention to the state of the color indicators - the Wi-Fi indicator light should light green. If this indicator does not light up or lights up red, then there is a clear problem in the modem module itself.
External modem
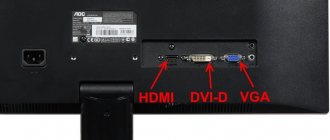
An external modem is an option for many PCs. The interface (unlike USB) has hardly been updated, so old devices are quite suitable.
In a matter of seconds, the OS recognized the installed modem, and now we can find our neighbors’ access points.
All that remains is to check if everything works!
This is what we were talking about: a modern OS can update to a new configuration almost instantly.
And now we again see the same list of networks on the third device. If it were not possible to immediately start showing the networks, then we would have to download the driver.
The problem is outdated drivers
This problem occurs very often. Drivers are released almost every month, and a computer system with a constant connection to the Internet is always looking for the latest drivers.
Manipulating driver updates through Device Manager does not always help. In this case, you need to resort to search engines, indicating in the request the exact model of the modem to download special software. Downloading must be done from the official website of the router manufacturer to avoid infecting the device with viruses.
The best option is to download special programs (for example, DriverPack Solution, Driver Booster, Snappy Driver Installer), which not only detect missing or outdated drivers, but also automatically download and install their appropriate version.
How to enable Wi-Fi in Windows 10 if there is no Wi-Fi button?
In this issue we will try to figure out how to enable Wi-Fi in Windows 10 if there is no Wi-Fi button. Where can I look for wireless network settings to turn on Wi-Fi and why does this problem occur? I'll tell you about the error “We couldn’t find wireless devices on this computer” in Windows 10.
I’ll say right away that when you cannot find “Wi-Fi” on your laptop (there is no power button, there is no item in the settings, etc.), then most likely you simply do not have the Wi-Fi driver installed, you do not have a Wi-Fi receiver, or it is turned off.
Let's look into everything in detail.
So the crux of the problem:
The whole problem is that we cannot connect to a Wi-Fi network on Windows 10. I have already written a detailed article on connecting to Wi-Fi. But, when we open the connection management window, there is simply no control button for the Wi-Fi adapter.
If we go to the settings, to the network parameters, we also won’t find the “Wi-Fi” item there. And on the Airplane Mode we will see the highlighted error “We couldn’t find wireless devices on this computer .
This problem could mean that:
- Your computer simply does not physically have a Wi-Fi receiver. If you have a laptop, then it should have a built-in wireless adapter. On your computer, you can use an external Wi-Fi receiver. If you are absolutely sure that your computer has Wi-Fi (you used it before installing Windows 10, looked at the specifications, connected an external receiver, etc.), then you need to check other reasons.
- The driver for the Wi-Fi adapter is not installed. In some article I already wrote that Windows 10 itself installs the driver for wireless adapters. But not always. And these drivers do not always work as they should. Therefore, the most common reason for such problems with Wi-Fi in Windows 10 is the lack of a wireless adapter driver, or an inappropriate driver.
- Well, it may be that the “Wireless Network” adapter is simply disabled.
One small nuance. If you have an “airplane” icon on your notification panel instead of the Internet icon, then simply turn off this mode by clicking on the icon itself and turning off the “Airplane” mode.
Let's check and fix it.
No Wi-Fi on a Windows 10 laptop: problem solving
Let's first check if the Wireless Network , and if you don't have this adapter at all, then let's make sure that the problem is in the driver, or in the absence of this adapter in your computer.
Right-click on the Internet connection icon in the notification bar and open Network and Sharing Center. In the new window, select Change adapter settings.
If you see the "Wireless Network" (or something like that) there, and it is disabled, then right-click on it, and select Enable . After this, Wi-Fi should appear on your laptop and you can connect to the wireless network.
If there is no “Wireless Network” adapter at all, then, as I already said, your computer most likely does not have a Wi-Fi driver installed. Or it is installed, but does not work stably.
Problems with the Wi-Fi adapter driver in Windows 10
We need to go to the device manager and see what's there. Is there a wireless adapter and how does it work? To do this, click on the Start and select Settings .
Next, select Devices .
At the bottom of the page, go to Device Manager .
In Device Manager, open the Network Adapters . There may be several adapters, but there are two main ones. These are: LAN - for connecting the Internet via a network cable to a network card, and a wireless adapter . As a rule, the name of the wireless adapter contains the word “Wireless” . This is what the Wi-Fi adapter looks like in Device Manager on my laptop:
As you can see, the name indicates the manufacturer and model. If you have an adapter in Device Manager and it is enabled, but you still cannot turn on Wi-Fi, then try updating the driver for your adapter.
If there is no driver, or the adapter itself is missing, then you won’t see it in the device manager either.
But, please note that if there is no adapter in the manager (but there is one on the computer), then there should be at least one “Unknown device” in the device manager, as in my screenshot. In this case, you need to try installing the driver for the Wireless adapter.
How to install or update the Wi-Fi adapter driver?
If you have a laptop, then go to the manufacturer’s official website, through the search, or through the menu, look for your model, there, find the section with driver downloads, and look for the driver for the Wireless adapter. Please note that there will most likely be an option to select your operating system. Select Windows 10. If there is no driver for Windows 10, you can try selecting Windows 8 (8.1). Also, the driver may be on the disk that usually comes with the laptop (but it is unlikely that there will be a driver for the “ten”).
Save the driver to your computer and simply start installing it. If you downloaded the archive, then the archive should contain an installation file that you just need to run and follow the instructions. After installation, restart your laptop and try to connect to the Wi-Fi network (Wi-Fi must be turned on).
If you have a desktop computer with a USB/PCI adapter, then look for the driver on the website of the adapter manufacturer. According to the adapter model. Well, you should also have a driver disk.
As for updating the driver, we do everything the same as in the case of installation: find it, download it to your computer, and install it.
WATCH THE VIDEO
How to enable Wi-Fi in Windows 10 if there is no Wi-Fi button?
By the way, if you suddenly forgot the password for your Wi-Fi, then watch the episode in which I tell you how to find out the password for your Wi-Fi.
Well, that's all for today, friends! Please write in the comments whether you were able to connect to the Wi-Fi network. And also subscribe to our channel if you haven’t already and be sure to click on the bell to receive notifications about the release of new videos.
Problems with network device discovery
To verify this problem and solve it, you need to:
- Go to “Wireless Network Settings”.
- Select the “Advanced sharing options” section.
- In the tab that opens, you need to check the box next to “Disable sharing.” This will make it possible to disable Internet sharing of folders, files and other information on the computer, and will also allow you to enable the wireless network.
Watch the video that discusses all the options for fixing the problem when Windows 10 does not connect to Wi-Fi:
Problems connecting Windows 10 to Wi-Fi can have a number of causes. You can try to solve it in various ways, first checking the functionality of the modem itself. If the cause cannot be found and solved, you should seek help from qualified specialists.
Previous post Reasons for the TV not connecting to Wi-Fi and how to fix them
Next entry MikroTik RB2011iL-RM Router: characteristics, performance, price, reviews
How to turn on the network on a laptop
WiFi is unstable on a Windows 10 laptop - reasons and solution
Surely, many users know that a combination of hot keys has been invented to turn on Wi-Fi. This procedure must be done correctly. To do this, you need to hold down Fn and F5. After this, a window should appear on the monitor screen in which you need to check the “Wireless network adapter” option.
Next, you need to go to the settings and turn on the network:
- Use a keyboard shortcut such as Win and I. This action will open the Windows Settings window.
- Then you will need to log into the network and turn on Wi-Fi mode by checking the appropriate box. To do this, you need to open the “Control Panel” and find the “Network and Internet” option there.
- After performing this action, a window will open in front of the user, as shown in the picture.
- In the window that opens, you need to click on the message called “Show available networks.” As a result, a menu should appear in the lower corner of the monitor, which will show all currently available Wi-Fi networks.