How to type in Word 2007, 2010 and others
The printing process itself should begin only after all the text in the document with which we are performing this procedure is completely ready. So let’s prepare it first.
Preparing document text
Making the cover
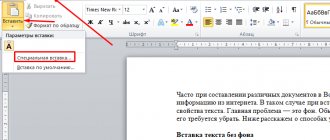
First, let's create the first home page. To make it beautiful and presentable, we use the built-in capabilities of the Word program. In the main menu, go to the “Insert” tab, and on it we find the “Pages” section. It contains “Title Page”. From the proposed options, choose the one that suits the style and you like the most.
You also need to fill in all the necessary information and, if necessary, you can slightly edit the template itself to suit your requirements.
Putting down page numbers
The “title” is ready, and therefore we can safely move on to numbering. To do this, in the same “Insert” tab, activate the “Page Number” button. Select placement (bottom, top, left, right) and format from a separate menu in the same list below. And also the user has the opportunity to insert footers or headers. There you can indicate the number or title of the current chapter, author and similar data.
Formatting sections
It is important to correctly format the beginning of sections from a new page from the beginning. Many people mistakenly press the “Enter” key to transfer to a new sheet. With further editing, insertion, or cutting of text on other pages of the book, it is quite possible that the beginning of the section will shift. This will entail the need to edit the entire document. We recommend using the Page Break option.
First, place your mouse cursor where the new chapter begins. Go to the “Insert” tab and click on the corresponding button there. But you can do it easier - press the key combination on your keyboard “CTRL+Enter”.
Setting up printing in portrait format
At this point, there are at least three important settings to make:
- Set margin sizes.
- Indicate the placement of two pages on one sheet.
- Set up duplex printing in the printer properties.
To the right of this menu is a preview window. When you make changes to the parameter settings, you will immediately see the effect. We recommend viewing it in full before sending for printing. If you find errors, problems or shortcomings, you can still correct them and prevent unnecessary waste of paper.
You can configure brochure printing using the page settings:
- Access this menu by clicking the corresponding shortcut in the print settings window.
- Select the orientation "Landscape", specify the type "Booklet", and the number of pages per sheet 4 and click "OK".
- Go back to the window and now specify the binding size.
What to do if there is no duplex in the printer
Unfortunately, not all, even modern, printers are equipped with automatic two-sided printing (duplex system). But you can also print in book format using this technology. The only disadvantage of this situation is the additional inconvenience of rearranging sheets of paper after printing the text on one side. Therefore, first experiment and find out how to properly re-put paper in the tray so as not to ruin it.
Preparing text for printing using Microsoft Word 2010
Before figuring out how to print a book in Word 2010, you need to understand the process of preparing it.
The first stage is making the cover. Go to the “Insert” tab, click on the “Cover Page” button and select the appropriate option. The proposed templates can be changed at your discretion. If none of the cover options suits you, simply remake any of the templates as needed.
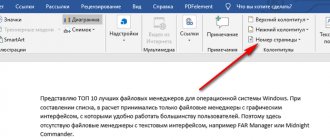
The next step is page numbering. Go to the “Insert” tab, click on “Page Number” and set the necessary settings. The numbers can be placed at the top, bottom or in the margins. The program also allows you to add a chapter number and start numbering from any number.
If desired, you can also make headers and footers indicating the author of the book, its title, chapter, etc. The necessary buttons are located to the left of the “Page Number”.
Microsoft Word automatically opens the Design tab when you click on the header and footer. There you can set additional settings. For example, the cover usually does not indicate a number, so it makes sense to check the “Special footer for the first page” box.
If the book has several parts, you should use the “break” option. Of course, you can do without this and move the beginning of each chapter to a separate page using the Enter key, but in this case any change, including adding or deleting pieces of text or changing the font, will lead to the placement of headings being confused and the document will have to be redone . When you set a chapter break, the chapter starts on a new page and the title is always at the top. To use this option, place the cursor at the beginning of the text you want to wrap, and then click on “Page Break” in the “Insert” tab. You can also use the keyboard shortcut Ctrl + Enter.
There remains the last stage of preparation for printing the book. You need to set fonts for headings, subheadings and paragraphs, set the margin size, align the text, make sure all the pictures are positioned correctly and adjust them if necessary.
How to print as a “book” without Word
If you do not have the Word program or its use is not suitable, then you can print the book without it. The editor or printer properties should allow you to configure the following settings:
- Printing more than one page per sheet.
- Book orientation.
- A4 paper format.
- Two-side print.
There is one more, perhaps the most important, step. Pages must be printed in a specific sequence. To understand exactly how, you should do a little experiment. Take several pages of paper, turn them into landscape format and fold them in the center. Write down the numbers in pencil, and then lay out each sheet separately. Notice which numbers are on one sheet. Thus, it will become clear to you in what order you need to place this or that page on the sheet on one side and the other.
Manual book printing setup
Let's look at an example. Let's say our book consists of 20 pages. We will need 5 sheets of paper to print it. We will place them in the following order: first and last, second and penultimate, third and third from last, and so on. In the end it will be like this - 20, 1, 2, 19, 18, 3, 4, 17, 16, 5, 6, 15, 14, 7, 8, 13, 12, 9, 10, 11.
Cover
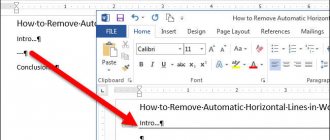
Removing extra table rows
On the tab
We find “ Title page ” and choose one of the proposed options. For business text, the “Conservative” style would be appropriate. Before the article, two sheets with tables consisting of one column appear. The template asks you to fill out:
- Name of the organization,
- book title,
- date and the like.
The abstract is located on the second sheet, which corresponds to the inside of the cover. If you don’t want to fill it out, select the cell and press the right mouse button. In the drop-down window, click “Cut”, the tooltip text will be deleted, and the table itself will remain in place. This way, the article will start on the next page, and the cover inside the brochure will remain blank. When you click on “Delete rows,” not only the table cell is removed, but also the page, which in this case is not necessary.
Special programs
As for any other purpose, for printing a book there are also special utilities for such actions. They may be provided free of charge or with some restrictions. But if you only need to use it once or a few times, then this “moment” should not bother you. Let's take a closer look at the most popular ones in this direction.
ClickBook
- Download the program from the Internet. It only takes up about 11 megabytes.
- Unpack the archive and start the installation.
- Open your document in Notepad or any other editor.
- Click the “Print” icon or the CTRL+P combination. There you should select the ClickBook printer. Click print.
- The document will open in ClickBook. ABOUT.
- As a result, we will receive text divided into pages, ready to be printed as a book.
What are the responsibilities of a layout designer?
When preparing a publication for release, a graphic designer not only deals with document formatting; his responsibilities include assembling the book; first, the sheets are folded into notebooks and then into the finished book. It is important to ensure that the sheets are arranged in the correct sequence in order to maintain page numbering.
In professional graphics programs, the assembly of printed sheets occurs automatically; for this, it is extremely important to properly plan the printing of the document. The layout designer will determine the type of document printing: black-and-white or full-color printing, and a combination of options for different pages. Before printing a book or magazine, the layout designer must work through and prepare all the images that will be in the document.
To do this, all the features of the image are studied on special monitors so that the printed version matches the original. In addition, it is important to consider the type of paper on which the book or magazine will be printed, so that the ink does not “bleed” or “squash” in the finished image.
Page layout
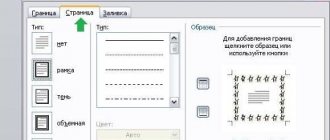
In this section, you select the width of the indents from the edges of the sheet and set the paper size. To do this, click on the “Fields” button and then “Custom Fields”. In the “Margins” tab, select portrait orientation and set the margin and binding parameters. You can do this by eye or stick to standard sizes:
- top – 15 mm;
- lower – 30 mm;
- inside – 20 mm;
- outside – 20 mm;
- binding – 0 mm.
The margins must be at least 5 mm! In the “Paper Size” tab, the default format is A4; if you want to print the book on sheets of a different size, specify the length and width manually. For example, for A5: width - 148 mm, length - 210 mm. In the “Paper Source” tab, in the “Distinguish between headers and footers” section, check the box next to even and odd pages. Click OK.
Creating a book layout yourself step by step
You will need Word 2007-2010, but you can also use version 2003. Here we provide an example step by step for the most popular book format A5 (60x90/16):
- Launch Word editor
- If you are using Word 2003, then select the menu command File - Page Setup . In Word 2007-2010, on the Page Layout , click the Page Setup at the bottom of the ribbon. Page Settings dialog will appear on the screen .
- In the Page Setup , on the Paper Size , set the Width to 14.5 cm and the Height to 20.5 cm, be sure to make sure that the Apply is set to Entire Document .
- On the Margins , set all margins to 1.5 cm, and in the Binding to 0 cm, be sure to make sure that in the Apply , To the entire document is checked .
- On the Paper Source select the Edge to Header to Header margins of 1.5 cm, and in the Binding - 0 cm, be sure to make sure that in the Apply , To entire document is selected .
- Insert page numbers in the layout using the Insert - Page Numbers .
- Next, mark up the text and headings with fonts, align everything in accordance with your plan, and collect the content.
What to consider when creating a layout
When creating a layout, you should consider some nuances:
- the first page of the book will act as the title, the last will be used for the imprint;
- in paragraphs beginning with a drop cap and in headings there should be no paragraph indentation;
- epigraphs, footnotes, etc. should also have a paragraph indentation;
- the text of the publication necessarily contains hyphens;
- The last line of the page should not end with a hyphen;
- You should not use more than 3 types of fonts within one book;
- the height of all stripes must be identical.
Details
Layout of books in a Word document
If you want to try yourself in this profession, then you can practice according to the simple instructions that will be in this article, and then decide for yourself how interested you will be in developing professionally in this field.
There are two ways to type out a book
Methods:
- According to the template of the desired book format, for example 60 by 90/16 (145 mm by 215 mm) or 84 by 108/16 (205 mm by 260 mm). You must insert the text of the selected book into the downloaded template. Further, these instructions can be read from the “adding headers and footers” section; you can skip the previous steps.
- Without a template in a Word document, I follow the step-by-step instructions from this article.
Step-by-step algorithm for making a book with your own hands
Settings
To layout a book, you need to create an empty Word document and configure the following styles and parameters in it.
Document markup . You can set the layout of your document in the “Page Layout” tab, here you need to select “size”, and then “other page sizes”. In the window that appears, you need to configure the required parameters for the height and width of the sheet.
IMPORTANT: the “apply” item must be set to “to the entire document”
Fields. The value of the field column is set depending on the selected book format. For a book with a format of 60x90/16, the top margin is 1.5 centimeters, the bottom is 2 centimeters, the inner margins are 2 centimeters, the outer margins are 1.5 centimeters. For the 84x108/16 format, the bottom margins are 2 centimeters, the inner margins are 2.5 centimeters, and the outer margins are 2 centimeters.
IMPORTANT: Check that the values in the following fields are correct: “Orientation” - “portrait”, “Pages” - “Mirror margins”, “Apply” - “to the entire document” After checking, just click the “OK” selection confirmation button.
Column digits. You can add column numbers in “Insert” - “Page Numbers” Tab. At your request, page numbers can be placed at the top or bottom of the page. When you select the desired option, a window will open where you can select the numbering style - page numbers can be placed horizontally or vertically, on the right, left or center of the page. After selecting a style, a window with headers and footers will open, where you can configure the display of page numbering.
IMPORTANT: For options for placing pages on the right or left, you will need to set additional settings; if you don’t want to bother with this, then you should choose the option of placing column numbers in the center.
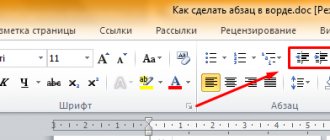
Font. The text font can be configured on the “Home” tab in the “Font” section, where you can also select its size (point). In the “Paragraph” tab, you can align the text, for example, by width, center, right or left.
IMPORTANT: for books that are planned to be printed using a professional offset method, the number of pages must be a multiple of 16. In order to adjust the number of pages to the optimal value, you can visually highlight quotes, tips, epigraphs, change line spacing or text size.
At this stage, you already have a book template ready. If you did all this with a blank document, then you can insert the finished text and proceed to formatting the text.
Text formatting
It starts with arranging and formatting all headings. This is necessary so that when creating a table of contents, the system itself recognizes the hierarchy and correctly selects chapters and sections of content.
Text:
- Headings. The heading style can be selected in the toolbar in the block called “Style”. Here you can set the value to "title" or "plain text". Headings are highlighted with the “Heading 1” style, subheadings with the “Heading 2” style.
- Footnotes In order to place a footnote on a page, you must select the “links” tab in the document menu. To make a footnote, you need to place the cursor after the desired word and click “insert footnote”, then write the text of the footnote and return the cursor to any place in the document. Links can also be placed at the end of the book, these are the so-called endnotes.
- Separating pages. If necessary, you can insert “page breaks” or “blank page” into your documents. Often such elements are used to start a new chapter on a new page or to separate the table of contents of a book from the main text. This can be done in the “Tab” tab.
Non-text elements in the book:
- Images. In order to insert an image into the text, in the “Insert” tab, you need to select the “pictures” item, then select the desired image in the dialog box. IMPORTANT: for color or black and white books, images must have a resolution of 225dpi
- Tables. To insert a table, you need to place the cursor at the desired location and go to the “Insert” tab, where we select the “table” item. From the drop-down list, select the required number of columns and rows.
Creating a Table of Contents
If the styles of both headings and subheadings have been chosen correctly, a table of contents can be created automatically. To do this, place the cursor in the place where you plan to place the table of contents (the beginning or end of the book), go to the “Links” tab menu and select the “Table of Contents” item. In the drop-down list, you can select a table of contents style or customize your own.
IMPORTANT: when editing a book, the page numbering and arrangement of headings will change, so the table of contents will have to be updated again each time. To do this, you can delete it and create it again, or use the “update table of contents” button
Formatting a book
This is not always a mandatory process, but with its help the book will look much more logical and correct:
- Hanging lines are a line of heading or text that is separated from the body paragraph and “hangs alone” on the previous or subsequent page,
- Posting pictures. Images should be placed within the width of the text without encroaching on the margins of the book. To do this, pictures are compressed to fit the width of the text and paragraph indents are not applied to them.