Font settings
First, you need to open your browser and go to settings in Chrome by clicking on the three dots in the right corner of the monitor (in older versions - three horizontal lines or a wrench).
In the menu that appears, select the “Settings” section.
Next, you need to click on “Show additional settings” at the very bottom.
Then a dialog box will open where you will need to select the “Page View” line and the “Customize Fonts” subsection.
Here you can select both the size and type of font, as well as the encoding, which may be configured incorrectly, resulting in incorrect display of the pages of some sites.
Web browser settings
In addition to scaling the page itself, users can change the size of the fonts used to display content. This is done in the browser configuration menu:
- Launch the Yandex browser.
- Open the control panel in your browser as described above.
- In the menu that opens, select the option called “Settings”.
- You will be taken to the browser configuration page. You need to scroll to the very bottom and click on the “Show Advanced” button.
- Find the section called “Web content”.
In this settings category, users can:
- Change the scale in the “Page zoom” column.
- Set the default text size in the Font size list.
- Go to the “Customize fonts” section for more subtle changes to text output parameters.
Was the article helpful? Support the project - share on social networks:
Grade: 4,87
Solving the problem of blurry and fuzzy fonts
Unfortunately, when updating the Google Chrome browser, developer bugs often appear. One of these bugs is problems with the correct display of fonts: after installing a later version, they become cloudy and lacking in contrast. But, much to the happiness of Google fans, this can be solved.
Starting with version 52, programmers for some reason removed the function of individual font customization using the useful “DirectWrite Windows” option, which perfectly solved the problem of blurry and unclear fonts with one click of a button. Now, unfortunately, this option is no longer available. And although many users demanded to restore this parameter, the developers did not heed them, and in the 53rd version there is no “DirectWrite Windows” function either. Well, well, Google programmers know better, and we will adapt to the created conditions.
Browser problems
They can present themselves in different ways in the browser. On some OSes the font simply floats, on others shadows appear, and on popular social networks (VKontakte, for example) they can be generally indistinguishable and quite strain the eyesight. For some, the letters look like they were not printed, and also crooked and slanted. All this makes surfing the Internet unpleasant and annoying.
To solve this problem, you should check the current version of Chrome. You need to type “chrome://help/” into the search engine and press “Enter”. A window will appear with information about the browser version.
If version 52 or higher, then troubleshooting tips are below. There are only two solutions to the problem:
- change browser, for example, to Firefox. Opera, by the way, has the same engine and similar problems;
- roll back Google Chrome to a version lower than 52 and enable the “DirectWrite” option.
But here the problem arises, where to get the old version. After all, you can only download the latest Chrome on the official website.
Rollback to old version
You will have to follow these steps:
Before uninstalling Google Chrome, you will need to synchronize (if not already done) with your Google account to save all your data. To do this, go to “Settings”, click on the “Login to account” button and in the window that appears, click “Other options” - “Create a new account”.
And following all the prompts, create a Google account and set up synchronization by selecting the necessary parameters, as in the screenshot below.
When you first start it, you need to type “chrome://flags/” in the address bar and in the window that opens, select the fourth line from the top with the value “Disable DirectWrite Windows” and click the “Enable” button. Then you will need to restart Chrome. After installing the old version, do not forget to disable the update in the browser, otherwise everything will go down the drain.
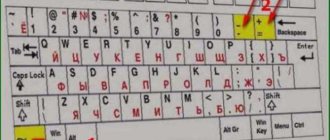
Selecting a language in the Chrome browser
When you launch Google Chrome for the first time, you may need to change the language. This is necessary for the browser to display web pages correctly. To adjust the settings, go to the “Settings” menu – “Show other settings” – “Languages” – “Change language settings”.
A dialog box will appear in which you can select the option to translate pages and the option to check spelling. You need to find a language from the list that will be used, and if it is not there, then add it (button at the bottom left).
In the window on the right, click on the “Display Google Chrome in this language” frame and restart the browser for all changes to take effect.
In Chrome, you can add or remove languages, sort them one by one according to your taste. If the user uses Windows OS, then it is possible to configure the settings for East Asian languages with complex fonts. It is recommended to add only the necessary languages, because phishing websites may use similar characters to spoof the URL.
If necessary, you can write in Chinese and Hindi in Chrome. To do this, you only need an extension from the Google store - “Chrome extension” and setting the language settings that use complex scripts in Windows.
Periodically, after updating the Chrome browser, users had problems with the font: it became soapy, fuzzy, blurry, etc. Up to version 51 inclusive, this problem was easily solved, but updating to version 52 brought a big surprise to all browser users...
In version 52.0.2743.82, which was released on July 21, 2016, the developers decided to remove the ability to individually customize the appearance of the font through the experimental option “Disable DirectWrite Windows,” which helped in case of blurriness and fuzziness.
There is no DirectWrite option now
.
How to explain such a step is absolutely unclear, but on forums, including the official Google forum, there are a huge number of angry reviews with requests and even demands to return everything back.
At the time of writing, August 6, we already have the next version of the Chrome browser (52.0.2743.116), but nothing has changed. Apparently the developers know better which font is more convenient for users and should not give them freedom of choice...
How to change the font in a Yandex web browser
There is one simple and working way to configure the font in the Yandex browser. There is a special section in the web browser menu that is responsible for text style settings. All you need to do is set the name of the desired font.
How to change the font in Yandex browser:
- Click on the stack of stripes in the upper right corner.
- Click on the “Settings” element.
- Scroll to the block called “Sites”.
- We look for the “Font Size” section and click on the “Font Settings” button.
- Set the desired font (Times New Roman is used by default).
Important! If we want to install a font not from the standard Windows set, we must first add the text style to the system.
Standard font settings:
- The "standard font" is initially Times New Roman. At the bottom there is a line that immediately displays the appearance of the text with this font;
- “Serif font” in the factory settings is set to the same as in the previous paragraph;
- The Sans Serif Font section is usually set to Arial;
- The default Monospace Font is Consolas.
We recommend:
- How to reduce screen scale in Yandex browser
How to change font size in Yandex browser
The font size should always be selected individually. When choosing a size, there are 3 main factors to consider:
- Firstly, the screen diagonal: the larger it is, the smaller the font can be set; it is still easier to see on a large device;
- Secondly, monitor resolution: as the resolution increases, desktop and browser elements become smaller. On 4k monitors it is better to use a large or largest font, and on FullHD – medium or large;
- Thirdly, the quality of vision. For people with poor vision, it is better to enlarge the font so that they do not have to look closely while reading.
How to change the font size in Yandex browser:
- Go to the “Settings” menu in the “Sites” column.
- Under the “Font Size” line, click on the drop-down list.
- Choose the appropriate text size: from very small to very large.
Healthy! If desired, we can adjust the font size in the Yandex browser much more precisely. To do this, go to “Font Settings”. Below “Font Size” we can set any value by dragging the slider to the left or right. There is also a “Minimum font size” item here. With its help, we can set the minimum size of the style in all sections of the browser and on websites.
Changing the font color in the Yandex web browser
Let us immediately note that it is impossible to change the font color throughout the Yandex browser. The only exception is if the site implements a separate color change. Quite often, forums allow you to write in different colors.
How to write a message in a different color on a forum that supports BB code:
- Frame the text with color tags with English color names. What it looks like: ;
- Specify the HEX code of the color. Not all colors have names, but using a HEX code it’s easy to specify absolutely any color. Example, . We can view the color codes here.
The BB code also allows you to set the background of the text using the tag.
On any site, it’s easy to change the text color through the developer panel, but all changes only apply until the page is refreshed. When the site reloads, the browser will return the default values.
Step-by-step instruction:
- Press the key combination Ctrl + Shift + I.
- In the window that appears on the right (or below), click on the image of the square with an arrow, which is located in the upper left corner of the developer panel.
- Select the required element.
- Pay attention to the block at the bottom of the page with the “Styles” tab.
- Click on “element.style” once.
- Enter the CSS code “color:red;” - without quotes. We can indicate colors in the form of an English name (red), a HEX code (#FF0000) or an RGB code, which has the following entry - rgb(255, 0, 0).
What problems may occur in the browser?
A problem with fonts can manifest itself in different ways. For some, the font is simply blurry and unclear. For some, the bold font has a shadow or is not at all different from the usual one:
Someone has problems with the display of the font on the VKontakte website: it is cloudy, completely unreadable, cuts and strains the eyes. Example:
For some, instead of black, all the letters are gray, barely visible on a white background:
And some users experience complete nonsense and horror: the fonts are broken and look crooked:
How to solve the problem with fonts in Google Chrome and return them to a readable state?
First, check the current version of your browser.
chrome://help/
into the address bar and press enter. The “about the program” page will open.
If Chrome version is 51 and lower, then you, and if 52 and higher, then listen carefully... Currently, there is no solution to how to make fonts clearer using Chrome itself - the developers have deprived users of influencing this by removing the DirectWrite parameter from the experimental settings!
There are only two ways to solve this problem:
- First, switch to another browser, such as Firefox. By the way, the latest versions of Opera have the same problem with fonts as Chrome, since they are based on the same engine.
- Secondly, roll back Chrome to the previous version, more precisely to the one where the problem was not yet present (51.0.2704.106), and configure the DirectWrite parameter. But there is one catch...
Google developers have outwitted everyone here too :) It is impossible to rollback through the settings of the browser itself - there is no such option. Even if you uninstall the current version of the program, you will not find installation files of previous versions on the official website.
How to zoom in on a page in Yandex browser?
A simple and fast way: press left Ctrl and turn the mouse wheel.
The scale increases or decreases depending on the direction you scroll the wheel. This works in all browsers. Another option to those mentioned above: Click the settings drop-down menu (three sticks) → There will be “+” and “-” buttons that change the page scale.
How can I increase the size of the icons on the board that displays the most visited pages, my own and built-in bookmarks? Ctrl + KM/+/- don't help.
Within small limits, you can change it if you right-click on any icon, an icon will open with a proposal to configure the display, follow the arrow and find 4 proposals, select. Ctrl+mouse wheel doesn't work for me.
How to use the “read articles” function using Alice on the Android Yandex browser?
If I understand you correctly. Then you just need to select the text and select the item - “Alice, read.” In any case, this is how it works in my Yandex Browser.
How to change the background in Yandex Browser?
In the search bar write “Yandex Browser background gallery”, follow the link to the site itself and select the background you like, click “apply”. There are animated and simple ones, with animated camera icons.
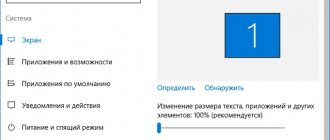
How to increase font size on windows 10 laptop?
Start - Settings (gear) - System - Display - Change the size of text, applications and other elements - select a value larger than the set one, at your discretion.
You can customize more precisely by going below Advanced screen options - Additional resizing of texts and other elements. And also increasing the size in individual applications by simultaneously pressing the CTRL and “+” key combination.
source
How to roll back to a previous version of Google Chrome
All that remains is this diagram:
Anyone who wants can search on their own, but we have already found it, downloaded it, and now we are sharing with you a link on Yandex.Disk: Google Chrome 51.0.2704.106 (there is a version for both 64bit and 32bit systems).
Now a few important notes:
- Before deleting Chrome, synchronize all the necessary data with your Google account so that it does not disappear! To do this, type chrome://settings/syncSetup
and press enter. In the window that opens, check the boxes next to all the necessary items, or better yet, just select the “Synchronize everything” option, as in the screenshot below - it will be more reliable :)
Wait a while for synchronization to complete, especially if you previously disabled this option.
- After installing version 51.0.2704.106, return the previous Chrome settings by synchronizing and be sure to disable automatic updating
to the latest version, otherwise the browser will be updated again and everything done will go down the drain!
How to disable Chrome updates
To prevent the browser from updating, we do one trick. Go to the folder c:\Program Files\Google\Update\ or c:\Program Files (x86)\Google\Update\, if you have a 64-bit version of the OS, delete the file GoogleUpdate.exe
.
That's it, no problems :) On the Internet they recommend editing registry entries, changing Windows group policies, adding administrative templates, etc., etc. As always, most of these instructions were written by those who did not do any of this themselves, but simply copied from each other . None of this is needed. Just delete the GoogleUpdate.exe file and Chrome will no longer be able to update.
When, after some time, you decide to install the latest version of Google Chrome (if this happens), simply manually download the installation file from the official website and run it. No problem!
PS (Update 06/2018)
Many users were helped by changing the font-cache-scaling parameter in the experimental settings. To do this, copy and paste chrome://flags/#enable-font-cache-scaling
, then select the “Disabled” state as shown in the screenshot:
Friends, did you manage to solve the problem of blurry fuzzy font in Google Chrome using these instructions? Share this article with your friends using the social buttons. networks - they will definitely thank you, because they probably experience the same problems with fonts as you.
Today there will be a purely technical post.
So, those of you who bought a laptop with a resolution higher than or equal to 1920 by 1080 have probably already noticed that fonts at this resolution can look extremely small. The solution may be to enable the scaling feature in Windows. For example, I have font enlargement enabled by 160 percent.
But if after such enlargement you launch the browser, you will notice an amazing metamorphosis - all pages, as well as system fonts, will look blurry and enlarged just up to 160 percent (in my case). Those. Not only fonts will float, but also pictures.
For chromium-based browsers (and these are Chrome, Yandex Browser, Amigo, Opera browsers above version 12.17) there is a solution that allows you to return the unstretched display of pages and fonts to their homeland.
This instruction was written and tested on the new Vivaldi browser, created by people from the Opera 12 team. Yes, it no longer works on the Presto engine, but it tries to preserve the features of the old Opera.
What it looks like:
The screenshot does not reflect the horror of the blur, but believe me, in reality the blur is simply catastrophic. But after applying the tweaks, it’s like a veil falls from your eyes! 
So here are the instructions themselves (alternative input options for other Chromium-based browsers are indicated in brackets):
Solving the problem of blurry fonts (with scaling enabled in Windows)
The method is equally suitable for any chromiuim-based browser.
So: 1. In the properties of the browser shortcut, after vivaldi.exe (chrome.exe), insert the line: —high-dpi-support=1 —force-device-scale-factor=1
We get something in the style: “C:\Vivaldi\Application\vivaldi.exe —high-dpi-support=1 —force-device-scale-factor=1”
2. Go to vivaldi://flags (chrome://flags) Find: " Disable DirectWrite Windows
Disable the test DirectWrite font rendering system.
#disable -direct-write and click “Enable”
, then restart the browser.
By doing this, we return real scale to fonts and images, and also make them clear and unblurred.
(in relation to Vivaldi):
Unfortunately, this will cause the fonts in the browser to become very small.
To increase system fonts - for example in tabs, menus, open the file common.css (for me it is located at: c:\Vivaldi\Application\1.0.162.4\resource es\vivaldi\style) and replace the line: font-size: 11.5px
for example on the line
font-size:15.5px
To change fonts on web pages, enter vivaldi://chrome/settings/fonts (chrome://settings/fonts)
, select “
Download extension for setting fonts
”. (for other browsers, setting fonts is possible without downloading the extension, but in the extension the fonts can be configured in more detail)
We are talking about this extension: chrome.google.com/webstore/detail/advanc. ..keecicepbmbm/related
After installing the extension, go to the address: chrome-extension://caclkomlalccbpcdllchk eecicepbmbm/options.html and customize the fonts for yourself.
z.y. By the way, if you use the portable version of Chrome, then the launch parameters can be specified in the ini file GoogleChromePortable.ini, which must be created in the same folder where GoogleChromePortable.exe is located.
Contents of the GoogleChromePortable.ini file:
AdditionalParameters= /high-dpi-support=1 /force-device-scale-factor=1
And if you want the portable version of Chrome to open all web links from other programs, then replace the value of the HKEY_CLASSES_ROOT\ChromeHTML\shell\open\c ommand “GoogleChromePortable\App\Chrome-bin\chr ome.exe” parameter in the registry with “GoogleChromePortable \GoogleChromePortab le.exe"
Agree, it’s almost impossible to work when all the characters on the screen are blurry and ripple. I know firsthand this problem and the pain in the eyes when working on a computer for a long time with such text. Unfortunately, no one is immune from this and, I hope, thanks to this article, we will be able to “overcome” blurry font.
The problem of blurry font did not escape the Tens users. This is usually encountered when updating the operating system.
Before we start looking at ways to fix blurry font, I would like to add something. Perhaps the problem is not in the operating system and everything is much simpler. Before you start performing the operations below, we strongly recommend that you check whether the screen resolution on your computer is set correctly. There is a possibility that the reason for the blurry font is a mismatch between the resolution of your monitor and the operating system. Have you checked? Has the blurry font disappeared? Then let's begin.
Typically, blurry font appears as a result of applying an incorrect scale. There are two ways to fix this problem: by changing the scale for an individual application or for the system as a whole.
Fix blurry fonts in apps in Windows 10
If the font is blurred not in your system, but in one or more programs, then this method is for you. With the help of the steps below, you will get rid of ripple letters whether it is Skype or Windows Media Player.
Right-click on the shortcut of the program you are interested in, go to “Properties”, then select the “Compatibility” tab.
Check the box to disable image scaling at high screen resolutions and click OK.
Fixing blurry fonts in Windows 10
If the font is blurry throughout the system, then the above method will not suit you. Fortunately, there are several ways to eliminate blurry fonts in Windows 10 in general.
In this method we will reduce the number of dots per inch (dpi), this is not as difficult as it seems.
If you don't like the result of the work done above, there is another option. Its essence is that we are returning scaling methods from Windows 7 and Windows 8 to Windows 10. Sometimes this gives much better results than with standard settings.
Ready! All that remains is to reboot the system and enjoy the absence of headaches after working at a computer with blurry characters.
How to undo changes you made
Changing the size of an already resized web page is as easy as installing it. Let's see below what ways this can be done.
On the computer
If you changed the page scale using a key combination, then to return it to its original size, just click on the magnifying glass icon located to the right of the search bar and click on the “Reset” button.
If the site scale has been changed through the settings, you must use a key combination. Hold down “Ctrl” on your keyboard and press the “Minus” key until the page size returns to its normal state.
On Android
- Launch the Yandex browser on your phone and go to the “Settings” section.
- Then we go to the “Scale and text transfer” menu we already know.
- In the window that opens, set the page size to 100%. This way the scale of all pages will be the same as it was before.
On iPhone
As mentioned earlier, to change the zoom on an iPhone, you need to use zoom gestures. If you want to return to the original size, then place your fingers on the device screen and start moving them towards each other. This will convert the original scale of the displayed page.
Now you know how to change the scale in the Yandex browser. To use this function quickly, just hold down the “Ctrl” key and use “+” and “-” to adjust the size of the web page.
How to fix blurry fonts in Windows 7
Everyone's favorite "seven" can also become a victim of blurry font. The root of the problem is the “crooked” ClearType font smoothing, which is used everywhere in Windows 7, even where it is not particularly needed. It would be possible to simply disable ClearType, but, unfortunately, this is not always enough.
To solve the problem, you can use several methods:
Disable ClearType Antialiasing
The first two methods are very easy to implement. To disable antialiasing, follow these steps:
This completes the first method of eliminating blurry font.
"XP style scale"
The second method is as simple as the previous one.
We follow the same steps as above until step 1.4. and go to the “Screen” menu. There we select the item “Other font size (dots per inch)”.
A kind of ruler will appear on which we correct the scale to 100% and check the “Use Windows XP style scales” checkbox.
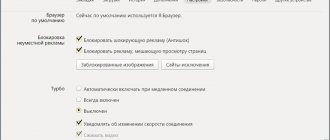
How to reduce content size
To zoom out a page in Yandex browser:
- press CTRL and "-" ;
- open the web browser menu and click on the minus sign;
- hold down CTRL and scroll the mouse wheel towards you;
- go to Yandex settings, open the “Site” and select the scale of interest.
Important! The minimum available content reduction is 25%.